
Image Upscaling Software for Ecommerce Catalogs
Practical guide to image upscaling software for ecommerce sellers. Learn how to upscale product photos at catalogue scale, compare AI methods, and meet
You've got two hundred product photos sitting in a folder, shot on a phone under mixed lighting. Most are around 1200 × 900 pixels, your backgrounds don't match, and the marketplace export deadline is getting closer. Opening each file in Photoshop is not a workflow. It's a queue that grows faster than you can clear it.
Start with a catalogue rule, not a creative preference. Keep the original files untouched, flag anything below your working threshold, standardize the crop and background, then upscale the approved images with locked settings. For Amazon, the safe main-image target is a pure white RGB 255,255,255 background with the longest side at 1600 pixels or more, according to Amazon-focused product photography guidance. Build your process around the largest catalogue you expect to handle, such as 500 SKUs, even if today's batch is smaller.
What Image Upscaling Software Actually Does for a Catalog
Image upscaling software increases pixel dimensions and reconstructs or preserves apparent detail. It doesn't recover every piece of information that was never captured. A small product image can become larger and cleaner, but the output still depends on focus, lighting, compression, subject contrast, and the quality of the original file.
A traditional enlarger spreads existing pixels across a larger canvas. Modern AI tools use learned patterns to estimate edges, texture, and fine detail. That can produce a more convincing result, but it can also create detail that wasn't present in the source. For catalogue work, that distinction matters. A fabricated logo or altered material pattern can misrepresent the item customers receive.
The catalogue calculation
A single hero image gives you room to inspect every corner. A 500-SKU catalogue doesn't. The same operation must run across hundreds of files while maintaining consistent sharpness, crop position, background tone, and output dimensions.
A five-minute manual pass on each image would take about 16 hours and 40 minutes for 200 photos, before export checks. That calculation is simple arithmetic, not a performance claim. A batch tool may process the same queue much faster, but actual runtime depends on the model, source dimensions, hardware, file format, and whether background removal or other operations run in the same pipeline.
| Method | Time per image | Time for 200 images | Hourly cost at $30/hr | Consistency |
|---|---|---|---|---|
| Manual editing | Depends on edits | About 16 hours 40 minutes at five minutes each | Not a universal cost | Depends on the operator |
| Batch processing | Depends on the tool and model | Tool-dependent | Depends on the service or hardware | Usually higher when settings are locked |
The important saving isn't only speed. It's repeatability. If every SKU passes through the same crop, resize, background, and upscale sequence, your collection looks like one store instead of a set of unrelated uploads.
Practical rule: Never judge an upscaler on one image. Test it on a representative group containing text, fabric, reflective packaging, pale products, and dark edges.
Use this guide to AI image enhancement to think about the full workflow, not just enlargement. An upscaler belongs inside a catalogue pipeline that includes quality control, naming, export, and human review.
Traditional Upscaling vs AI Methods on Product Photos
Take a 600 × 600 cotton t-shirt on a white background and enlarge it by 4×. The output now has 16× as many input-pixel positions to reconstruct, which is the standard way single-image super-resolution tests describe a 4× enlargement.
Bicubic interpolation produces a predictable result. It smooths the shirt's edges and stretches the available colour transitions. The stitching becomes softer, the fabric weave largely disappears, and a small neckline tag stays limited by the original pixels. Lanczos usually preserves edge contrast more aggressively, so the collar may look crisper, but halos can appear around dark text or high-contrast seams.
A modern AI model takes a different risk. It may restore a convincing weave and make the neckline look clearer, but it can also invent a knit pattern, alter a seam, or turn an unreadable care label into plausible but incorrect lettering. That isn't a cosmetic problem for ecommerce. It changes what the buyer thinks they're ordering.
What each method is good at
| Method | Stitching detail | Fabric texture | Text and label legibility | Hallucination risk |
|---|---|---|---|---|
| Bicubic | Soft but predictable | Smoothed | Limited | Low |
| Lanczos | Sharper edges, possible halos | Retains more contrast | Often clearer, still limited | Low |
| AI upscaler | Can reconstruct convincing edges | Can add plausible texture | May improve appearance without restoring truth | Higher |
Traditional resampling is the safer choice for neutral backgrounds, colour-critical packaging, and images where authenticity matters more than perceived sharpness. AI is more useful for organic surfaces such as fabric, leather, wood, and hair, provided someone checks the result against the original.
For background preparation, Ruit's guide to AI background removal is a useful reference because background extraction and upscaling solve different problems. Remove the background first when the product can be isolated cleanly, then inspect the edge before enlargement. A bad cutout becomes more visible after upscaling.
The technical history explains why current tools behave differently from basic resamplers. Super-resolution developed from signal-processing work, moved through example-based methods, then advanced with SRCNN, VDSR, EDSR, and ESRGAN. That progression shifted the task from stretching pixels toward learning how high-resolution detail commonly looks.
For a practical explanation of the enlargement factor, see this guide to 4K upscaling. The operating rule is straightforward: use traditional methods when the source is clean and colour accuracy is critical, use AI for difficult texture, and review every output class before releasing it across the catalogue.
How to Read PSNR, SSIM, and LPIPS Scores
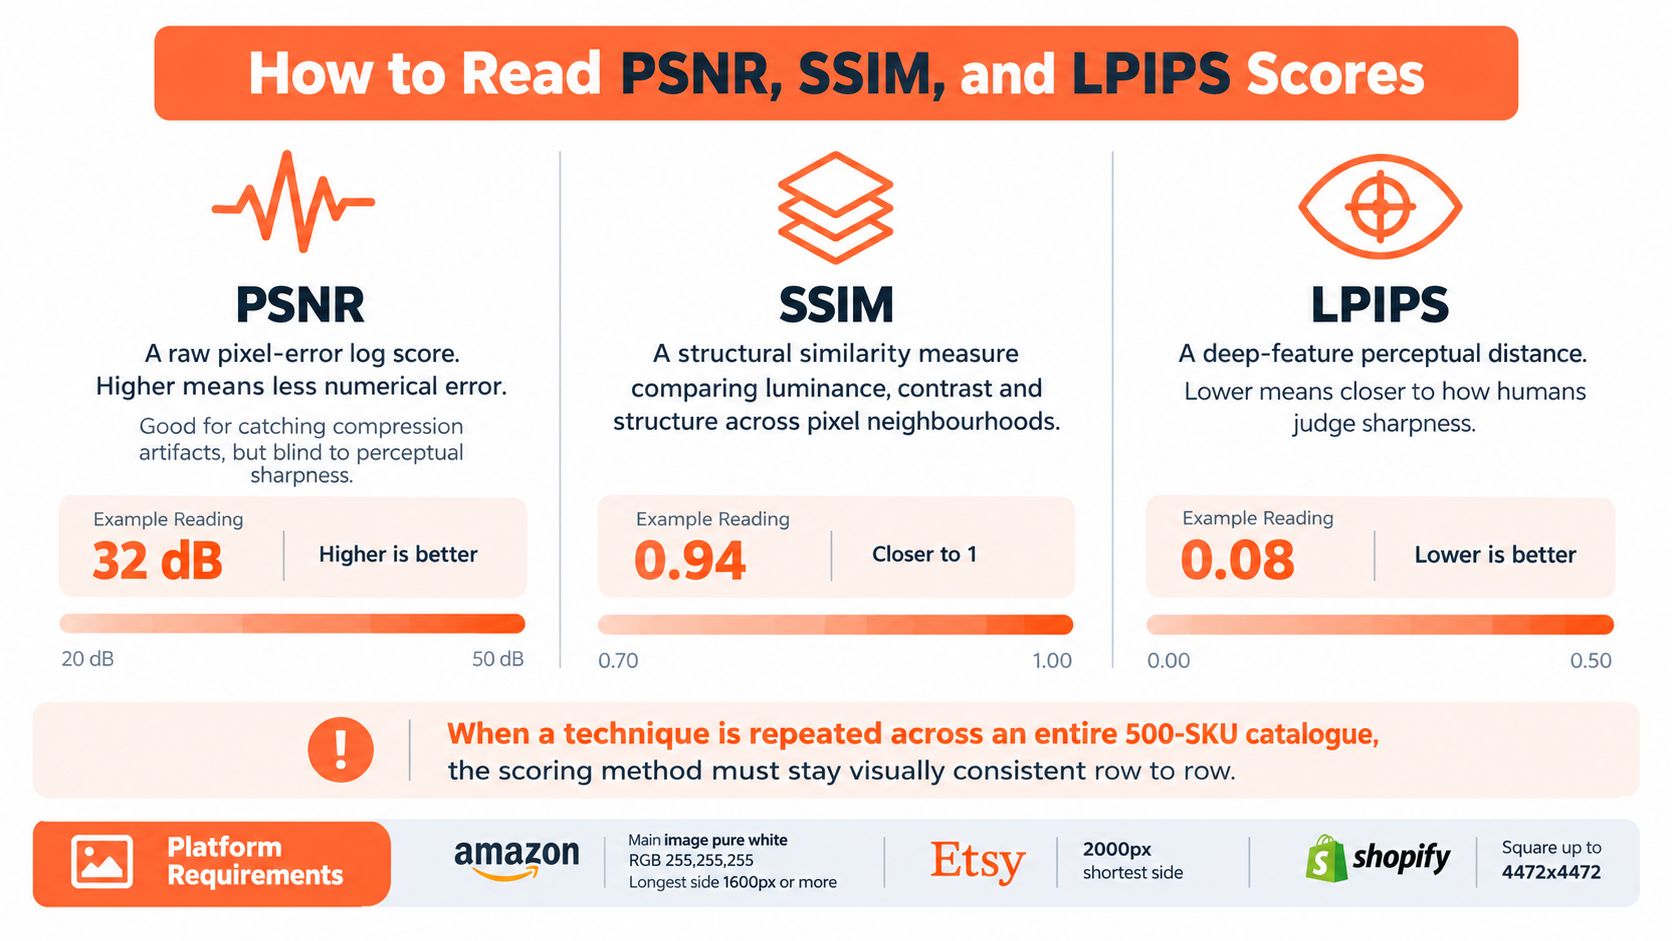
A vendor can show you a benchmark table and still fail your product images. PSNR, SSIM, and LPIPS measure different qualities, so you need to know what each score rewards before choosing an image upscaling software workflow.
PSNR measures numerical error
PSNR, or peak signal-to-noise ratio, compares the output with a reference image and expresses pixel error on a logarithmic scale. Higher is better for numerical fidelity. It can expose compression damage and large deviations, but it doesn't know whether an image looks natural to a shopper.
A model can score well by producing a smooth average of uncertain texture. That may be mathematically close to the reference while making a handbag strap look flat or a woven label look muddy.
SSIM checks structure
SSIM, or structural similarity, compares luminance, contrast, and local structure. It's closer to visible image quality because it gives more weight to preserved edges and relationships between nearby pixels. A score closer to one generally indicates stronger structural similarity, but the score still depends on the dataset and reference image.
For context, a GAN-based super-resolution comparison reported SRResNet at 32.05 dB PSNR and 0.9019 SSIM on Set5, while its perceptual SRGAN variant scored 30.51 dB PSNR and 0.8803 SSIM. The source explains the tradeoff between pixel-level fidelity and more realistic-looking texture in the SRGAN research paper.
LPIPS handles perception
LPIPS uses learned visual features to estimate how different two images feel to human observers. Lower is generally better because the output is closer to the reference in deep-feature space. It can disagree with PSNR and SSIM, especially when an AI model creates sharp texture that looks convincing but differs from the source.
Read scores in this order:
- LPIPS on real product crops, especially labels, seams, reflective surfaces, and texture.
- SSIM on the same crops, to confirm that structure and edges remain stable.
- PSNR as a diagnostic, particularly for compression and obvious pixel-level errors.
- Manual catalogue review, because no score can verify that a logo, label, or product feature remains truthful.
A review of GAN-based methods reported ESRGAN at 32.464 dB PSNR and 0.9837 SSIM on one benchmark, while also noting that model performance changes with the dataset and degradation type. Treat benchmark numbers as screening evidence, not as a buying decision. This guide to resolution in AI is more useful when you're translating technical output into a repeatable product-image process.
A Catalog Workflow From Import to Marketplace Export
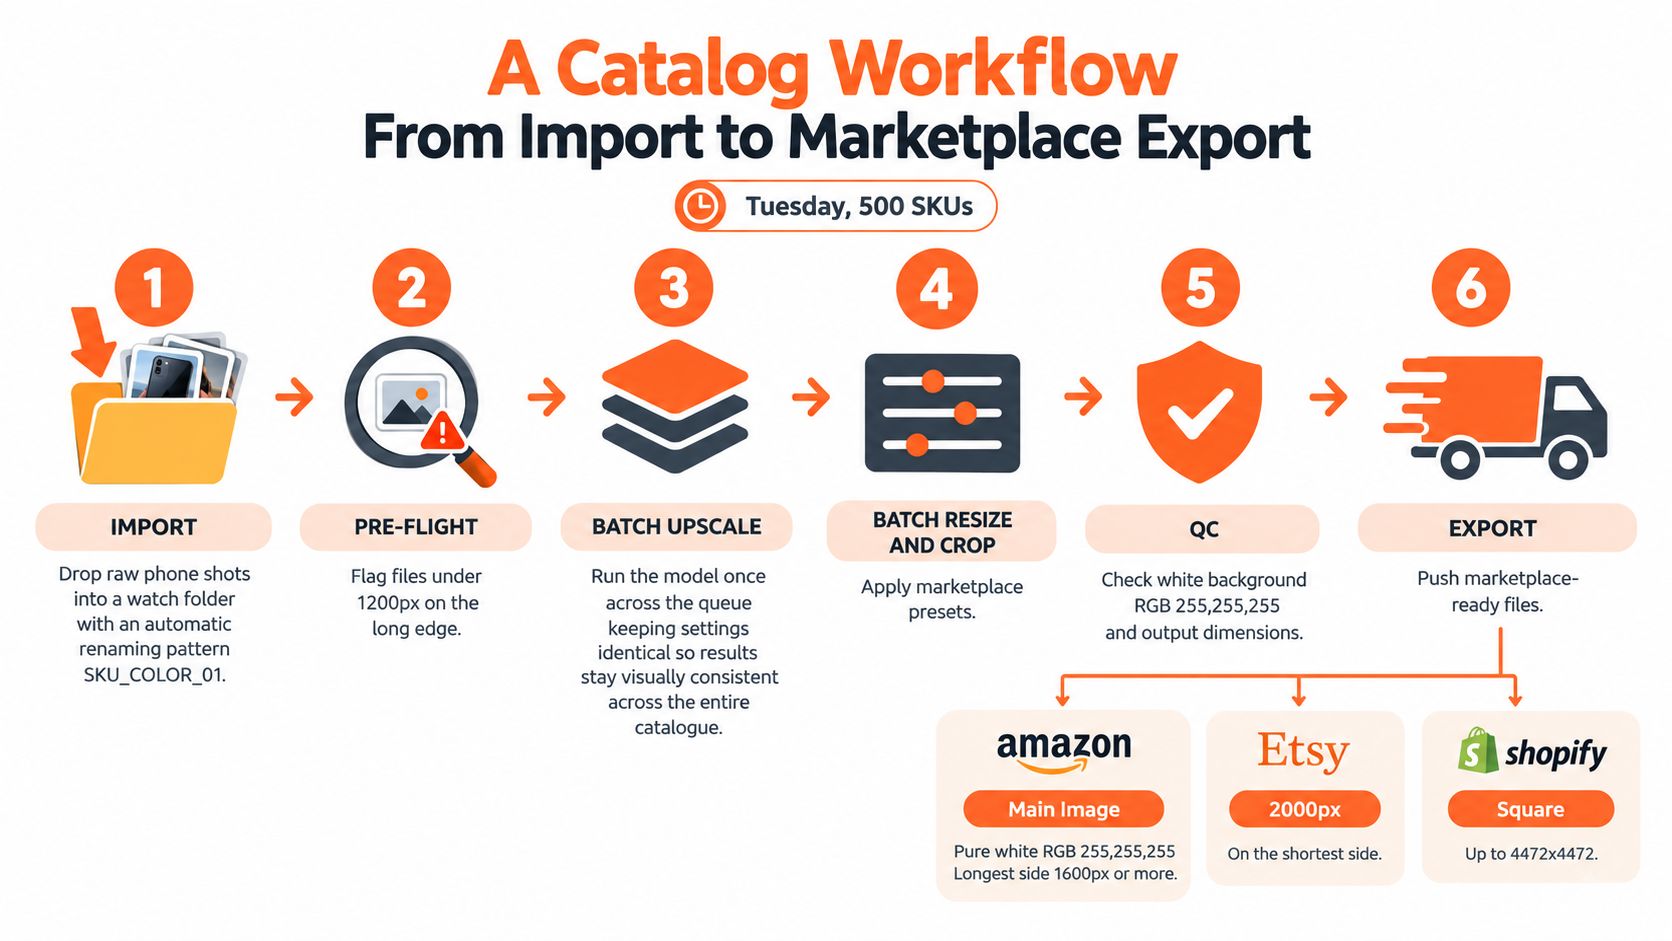
A 500-SKU seller needs a queue, not a collection of tabs. Start with one watched input folder, a naming convention tied to your SKU sheet, and a quality gate that stops weak files before they consume processing time.
Import and pre-flight
Drop raw phone or camera images into a watch folder. Rename them using a pattern such as SKU_COLOR_01, then flag any file below 1200 pixels on the long edge for review. Don't upscale every weak image automatically. Some need a reshoot because the product is out of focus, clipped, or badly exposed.
Doing this for a whole catalog?
MerchLoom runs background removal, upscaling and AI editing across every product photo you have — one prompt, whole batch. Try 2 batches free, no signup.
Try it freePrepare the source before enlargement:
- Crop consistently: Use a square canvas for Amazon and Shopify product grids when that matches your template.
- Remove the background: Do this before upscaling when the cutout is clean. The model then processes less unnecessary background data.
- Convert to sRGB: Keep colour handling consistent across phone photos, edited files, and marketplace exports.
- Deduplicate: Don't spend processing credits on repeated shots or unused angles.
Upscale and resize
Set one model and one enlargement rule for each product class. For an Amazon main-image workflow, a 2000 × 2000 working target gives you room above the platform's safe minimum of a 1600-pixel longest side, while keeping the export template consistent.
For Etsy, use a 2700 × 2025 hero-shot working canvas when that composition suits the listing, while remembering Etsy's stated image target of 2000 pixels on the shortest side. For Shopify, use a square working canvas such as 2048 × 2048, then keep the final image within Shopify's stated square limit of 4472 × 4472.
Run background removal before upscaling when possible. Apply colour correction after enlargement if the enlarged file shows banding or uneven gradients. Keep the same settings across the queue, then compare neighbouring SKUs rather than approving files one at a time.
Place the output into channel folders and verify dimensions, aspect ratio, background colour, naming, and file opening before upload. This batch image editing workflow is the right mental model: one controlled operation across a collection, followed by sampling and correction.
Here's the six-step sequence shown in the workflow:
- Import raw files into the watched folder.
- Pre-flight dimensions, focus, duplicates, and naming.
- Prepare crops, backgrounds, and colour space.
- Upscale with locked settings.
- Resize and export to channel-specific folders.
- Review a sample from every product type before publishing.
Cost and Performance Tradeoffs at Catalogue Scale
The expensive mistake is to upscale files that shouldn't be processed. A catalogue pipeline should spend its heaviest operation only on images that have passed the basic checks.
Start with file discovery, deduplication, background removal, and working-size normalization. Then run the upscale. Image decode and encode, model inference, and file input/output all contribute to runtime, but model inference usually dominates when the source is large or the enlargement factor is high.
Compare the operating models
| Run mode | Per-image cost | Total cost | Wall time | Best for |
|---|---|---|---|---|
| Local batch on existing hardware | Electricity and hardware time | Depends on the machine | Depends on model and queue | Repeatable internal processing |
| Cloud API | Published per-image or credit fee | Scales with image count | Includes upload, queue, and processing | Flexible demand and no local setup |
| GPU rental | Hourly infrastructure fee | Depends on runtime | Fast when the model is configured well | Large controlled batches |
| Per-image SaaS | Credit or image fee | Predictable before processing | Depends on the service | Seasonal or irregular catalogues |
Don't compare only the headline fee. A failed batch can force a full re-export, and that delay may cost more than the processing itself when listings are waiting for launch. Cloud services also add upload and download time, while local tools may require model installation, storage, and hardware maintenance.
The category has moved beyond specialist software. One market estimate places AI image upscaling at about USD 6.32 billion in 2025 and projects USD 44.71 billion by 2033, with software accounting for 67.1% of the market, as reported by Grand View Research. The useful conclusion for a seller isn't the forecast itself. It's that software-led processing is becoming a normal part of digital catalogue production.
For a Shopify store, the right optimizer is the one that preserves the source, handles the required dimensions, and lets you rerun the same settings. This Shopify image optimizer guide is useful for defining that export discipline. For seasonal sellers, pay-per-image pricing with credits that never expire can be safer than a monthly commitment. MerchLoom states that its first images can be tried without an account and that its credits are pay-per-image and never expire, which supports a small test before a full collection run.
How to Choose or Build an Upscaling Solution
Test the workflow before you commit. Don't judge a tool from a portrait sample or a dramatic before-and-after image. Your catalogue contains seams, text, packaging, glass, jewellery, dark clothing, white backgrounds, and inconsistent phone lighting.
Five checks that matter
1. Test product evidence. Use a small sample containing printed text, repeated patterns, reflective surfaces, and fine edges. Compare the output with the original at actual listing size, not only at maximum zoom. Reject any tool that regularly changes labels or creates false logos.
2. Test batch control. Confirm that the tool can process folders, preserve the folder structure, and resume after an interrupted run. A single-image upload interface becomes a bottleneck when the same operation must cover hundreds of SKUs.
3. Test formats and dimensions. The solution should accept the formats your photography workflow produces and export JPEG, PNG, and WebP when required. It must let you specify exact pixel dimensions instead of giving you only vague size presets.
4. Test price predictability. Seasonal sellers should favor a model where the cost is visible before processing. Pay-per-image credits with no expiry avoid paying for idle months, especially when a catalogue changes around launches or holidays.
5. Test integration. A watch folder, command-line tool, or API is more useful than repeated manual uploads. Your image process should connect to storage and commerce systems already used by the store.
Buying is usually simpler than building unless your volume and requirements justify dedicated engineering. A custom model adds model evaluation, infrastructure, monitoring, storage, and review work. A managed service is often the practical choice for a seller who wants catalogue output rather than another software project.
MerchLoom fits the managed side of that decision. It runs chained AI pipelines across a collection, including background removal, reframing, colour correction, and upscaling, while keeping the seller responsible for reviewing the output. It isn't a full Photoshop replacement. It's a way to apply repeatable image operations without opening every file individually.
A Repeatable Batch Workflow and Final Checklist
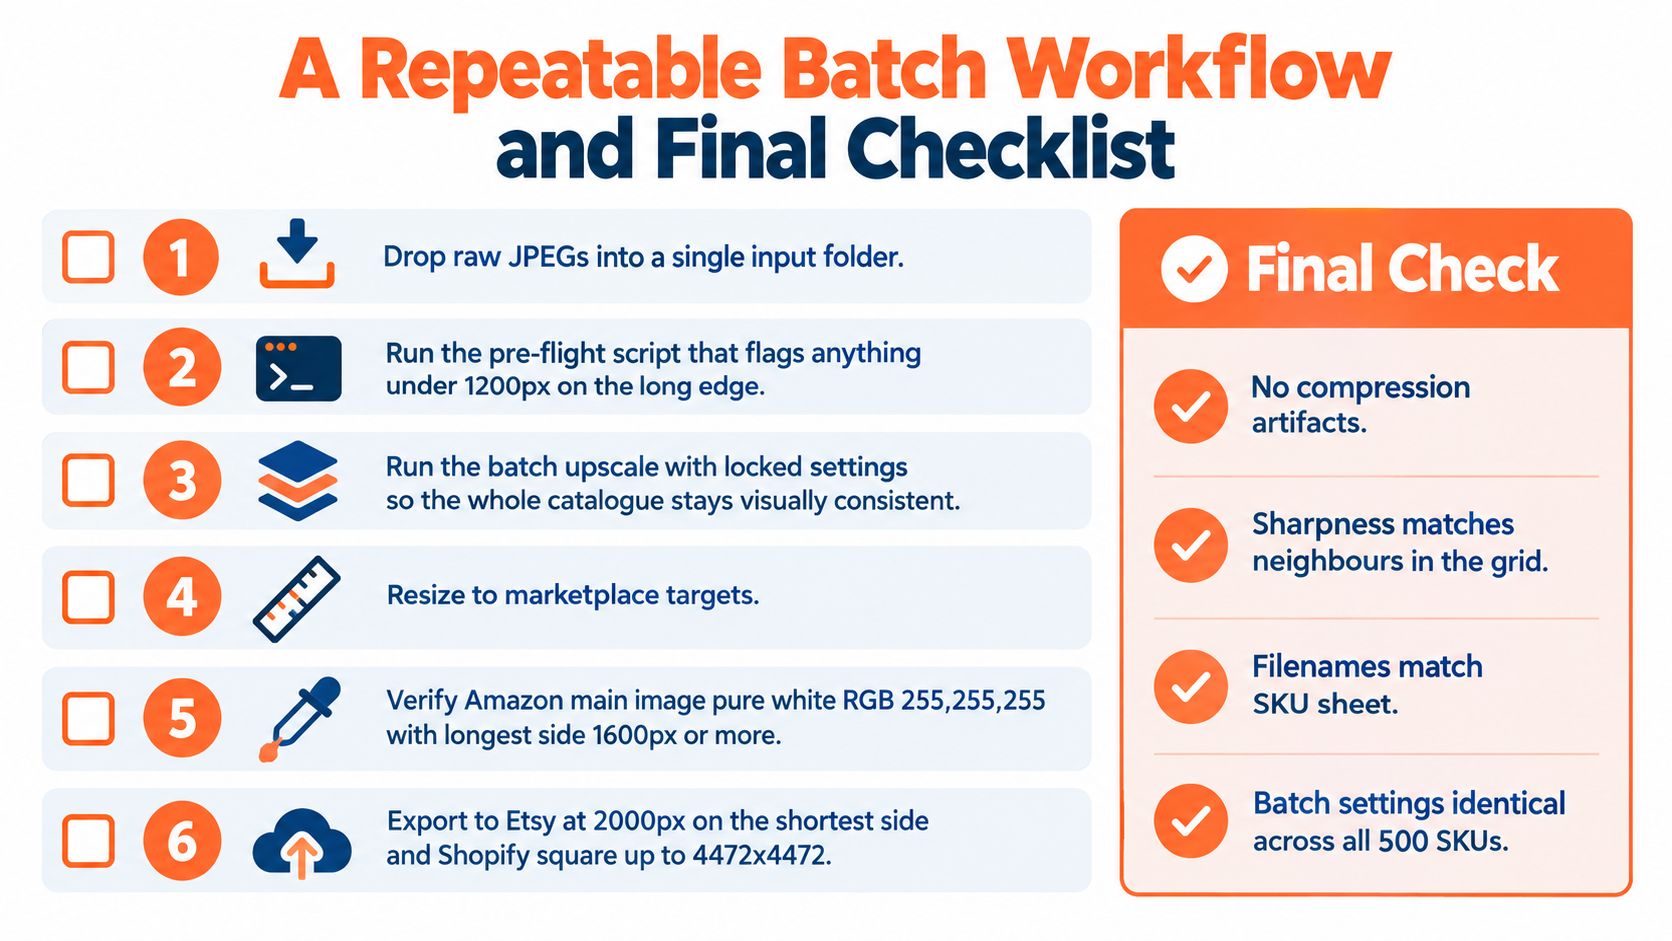
Use this sequence on Monday morning and keep it unchanged until the catalogue passes review:
- Drop the raw JPEGs into one input folder.
- Run a pre-flight check that flags files under 1200 pixels on the long edge.
- Remove duplicates and isolate files that need a reshoot.
- Remove backgrounds before enlargement when the edges are clean.
- Run a 2× upscale with one locked AI model.
- Apply sharpening at radius 0.6 and strength 0.3 only if your test batch supports those settings.
- Resize into marketplace-specific folders.
- Run a five-image spot check across each product type.
- Upload only after dimensions, colour, naming, and background checks pass.
Practical implementation
In ImageMagick, create a source folder and an output folder, then use a fixed resize and sharpening profile for the batch. In Photoshop, record an Action that opens the file, converts to sRGB, applies the agreed resize and sharpening settings, saves into the correct channel folder, and closes without overwriting the original. In a cloud upscaler, upload a test group first, lock the model and output dimensions, then process the remaining queue only after the test passes.
Your pre-publish checklist should include:
- Amazon: Pure white RGB 255,255,255, with the longest side at 1600 pixels or more.
- Etsy: 2000 pixels on the shortest side.
- Shopify: Square output, staying within 4472 × 4472.
- Colour: sRGB, with consistent rendering across neighbouring products.
- Depth: Keep the workflow in 8-bit where your marketplace pipeline requires it.
- File size: Apply the limit used by your marketplace export settings and verify every file opens correctly.
- Naming: Match filenames to the SKU sheet and channel folder.
- Authenticity: Check labels, logos, seams, textures, and product edges against the original.
The final review is not optional. AI can make a weak photo look sharper while making the merchandise less accurate. Compare the output with its neighbours in the catalogue, not only with the source file.
MerchLoom lets sellers try the first images without creating an account, then run the same chained AI pipeline across a collection with pay-per-image credits that never expire. Test five representative SKUs, approve the settings, and use the resulting workflow for the rest of the catalogue instead of processing every image by hand.
If your store has hundreds of product photos waiting for cleanup, use MerchLoom to batch background removal, reframing, colour correction, and image upscaling in one repeatable catalogue workflow. Start with a small SKU sample, review the outputs against your Amazon, Etsy, or Shopify export rules, then scale the approved pipeline across the collection.
Stop editing product photos one at a time
Upload your catalog or connect your store. Describe the result once. MerchLoom does the rest.
Try it free — no signup