
Best Shopify Image Optimizer for Catalog-Scale Stores
Find the best Shopify image optimizer for hundreds or thousands of product photos. Compare apps, CDNs, AI batch tools, and dev workflows with real specs.
You've got hundreds of product photos spread across folders, Shopify, Amazon, Etsy, and maybe a marketplace feed. Some are square, some are wide, some still carry camera metadata, and a few are large enough to slow an entire collection page. You don't need another tool that makes one photo look better. You need a repeatable system that prepares 200 or more images without breaking marketplace requirements or delaying your storefront's main image.
Start with the file itself. For most Shopify product photos, keep the longest edge around 2000 pixels, create smaller listing derivatives such as ?width=400, and make sure the first visible product image isn't lazy-loaded. Shopify's guidance identifies images as a major LCP factor, and a Shopify-focused analysis found that 77% of Largest Contentful Paint elements are images. The same analysis found that 59% of Shopify pages lazy-load the LCP image, with a suggested LCP penalty of about 3 seconds on affected sites. See the Shopify image optimization guidance before choosing an optimizer.
The Catalog Image Problem Most Stores Ignore
Two years after launch, your product library rarely looks like a library. It looks like a recovery operation. You have folders named final, final-new, and product photos - final - v3, while the same SKU may exist as a large JPEG, a transparent PNG, and an old crop from a previous theme.
That mess creates a performance problem before a shopper reaches checkout. A product card may request an image that's much larger than its rendered size. A hero image may be marked loading="lazy". A mobile visitor may download a desktop-sized asset before seeing the product title or add-to-cart button.
The backlog is the unit of work
One oversized image is easy to fix. A catalogue with hundreds of oversized images needs a workflow. Manual editing fails because you have to resize, compress, rename, export, upload, and verify every product set while keeping lighting, framing, and image order consistent.
The business cost is direct. Portent research cited by Pixc found that ecommerce conversion rates drop by an average of 4.42% for every additional second of load time in the zero-to-five-second window. Product imagery often occupies the most prominent space on a product or collection page, so image weight can delay the shopper's first meaningful view. Pixc's analysis of slow product images puts the conversion risk in practical terms.
Practical rule: Treat image cleanup as a catalogue backlog, not a photography task.
Shopify can deliver responsive image sizes and a CDN, but it doesn't turn a chaotic source folder into a consistent production set. The uploaded master can still be oversized, incorrectly framed, poorly named, or assigned the wrong loading behavior in the theme.
A bulk workflow such as ecommerce image automation matters because it repeats the same transformation across every SKU. You can define the canvas, background, output format, naming pattern, and review point once, then process the catalogue in batches. That's the difference between fixing a page and fixing the system that keeps creating slow pages.
Shopify, Amazon, and Etsy Specs You Must Hit
Before comparing the best Shopify image optimizer options, set the output contract. A smaller file that fails a marketplace requirement is not optimized. It's unusable.
Shopify product imagery is commonly prepared at 2048 × 2048 pixels for square photos. Shopify supports uploads up to 4472 × 4472 pixels, and gathered community guidance also notes a 20 MB file-size ceiling. For most stores, 2048 × 2048 is the practical catalogue standard. The recommended pixels for Shopify 2026 resource from Photo Speak is useful when you're standardizing a large image library.
Amazon main images need a pure white RGB 255,255,255 background. The longest side should be at least 1600 pixels to support zoom and a cleaner listing presentation, according to the marketplace guidance in the gathered source material. Prepare Amazon exports separately from Shopify storefront files, especially when the Shopify image includes transparency, lifestyle styling, or a coloured background.
Etsy sellers should target 2000 pixels on the shortest side for listing photos. That target works well for batch preparation because it gives your image pipeline a clear minimum without forcing every product into the same crop.
| Spec | Shopify | Amazon | Etsy |
|---|---|---|---|
| Practical product target | 2048 × 2048 square | Longest side at least 1600px, with 2000 × 2000 commonly used for prepared exports | 2000px on the shortest side |
| Maximum or ceiling stated in gathered guidance | Supports uploads up to 4472 × 4472px, with a 20 MB ceiling noted in community guidance | Use a marketplace-compliant main image with pure white RGB background | Keep listing files within the platform's stated upload rules |
| Background | Match the theme and product presentation | Pure white, RGB 255,255,255 | Follow the visual requirements of the listing category |
| Working format | WebP or AVIF where supported, with a compatible fallback when needed | JPEG for the main export | JPEG is a practical choice for listing batches |
| Main workflow concern | Fast LCP and consistent square presentation | Marketplace compliance and zoom-ready resolution | Consistent listing presentation across a large batch |
Don't use one universal export for every channel. Build a master, then branch it into Shopify, Amazon, and Etsy versions. That keeps the catalogue consistent while respecting the different display and marketplace requirements.
For Shopify, resize before upload instead of sending a 4000-pixel source when the theme renders the image at about 800 pixels. Use Shopify URL sizing parameters such as ?width=400 for collection cards and other smaller placements, as described in this Shopify speed optimization guide. A bulk process can apply those rules without forcing you to edit every product manually. The bulk resize product images for ecommerce workflow is relevant when the same catalogue needs repeatable dimensions across channels.
Four Ways to Optimize Shopify Images at Scale
There isn't one best Shopify image optimizer for every catalogue. There are four practical categories, and each solves a different operational problem.
| Category | Compression Control | Format Support | Bulk Workflow | Cost Shape | Best Fit |
|---|---|---|---|---|---|
| Native Shopify settings | Basic platform handling and responsive delivery | Shopify-managed delivery formats | Limited source-file preparation | Included with the platform | Sellers with a clean, modest catalogue |
| Shopify apps | Bulk compression, resizing, and sometimes metadata controls | Often WebP, with support varying by app | Runs inside the admin | Usually recurring monthly pricing | Shopify-only merchants who want quick setup |
| External CDNs | Dynamic quality, resizing, and viewport-based transformation | WebP and AVIF commonly supported | Automatic at delivery time | Traffic-based billing | High-traffic stores and technical teams |
| Batch AI platforms | Pre-upload compression, reframing, background work, and export rules | WebP, AVIF, JPEG, and channel-specific outputs | Processes full folders or imported catalogues | Pay-per-image or batch-based pricing | Multi-marketplace catalogues and repeated production work |
Native Shopify is the lowest-friction starting point. It creates responsive derivatives and handles delivery, but the original source still determines the quality and weight of the pipeline. If your source folder contains oversized files, native delivery won't replace the need for preparation.
Shopify apps are useful when your images already look correct and the main task is bulk compression, conversion, or metadata cleanup. They keep the workflow close to the admin, which is convenient for a Shopify-only operation.
CDNs are strongest when your store has technical support. They can transform images at request time, cache variants, and select output based on viewport or browser capability. The trade-off is configuration and traffic-based cost.
Batch AI platforms work before upload. They're better suited to stores that need the same background removal, crop, padding, resize, and format conversion repeated across a whole catalogue. A workflow such as reducing image file size becomes useful when file preparation and visual cleanup belong in the same pipeline.
How Each Category Handles Compression and LCP
Compression is only half the performance decision. The other half is whether the browser receives the correct image at the correct moment.
Native Shopify delivery can provide responsive sizes and modern browser formats, but it still relies heavily on the source you upload and the theme's markup. An oversized source, an incorrect srcset, or a lazy-loaded hero can undermine the benefit of responsive delivery.
Apps add a dedicated compression pass. They may apply lossy or lossless settings, remove metadata, resize files, and generate WebP outputs. That's useful for a large backlog because the app can process the same rule across many product images, but you still need to inspect the theme's loading attributes.
CDNs transform at delivery time. A CDN can choose a width for the shopper's viewport, transcode to WebP or AVIF, and cache the result. This reduces manual pipeline work, but it doesn't automatically fix a theme that tells the browser to defer the largest visible image.
Batch AI platforms prepare the file before Shopify receives it. They can create a correctly sized product image, normalize the canvas, remove unwanted backgrounds, and compress the finished asset. The output is predictable, but the theme still controls whether that asset loads eagerly.
| Category | Compression | Format Output | LCP Handling |
|---|---|---|---|
| Native Shopify | Platform-managed delivery, dependent on uploaded source | Responsive Shopify delivery and supported modern formats | Theme markup determines whether the hero is prioritized |
| Shopify apps | Bulk lossy or lossless passes, often with metadata cleanup | Commonly WebP, with fallback behavior depending on setup | May reduce file weight, but usually doesn't repair theme loading logic alone |
| External CDNs | On-the-fly quality and width transformation | WebP or AVIF based on browser and configuration | Can serve a suitable variant, but priority still needs theme support |
| Batch AI platforms | Pre-upload perceptual compression and resizing | Static WebP, AVIF, JPEG, or channel-specific files | Gives the theme a prepared asset, while the theme controls eager loading and priority |
Doing this for a whole catalog?
MerchLoom runs background removal, upscaling and AI editing across every product photo you have — one prompt, whole batch. Try 2 batches free, no signup.
Try it freeShopify's guidance is clear on the critical point. Don't lazy-load the LCP image, reserve space for images, and prioritize above-the-fold content. AVIF can be smaller than WebP at equivalent visual quality, with comparisons commonly placing AVIF 20–30% smaller than WebP and about 50% smaller than JPEG. The AVIF versus WebP ecommerce comparison also notes WebP's broad compatibility, making it the safer default when a catalogue needs predictable browser delivery.
The hero image should load early. Below-the-fold images should wait.
A Real Workflow for 300 Product Photos
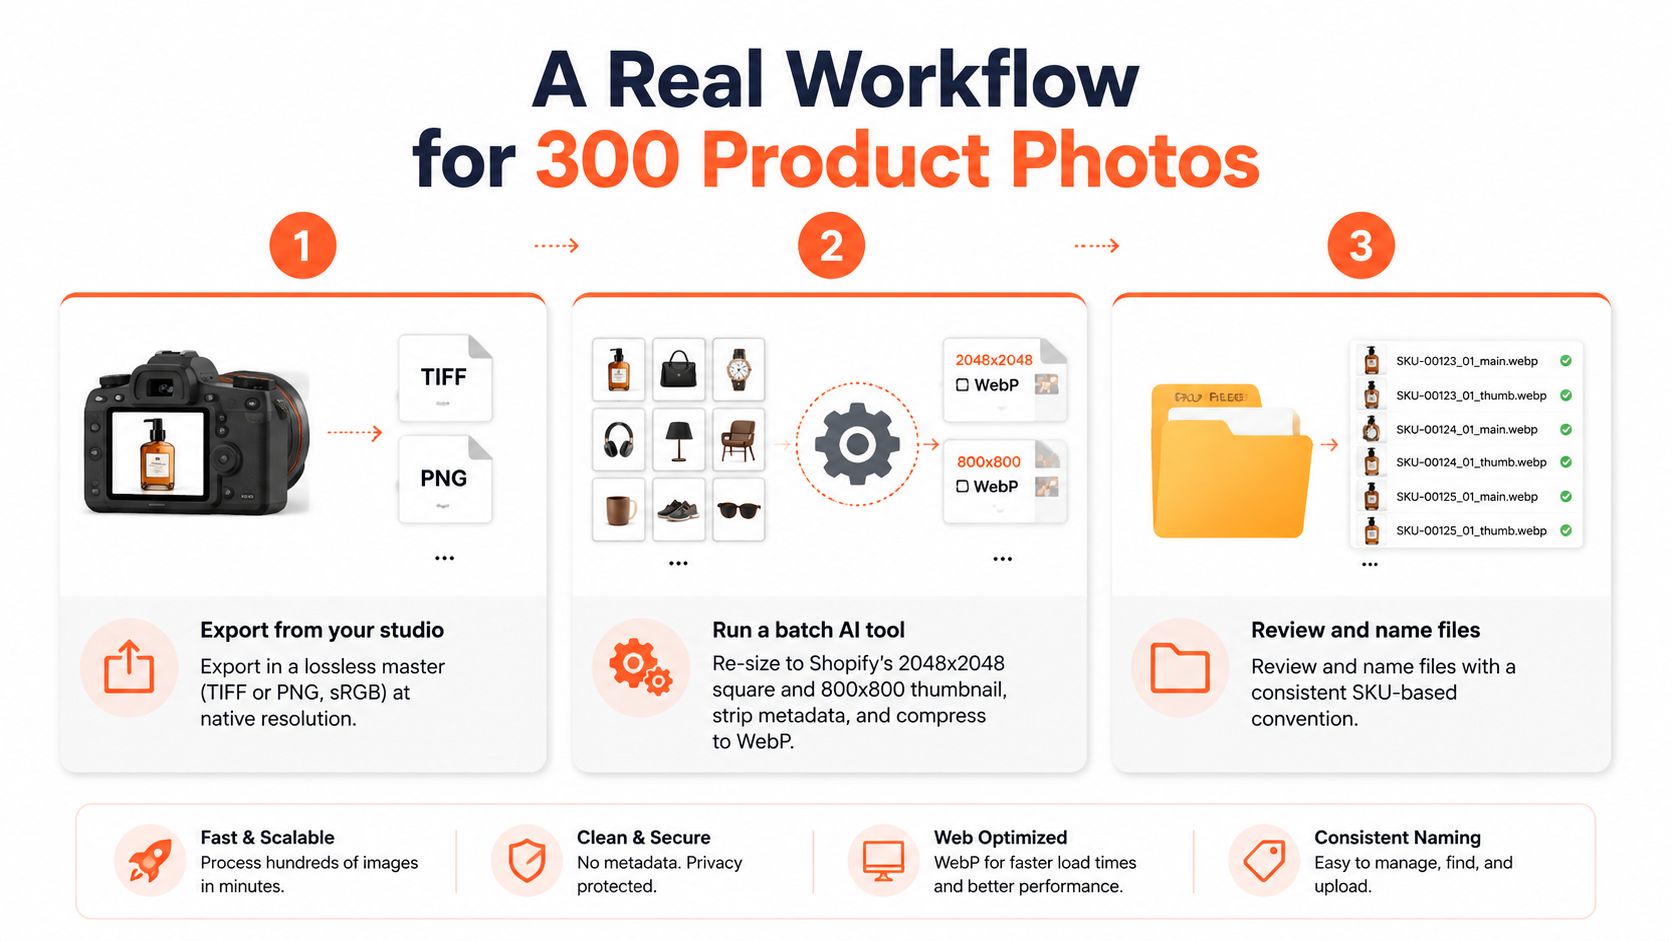
A 300-product catalogue needs a production line. Don't start by uploading random files into Shopify and trying to correct them later.
Preserve a master. Export from your photography workflow as TIFF or PNG in sRGB at native resolution. Keep that master outside the storefront so you can create new channel versions without starting over.
Create the Shopify branch. Resize the product image to a square 2048 × 2048 output and create an 800 × 800 thumbnail for smaller placements. Strip unnecessary metadata and convert the storefront version to WebP. The goal is consistent framing, not maximum pixel count.
Generate catalogue data. Use the SKU and a plain product descriptor for filenames, such as
SKU123-black-leather-wallet-front.webp. Generate alt text from the product record and image detail, then store it in a CSV matched to Shopify product handles.Stage before publishing. Put the outputs in a review folder. Check image order, crop, background, colour, and filename before uploading. Then use Shopify's CSV process or a bulk upload app that preserves the intended order and metadata.
Branch for marketplaces. Prepare Amazon files with a pure white RGB 255,255,255 background and a longest side of at least 1600 pixels. Prepare Etsy files with 2000 pixels on the shortest side. Don't send Shopify WebP files to Amazon when the marketplace requires a JPEG main export.
Validate the page, not just the file. Test five random product pages with PageSpeed Insights and Chrome DevTools. Inspect the LCP element and confirm that the hero loads eagerly, uses the right derivative, and doesn't arrive as an oversized desktop asset on mobile.
For a catalogue this size, batch product photo editing is more practical than opening each image individually. MerchLoom can chain steps such as background cleanup, resizing, reframing, and format export across a collection. The first images can be tried with no account. It's pay-per-image with credits that never expire, but you still need human review because AI output can introduce incorrect edges, shadows, product details, or cropping.
Use this video as a visual reference for the workflow, then adapt the checks to your own theme and marketplace feeds.
Cost and Quality Trade-Offs at Catalog Scale
Pricing changes meaning when the catalogue grows. Pay-per-image feels convenient for a small test, but the same model becomes harder to forecast when you process every angle, variant, and marketplace branch.
| Pricing Model | Example Cost Trigger | Hidden Cost at 300+ SKUs |
|---|---|---|
| Pay-per-image | Each processed image or pipeline step consumes credits | Multiple variants and reprocessing can increase the effective cost per product |
| Monthly subscription | A recurring plan covers a defined processing allowance or feature set | You may pay during quiet periods, then need a higher tier for a launch |
| CDN usage | Requests, transformations, or transferred data drive billing | A popular product or campaign can increase traffic costs unexpectedly |
| In-house pipeline | Developer time and infrastructure replace app fees | Maintenance, debugging, storage, and format changes become ongoing work |
Quality usually breaks in predictable places. Aggressive lossy compression can create banding on flat backgrounds. Sharpening can make a soft source look harder while increasing file weight. A file that is technically small but visibly damaged is a conversion problem, especially for products where texture, material, or colour affects purchase confidence.
WebP is generally the safer default for storefront delivery because it combines smaller files with broad compatibility. AVIF can reduce file size further, but encoding and decoding can require more computation. Choose it when your delivery stack handles that trade-off and keep a compatible fallback for browsers or downstream systems that don't.
A catalogue workflow also carries rework costs. Change the target dimensions and you may need to regenerate every branch. Change a marketplace rule and you may need a second export. A CDN can save manual work but may introduce traffic or transformation charges. An app can simplify Shopify uploads but may not help with Amazon's white background or Etsy's shortest-side target.
Quality rule: Compare files at the size shoppers actually see. Don't approve an export because its byte count looks good in a spreadsheet.
Test a representative set before processing the entire folder. Include a white product, a dark product, a reflective product, a transparent cutout, and a lifestyle scene. If those pass visual inspection and page testing, the same pipeline is more likely to hold together across the catalogue.
Pre-Publish Image Optimization Checklist
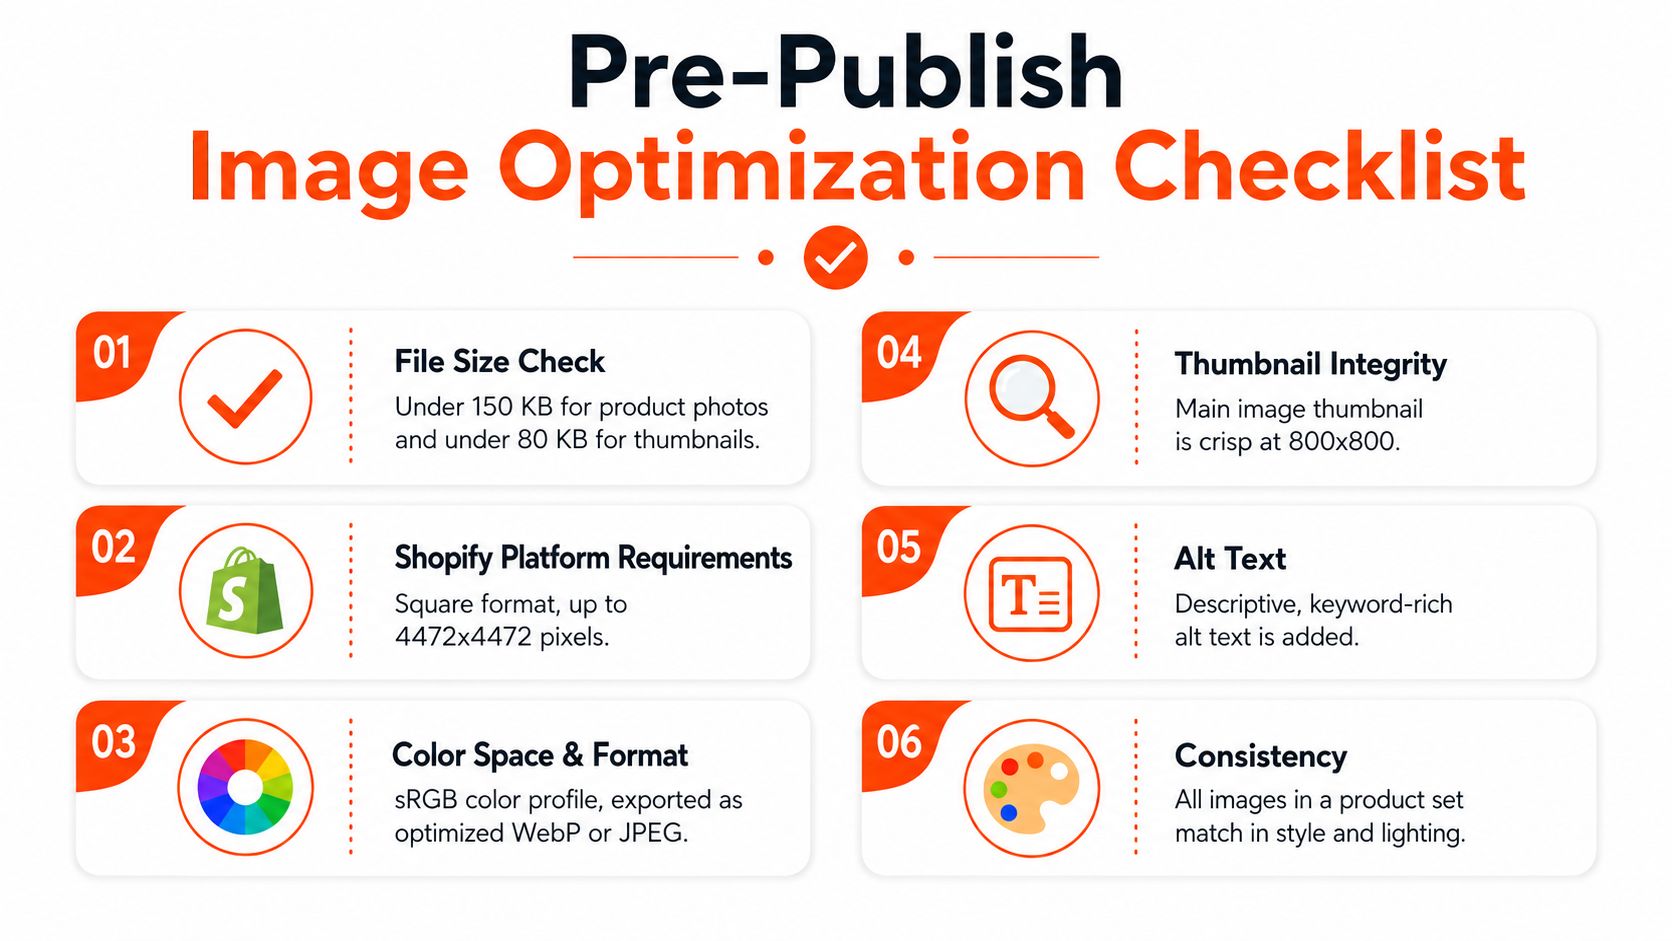
Run this checklist before publishing a product set. It catches the mistakes that bulk tools can repeat very efficiently.
- File size: Set a working target under 150 KB for standard product photos and under 80 KB for the hero where the image still looks sharp. Treat these as operating targets, not platform guarantees. A product with fine texture may need a larger file.
- Shopify dimensions: Use a square 2048 × 2048 product output for a consistent catalogue. Shopify supports uploads up to 4472 × 4472, but don't upload that size when the rendered image is much smaller.
- Amazon dimensions: Create a separate main-image export with a longest side of at least 1600 pixels, a pure white RGB 255,255,255 background, and JPEG output.
- Etsy dimensions: Keep at least 2000 pixels on the shortest side for listing imagery. Use a separate branch when the original crop doesn't suit the listing layout.
- Format: Use WebP for the storefront where supported, with a JPEG fallback. Use JPEG for Amazon main images. Use PNG when a transparent product cutout requires it.
- Naming: Combine a SKU with a useful descriptor, using lowercase words and hyphens. Keep the pattern identical across every product and image angle.
- Alt text: Write a concise description of the product and a visible detail. Don't use the filename as alt text, and don't stuff repeated keywords into every image.
- Loading: Exclude the first one or two LCP images from lazy loading. Apply lazy loading to images below the initial viewport.
- Layout: Reserve image space in the theme so product cards don't shift while images load.
- Review: Inspect colour, edges, shadows, crop, image order, and variant matching before the batch reaches the live store.
Open a product page in Chrome DevTools, throttle the connection to Slow 4G, and inspect the LCP element. Aim to keep LCP under 2.5 seconds, the commonly used good-performance threshold referenced in the Shopify performance material. If it's above that, inspect the hero request first. Don't assume compression alone will solve a lazy-loading or theme-priority problem.
Common misses include uploading 4000 × 4000 frames for an 800-pixel display, leaving camera metadata attached to every file, exporting the wrong colour profile, and sending WebP to a marketplace that expects JPEG. Catch those errors in the staging folder, not after a campaign starts.
Which Optimizer Fits Your Store
Choose by catalogue structure and channel mix. A solo Shopify seller with a small catalogue doesn't need the same system as an agency managing multiple storefronts.
| Seller Persona | Catalog Size | Best Fit Category | Primary Reason |
|---|---|---|---|
| Solo Shopify merchant | Under 200 SKUs | Native Shopify plus a Shopify app | Simple setup for compression, resizing, and metadata |
| Multi-marketplace seller | Hundreds or thousands of products | Batch AI platform | One source catalogue can produce Shopify, Amazon, and Etsy branches |
| Agency | Multiple client stores | External CDN with account-level rules | Centralized delivery controls and reporting |
| Theme or Hydrogen developer | Any size, especially custom storefronts | Build-time tooling plus CDN delivery | Code controls responsive markup and runtime transformations |
For a solo Shopify merchant under 200 SKUs, start with clean source files, Shopify's native responsive delivery, and one focused Shopify app if you need bulk compression or metadata. Avoid stacking tools that all rewrite the same files. Your main risk is not a lack of features. It's inconsistent output and a theme that lazy-loads the first visible image.
Multi-marketplace sellers should use a batch workflow that branches exports by channel. Shopify needs a fast storefront asset. Amazon needs a compliant white-background main image. Etsy needs a listing image that meets the shortest-side target. A single source master with separate outputs is easier to audit than three unrelated folders.
Agencies need repeatability and separation. A CDN can apply delivery rules across client stores, while build-time processing can standardize each tenant's dimensions and formats. Developers working on Liquid or Hydrogen themes should control srcset, image dimensions, reserved space, and loading priority directly, then use a CDN for runtime delivery.
For a practical guide to preparing consistent product sets, see this Shopify product photo editor workflow. MerchLoom fits batch AI workflows across Shopify, Amazon, and Etsy for sellers managing 200 to 10,000 SKUs who need consistent channel specifications without per-image manual work.
MerchLoom lets you import catalogue images, chain AI steps such as background removal, reframing, resizing, and format preparation, and review the results before publishing. Try the first images without an account, then visit MerchLoom to process the next batch with pay-per-image credits that never expire.
Stop editing product photos one at a time
Upload your catalog or connect your store. Describe the result once. MerchLoom does the rest.
Try it free — no signup