
Shopify Product Photo Editor: Scale Your Workflow
Master product image editing on Shopify. Discover how a powerful Shopify product photo editor can streamline & scale your e-commerce workflows.
You've got a folder full of product shots. Some are clean studio images. Some came from a supplier. A few are phone photos you took because the launch date moved up. Now each SKU needs a square Shopify image, maybe a white-background version for marketplaces, a cropped banner for the home page, and a few lifestyle assets for ads and social.
That's where most sellers start looking for a Shopify product photo editor. They think they need one tool to fix one image. What they usually need is a repeatable system that turns raw photos into consistent visual assets across a catalogue.
The difference matters. Editing a single hero image is easy enough. Keeping hundreds of images aligned across collection pages, PDPs, banners, ads, and social posts is where time disappears and quality drifts. If you're also adapting assets for Amazon white backgrounds, Shopify squares, and Etsy-sized images, the problem gets bigger fast.
A lot of sellers first experiment with built-in AI tools, then branch into resources that help them create stunning AI product images for more polished scenes and campaign assets. The missing piece is usually workflow discipline. If you're also building promotional assets around those same products, it helps to think about image production and ad creative together, not separately, especially when reviewing approaches like this AI ad creative generator for ecommerce.
From Product Photos to Visual Assets
A seller with ten products can get away with improvising. A seller with two hundred can't.
What starts as “I just need to clean up these photos” usually turns into a production problem. The store needs primary product images for collection pages. PDPs need zoom-friendly photos. Landing pages need wider crops. Meta ads need image-safe layouts. Instagram wants different framing again. The same product ends up needing several versions, each with a different job.
The real job isn't photo editing
A Shopify product photo editor is useful, but the tool itself isn't the strategy. The strategy is deciding how every image should behave across the store.
That means answering practical questions early:
- Which images are for browsing: collection pages need visual consistency more than dramatic styling.
- Which images are for conversion: PDP images need sharp detail, accurate colour, and predictable framing.
- Which images are for merchandising: banners, ads, and social posts can carry more context, text space, and lifestyle treatment.
- Which images are for external channels: Amazon, Etsy, and paid social each push you toward different background and crop rules.
If you don't set those rules up front, your catalogue starts to look like it was assembled from different brands.
Practical rule: Don't treat every product image as a standalone design task. Treat it as part of a catalogue system.
What good workflows look like
The strongest stores don't rely on heroic manual effort. They standardise the boring parts first. Background cleanup, reframing, square crops, naming, export settings, and channel-specific variants all need to happen the same way every time.
For a casual seller editing one image, a native tool inside Shopify may be enough. For a store managing batches, the better question is this: can the workflow produce consistent outputs without repeating the same manual decision hundreds of times?
That's the lens for everything below.
Your Shopify Image Technical Checklist
Catalogues usually break at the technical level before they break at the creative level. One supplier sends oversized PNGs, another sends compressed JPEGs, one category is cropped tight, another floats in empty space. The result is a store that feels inconsistent even when each individual product photo looks acceptable on its own.
Set one master standard first
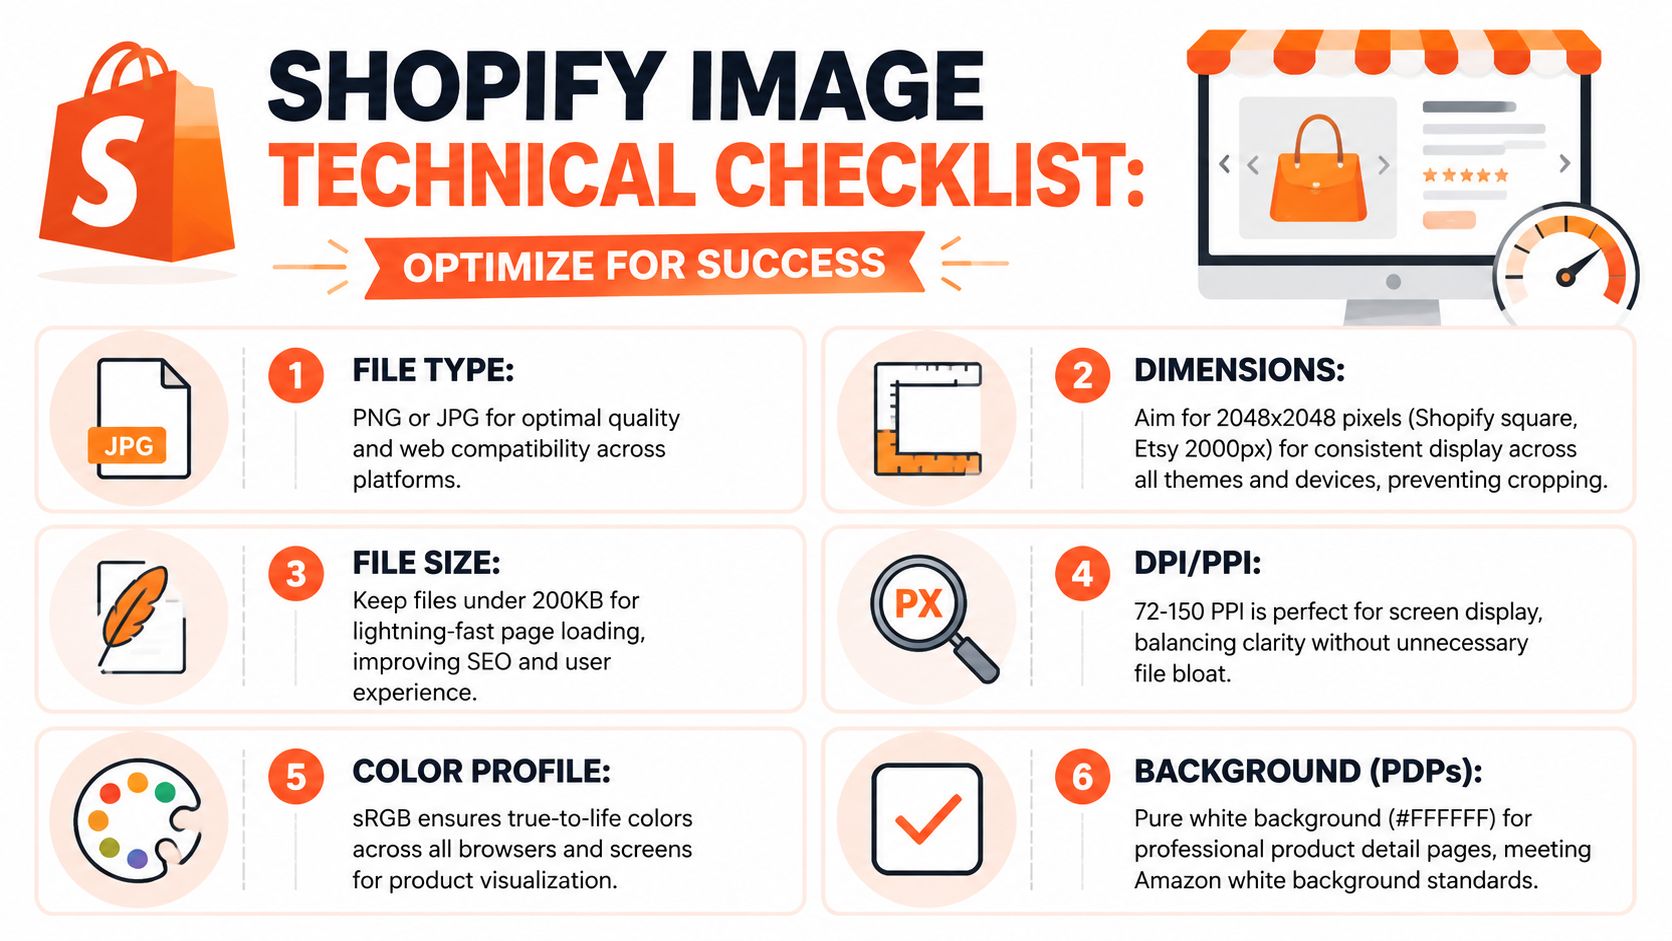
For Shopify product images, 2048 × 2048 pixels at a 1:1 ratio is a dependable working standard. Squareshot's guide to Shopify product image requirements points to that size because it holds up for zoom and stays sharp on modern screens.
The bigger win is consistency. Square images reduce layout drift across collection grids, search results, and featured product sections. They also give your team one repeatable export target instead of a category-by-category guessing game.
If you sell across channels, square is still the safest master format. You can always crop derivatives later for marketplaces, ads, or editorial placements.
Control file weight before upload
Image quality and page speed pull against each other. Heavy files make product pages slower. Aggressive compression makes fabrics, textures, and edges fall apart.
A practical target for most Shopify catalogues is about 100 to 200 KB per product image, with exceptions for detail-heavy items such as jewelry, patterned apparel, or products that rely on close zoom. Squareshot also notes that JPEG quality around 70 to 80% is usually enough for store use. Above that, file size often rises faster than visible quality.
For quick prep work, a free online image resizer can help standardise dimensions before files go through your main editing process. That is useful for bulk supplier batches, but it should not replace a proper export preset inside your actual workflow.
A second reference from Amasty's overview of Shopify product image size also supports keeping files in a controlled range for performance, especially on mobile-heavy storefronts.
Use sRGB every time
Colour mistakes cost more than minor sharpness issues. If product colour affects buying confidence, file prep needs to be boring and predictable.
Use sRGB for anything headed to Shopify. It is the safest profile for consistent browser display, and it reduces the chances of supplier files rendering differently across devices. Adobe RGB may look fine in one environment and shift in another. That is not a risk worth taking for catalogue imagery.
One sentence rule. If colour accuracy matters, standardise the profile before anyone starts editing variants.
Turn the checklist into a repeatable rule set
Teams need a checklist they can apply without debate:
| Check | What to use | Why it matters |
|---|---|---|
| Main ratio | 1:1 square | Keeps collection pages visually consistent |
| Main size | 2048 × 2048 px | Supports zoom and crisp display |
| Minimum fallback | 800 × 800 px | Maintains basic zoom usability, based on this Shopify image size guidance |
| File weight | Aim for 100 to 200 KB | Balances speed and visible detail |
| Compression | JPEG around 70 to 80% | Controls bloat without obvious quality loss |
| Colour profile | sRGB | Reduces colour shift across screens |
This matters more at scale than any one retouching trick. Once these specs are fixed, batch editing becomes easier because every tool, template, and export preset is working toward the same output.
Clean up the admin-side details too
Shopify supports common image formats such as JPEG, PNG, WEBP, SVG, HEIC, and GIF. In practice, most product catalogues should stay focused on JPEG for standard photos and PNG only when transparency is necessary. More format options do not automatically produce a better workflow.
Alt text should stay concise, specific, and useful to a shopper using a screen reader. Keep it focused on what is present in the image instead of stuffing product names and keywords into every field.
If your team is receiving weak supplier files, fix the source problem early. A documented HD photo converter workflow is far more efficient than uploading inconsistent low-resolution assets and trying to repair them one by one inside Shopify.
Editing One Photo vs One Thousand Photos
A single hero image can be fixed in five minutes inside Shopify admin. A 2,000 SKU catalogue exposes every shortcut in your process by the end of the week.

That is the gap many product photo editing guides miss. Editing one image is a design task. Editing hundreds or thousands is an operations task. The goal shifts from making one photo look good to making an entire catalogue look like it belongs to the same store, regardless of who shot it, who edited it, or when it was uploaded.
The failure usually starts small. A few products are cropped tighter than the rest. One supplier shoots on warm white, another on cool grey. A teammate exports PNGs because they want the cleanest possible file, while someone else saves compressed JPEGs to move faster. Each choice seems harmless on its own. On collection pages, the inconsistency is obvious.
Inconsistency changes how the catalogue feels
Shoppers do not audit your image workflow. They notice the result. If product cards jump between different margins, tones, and subject sizes, the store feels less organised and the products look less comparable. That makes browsing slower, especially in categories where customers scan dozens of options before clicking.
I have seen this show up most often during catalog expansion. A store starts with 50 polished SKUs, then adds seasonal drops, supplier images, marketplace imports, and UGC-inspired variants. Image quality stays acceptable at the individual file level. Brand consistency disappears at the category level.
That hurts more than aesthetics.
Merchandising gets harder because products do not sit well beside each other. Paid social creatives pull from mixed-quality source images. Email teams waste time hunting for the few assets that match the campaign. Support gets avoidable questions because colour, scale, or finish looks different from one listing to the next.
Single-image editing habits do not scale
The core problem is not weak software. It is a weak editing rule set.
Teams that work image by image tend to make decisions in the moment:
- Background cleanup varies by editor and by batch
- Subject size drifts across products in the same category
- Shadow depth changes between retouched sets
- Colour correction is handled by eye instead of preset
- Export settings depend on who saved the file last
That creates repetitive correction work. Someone eventually has to reopen files, reframe thumbnails, replace backgrounds, or compress oversized exports after the products are already live.
A batch-first process prevents that rework.
For growing catalogues, the better question is not “How should this photo look?” It is “What rules should every image in this category follow?” Once that is documented, tools matter less than consistency. Cropping ratios, canvas position, background treatment, shadow style, and export settings can all be applied the same way every time.
That is why structured batch product photo editing workflows outperform one-off fixes in Shopify admin. They reduce manual judgment, keep categories visually aligned, and give teams a process that still works when the catalogue triples in size.
Choosing Your Product Photo Editing Toolkit
Tool choice decides whether your team can keep a catalogue consistent after the first 50 SKUs.
Doing this for a whole catalog?
MerchLoom runs background removal, upscaling and AI editing across every product photo you have — one prompt, whole batch. Try 2 batches free, no signup.
Try it free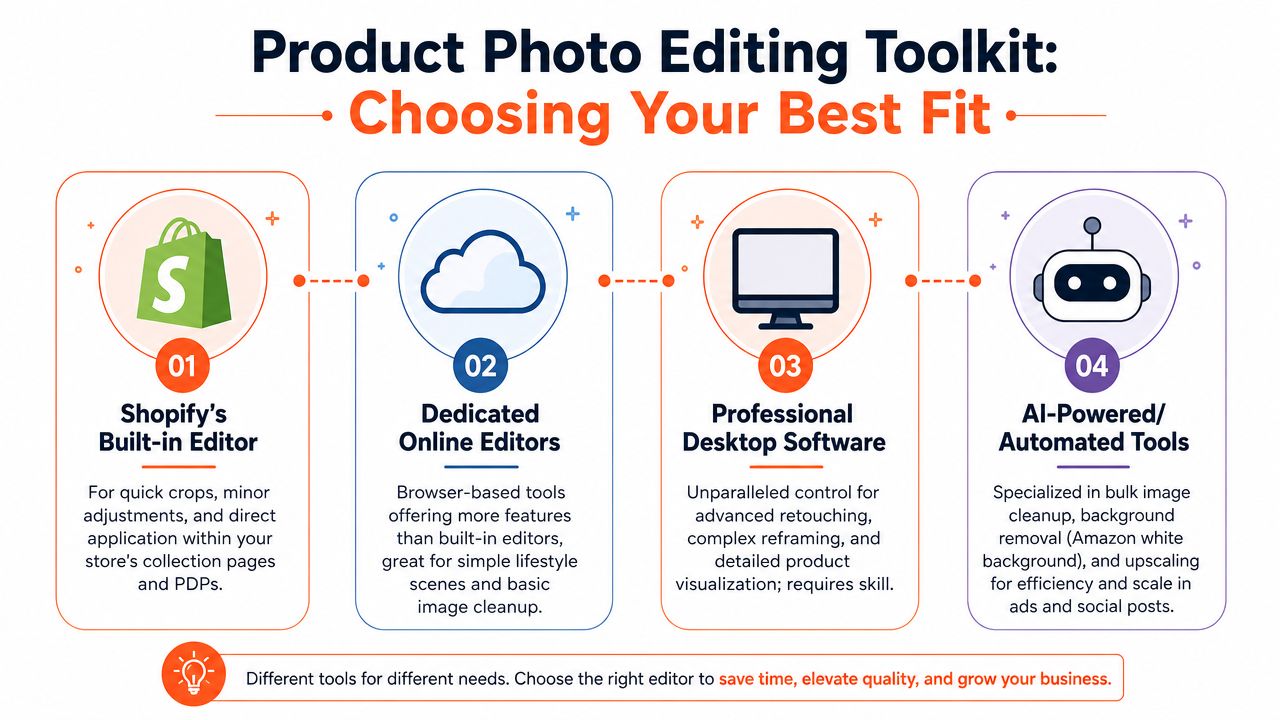
A merchant editing ten images can get away with almost anything. A merchant maintaining hundreds of products across collections, ads, seasonal refreshes, and marketplace feeds needs a toolkit that protects originals, applies the same rules repeatedly, and does not create version chaos.
Shopify's built-in editor
Shopify's native editor is useful for quick fixes inside admin. It covers the basics well enough. Crop an image, resize it, clean up a distraction, test a generated background, and move on without opening another app.
That speed matters for solo operators and small catalogues.
The problem starts when the built-in editor becomes the main production tool. It is convenient, but it is not designed like a proper asset workflow. Teams still need to check generated results for edge errors, warped product details, and backgrounds that look acceptable in isolation but inconsistent beside the rest of the category. Built-in AI can help produce options quickly, yet it still requires human review before anything customer-facing goes live.
The trap sellers run into later
The biggest issue is not whether the edit looks decent on one product page. It is whether the workflow holds up after repeated edits across a live catalogue.
Shopify's editor can overwrite working files in a way that makes source preservation harder than it should be. For one-off changes, that may be acceptable. For a store running launches, retakes, localisation, and channel-specific variants, it creates avoidable risk. Teams end up downloading backups manually, renaming files inconsistently, or losing the clean original they needed for the next campaign.
That is why I treat Shopify's editor as a last-mile tool, not the system of record.
Desktop software and web apps
Desktop tools still earn their place because they give teams tighter control over colour, presets, exports, and repeatable adjustments. Lightroom and Capture One are strong choices after a structured shoot, especially when the job is standardising a full category instead of rescuing bad source images. If skin tone, fabric colour, packaging finish, or shadow density needs to stay consistent across a range, preset-driven software is still hard to beat.
Browser-based editors sit in the middle. They are faster to access and easier to hand off to non-specialists. They work well for cleanup, reframing, white background swaps, and simple marketplace edits. Their weakness is process discipline. Files move between tabs, folders, and downloads. Naming slips. Output settings vary by operator.
For catalogue-scale work, that friction adds up fast.
| Tool type | Best for | Weak spot |
|---|---|---|
| Shopify native editor | Quick in-admin fixes and simple experiments | Weak version control for serious production |
| Desktop software | Colour accuracy, presets, bulk exports, controlled output | Requires trained operators and a disciplined file structure |
| Online editors | Fast browser-based cleanup and simple edits | File handling gets messy at scale |
| Automated batch tools | High-volume, repeatable production across many SKUs | Only works well if your image rules are clearly defined |
The best setup for growing stores is usually a combination, not a single editor. Use Shopify for minor last-step edits, desktop or specialist tools for master image prep, and a batch layer for repetitive catalogue work. Stores that process large volumes usually get better results from AI batch image editing workflows than from relying on manual edits inside Shopify admin.
A short demo helps clarify where native editing is useful and where a broader workflow becomes necessary.
Building a Scalable Image Production Pipeline
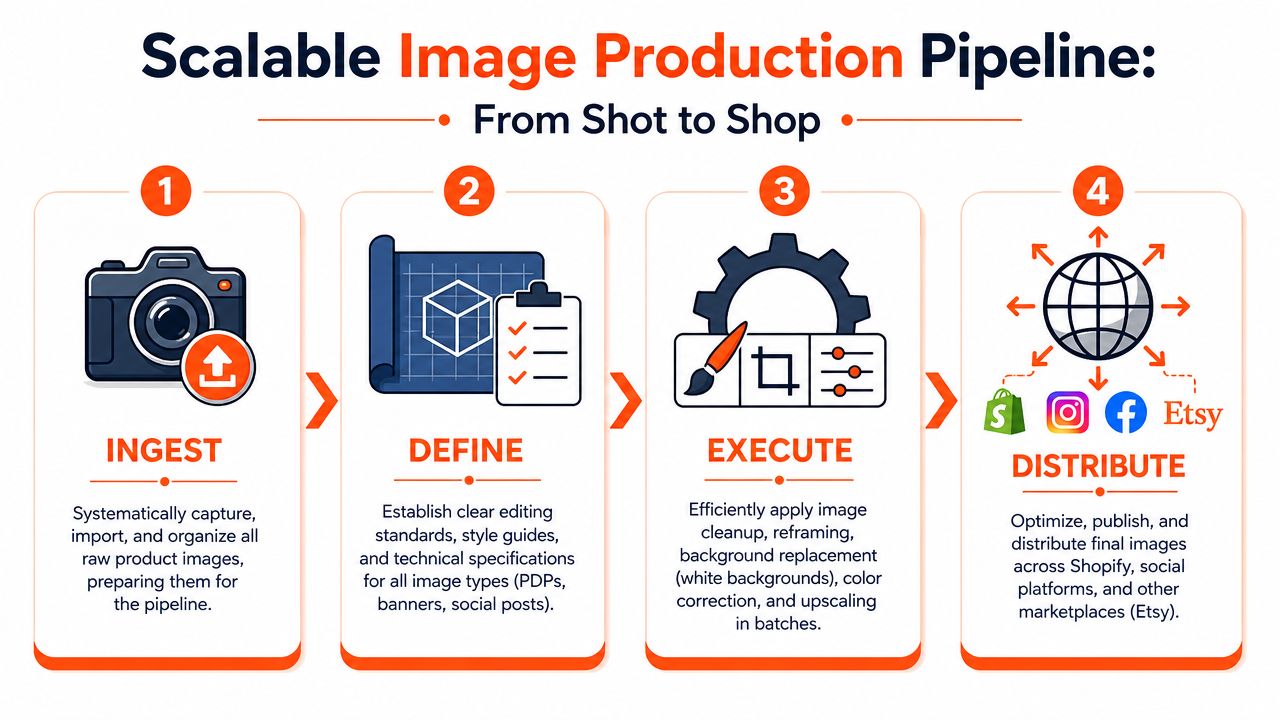
The stores that stay organised don't just edit images. They run a production pipeline.
Ingest
Start by deciding where source files live and who owns them. Raw images usually come from a studio shoot, a phone camera, a supplier folder, cloud storage, or directly from the store.
What matters here is consistency. If assets arrive through five different routes with no naming or folder rules, every later step becomes slower. Keep a clear raw source, and separate it from edited outputs. That matters even more if someone on the team is still using destructive tools.
A practical ingest rule is to collect by product family, not by campaign. That makes it easier to create one clean set of base assets before spinning off ad and social variations.
Define
Most workflow gains are realized here. You need a written spec for each asset type.
For example:
- PDP master image: square crop, neutral background, accurate colour, sharp edges
- Collection image: same framing ratio within category, no distracting props
- Amazon-ready image: pure white background and compliant positioning
- Etsy-ready image: high-resolution square adapted to the marketplace's visual style
- Ad creative source: clean cutout or scene-ready file with room for alternate crops
If you don't define these standards, people improvise. Improvisation is why catalogues drift.
The fastest teams aren't making fewer edits. They're making fewer decisions per image.
Execute
Execution should happen in batches whenever the task is repeatable. That includes image cleanup, white background generation, reframing, colour correction, product visualisation, lifestyle scene creation, and upscaling.
This is also where processing order matters. Removing a background before expensive enhancement steps can cut waste, especially when you're generating many variants. If you're exploring how automated sequencing works in practice, this piece on AI image workflow automation is a useful reference point for how batch pipelines get structured.
Execution also needs channel awareness. One master file rarely serves every destination without adjustment.
Distribute
Distribution is where edited files become sellable assets instead of “finished images” sitting in a folder.
A good distribution routine includes:
- Publishing the store version to Shopify in the right square format.
- Sending marketplace variants to channels that need white backgrounds or different crops.
- Creating campaign derivatives for banners, ads, and social posts.
- Archiving approved outputs so the same product doesn't get reworked from scratch later.
The pipeline only works if outputs stay reusable. A seller shouldn't have to rebuild a product image stack every time a product appears in a sale collection, a retargeting ad, or a seasonal homepage banner.
Going Beyond the Basic White Background
A white background is still the right default for many PDPs and marketplace listings. It's clean, compliant, and easy to scan. But it shouldn't be the limit of your visual strategy.
Once the catalogue basics are stable, stronger stores expand into lifestyle scenes, product visualisation, on-model imagery, alternate colourways, ad crops, and social-first formats. Those assets help buyers understand scale, context, material, and use case in a way plain cutouts can't.
Why richer assets are worth producing
There's a strong business case for moving beyond plain packshots. MindStudio's analysis of AI image generation for Shopify states that high-quality product photos can increase conversion rates by 30–47%, and that the cost of producing studio-quality product variations can fall from $75,000–$200,000 for 1,000 products to under $5,000 with AI image generation tools.
That changes the economics of catalogue expansion. A small brand no longer has to choose between thin visuals and an expensive reshoot every time it adds variants, tests a new scene, or updates creative for a campaign.
Where advanced editing helps most
The best use cases are usually practical, not flashy:
- Lifestyle scenes: show the product in a believable environment that supports the category
- Product visualisation: place furniture in a room, packaging on a shelf, or accessories on a person
- Reframing for ads: produce wider or taller crops that leave room for copy and platform-safe margins
- Upscaling supplier images: rescue usable catalogue assets when the original files arrive too small or poorly prepared
- Colour and background variants: create a coherent set of options without reshooting every combination
What doesn't work is pushing AI too far without review. Unrealistic shadows, warped edges, and floating objects damage trust quickly. For selling images, believable beats clever.
Keep the hierarchy clear
Use a simple visual hierarchy across channels:
- Primary commerce images: clean, standardised, low-friction
- Supporting PDP images: detail, scale, and alternate context
- Campaign assets: more expressive, but still product-led
- Social posts: adapted for platform crops and attention patterns
That hierarchy keeps the storefront grounded while giving paid and social teams enough material to work with. The goal isn't to replace product photography with AI scenes. It's to give each SKU a more complete asset set without multiplying production headaches.
Your Visuals Engine for E-commerce Growth
The strongest Shopify stores don't treat images as isolated design tasks. They run a visuals engine that produces the right assets, in the right formats, for the right channels.
That engine starts with technical discipline. It improves when teams stop editing one image at a time and start standardising categories, outputs, and review rules. It gets much more effective when product photos, white-background marketplace images, banners, ad creatives, and social crops all come from a controlled workflow instead of scattered tools.
If you're refining your broader visual standards across merchandising and display, it's worth comparing your process against Display Guru's 2026 guide for additional industry best-practice thinking.
A Shopify product photo editor still matters. It's just not the whole answer. For growing catalogues, the advantage comes from building a process that keeps quality high without burying the team in repetitive edits.
If you want a Shopify-friendly batch workflow layer rather than another one-image editor, MerchLoom is built for that job. You can bring in product images from Shopify or storage, describe the output you need in plain English, and generate assets in batch for collection pages, PDPs, white-background listings, lifestyle scenes, banners, ads, and social posts without rebuilding the process for every SKU.
Stop editing product photos one at a time
Upload your catalog or connect your store. Describe the result once. MerchLoom does the rest.
Try it free — no signup