
The E-Commerce Seller's HD Photo Converter Playbook
Tired of tedious edits? Learn how to use an HD photo converter for batch processing product photos for Shopify, Amazon, and Etsy and drive more sales.
You're a busy seller. You don't edit one photo; you process hundreds. So, what exactly is an HD photo converter in your world? It’s not just an app to make one picture look nice. It's an industrial-strength tool that takes entire product collections and systematically upscales them to meet the demanding, high-resolution standards of every marketplace you sell on. It’s the bridge between a folder of raw shots and a catalog of professional, marketplace-ready images that actually drives sales.
Why an HD Photo Converter Is Your Secret Weapon
Let's be real—your product photos are your digital sales team, and they're working 24/7. We’ve all heard that "good photos sell more," but that advice feels hollow when you’re staring at 500 images for a new collection with a weekend sale looming. The pressure is immense. You're not just touching up a single photo; you're trying to wrangle a massive visual catalogue and make it consistent.
This is where we need to stop thinking about one-off photo editing and start thinking about strategic, batch image processing. The real challenge for sellers is creating consistency across hundreds of shots and ensuring every single one meets the specific, often non-negotiable, standards of every platform.
The Real-World Pressures of E-Commerce Imagery
If you’ve ever managed product images at scale, you know it's a constant battle against different marketplace rules. What looks great on your Shopify storefront can get flagged and suppressed on Amazon.
- Amazon's Strict Standards: They demand pure white backgrounds and very specific resolutions. A background that’s even slightly off-white or an image that’s too small can get your listing buried, especially during a high-stakes event like Prime Day.
- Shopify's Visual Flow: Here, your images need to look uniform on collection pages, which usually means a square aspect ratio. A messy grid of vertical and horizontal shots just looks unprofessional and erodes customer trust.
- Etsy's Detail-Oriented Buyers: Shoppers on Etsy want to see the craftsmanship. They expect to zoom in on every stitch and texture, which requires a minimum image width of 2000px. A standard photo won’t deliver that experience, costing you sales.
An HD photo converter, when used for batch processing, isn’t just a nice-to-have; it’s business infrastructure. It's as critical as your inventory software because it’s the tool that ensures your visuals meet these varied, demanding requirements without you editing each of the 500 images by hand.
For sellers, the link between image quality and sales is undeniable. An HD photo converter automates the process of meeting—and exceeding—marketplace standards, turning a tedious, manual task into a scalable, profitable workflow.
From Good Enough to High Converting
This push for better quality isn't just for show—it directly impacts your bottom line. E-commerce is a race to produce the clearest visuals. The numbers don't lie: superior product photos can deliver a 94% higher conversion rate compared to their low-resolution counterparts. At that point, HD conversion for your entire catalog becomes a necessity, not a choice.
This is exactly where modern batch processing tools prove their worth. A platform like MerchLoom, for instance, lets you build an entire workflow—an AI pipeline—to handle all these needs at once. You can upload a whole product collection and tell the AI to remove backgrounds, reframe everything for Shopify's square format, and finally, upscale all the images to HD quality. This approach turns what could be a multi-day editing nightmare into an automated process that runs while you focus on selling.
Prepping Your Product Images for Batch Conversion
Dumping a folder of 500 unsorted images into an HD photo converter and hoping for the best is a recipe for disaster. I’ve seen it happen. Before you even touch that "upscale" button, a bit of upfront prep work will save you hours of headaches and costly re-dos.
Think of it this way: AI is smart, but it's not a mind reader. The old saying "garbage in, garbage out" has never been more true for batch processing. If you feed it a chaotic jumble of photos, you'll get a chaotic jumble of results. Our goal here isn't fancy artistic editing; it's about building a smooth, predictable assembly line for your images.
By standardizing your source files first, you give your HD photo converter the best possible chance to succeed. This is the secret to getting clean, consistent results across an entire product catalogue in one go.
The Power of Smart Organisation
We’ve all been there. When you're staring at a folder full of files named New-Project-Final-Final-2.jpg, you know things have gone wrong. For batch processing, a logical folder structure and a clear naming convention aren't just for neat freaks—they're your best friends for staying sane.
Start by sorting your photos into folders based on where they'll end up. This simple act makes it so much easier to grab the right batch for a specific marketplace campaign.
- Amazon-Main-Images: These are your hero shots, the ones that absolutely need a pure white background. They have their own set of rules.
- Shopify-Lifestyle-Shots: Here’s where you put your product-in-use photos. These often need different reframing for collection pages versus product detail pages.
- Etsy-Detail-Closeups: These are perfect candidates for 4x upscaling, as buyers will be zooming in to see the fine details of your craftsmanship.
I once burned an entire afternoon re-processing a batch because I’d accidentally mixed my lifestyle photos in with the main product shots. Creating separate folders for each marketplace right from the start would have saved me both time and a lot of processing credits.
Next, come up with a file naming system and stick to it. This makes finding a specific image later a breeze. A format that works wonders is:
Brand-ProductName-Colour-Angle.jpg
For example: MyBrand-WaffleKnitSweater-Olive-Front.jpg. You know everything about that photo without even having to open it.
Consistent Shooting for Consistent Results
Your source photos don't need to be professional-grade masterpieces, but for batch processing, they do need to be consistent. Whether you're using a DSLR or a newer smartphone, shooting with consistent lighting is the single most important thing you can do.
If half your batch was shot in bright, cool morning light and the other half under warm, dim indoor lamps, no automated color correction tool on earth can make them look uniform. The AI will struggle to apply one rule across such different starting points, leaving you with a batch of mismatched images that you'll have to fix manually.
For that initial consistency, you might find our guide on getting a clean white photoshoot background helpful, even if you’re just starting out with a simple setup.
Finally, doing a quick, rough crop before you upload can make a huge difference. If your products are all reasonably centered and fill the frame in a similar way, AI tools like smart reframing will work far more reliably. This little bit of prep gives the AI a clear subject to lock onto, dramatically reducing the odds of it cropping out a key part of your product. This is how a tool like MerchLoom can run an entire collection through its AI pipeline and produce perfectly uniform, high-quality results every single time.
With your source images organized, we can now build the AI pipeline that will do all the heavy lifting. This is where you graduate from tedious one-off edits to a repeatable, automated system for your entire product catalog. Setting up a smart workflow for your HD photo converter is the key to getting consistent, high-quality results at scale.
The whole idea is to "chain" different AI tasks together. Instead of running background removal on 500 images, waiting, then uploading them all again to reframe them, and then doing it all over again to upscale them, you define the entire sequence at once. It’s a true set-it-and-forget-it system for busy e-commerce sellers.
A Pro Tip for a Faster, Cheaper Workflow
Here’s a secret I've learned from processing thousands of images that has saved me countless hours and a surprising amount of money: always run background removal before AI upscaling.
It seems like a minor detail, but the impact is massive when processing batches. When you remove the background first, you’re getting rid of a huge amount of unnecessary pixel data. This makes the image file much smaller, which drastically cuts down on the processing time—and cost—for the more intensive upscaling step. It’s a simple tweak to your pipeline that makes everything more efficient.
This simple flow chart really drives home the point: a bit of prep work before you start makes the whole automated process smoother and more reliable.
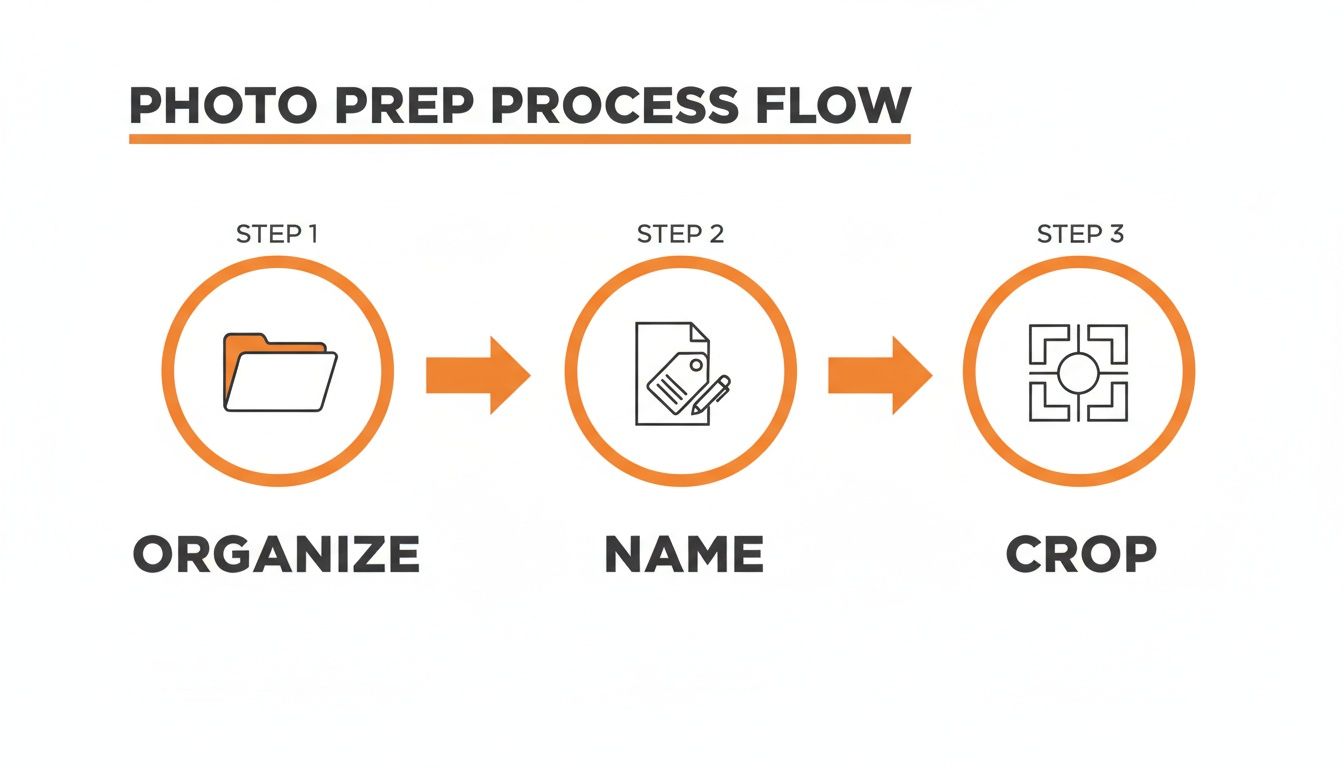
A little organization upfront pays huge dividends down the line, ensuring your automated steps run faster and with fewer errors.
Designing Your E-commerce Pipeline
Modern AI tools are built for these kinds of multi-step, catalogue-wide jobs. A platform like MerchLoom, for example, lets you describe your entire pipeline in plain English. You don’t need to be a technical whiz; you just need a clear vision for your final images across the whole collection.
Let’s walk through a real-world scenario. Imagine you’ve just shot a new 200-piece collection of t-shirts for your Shopify store. Here’s what your ideal pipeline could look like:
- Background Removal: First, get every shirt onto a clean, pure white background. This is non-negotiable for a professional, uniform look.
- Smart Reframing: Next, automatically crop and center each image into a perfect square. This ensures they line up beautifully on your Shopify collection pages.
- Color Correction: Then, apply a subtle brightness and contrast boost to make the fabric colors pop consistently across every single photo.
- HD Upscale: Finally, run the HD photo converter to upscale every image to a crisp 2048x2048 pixels, making them perfect for Shopify’s product zoom feature.
You define this sequence once, point it at your folder of t-shirt photos, and the system handles the rest. This is how you get that polished, consistent look across hundreds of listings without touching a single image by hand. If you’re trying to create more complex composite images, our guide on using an AI image combiner can show you how to integrate that into your workflow.
The order of these operations is what separates a basic tool from a true e-commerce workflow solution. To maximize quality and minimize cost, especially when processing hundreds or thousands of photos, the sequence matters.
Here's a breakdown of the optimal order for your AI processing pipeline.
Optimal Pipeline Order for Batch HD Conversion
| Step | Action | Why It's Done in This Order | Cost/Time Impact |
|---|---|---|---|
| 1 | Background Removal | Removes the most pixel data first, making all subsequent steps faster and cheaper. | High Impact: Significantly reduces file size, lowering processing costs for upscaling by up to 87%. |
| 2 | Smart Reframing | Crops the image to the final aspect ratio. Ensures you're not upscaling pixels that will be cropped out later. | Medium Impact: Reduces processing on irrelevant areas, saving time and minor cost. |
| 3 | Color Correction | Adjusts colors on the smaller, pre-upscaled image. This is a less intensive task, so it's efficient to do it here. | Low Impact: Minimal effect on cost, but ensures color consistency before the final upscale. |
| 4 | HD Upscaling | The most resource-intensive step. By doing it last, you're only processing the essential pixels of the final, framed image. | High Impact: This step has the highest cost, which is why it's critical to have optimized the image beforehand. |
Following this order ensures you're not wasting time or money processing pixels that will just be thrown away. It’s about working smarter, not harder.
The Bottom Line: High-quality visuals are no longer a luxury in e-commerce; they're a necessity. With studies showing they can lead to 94% higher conversion rates, investing in your product photography is a direct investment in your sales.
By chaining AI tasks into an intelligent pipeline, you're not just editing photos—you're building a scalable asset production machine. This frees you up to focus on the parts of your business that truly need your attention, like marketing, sourcing, and selling.
Fine-Tuning Upscale Settings for Flawless Results
Alright, you've got your automated pipeline set up. Now for the crucial part: dialing in the settings. Think of your workflow as the main assembly line; these adjustments are the final calibrations that ensure every single one of your 500 product photos comes out perfectly. We’re not talking about huge changes here—it's the small, critical tweaks that take your images from good to genuinely great across the entire batch.
Getting these settings right is how you turn a standard snapshot into a high-quality asset that drives sales. The whole point is to produce images that aren't just bigger, but are noticeably sharper and more inviting to customers who are zooming in to check every last detail.
Choosing Your Upscale Factor
Doing this for a whole catalog?
MerchLoom runs background removal, upscaling and AI editing across every product photo you have — one prompt, whole batch. Try 2 batches free, no signup.
Try it freeYour first big decision is the upscale factor, usually between 2x and 4x. This isn't a random choice; it's directly tied to the quality of your source images and the specific requirements of the marketplaces you're selling on.
- 2x Upscaling: This is your workhorse for most decent-quality source images. If you shot your products with a modern smartphone or a DSLR and just need more resolution for platforms like Shopify or Amazon, 2x is often the sweet spot. It enhances detail across a large batch without much risk of strange-looking artifacts.
- 4x Upscaling: Reserve this for when you're working with lower-quality source images and have a high-resolution target to hit. A classic example is getting an older 800px photo up to Etsy’s 2000px minimum width. It's also perfect for creating stunning hero images where you want shoppers to zoom way in on things like fabric weaves or the intricate settings on a piece of jewelry.
Remember, higher upscale factors give the best results with clean, well-lit source photos. If you try to push a low-light, grainy picture to 4x, you can just make the noise worse. It's always a good idea to run a quick test on a few images from your batch first. When you do run into issues with grain, you might need to look at other ways to enhance the image. Our guide on how to sharpen an image in Photoshop has some tips that are useful even if you're using an automated tool.
The Power of Real-Time Quality Control
When you're processing a batch of 500 images, the last thing you want is to find out something went wrong after the entire job is finished. That’s where having a real-time quality control (QC) process becomes your safety net. You need the ability to spot-check the first few images as they come off your digital assembly line.
This is a non-negotiable feature in modern batch processing tools. On a platform like MerchLoom, for example, your results stream in as they’re ready, so you don't have to wait for the whole batch to complete. This gives you a crucial window to review the initial output and catch any problems.
This real-time feedback loop is an absolute game-changer. I once noticed the first ten images of a new apparel line were coming out a bit too dark. I was able to pause the pipeline, tweak the brightness, and restart the job—all without having to re-upload everything or start from scratch.
That ability to pause, tweak, and continue saves a massive amount of time and processing credits. It lets you correct your course mid-batch, ensuring the final output for your entire catalogue is exactly how you want it.
Troubleshooting Common Upscaling Issues
Even with a perfectly tuned pipeline, you’ll hit the occasional snag when processing hundreds of images. Knowing how to troubleshoot these problems quickly is what separates the pros from the amateurs.
Here are a couple of common scenarios I've run into and how to fix them:
Problem: The AI is creating weird artifacts or "hallucinations." This tends to happen when you're upscaling images that have complex patterns or textures across a batch. The AI tries to invent details that aren't really there.
- Solution: Your first move should be to dial back the upscale factor from 4x to 2x. If that doesn't fix it, try using a different AI upscaling model if your tool has that option. Some models are much better with photorealism than others.
Problem: A batch of photos has inconsistent lighting. You know the drill—one product was shot on a cloudy day, and the next was in direct sunlight. A single pipeline won't work.
- Solution: Don't try to solve this with a one-size-fits-all rule. Instead, split your batch into smaller, more consistent groups. Create one pipeline with a specific brightness adjustment for the "cloudy day" photos and a separate one for the "sunny day" set.
The efficiency of an HD photo converter is quickly becoming essential to e-commerce operations. The photography landscape is projected to become a massive industry, which shows just how vital these tools are for anyone selling in high volumes. Platforms like MerchLoom are at the forefront of this shift, enabling AI batch processing with real-time QC feedback loops—perfect for managing seasonal apparel catalogues or a big inventory of online listings. As the industry keeps growing, these efficiency gains translate directly into faster listing times and more sales. You can discover insights into the photography industry's expansion and see where things are headed.
Deploying Your HD Images to Marketplaces

It’s a fantastic feeling to have a folder packed with gorgeous, newly upscaled images. But that’s only half the battle. The final, and arguably most important, step is getting those images live on each marketplace correctly. A misstep here can waste all the effort you've put into processing your catalog.
Every platform plays by its own rules. To really succeed, you need to think less about a single "master" image and more about creating tailored exports for each channel. This ensures your products look professional and enticing everywhere you sell.
Customising Exports for Each Platform
One of the most common mistakes I see is sellers using the exact same image files across every platform. You’ve just put in the work with a powerful HD photo converter to create stunning assets; don't stumble at the finish line. A one-size-fits-all approach simply doesn't cut it in e-commerce.
For Amazon: The guidelines here are notoriously strict. You absolutely need a pure white background (RGB 255, 255, 255) and have to meet their resolution requirements. Your main image has to be flawless, otherwise you risk getting your listing suppressed. It's best to configure a dedicated "Amazon-Ready" batch in your export settings.
For Shopify: On your own store, visual consistency is king, especially on collection pages. This often means exporting images in a square format (1:1 aspect ratio) to keep your product grid looking tidy and professional. Don't forget to check your theme’s documentation, as it might have specific resolution recommendations.
For Etsy: Shoppers on Etsy are often looking for unique details and a sense of craftsmanship. The platform encourages images that are at least 2000 pixels on the shortest side. This is where your high-resolution upscales really get to shine, letting customers zoom right in and see the quality for themselves.
I keep a simple checklist for my main channels, detailing the exact resolution, aspect ratio, and background requirements for each. Before I export any batch, I run through that list. It’s a simple habit that has prevented countless listing errors.
This tailored strategy ensures your images don't just meet the bare minimums but are actively optimized to perform well on each specific platform.
Nailing SEO-Friendly File Names
Before you upload your batch, you have a golden opportunity for a small but meaningful SEO boost. Believe it or not, search engines like Google actually read your image file names. A generic name like IMG_8432.jpg tells them nothing.
A descriptive file name, however, gives them valuable context about what your product is. It’s a dead-simple, free way to improve your search visibility across your entire catalog.
Over the years, I've landed on a naming convention that works wonders for both SEO and my own file organization:
Brand-ProductName-KeyDescriptor-Angle.jpg
For example: LoomKnit-MerinoCardigan-ForestGreen-Back.jpg. This file name tells search engines the brand, the product, a key feature (the color), and the shot angle. When you apply this system across your entire catalogue, it adds up to a significant long-term advantage.
Advanced Multi-Pipeline Workflows
Once you're comfortable with a basic image processing pipeline, you can start building more advanced workflows. This is where a tool like MerchLoom truly demonstrates its value. Instead of starting from scratch for every task, you can use the output from one pipeline as the input for another.
Let's say you've just processed 100 photos through your "Amazon Pipeline," which created perfect, HD images on a crisp white background. Now you need some assets for your Instagram feed.
Instead of going back to your original source files, you can simply feed the Amazon-ready images into a new "Social Media Pipeline." This second pipeline could automatically:
- Reframe the images to a 4:5 vertical format ideal for feeds.
- Add a subtle, branded watermark in the corner.
- Apply a slightly different color grade to match your feed's aesthetic.
This method of "chaining" pipelines saves you from ever having to re-upload source files, effectively turning your image library into a dynamic asset factory. Understanding the finer points of how AI handles these images is a big help, and you can learn more about the role of resolution in AI image processing to get a deeper insight. It’s a powerful way to work smarter, not harder.
Common Questions About Batch Photo Conversion
We've covered the whole workflow, from prepping your images to getting them live on various marketplaces. But even with the best plan, practical questions always come up once you start processing entire product catalogues. These are the real-world queries I hear all the time from fellow sellers who are in the thick of it.
My goal here is to give you clear, straightforward answers based on my own experience managing large-scale image pipelines. Let's get you feeling confident enough to handle whatever your e-commerce business throws at you.
How Much Better Are AI-Upscaled Images, Really?
This is probably the most common question I get, and it’s a good one. The difference isn't just noticeable; it's often night and day, especially from a customer's perspective. An AI converter isn't just stretching your image—it’s intelligently rebuilding it, adding detail, sharpening lines, and cleaning up compression artifacts across an entire product line.
Think about it from a shopper’s point of view. On a marketplace like Etsy, they can zoom in on a handmade necklace and see the intricate details of the metal, not a pixelated blob. On your Shopify store, it means the texture on a wool sweater looks so crisp they can almost feel it. This is how you communicate quality and build the trust needed to make a sale.
Will Upscaling Fix My Blurry or Out-of-Focus Photos?
Here’s a crucial distinction: an HD photo converter works wonders on a photo that’s already sharp, just low-resolution. It can take that image and make it look fantastic at a much larger size.
But it can't invent focus that was never there to begin with. If your original shot was genuinely blurry—maybe the camera missed its mark or the product moved—upscaling will just give you a bigger blurry photo. It's a powerful tool, but it's not magic. For the best batch results, you absolutely have to start with the sharpest source files you have.
Can I Process Different Product Types in One Batch?
You can, but I’d strongly advise against it. Just picture it: you're running a batch that includes both gleaming stainless steel cookware and soft, fuzzy blankets. The sharpening and contrast settings that make the steel pop will probably make the blankets look harsh and unappealing.
My rule of thumb is to create separate batches based on product category and material. I have one pipeline for all my soft goods like apparel and textiles, and a completely different one for hard goods like jewelry, electronics, or ceramics.
This simple step gives you so much more control and ensures every single product looks its absolute best.
Is It Cheaper to Upscale First or Remove the Background First?
For the sake of your wallet, always remove the background first. This is one of the most effective ways to cut down on processing costs when working with large batches. The background of a product photo often accounts for 50-70% of the image's total pixel data.
When you remove it before upscaling, you dramatically reduce the file size that gets fed into the most resource-intensive step. A smart tool like MerchLoom automatically orders your pipeline this way to keep costs down, but if you’re building a workflow manually, this sequence is non-negotiable. It makes a huge difference to your bottom line when processing hundreds of images.
What’s the Best File Format for My Final HD Images?
For virtually all e-commerce applications, JPEG is your best bet for the final, customer-facing images. JPEGs provide the ideal balance between image quality and small file size, which is critical for fast-loading pages—something both Google and your customers appreciate.
The main exception is when you need an image with a transparent background, perhaps for your website’s design or for layering in promotional graphics. In those specific cases, you'll need to export your batch as PNG files to preserve that transparency. Otherwise, for all your product listings on Amazon, Shopify, or Etsy, stick with high-quality JPEGs.
Ready to stop editing photos one by one and start processing your entire catalogue with a single command? MerchLoom builds an AI-powered pipeline to handle everything from background removal to marketplace-specific reframing and HD upscaling. Describe your needs in plain English and let the AI do the heavy lifting. Try MerchLoom for free today and see how quickly you can get your products to market.
Stop editing product photos one at a time
Upload your catalog or connect your store. Describe the result once. MerchLoom does the rest.
Try it free — no signup