
How to Make an Image in Circle for E-Commerce in 2026
Learn to create an image in circle using CSS, Photoshop, or automated workflows. A 2026 guide for e-commerce sellers managing large product catalogues.
You've probably got the same problem in front of you right now. A product team wants circular colour swatches, the homepage needs round category icons, and the listings crew wants every avatar, badge, and thumbnail to look identical across hundreds of SKUs. The hard part isn't making one image in circle, it's keeping the result consistent when the same asset has to survive Shopify, Amazon, Etsy, and your own site without getting awkward crops, fuzzy edges, or mismatched backgrounds.
Why Creating Circular Images Is a Workflow Problem
A Shopify seller with 100 products doesn't need a clever one-off edit. They need a repeatable way to turn the right source images into circular assets that look the same everywhere they appear. That's where most advice falls short, because the common answer is still the simple editing question, not the operational one.
Most search results on this topic miss the e-commerce angle, focusing on single-image edits rather than the operational challenge of ensuring consistency for avatars, badges, and thumbnails across many SKUs. That gap matters because circular crops can either improve trust signals or reduce product visibility depending on how they're used in a large catalogue, as noted in Adobe's circle crop guidance.
Three ways teams usually handle it
The first path is manual editing for one image at a time. That works when you're polishing a hero graphic or a blog asset, but it becomes fragile when dozens of listings need the same treatment. The second path is code, where a website theme uses CSS to display a circular crop without changing the file itself. The third path is automation, which matters most for catalogue work because it can handle collections instead of single images.
For e-commerce, the true test is not whether the circle looks good once. It's whether your process still looks good after the twentieth export, the fiftieth revision, and the hundredth SKU update.
Practical rule: if the same circular treatment has to appear across many listings, decide the workflow first, then decide the tool.
For a broader look at how batch-oriented image operations fit into a seller workflow, the most useful starting point is this MerchLoom guide on product photo automation.
Manual Cropping for One-Off Design Tasks

When you only need one polished asset, manual editing still has a place. Photoshop, GIMP, Canva, and Preview all let you carve out a circle, clean up the background, and export a neat result. The advantage is control. You decide exactly what sits in the frame, which matters when a product has a handle, logo, or detail that needs to stay centred.
The basic manual sequence
The common workflow is straightforward. Create a circular selection, usually by holding Shift so the shape stays perfectly round, then invert or remove the background and refine the edge. In GIMP, you also need to add an alpha channel first, then use the Ellipse Select tool with the Fixed option set to 1:1 to guarantee a true circle, not an oval, as described in GIMP's circle-image tutorial.
That extra alpha step matters because it gives you transparency instead of a hard background block. Without it, the circle may look fine inside the editor but fail when you place it on a coloured product page or a marketplace banner.
Where manual editing breaks down
Manual work is slow because every image needs judgement. One swatch may need a tighter crop, another may need more headroom, and a third may need a subtle reposition to avoid clipping. That flexibility is useful for a single marketing asset, but it's a weak fit for a full catalogue where the same rules need to be applied again and again.
A manual circle crop is fine for a feature image, but it gets expensive in attention, not just time, when the list turns into a batch.
If you're editing in Photoshop and want a more detailed companion workflow, this scaling guide from MerchLoom is a practical reference point for keeping assets aligned before the crop.
Using Code to Display Circular Images on Your Website
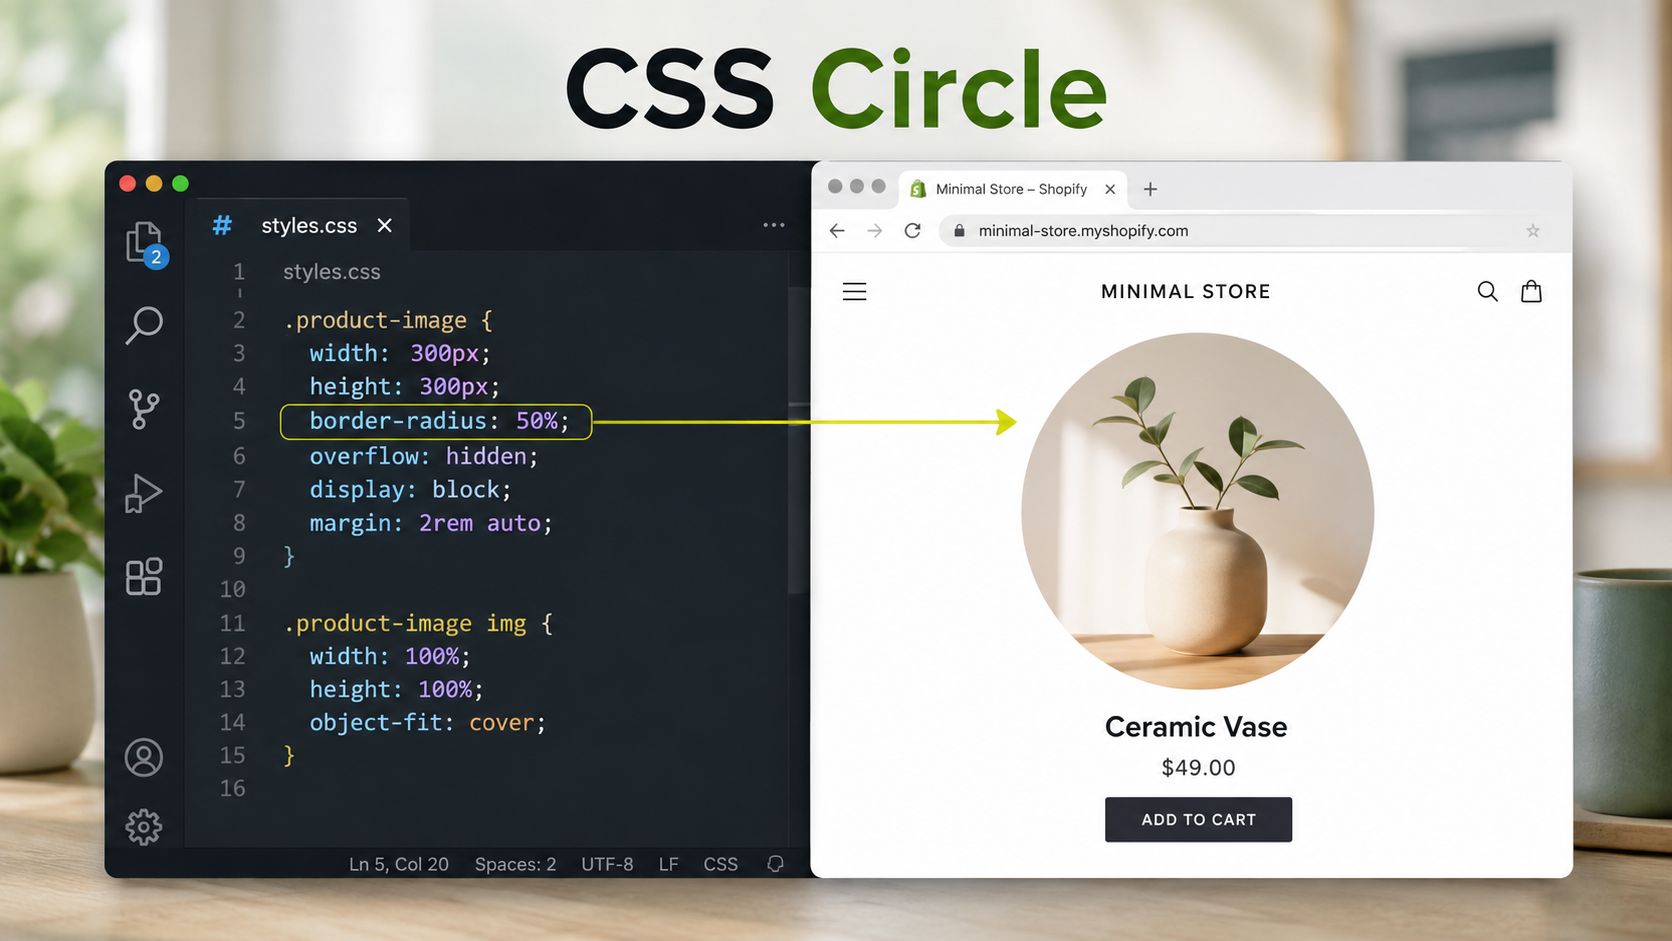
CSS is the cleanest option when you only need the image in circle on your own site. It doesn't alter the file, so you can keep the master image intact and let the theme handle the presentation. That's useful for profile pictures, category icons, team avatars, and circular product badges inside a storefront.
The key rule is simple. Set the image to width: 100% and height: 100%, hide overflow on the circular container, and use object-fit: cover so the image fills the frame without getting stretched, as explained in this CSS circle image guide.
Why CSS is efficient but limited
CSS is non-destructive, which means your original file stays usable everywhere else. That makes it ideal for web layouts that need a consistent round display without creating a separate circular export. It's also easy to maintain because one stylesheet rule can apply across many cards or tiles.
The limitation is just as important. CSS only controls display on your website. It doesn't create a standalone circular file you can upload to Amazon, Etsy, or eBay. If the marketplace needs an actual image asset, CSS can't solve that.
For web teams thinking about speed and page presentation, Jimmy Clemmons' article on website image optimisation is a useful companion because circular presentation still has to load fast and render cleanly.
If the circle exists only in the browser, treat it as a presentation layer, not as your master asset.
For teams using cloud-based image orchestration, this MerchLoom page on AI image workflow with Cloudinary helps connect front-end display rules with upstream image handling.
Doing this for a whole catalog?
MerchLoom runs background removal, upscaling and AI editing across every product photo you have — one prompt, whole batch.
Try MerchLoomAutomating Circular Images for Entire Product Catalogues
A catalogue team can't afford to hand-finish every swatch, badge, and avatar. Once the request moves from one image to hundreds, the work stops being design and starts becoming operations. The cleanest way to handle that is a pipeline that applies the same sequence to every file, so the source, crop, mask, export, and destination all follow the same rules.
That pipeline usually starts with source preparation, then a square crop or square canvas, then a circular mask, then the right export format. The point is not just speed. It's consistency across all the places an asset needs to live, including store pages, marketplaces, and ad placements.

Why batch logic matters more than single-edit tools
Production pipelines must handle edge cases like aspect ratio and transparency. Many online tools don't explain that a perfect circle requires a square source image or how to preserve clean edges with PNG or WebP exports, which leads to rework when assets get reused across different channels, according to PixelPanda's round-corners workflow notes. That's the part most sellers feel later, when a file looks fine in one place and breaks in another.
Batch automation is the answer because it standardises source preparation and export settings. In a real product workflow, that means one consistent rule for swatches, another for badges, and another for profile-style graphics, rather than a dozen hand-edited exceptions.
Where a workflow tool earns its keep
A tool like MerchLoom is built around that collection-first model. Instead of opening files one by one, you describe the result you want in plain English, then run it across a whole image set. That matters for sellers managing seasonal collections, replenishment photos, or marketplace-specific variants, because the output stays aligned even when the catalogue changes.
If you're comparing different generations of image tooling and thinking about where AI is headed next, UGC Copilot's look at the future of AI image generation is a helpful perspective, especially if your pipeline needs to keep improving without adding manual labour.
For a more operational view of batch editing, this MerchLoom article on AI batch image editing fits naturally with the catalogue-scale approach.
Best Practices for Quality and Platform Compliance
A good circle crop starts long before the final mask. If the source image is soft, off-centre, or shaped like a rectangle with too much empty space, the result will look amateur even if the circle itself is mathematically perfect. The best practice is to standardise the source before you worry about the crop.
A practical quality checklist
- Start square first: A square source gives you the cleanest circular result and avoids odd framing later.
- Keep transparency in mind: If the circle needs to sit on different backgrounds, export with transparency.
- Use PNG when transparency matters: JPG won't preserve the alpha channel, so the transparent areas flatten into a solid block, as noted in Adobe's circle crop guidance.
- Make the subject the centre of attention: For badges, portraits, or swatches, check that the important detail isn't clipped by the edge.
- Check the same asset in multiple places: A circle that looks polished on one page can feel cramped on another if the surrounding layout changes.

Platform fit changes the decision
Marketplaces don't all treat imagery the same way. Amazon listing environments often demand clean, compliant presentation, while Shopify themes may rely on square or round tiles depending on the layout. Etsy shops can also be unforgiving when thumbnail crops are too tight, because the smaller view has to carry the whole visual message.
That's why a circular asset should be tested in context, not just in isolation. A badge that works on a white background may disappear on a busy theme, while a transparent PNG can blend cleanly across different colour treatments. For storefront structure and layout decisions that affect how the circle appears on product pages, SelfServe's guide to Shopify product page optimisation is a useful companion read.
For teams mapping these rules to Amazon-specific listing work, this MerchLoom reference on Amazon product image requirements is worth keeping nearby.
Quality rule: if the crop depends on a transparent background, the export format is part of the design decision, not an afterthought.
Choosing the Right Method for Your Business
The right method depends on scale. Manual editing is still the best choice for a single polished asset. CSS is the smartest choice when you only need a circular display on your own website. But if you're running a catalogue that changes constantly, the workflow has to be automated or you'll keep paying the same attention tax over and over.
That's the strategic split. Single-image tools solve a local problem. Batch systems solve an operational one. If your business lives in product launches, seasonal refreshes, variant swatches, and marketplace uploads, then thinking in workflows is the only way to keep the output consistent.
For a practical lens on organising all those assets before and after the crop, MerchLoom's product image library management guide is a solid next read.
If you're ready to stop redoing the same crop decisions across your catalogue, try MerchLoom on a real batch and see how a workflow-based approach handles circular images, transparency, and consistency across the whole set.
Stop editing product photos one at a time
Upload your catalog or connect your store. Describe the result once. MerchLoom does the rest.
Try MerchLoom