
WooCommerce Product Image Optimization: Scale Your Store
Learn WooCommerce product image optimization for large catalogs. Our 2026 guide covers batching, compression, CDNs, & SEO to speed up your store & boost sales.
If you're managing your own WooCommerce catalogue, image work usually becomes messy in the same way. Product photos arrive from a phone, a photographer, a supplier, or an old Dropbox folder. Some are square, some are portrait, some have grey backgrounds, some have shadows cut off, and half of them are much larger than they need to be. Then they get uploaded anyway because the store needs to go live.
That approach creates two problems at once. The site gets slower, and the catalogue starts to look inconsistent. Customers notice both. They may not describe it as an image workflow problem, but they feel it as friction on category pages, weak thumbnails, awkward zooms, and product pages that don't feel trustworthy.
Good WooCommerce product image optimization starts long before a plugin touches the file. The stores that stay organised treat images as a repeatable production workflow, not a cleanup job after upload. That matters even more when you're handling hundreds of SKUs and trying to keep WooCommerce, Amazon, Shopify, Etsy, and ad creatives aligned without rebuilding each image by hand.
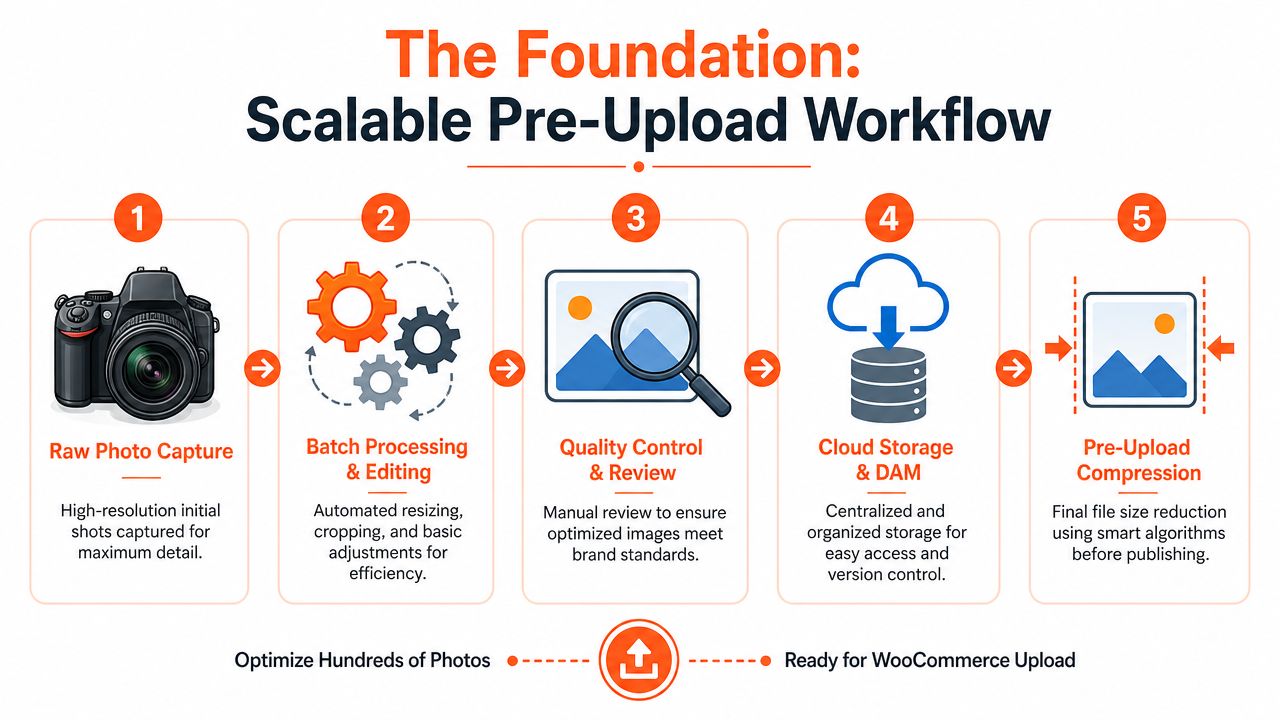
The Foundation A Scalable Pre-Upload Workflow
The fastest way to waste time is to optimise images one by one after they're already inside WooCommerce. By then, you're fixing the same issue in multiple places. You're also forcing WooCommerce to generate derivatives from files that may have the wrong crop, the wrong background, or the wrong dimensions to begin with.
A better system starts upstream. Collect raw photos, standardise them in batches, review them once, then upload only approved versions. For WooCommerce stores, the optimal width for standard product images is 800px to 1000px, while detailed images that need zoom should be up to 2000px. The same guidance also notes that maintaining uniform dimensions across the catalogue is critical because over 60% of shoppers browse on mobile devices, where inconsistent image sizes hurt visual appeal and user experience (LD Ninjas on WooCommerce image optimisation).
Build one master standard
Start with a simple rule set for the whole catalogue. Decide your base canvas, crop style, background treatment, and output rules before any upload happens.
A practical baseline looks like this:
- Main catalogue images: use one consistent shape across category and search pages so cards line up cleanly.
- Standard product width: keep most products in the 800px to 1000px range if they don't need extreme zoom.
- Detail shots: prepare separate close-up images up to 2000px when stitching, materials, or texture help sell the item.
- Background policy: choose white, transparent, or a branded neutral background and stick to it by product family.
Practical rule: if a buyer can see three products side by side, those images should feel like they came from the same shoot, even when they didn't.
That consistency is where catalogue-scale workflows win. A batch of handbags, mugs, or T-shirts should be processed as a collection, not as isolated files.
Solve platform needs before WooCommerce sees the file
Most store owners don't sell in one place only. The same product may need a white background for Amazon, a square crop for Shopify, a taller lifestyle variant for social, and a cleaner thumbnail crop for WooCommerce. If you try to create those versions manually after upload, you'll end up duplicating labour and introducing visual drift.
Batch systems prove their worth. You can organise raw files by collection, then run one pass for cleanup and framing, another for platform-specific crops, and a final pass for approved export sizes. For sellers who also need creative variants, it helps to look at resources on AI tools for social media assets so those off-site requirements don't hijack the store workflow.
For large catalogues, the operational question isn't “Can I edit this image?” It's “Can I repeat this across 300 images without introducing exceptions?”
Use a pipeline, not a folder of random edits
A clean workflow usually follows the same order:
- Ingest: gather files from storage, photographer drops, supplier exports, or previous listings.
- Normalise: fix orientation, crop family, and visual framing.
- Clean: remove distractions, standardise background, correct obvious colour issues.
- Create variants: produce marketplace, store, and promotional versions from the same approved base.
- Export: send only final, compressed, named assets into WooCommerce.
If you want a good model for thinking about automation upstream of the CMS, this guide on e-commerce image automation workflows is useful because it frames the process around batches rather than single edits.
One more point gets ignored too often. Background removal and reframing aren't just design tasks. They're production tasks. For sellers handling collections, pre-upload batch work is where speed, consistency, and cost control come from. The biggest mistakes on WooCommerce stores usually happen because teams upload first and standardise later.
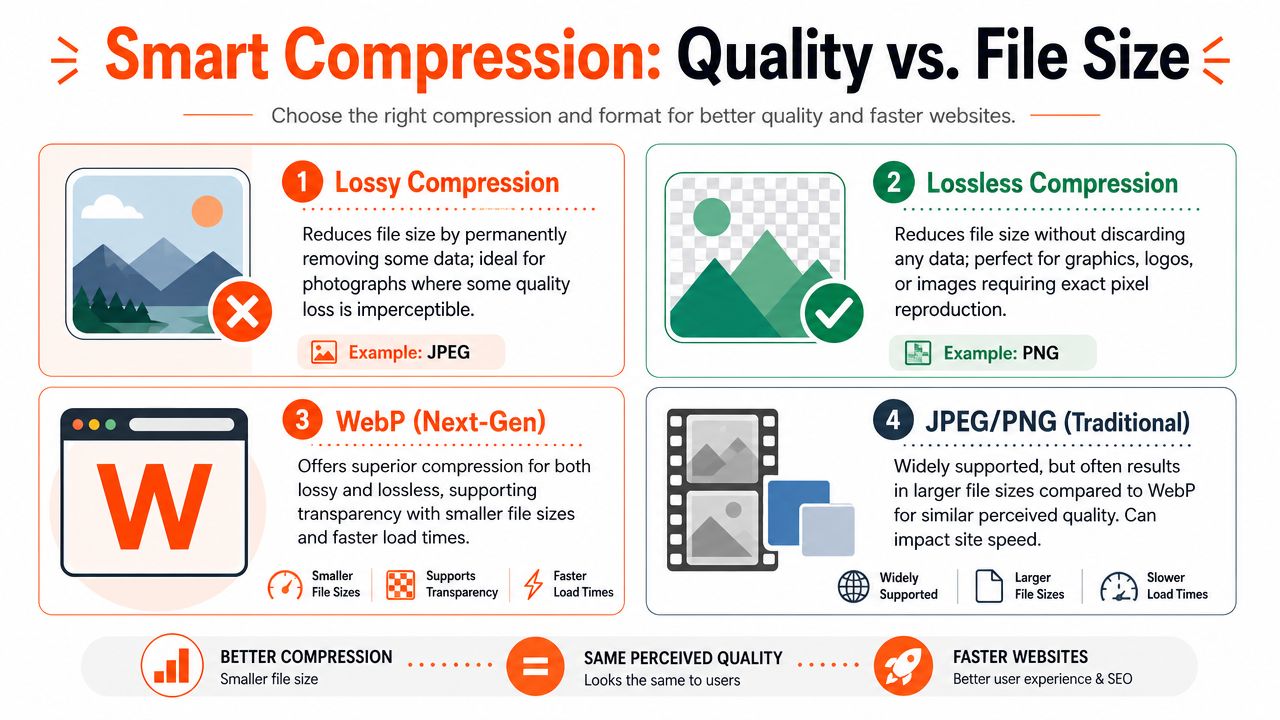
Smart Compression and Next-Gen Formats
A common failure point shows up after the photo shoot, not during it. A team receives clean source images, uploads them in bulk, lets WordPress generate every derivative, then tries to claw back performance with a plugin. By then, the heavy files have already spread across product pages, thumbnails, and mobile views.
Compression works best as an upstream batch step. Set the export rules before files ever reach WooCommerce, and every downstream image starts from a lighter, cleaner source.
Optimise for buying confidence, not camera fidelity
Shoppers are not judging your RAW files. They are judging whether the product looks trustworthy, accurate, and worth the price. That changes how compression should be handled.
For apparel, buyers need fabric texture and colour that feels believable. For cosmetics, they need clean packaging edges and readable labels. For homeware, surface finish often matters more than microscopic detail. The right export keeps those signals intact and removes weight the browser does not need.
The practical format split looks like this:
| Format | Best use | Trade-off |
|---|---|---|
| JPEG | Product photos without transparency | Small files, but lossy compression can create visible artefacts if pushed too hard |
| PNG | Transparency, logos, line art, interface graphics | Cleaner edges, but usually too heavy for standard product photography |
| WebP | Most storefront image delivery | Better compression efficiency, though you still need to test theme support, backups, and fallback handling |
For a broader overview of format and size choices, this guide to image optimization for web performance is a useful reference.
Compress the approved master before WooCommerce creates variants
Workflow order is critical at this stage. If you upload oversized files first, WooCommerce will generate thumbnails, gallery sizes, and other derivatives from those oversized originals. Every mistake gets multiplied.
A better process is simple. Approve the image, export the master at the right dimensions for your store, compress it once, then upload that version. WooCommerce can still create the sizes it needs, but it starts from a file that is already controlled.
WordPress also applies its own compression on upload. That can help, but it should be treated as a safeguard, not the main strategy. Store owners with larger catalogues save more time by setting export presets in the editing stage and applying them consistently across batches.
Repeated JPEG saves create another avoidable problem. Each export can soften edges, flatten texture, and add noise around product outlines. If your catalogue team edits yesterday's export instead of the approved master, image quality slips with every revision. This explanation of JPEG compression artefacts in product images shows the issue clearly.
Good compression should be invisible to the shopper and easy to see in page weight, Core Web Vitals, and conversion reports.
Later in the workflow, a visual demonstration helps more than theory alone:
What holds up in production
Stores with growing catalogues usually get better results from a few fixed rules than from endless manual judgment.
What works:
- Export one approved master per image use case: main product, zoom image, banner, or marketplace asset.
- Use JPEG for standard photos, PNG only where transparency or hard edges matter, and WebP where your stack supports it cleanly.
- Apply compression once at export: avoid opening and re-saving delivered JPEGs.
- Review samples by product type: glossy packaging, textiles, and jewellery break differently under compression.
What wastes time or hurts conversion:
- Uploading camera originals and expecting plugins to sort it out later
- Saving every asset as PNG regardless of content
- Using one compression level for every category
- Letting multiple team members export with different settings
Compression is part of the production system. Handle it upstream, in batches, with fixed rules, and WooCommerce becomes much easier to keep fast as the catalogue grows.
Configuring WooCommerce for Perfect Image Display
Once the files are prepared properly, WooCommerce needs to display them consistently. Achieving this consistency proves a hurdle for many stores. The source images are fine, but thumbnails look soft, category cards crop badly, or regenerated images suddenly lose sharpness.
Why thumbnails go wrong
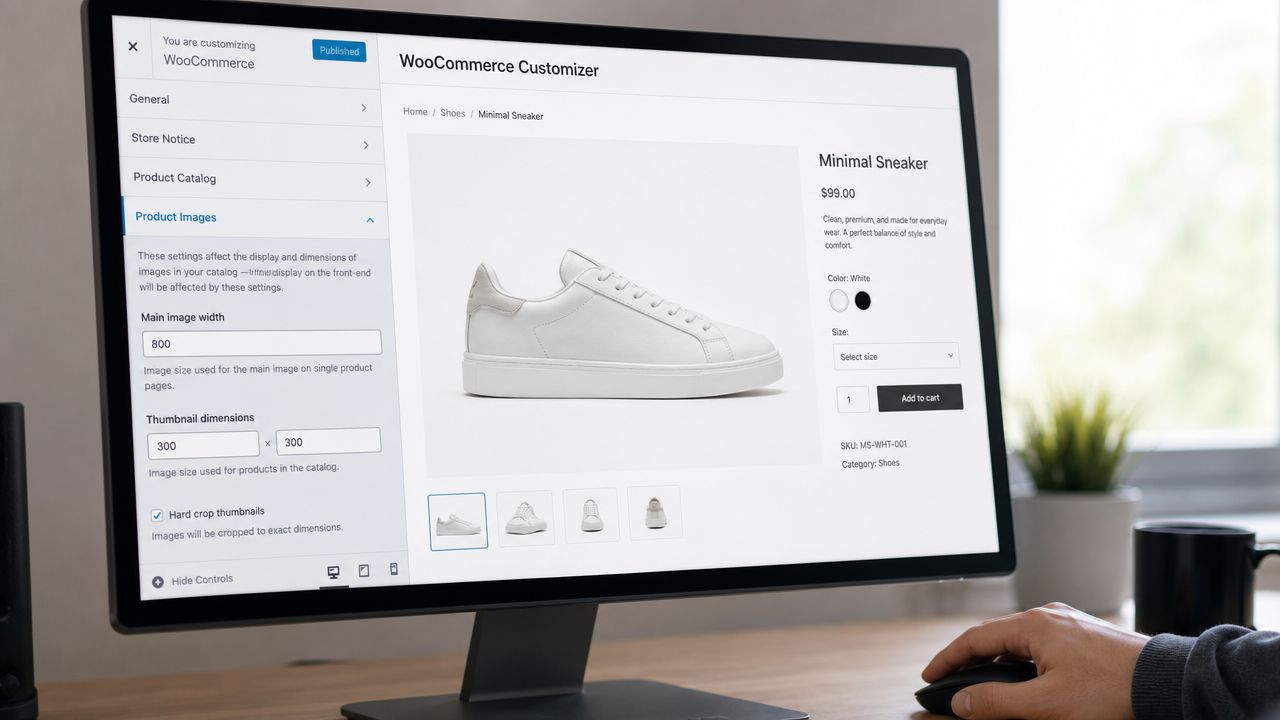
WooCommerce creates multiple versions of an uploaded image for different placements across the store. If your source file is inconsistent, every derived version inherits the inconsistency. If your crop rules don't match your actual product photography, the grid starts looking uneven fast.
There's also a more specific issue that keeps surfacing in Elementor-based stores. The question of blurry thumbnails after site regeneration remains badly handled in most tutorials. According to a discussion cited for this issue, 52% of California-based WooCommerce stores using Elementor experience thumbnail blur post-regeneration, and the common advice often misses root causes such as EXIF data stripping and DPI mismatch (Elementor thumbnail blur discussion).
That doesn't mean every blurry image is an Elementor fault. It means theme-level tweaking often isn't enough.
A practical setup checklist
Store owners usually need to review three areas inside WooCommerce and the theme stack:
- Thumbnail dimensions: align these with the actual way products are framed, not with a default that worked for another catalogue.
- Cropping behaviour: decide whether hard crop or uncropped display better suits your product category.
- Regeneration workflow: only regenerate after you've fixed the source and confirmed the target dimensions.
A clean process looks like this:
- Set catalogue image behaviour based on how products appear in shop and category grids.
- Check a few representative products, not just one hero SKU.
- Regenerate thumbnails only after settings are final.
- Clear caching layers so you're not reviewing stale derivatives.
- Re-check on mobile, where crop mistakes are more obvious.
If category pages look uneven, the problem is usually upstream framing or source-image inconsistency, not just the WooCommerce setting itself.
Fix the source before you fix the display
Many teams lose hours at this stage. They regenerate thumbnails over and over from the same flawed file set. That only creates fresh versions of the same problem.
When a store is plagued by blur, review these first:
| Problem | Likely cause | Better fix |
|---|---|---|
| Soft thumbnails | Source file already compressed too hard | Replace with cleaner master export |
| Inconsistent grid crops | Mixed aspect ratios | Rebuild a uniform source set |
| Regeneration still looks poor | Metadata or DPI mismatch issues | Standardise export settings before upload |
| Detail page sharp, grid soft | Thumbnail settings too restrictive | Revisit thumbnail dimensions and crop logic |
Doing this for a whole catalog?
MerchLoom runs background removal, upscaling and AI editing across every product photo you have — one prompt, whole batch. Try 2 batches free, no signup.
Try it freeFor sellers rebuilding legacy catalogues, this guide on scaling images in Photoshop without introducing avoidable issues can help when you need to repair source assets before putting them back through WooCommerce.
The key is control. WooCommerce isn't there to rescue chaotic files. It works best when the upload set is already deliberate.
Accelerating Delivery with CDNs and Lazy Loading
Even a well-prepared image can still arrive slowly if delivery is handled badly. Store owners often spend time compressing files, then leave them on an origin setup that makes every shopper wait longer than necessary. That's a technical problem, but it has a commercial outcome. Slow category pages kill browsing momentum.
A CDN should be treated as basic infrastructure. It places copies of your images closer to the shopper so the browser doesn't have to fetch every asset from a single distant server. For image-heavy stores, that reduces friction on product grids, gallery views, and mobile sessions where connection quality varies throughout the visit.
Why delivery matters as much as file size
There's a useful operational detail here. Using white backgrounds for WooCommerce product images reduces file size by 15–25% compared to multi-coloured backgrounds, and enabling Jetpack's Site Accelerator to serve images from local edge servers can reduce latency by 40–50% for users (WooCommerce on fast-loading product photos).
That combination matters because it ties presentation and delivery together. Cleaner product shots aren't only visually neater. In many cases they're lighter and easier to compress efficiently.
Lazy loading is not optional on image-heavy stores
Lazy loading delays offscreen images until the shopper scrolls to them. On a category page with dozens of products, that means the browser can focus first on what's visible. The store feels faster because it is prioritising the right assets.
Used properly, lazy loading helps in three places:
- Long category pages: first viewport content appears sooner.
- Product galleries: secondary images don't compete with the main product view on first load.
- Large catalogues: shoppers can browse deeper without every tile loading at once.
If you want a WordPress-focused walkthrough of implementation thinking, these expert WordPress speed techniques for lazy loading are a solid complement to the broader image workflow.
A fast store doesn't load everything immediately. It loads the right things first.
What to watch for
Delivery optimisation can create its own problems when handled carelessly. Background images hidden in theme components may bypass the same logic as media-library images. Third-party apps may inject heavier visuals than your core catalogue uses. Hotlinked assets and off-platform graphics can also undermine the consistency you built upstream.
A simple review table helps:
| Area | Good sign | Warning sign |
|---|---|---|
| CDN setup | Product images are served consistently and quickly | Some media still loads from scattered sources |
| Lazy loading | Offscreen grids don't block the first render | Main product image loads too late or flickers |
| Theme elements | Banners and category art follow the same optimisation rules | Decorative assets are heavier than product photos |
| Mobile browsing | Scroll feels smooth through product listings | Jank appears when images pop in late |
If you're cleaning up source material before delivery tuning, an HD photo conversion workflow can help when old assets are too weak for modern display requirements and need controlled repair before web export.
Image SEO That Drives Traffic and Sales
A common WooCommerce pattern goes like this. The team spends time compressing images, sets up delivery properly, then uploads files called IMG_4837-final-final.jpg with blank or generic alt text. The store stays fast, but the catalogue loses search context at the last step.
Image SEO works best as part of the same upstream batch workflow used for cropping, export, and upload prep. On large catalogues, that is the only approach that stays consistent once suppliers, freelancers, and internal teams are all feeding images into the same store.

File names and alt text should describe the product, not your workflow
Search engines cannot infer much from production shorthand. Buyers cannot either, if those same labels feed marketplaces, shopping ads, or asset exports later.
Use file names that match how a shopper would identify the item, then write alt text that describes what is visibly in the frame. Keep it plain. Keep it specific. Skip keyword stuffing.
Good examples:
- File name:
brown-leather-crossbody-bag.jpg - Alt text:
Brown leather crossbody bag with gold clasp
Weak examples:
- File name:
DCM0092-new-2.jpg - Alt text:
bag image
Google's image SEO documentation also supports this direction. It recommends descriptive file names, useful alt text, and clear surrounding context so images are easier to understand and index (Google Search Central image SEO guidance).
Build naming conventions by category before upload
Ad hoc naming breaks down fast once the catalogue grows. A supplier sends one format, your photographer uses another, and a merchandising assistant uploads whatever came in that morning. Six months later, search visibility is uneven and no one wants to clean up media filenames inside WordPress.
Set a naming rule by product type and apply it before anything reaches WooCommerce. That keeps image SEO tied to the source asset, where it belongs.
| Product type | File naming pattern | Alt text pattern |
|---|---|---|
| Apparel | colour-product-type-angle | colour + garment + feature |
| Home goods | material-product-type-size | material + item + visible detail |
| Beauty | brand-product-type-variant | product name + shade or size |
| Accessories | colour-material-item | colour + material + form factor |
This also saves work outside image search. The same product language often carries into titles, bullet points, structured data, and feed copy. If your team is scaling catalogue text as well, AI-assisted workflows for product description generation can help keep wording aligned with the way products are named visually.
The strongest image SEO usually looks like disciplined catalogue management.
Connect image discoverability to merchandising context
File names and alt text matter, but they are only part of the picture. Search engines also look at the page context around the image. That includes the product title, visible copy, structured data, and whether the image matches what the page is selling.
In practice, this means the upstream workflow needs one final QA pass before upload. Check whether the exported image name matches the product slug. Check whether the alt text reflects the selected variant. Check whether the primary image supports the main keyword theme of the page instead of showing a vague lifestyle crop that hides the actual product.
A simple checklist keeps this manageable:
- Descriptive filenames: rename assets before upload.
- Useful alt text: describe the product and visible attributes clearly.
- Primary image relevance: lead with the clearest sellable view, not the most artistic one.
- Structured data and sitemaps: make sure key product imagery can be discovered.
- Variant accuracy: match colour, size, or finish references to the image shown.
- Mobile review: confirm that the image still communicates the product well on a smaller screen.
Stores that get results from image SEO usually do one thing well. They treat it as part of the batch production process from raw photo to live product page, not as cleanup inside a plugin after the catalogue is already online.
Auditing and Maintaining Your Image Performance
Image performance drifts. New products get rushed in. A supplier sends oversized PNGs. Someone uploads a lifestyle image straight from a design file. A theme update changes a crop. Three months later, category pages are heavier and no one can say exactly when that happened.
That's why WooCommerce product image optimization needs a maintenance routine, not just a setup phase.
Run a simple quarterly audit
You don't need an enterprise performance programme. You need a repeatable review with a short checklist and a sample of real pages.
Check these page types every quarter:
- Homepage or landing page: watch for banners, featured products, and promotional graphics.
- Category pages: these usually reveal the biggest image volume problems.
- A few product pages: especially products with galleries, zoom images, or variation swatches.
- Mobile views: image issues often show up first on smaller screens and weaker connections.
Use common auditing tools such as PageSpeed Insights or GTmetrix to identify oversized images, incorrectly sized renders, and loading behaviour problems. The goal isn't to chase a perfect score. The goal is to catch image regressions before they affect shopping experience.
Focus on patterns, not one-off anomalies
A single slow page can be a content issue. A pattern across categories is usually a workflow issue. That distinction matters because the fix is different.
Look for recurring signs like:
| Signal | Usually means |
|---|---|
| Large images on multiple templates | upload standards have slipped |
| Blurry thumbnails across one product family | source assets or crop rules are inconsistent |
| Heavy mobile pages | decorative or offscreen images aren't being handled well |
| Uneven card layouts | catalogue dimension standards aren't being enforced |
When you find a pattern, fix the rule, not just the file. If ten products are wrong for the same reason, manual cleanup is the slowest possible response.
Keep a live intake standard
The easiest way to preserve performance is to control what enters the library. Every new batch should pass the same intake checks used during the initial cleanup.
A practical intake gate includes:
- Confirm approved dimensions by product type.
- Check format choice against actual image needs.
- Verify naming and alt text before or during upload.
- Reject background styles that break catalogue consistency.
- Spot-check category pages after publishing new ranges.
This is the difference between a tidy store and a store that needs constant rescue. Maintenance isn't glamorous, but it protects the work you already paid for in photography, editing, and merchandising.
If you're tired of rebuilding the same product images one file at a time, MerchLoom is worth a look as an upstream workflow layer. It lets sellers import images from storage or commerce systems, process full collections through chained AI pipelines, create cleaner product visuals, generate lifestyle and ad variants, and finish assets with Clarity upscaling before publishing to the store. For WooCommerce owners managing a real catalogue, that batch-first approach is often the difference between an organised image system and a permanent backlog.
Stop editing product photos one at a time
Upload your catalog or connect your store. Describe the result once. MerchLoom does the rest.
Try it free — no signup