
Fixing JPEG Compression Artifacts: An E-commerce Guide
Learn to spot, fix, and prevent JPEG compression artifacts in your product photos. A practical guide for e-commerce sellers on managing image quality at scale.
You upload a product photo that looked clean on your desktop. On the live listing, the white background has turned patchy, the product edge looks fuzzy, and the label text has that cheap, smeared look buyers notice even if they can't name it.
That problem shows up all over catalogue work. A seller edits in one app, exports from another, crops again for a marketplace, then downloads the platform copy later because the original is nowhere to be found. By the time that image lands on Amazon, Shopify, Etsy, or a reseller marketplace, it may have been compressed multiple times. The result is a listing that feels lower quality than the product is.
The technical name for that damage is JPEG compression artifacts. In practice, it means blocky backgrounds, haloed edges, muddy detail, and colour that no longer feels trustworthy. For a single family photo, that might be annoying. For an online store with hundreds of SKUs, it becomes an operations problem. Inconsistent image quality makes a catalogue look disorganised, weakens brand presentation, and creates more manual cleanup work than can be readily absorbed by teams.
The Hidden Quality Killer on Your Product Listings
A common pattern in e-commerce goes like this. The original shoot was fine. The lighting was fine. The retoucher did a decent job. Then someone exported the final files as JPEGs too early, reused those JPEGs for every downstream task, and slowly turned good source material into tired-looking listing images.
This is why teams get confused about where quality went wrong. They blame the camera, the marketplace, or the resizing step. Often the issue is that the file has already lost information before it reaches the final listing.
On product pages, these flaws don't always appear as obvious “pixelation” in the way people imagine it. Sometimes the first sign is subtler:
- White backgrounds stop looking clean and start showing patches or block boundaries.
- Product edges lose confidence so cut-outs look less premium.
- Printed text and logos soften until packaging looks slightly off.
- Texture gets flattened on fabric, leather, ceramics, and food packaging.
Practical rule: If the product photo feels cheap on the listing, check the file history before you touch the lighting or sharpen the image again.
This matters more in batch operations than in one-off editing. A casual user can repair one image by hand and move on. A seller with seasonal drops, variant listings, and multiple sales channels needs a process that keeps quality stable across a full collection.
The main mistake is treating JPEG damage as a single-image defect. It's usually a workflow defect. Once you see that clearly, the fixes become much more practical.
What Are JPEG Compression Artifacts
JPEG compression artifacts are the visible errors that appear when JPEG throws away image information to reduce file size. The most obvious ones are 8×8 block boundaries and ringing near high-contrast edges, because JPEG stores image content in blockwise DCT coefficients and removes high-frequency detail through quantization. When compression gets aggressive, neighbouring blocks stop matching smoothly and edges pick up light or dark halos, especially in flat areas such as white backdrops or simple studio backgrounds, as described in Wikipedia's overview of compression artifacts.
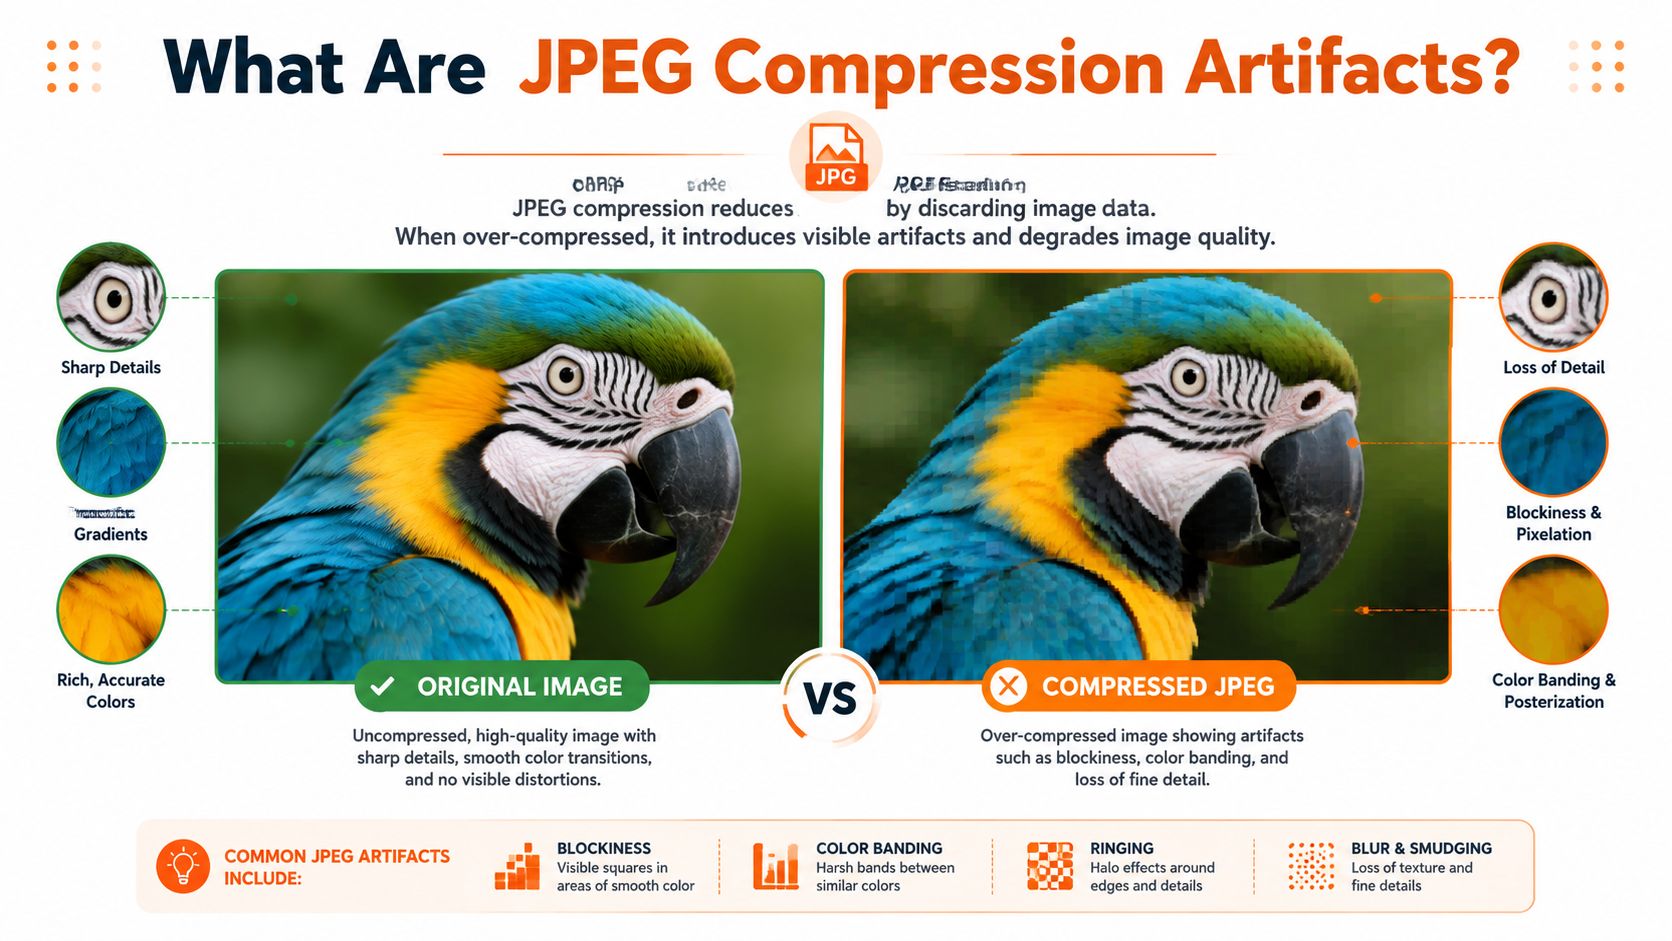
Blockiness in smooth areas
This is the classic checkerboard look. You'll usually spot it first on backgrounds, shadows, or any area that should look calm and even.
On a product shot, blockiness makes a white background look dirty and uneven. It also makes soft gradients, like a subtle shadow under a shoe or bottle, look synthetic instead of photographic.
Ringing around hard edges
Ringing looks like a faint halo or fuzz around contrast transitions. Think black text on white packaging, the edge of a handbag against a light backdrop, or jewellery against a clean studio setup.
This is one reason small labels and logos often look worse than the product body itself. JPEG doesn't struggle equally across the whole frame. It struggles most where sharp detail matters.
If you're also troubleshooting size and clarity problems, this guide to image resolution in AI workflows helps separate resolution issues from compression damage. They're related, but they aren't the same thing.
Colour degradation and corruption
Not every artifact looks like obvious squares. Research on JPEG artifact detection looked at pixel-level degradation across YUV and Lab colour channels and used an empirically selected threshold of 0.0015 to locate damage in compressed images. That work separates artifacts into texture and boundary degradation, colour change, and text corruption, which is especially relevant for e-commerce images where labels, product edges, and printed packaging all matter, as detailed in the JPEG artifact detection paper on arXiv.
A quick field guide helps:
| Artifact type | What you see on a listing | Where it shows up first |
|---|---|---|
| Blockiness | Square patterns, broken smooth areas | White backgrounds, shadows, soft gradients |
| Ringing | Halos, fuzzy outlines, edge chatter | Product cut-outs, text, logos, packaging |
| Colour degradation | Strange shifts, uneven transitions, corrupted text areas | Labels, cosmetics, food packaging, printed surfaces |
If a background looks “crunchy” and a logo looks “buzzed”, you're usually looking at compression, not just poor focus.
Why Your Product Photos Look Pixelated
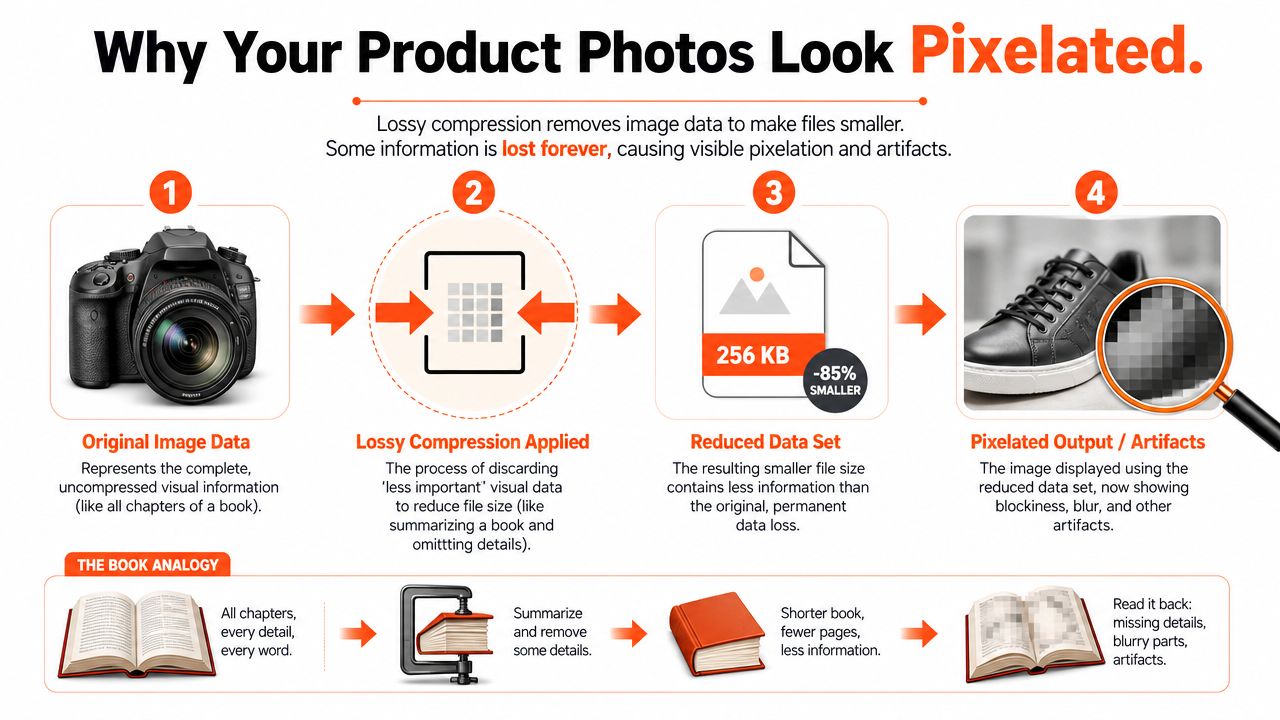
Most sellers run into this after a normal sequence of edits. Crop the image. Save it. Open it later for a white background version. Save it again. Resize for a marketplace. Save again. Download the marketplace copy for social reuse. Save again.
That chain matters because JPEG is lossy. It keeps a smaller, simplified version of the image data and throws some information away. This process is similar to rewriting a full book as a summary. The main point survives, but the nuance doesn't. Then someone summarises the summary.
The technical reason in plain language
JPEG splits the image into 8×8 blocks, transforms the image information, and then quantizes it. That's where detail gets discarded. Fine texture, edge precision, and smooth transitions are the first things to suffer.
For catalogue teams, the important point isn't the math. It's the operational consequence. Every re-save of an already compressed JPEG applies another lossy pass, and those little losses stack up.
One public comparison showed that recompressing a JPEG once, twice, or three times caused very little visible penalty, but by generation five artifacts were noticeable and by generation ten the image was “definitely in trouble,” according to Coding Horror's JPEG recompression comparison.
Where e-commerce workflows go wrong
The damage usually doesn't happen in one dramatic step. It happens in ordinary handoffs:
- Editing from a JPEG export instead of the original
- Downloading marketplace images and reusing them as source files
- Creating platform variants from already-compressed derivatives
- Letting multiple people resize and export in different tools
That's why image operations and listing operations need to stay connected. If your team is moving product data and media across storefronts, tools like API2Cart's product image API technology are useful to review because the way images travel through systems often determines whether teams preserve originals or accidentally keep recycling derivatives.
There's another source of confusion. Sellers often blame pixelation on resizing alone, when the bigger issue is poor source quality before resizing ever begins. If you're resizing in GIMP, this guide on how to resize an image in GIMP is a helpful reference, but resizing won't restore detail that repeated compression already removed.
A blurry export can stay acceptable for a while. A repeatedly resaved JPEG almost never ages well in a busy catalogue.
Manual Fixes for Damaged JPEGs and Their Limits
When one product image is already damaged, manual repair can help. It just doesn't scale well, and it often trades one problem for another.
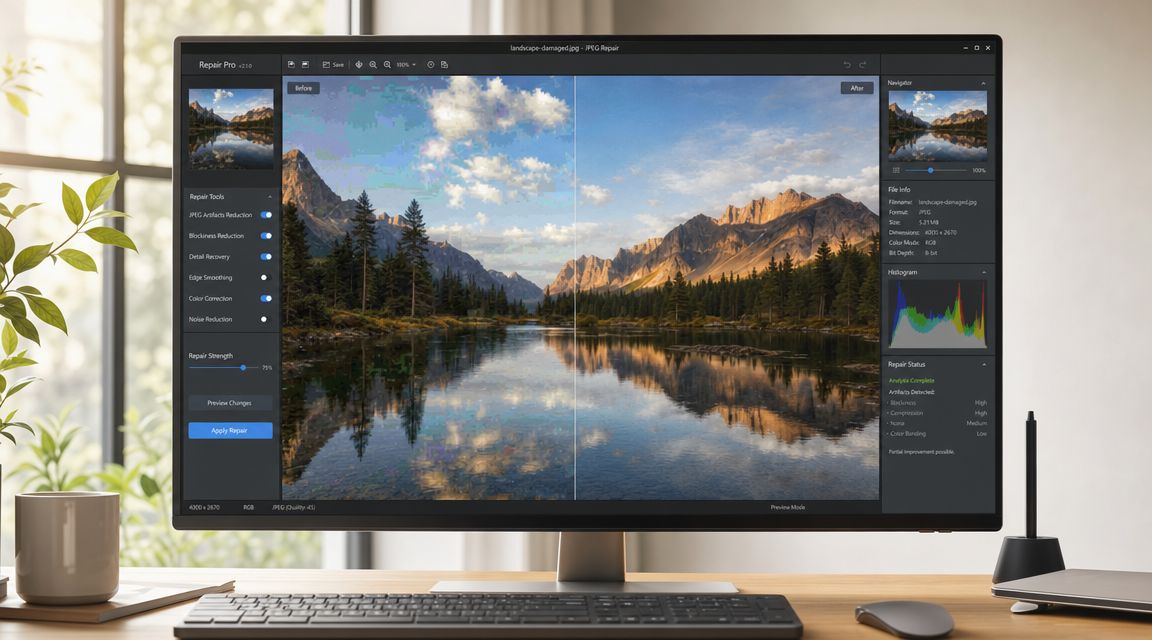
Adobe Photoshop Elements now includes an AI-based JPEG Artifacts Removal action with automatic detection and a fine-tune step, which shows that consumer editing tools are making artifact cleanup easier to access. The harder question is still the one operations teams care about most: how much of the damage is already irreversible, and what happens to product-detail accuracy after heavy compression? Adobe's own documentation on JPEG Artifacts Removal in Photoshop Elements points to the convenience side of the tool, but it doesn't remove the underlying trade-off.
What usually works on a single image
The standard repair playbook is familiar:
- Dedicated artifact removal tools can reduce blockiness and edge chatter.
- Mild noise reduction can hide rough compression patterns in flat areas.
- Selective blur or smoothing can calm a damaged white background.
- Careful sharpening after cleanup can recover some edge presence.
If you're adjusting local sharpness after cleanup, a guide on how to sharpen an image in Photoshop is useful, because sharpening at the wrong point often makes halos and block edges look worse.
What these fixes cost you
Doing this for a whole catalog?
MerchLoom runs background removal, upscaling and AI editing across every product photo you have — one prompt, whole batch.
Try MerchLoomManual repair doesn't really bring lost data back. It mostly disguises the damage. On a listing image, that can be good enough. On a detail-critical image, it can create a new problem.
Here's the trade-off:
| Repair approach | Likely benefit | Common downside |
|---|---|---|
| Artifact removal filter | Cleaner blocks and halos | Fine texture may soften |
| Noise reduction | Smoother background | Printed detail can blur |
| Local retouching | Better-looking hero image | Slow and inconsistent across a catalogue |
| Sharpening after cleanup | Restores edge contrast | Can exaggerate ringing if overdone |
This walkthrough is worth watching because it shows the actual feel of hands-on cleanup rather than promising a magic button:
For one hero image, the time may be justified. For a store with variant colours, alternate angles, and multiple marketplaces, it usually isn't. Manual fixes also introduce inconsistency. One editor smooths too much, another sharpens too hard, and the collection stops looking like it came from one brand.
The more manual rescue work a catalogue needs, the stronger the sign that prevention is the real fix.
The Professional Workflow to Prevent Artifacts Entirely
The cleanest fix is procedural. Keep a lossless master and treat every platform-ready JPEG as a final export, not as a working file.
For production workflows, a practical mitigation is to avoid JPEG-to-JPEG recompression and preserve a lossless master in PNG or TIFF until final delivery, because each re-save applies another lossy quantization pass that compounds blocking and smearing, as explained in this guide to compression artifacts and recompression.

What a stable master-file workflow looks like
A strong catalogue workflow usually follows a simple rule set:
- Start with the highest-quality original available.
- Save a master in a lossless format.
- Do your editing from that master only.
- Export platform-specific JPEGs once, at the end.
- If you need a new variant later, go back to the master, not the JPEG.
That sounds basic, but it solves most recurring quality failures.
Why this matters across marketplaces
Different channels want different crops, dimensions, and presentation styles. Amazon may need a white background. Shopify often needs square consistency. Etsy sellers often want large, clean images that still preserve product texture. If every version starts from the same lossless source, your outputs stay visually aligned.
If every version starts from an older JPEG export, each channel receives a different level of damage. That's when the same candle, shoe, or skincare bottle starts looking slightly different depending on where the buyer sees it.
Teams that already think in systems usually understand this immediately. The image pipeline should be as deliberate as the customer support pipeline or fulfilment workflow. If you're reviewing operational tools more broadly, Solutions for e-commerce customer service is a good example of how structured workflows reduce repetitive work. Product imagery needs the same mindset.
The files that should not be JPEGs
Some image types are especially poor candidates for JPEG as a working format:
- Screenshots
- Text-heavy graphics
- Labels and instruction panels
- Simple graphics with hard edges
Those assets often need pixel-accurate detail. Once compressed too early, they rarely come back cleanly.
Automating Image Quality with AI Batch Processing
The master-file workflow is the right standard. The bottleneck is execution. Most sellers don't have a quality problem because they disagree with the method. They have a quality problem because they're managing too many files, too many formats, and too many destination channels for manual discipline to hold.
Batch automation matters. Not because AI is magical, but because repeatability is. A useful image workflow for e-commerce should take a collection of source files and apply the same sequence every time: background handling, reframing, export logic, destination-specific variants, and quality checks in the right order.
What automation should handle well
For catalogue work, the best automated systems are good at jobs that are repetitive and rule-driven:
- Background preparation for marketplaces that require clean white or neutral presentation
- Reframing and cropping for square storefront layouts and channel-specific aspect ratios
- Colour normalisation so one collection doesn't drift across batches
- Upscaling or restoration for weak source images that still need to be listing-ready
- Consistent export logic so the team isn't manually recreating settings for every batch
This is also where workflow order matters. If an image needs both background removal and enhancement, the sequence changes cost and output quality. In batch operations, a poor order multiplies waste across the whole catalogue.
What automation still can't promise
AI cleanup can improve appearance, but it can't guarantee factual recovery of missing detail. That distinction matters for product accuracy.
If a source image is heavily compressed, a restoration model may produce a cleaner-looking version while inventing texture that wasn't clearly visible in the file. That can still be useful for marketing creatives. It's riskier for detail-dependent listings where buyers rely on weave, grain, print quality, or packaging text.
A lot of current advice ignores that line. Sellers shouldn't.
For creators exploring enhancement workflows, this piece on flawless visuals for creators is a useful companion read because it shows where upscaling fits into broader image improvement, but it's still important to judge outputs by product truth, not just surface polish.
What good batch operations look like in practice
In a practical catalogue environment, teams usually need something like this:
| Workflow need | Manual approach | Automated approach |
|---|---|---|
| Prepare hundreds of source images | Open and export one by one | Process full folders or collections |
| Make channel variants | Rebuild crops repeatedly | Apply preset output rules |
| Keep quality consistent | Depends on editor habits | Depends on a defined pipeline |
| Reuse process next month | Reconstruct from memory | Re-run the same workflow |
That's why process design matters more than any single editing feature. If your operation handles large product sets, a system for AI image workflow automation is usually more valuable than one more manual retouching trick.
In real e-commerce operations, the target isn't perfection on one image. It's dependable quality across all the images that make it to live listings.
Good Images Are a Process Not a Single Fix
JPEG damage tempts people into rescue mode. They start hunting for the one filter, one AI tool, or one export setting that will reverse everything. That usually leads to more inconsistency, more rework, and more time spent rescuing files that should never have become the working source.
The stronger approach is operational. Protect the original. Use lossless masters. Export final JPEGs once. Batch the repetitive work. Review outputs where product truth matters most, especially on labels, edges, texture, and colour-sensitive items.
Research is also moving in that direction. Newer work shows models need compression-aware priors because compression quality affects reconstruction, and a projected 2025 one-step diffusion paper adds a compression-aware visual embedder to guide restoration, signalling a shift from simple denoising to quality-conditioned recovery, as discussed in the ECCV paper on compression-aware restoration.
That's promising, but it doesn't change the day-to-day rule for sellers. Prevention beats repair. Process beats heroics. If your catalogue team is still fixing one product shot at a time, it's worth reviewing how batch product photo editing fits into the operation before the next upload cycle starts.
Good listing images don't come from better last-minute rescue. They come from a workflow that stops damage from entering the catalogue in the first place.
If you're managing product images across collections, marketplaces, and repeated seasonal updates, MerchLoom is built for that reality. It lets sellers run chained AI workflows across full batches instead of repairing files one by one, which is a much saner way to keep catalogue images consistent while protecting quality from source to listing.
Stop editing product photos one at a time
Upload your catalog or connect your store. Describe the result once. MerchLoom does the rest.
Try MerchLoom