
Virtual Outfit Try on: A Practical E-Commerce Guide
Build virtual outfit try on workflows that scale across hundreds of catalog images. Covers 2D, 3D, and AR approaches, batch processing, and integration.
You've got the product photos, the model shots, and the retouch queue. What you probably don't have is time to babysit 800 SKUs one at a time while a buyer wants to know what a jacket looks like on a body, on a phone, and in a marketplace listing that has its own image rules.
That's why virtual outfit try on stops being a flashy feature the moment it hits an actual catalog. For Canadian retailers, it sits on top of a real e-commerce base, with Statistics Canada reporting Canadian e-commerce retail sales of CA$3.91 billion in May 2024, up 2.6% month over month, while broader retail trade reached CA$69.9 billion that same month, which tells you the channel already has enough volume to justify better product visuals (Statistics Canada context and shopping implications). The practical question isn't whether the demo looks clever. It's whether the whole batch can move from raw photos to clean, consistent, marketplace-ready assets without turning into a manual art project.
Why Virtual Try-On Is a Catalog Problem, Not a Novelty
A fashion manager can fall in love with one polished demo in five seconds. Then the operational reality shows up. There are hundreds of untried-on SKUs sitting in folders, each with a different background, different lighting, different crop, and a slightly different product story. The work is not producing one good image. It is producing a coherent batch that still looks like the same brand when it lands on a storefront, a marketplace, and a mobile campaign.
The unit of work is the collection
That is the first shift every team has to make. Virtual outfit try on only matters when it scales across a collection, because the buyer does not experience it as a standalone trick. They see it as part of the product discovery path, alongside size selection, colour swatches, and listing imagery.
The consumer side already reflects that shift. Google's Shopping help pages say eligible users can upload a photo and tap “Try it on” for supported clothing items, and that the experience extends across Shopping surfaces in Search, Shopping, and Images in the U.S. (Google Shopping try-on guidance). That makes the feature part of the discovery stack, not a novelty tucked away in an app menu.
Practical rule: if the workflow cannot handle a whole collection with consistent output, it is not ready for commerce.
A batch-first mindset also changes how you evaluate tools. A single image that looks impressive in a pitch deck can still be useless if it breaks on pose variation, clothing categories, or messy source photos. The question is whether the pipeline keeps working when the seller uploads the next 200 assets, not just the first three.
For teams already cleaning up uploads, a structured asset workflow is the right starting point, and this internal guide on product photo automation fits that reality because it treats images as operational inventory, not one-off creative files.
Fit confidence is not the same as visual realism
The other trap is assuming a flattering preview means a reliable buying signal. Photo-based try-on is good at silhouette and styling, but it is not a perfect fit test. Consumer guides that discuss the feature also point shoppers back to size charts and returns policies, which is a quiet admission that the rendered image and the actual garment still solve different problems (fit-risk gap and practical usage).
That distinction is why the catalog owner should think in terms of fit-risk reduction, not just visual polish. If the preview reduces uncertainty, helps the shopper compare styles faster, and keeps the catalog visually consistent, it has operational value. If it only creates a prettier thumbnail, it has not solved the actual problem.
Choosing Between 2D Overlay, 3D AR, and Fit Simulation
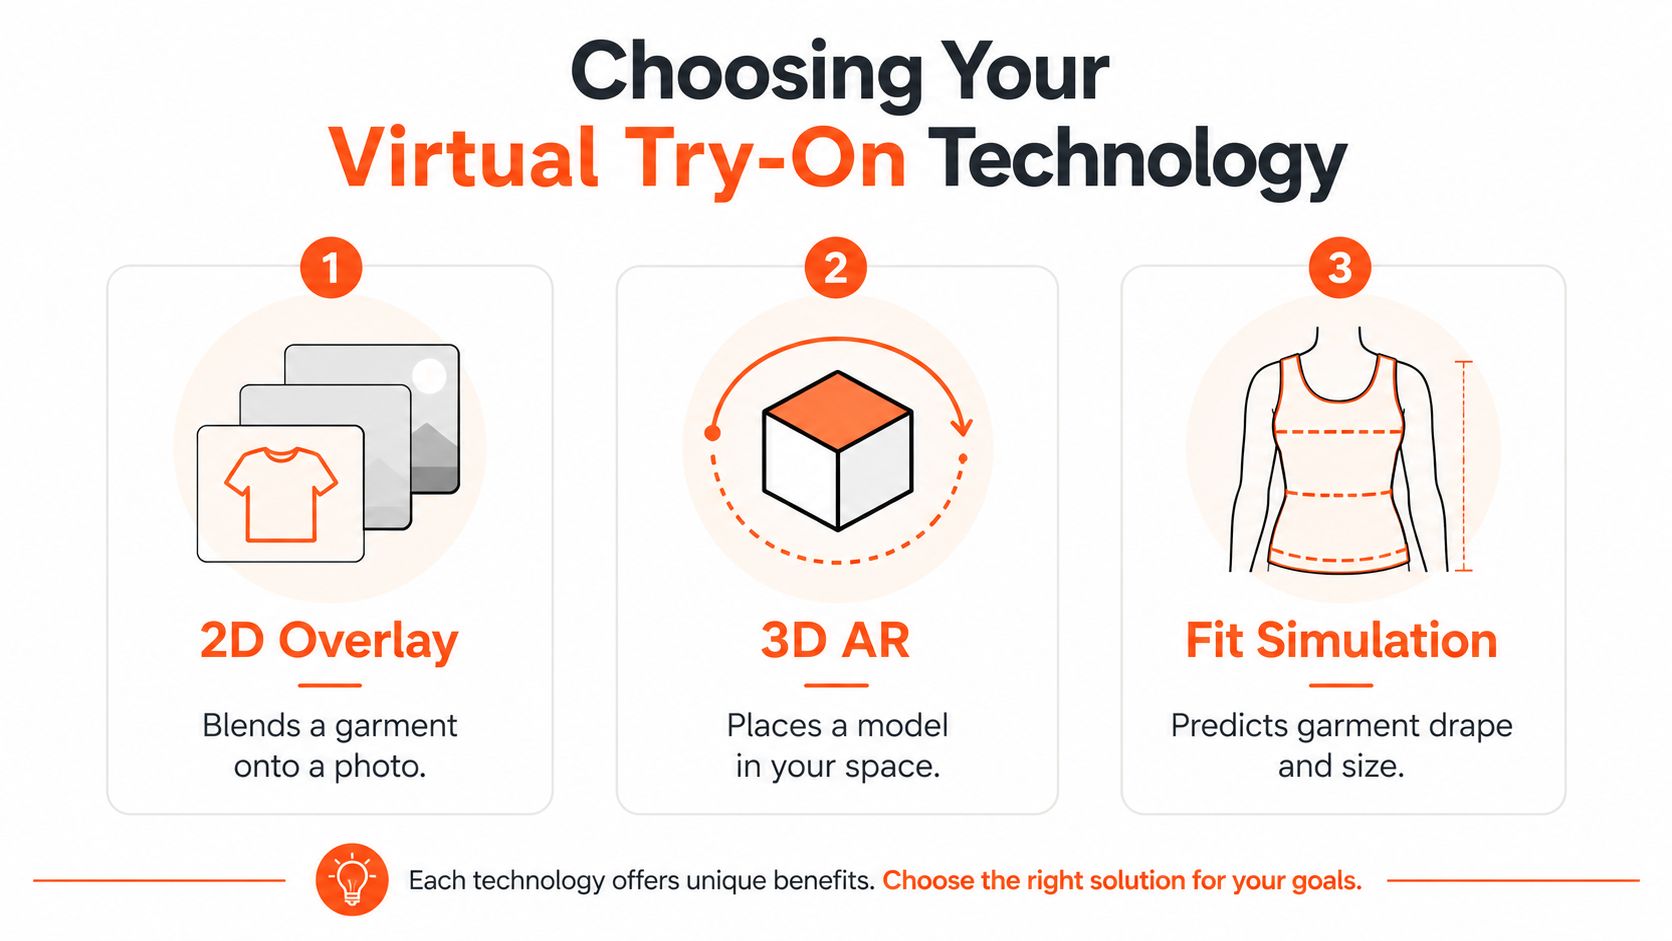
Three different systems get lumped together under “virtual try-on,” but they answer different questions. If you pick the wrong one, you'll spend money generating the wrong kind of output for the wrong channel. The most practical way to decide is to start with your catalog size, your image inventory, and where the buyer makes the decision.
What each approach really does
2D overlay is the workhorse for catalog previews. It takes a garment image and a person image, then synthesises a new image that shows the outfit on the body. The appeal is obvious, it's fast, and it can be run across a large assortment of products without asking every SKU to have a 3D asset.
3D AR shifts the experience toward a live rendering layer. That can be helpful on shopping surfaces where the user expects motion, perspective, or an in-camera experience, but it usually requires far more asset preparation because the garment or body needs geometry.
Fit simulation goes further. It aims to model drape, measurements, and garment behaviour, which makes it more relevant for products where size confidence matters more than a nice-looking preview. It's the most technical of the three, and it's the least forgiving if your source data is weak.
| Approach | Cost per SKU | Asset prep | Fit accuracy | Best for |
|---|---|---|---|---|
| 2D Overlay | Lower operational burden | Clean photos and consistent crops | Limited, mostly visual | Catalog previews and batch listings |
| 3D AR | Higher due to geometry work | 3D or structured source assets | Better for live interaction, not a substitute for sizing | Interactive shopping surfaces |
| Fit Simulation | Highest process complexity | Body and garment data | Stronger modelling of drape and size | High-return categories and made-to-order use cases |
How to choose without getting seduced by the demo
The right choice depends on the buying moment. If your customer is browsing a product grid, 2D overlay usually does the job. If they are interacting in a live shopping surface, 3D AR may justify the extra preparation. If the business problem is repeated size confusion, fit simulation is the more serious route, but it also asks for a much cleaner underlying data model.
The AI glasses try-on guide is a useful parallel here, because it shows the same pattern outside apparel. The technology that wins is usually the one that matches the image inventory you already have, not the one with the most impressive rendering.
Don't start with the technology stack. Start with the question your catalog needs to answer, then choose the lightest system that answers it well enough.
Preparing Source Images and Garment Assets at Scale
A virtual try-on project usually breaks before the model ever sees a garment. The failure is rarely a hard error. It is a crop that looks slightly off, a background that changes from listing to listing, or a product image that survives a quick review even though it will confuse the batch later.
That is why the first job is catalog discipline. The source standard is plain, and that is the point. Google's try-on guidance tells users to submit a full-body or selfie image with one person, good lighting, a clean background, fitted clothing, and visible hands for eligible apparel categories. It also warns that baggy clothing, far-distance shots, and cluttered scenes distort results, and it excludes lingerie, bathing suits, and accessories from eligibility (Google input guidance).
What the batch should look like before generation
For seller teams, the work happens before any expensive generation step starts. The raw photo set needs to be standardised first, because once the images are inconsistent, the downstream pipeline spends money correcting problems that should have been removed at ingest.
- Remove the background so the garment or model stands alone.
- Reframe to a consistent crop, usually square or portrait depending on channel.
- Correct colour and exposure so white shirts do not drift between listings.
- Normalise the silhouette so the system sees a clean shape instead of a cluttered scene.
The order matters. If you generate first and clean later, you pay for the wrong pixels. If you clean first, you shrink the amount of work the downstream stages need to do.
Catalog teams also need to separate asset types instead of treating every image as interchangeable. A model-on-photo workflow behaves differently from a flat-lay or ghost-mannequin workflow, and the batch rules should reflect that. A clean garment photo on a neutral background is usually the best starting point because it keeps the input predictable, especially when the output has to fit several marketplaces with different presentation rules and upload requirements. For teams that are still sorting out file naming, version control, and category-level consistency, product image library management is the more useful reference, because the hard part at scale is usually organisation and reuse, not visual invention.
A practical hosting consideration
Asset prep also creates storage and handoff friction. Editors, merchandisers, and marketplace managers need a place to move files without turning every review cycle into manual file chasing, so managed hosting options from ARPHost, LLC is worth reviewing as a background resource for how online-store assets can be stored and served without adding another bottleneck.
The strongest habit is simple. Standardise the source, then let the try-on system inherit that discipline. That keeps the batch from becoming a cleanup operation after the fact.
Designing the Batch Processing Pipeline
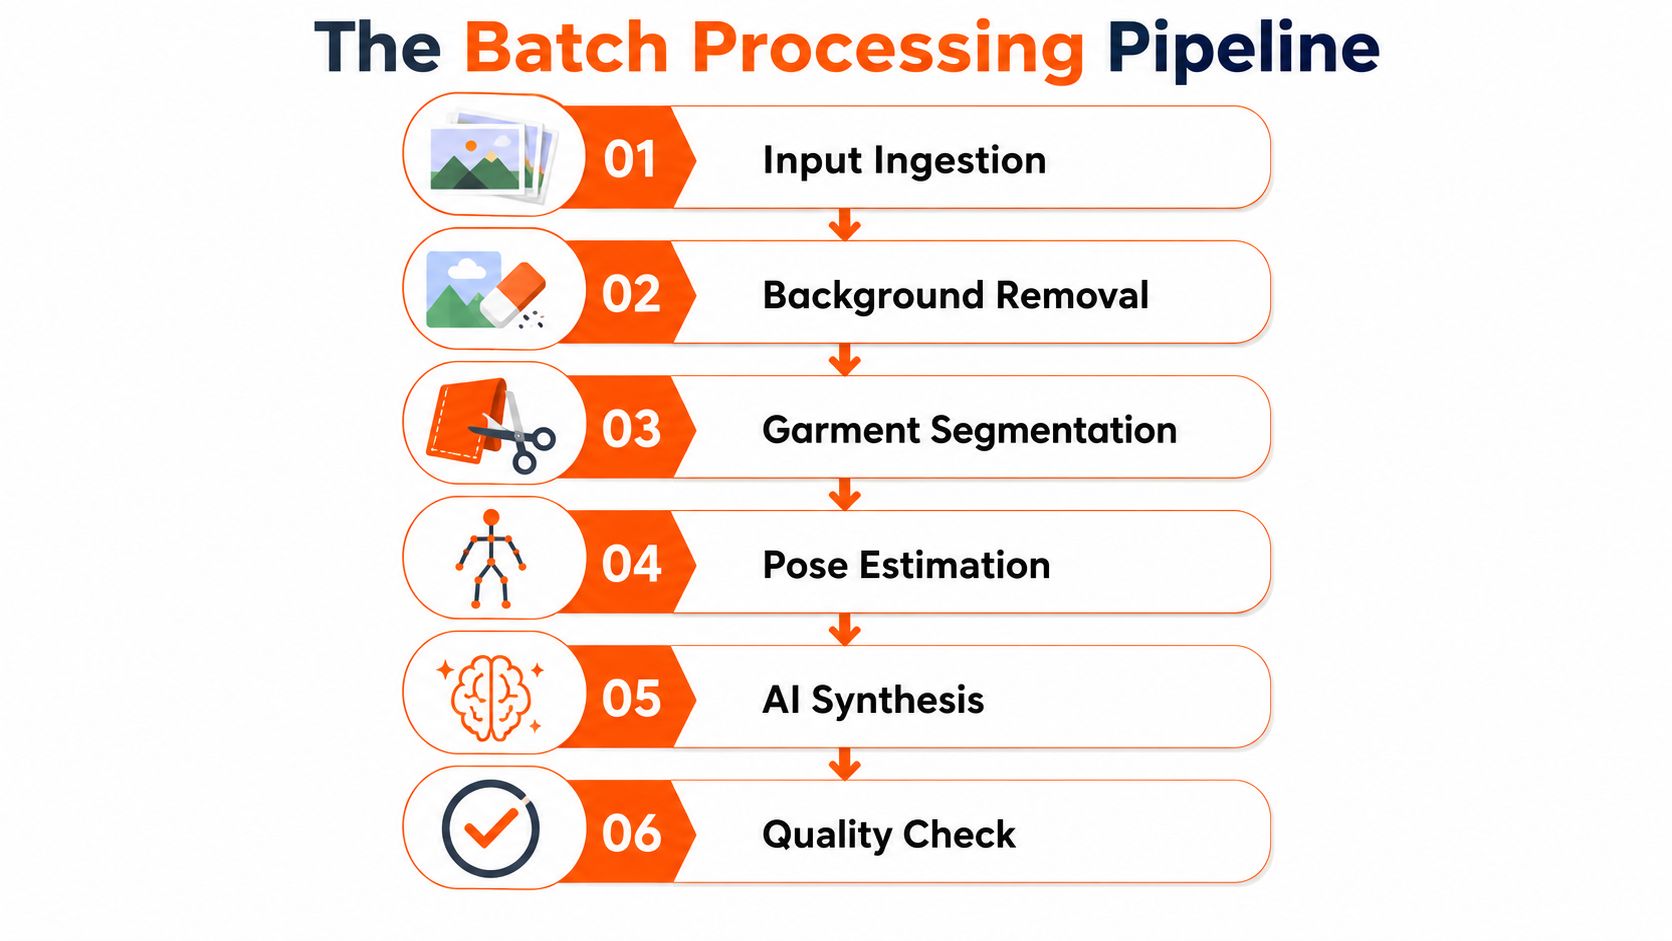
Once the inputs are clean, the pipeline becomes the product. At catalogue scale, a good try-on flow is less about one perfect model and more about how the steps are chained, where the failures are caught, and how much compute gets wasted on images that should've been rejected earlier.
The order should save money before it spends money
A production try-on workflow usually runs in this order, background removal, segmentation, pose estimation, garment warping, generative synthesis, then optional upscaling. That sequence is not arbitrary. Cheaper preprocessing should happen first, because it reduces the amount of work the expensive stage has to carry.
That's the same logic behind the earlier input cleanup. If a shirt is obviously unusable, reject it before you spend time synthesising a polished but irrelevant render. If the crop is too loose, fix the framing before the synthesis stage starts inventing detail that the source image never supported.
An efficient batch chain also has to be parameter-driven, not hand-tuned for each SKU. The seller needs repeatability across the collection, which means the same crop logic, the same output size rules, and the same handoff path every time. The system should accept a folder or collection, process it in sequence, and write finished files into the channel-specific destination without waiting for a human to drag each item somewhere else.
Doing this for a whole catalog?
MerchLoom runs background removal, upscaling and AI editing across every product photo you have — one prompt, whole batch.
Try MerchLoomBuild for failures in the middle of a batch
Real operations diverge from demo software. In the wild, a batch won't finish perfectly. One image will fail pose detection. Another will have an occluded sleeve. A third will render acceptably but look wrong next to the rest of the collection.
The pipeline should keep moving when that happens. Failed items need to be logged, skipped, and queued for review, not allowed to stall the entire run. That is the difference between a workflow and a screenshot.
The AI image processing from Amazon S3 guide is relevant because the value is not the storage bucket itself, it's wiring the batch so the next step can consume the result without a manual upload.
A strong pipeline is boring in the best way. It ingests, cleans, generates, checks, and ships without forcing a merchandiser to babysit every file.
The right mental model is a reusable collection flow. One source set in, one standardised output set out, with enough checkpoints to catch bad images before they reach the storefront.
Connecting the Pipeline to Storefronts, Marketplaces, and CDNs
A try-on output that sits in a downloads folder is just another file. It only matters once it lands where the shopper sees it. That usually means a storefront, a marketplace listing, a shared asset drive, and a delivery layer that doesn't slow the page down.
Match the output to the channel
The same source render often needs different finishing steps depending on where it's going. Shopify teams usually want square crops that sit cleanly in product grids. Amazon listings need the stricter white-background treatment that keeps catalog presentation consistent. Etsy sellers often care more about large, polished listing images, and 2000px assets are a common operational target for that kind of marketplace presentation.
The point is not to make three separate creative projects. It's to write the batch output once, then format it per channel. A clean pipeline can take the same render and route it into a storefront CMS, a marketplace uploader, or a shared drive for review.
Don't create a second library you have to maintain
A lot of teams accidentally build parallel asset systems. One folder for raw files, one for processed files, one for “final final,” and another for marketplace exports. That setup looks organised until something changes and nobody knows which version is live.
A better pattern is to connect the processing flow to the systems already in use, such as Shopify, BigCommerce, Google Drive, Dropbox, or a delivery layer like Cloudinary or Cloudflare R2. The images should move through the pipeline and land where the next operator expects them to be. If the team has to re-upload the same try-on outputs by hand, the workflow is already leaking time.
For a related operational view on delivery and image handling, the internal reference on AI image workflow for Cloudinary is useful because it frames image operations as a distribution problem, not just a generation problem.
If the output cannot be consumed automatically by the next system, the batch isn't finished.
That's the practical standard. The generation step is only one link in the chain, and it's usually not the bottleneck people think it is.
Cost, Performance, and Common Failure Modes
Enthusiasm meets unit economics here. Batch try-on can get expensive fast if the pipeline burns compute on bad inputs or forces reruns because one file breaks the queue. The cheapest mistake is to reject weak images early. The most expensive mistake is to let them travel all the way to synthesis.
Where the money actually goes
The biggest cost trap is running premium generation on images that should have been filtered in preprocessing. That includes cluttered shots, far-distance photos, badly lit garments, and frames that don't support a clean pose or silhouette. If the source is weak, the downstream render usually wastes time even when it technically completes.
The second trap is rerunning whole batches after a single file causes a stall. That's a workflow design problem, not a model problem. Each item in the batch should be independently logged, reviewed, and either accepted, queued, or dropped so the rest of the collection keeps moving.
Merchants who already manage large catalog runs know the broader lesson. The processing order affects cost, and cheaper steps should shrink the image before the expensive ones run. That's especially important when the same batch has to be reformatted later for multiple channels and resolutions.
The failures that show up most often
The common production problems are predictable. Pose mismatch makes the render look staged in the wrong direction. Garment occlusion hides details the model needed to preserve. Layered outfits confuse warping because the system has to separate overlapping cloth. Some outputs even pass a quick visual check but fail the more important test, they don't resemble the actual product closely enough to support purchase confidence.
That's why quality control can't be cosmetic. The team needs to inspect whether the image still behaves like the SKU it represents. If it doesn't, the render is decoration, not merchandising support.
Measure what matters
The only way to know whether the pipeline is helping is to connect it to business signals. Track conversion lift, changes in return rate on try-on-influenced SKUs, and the time saved versus manual styling. Those are the three checks that tell you whether the batch workflow is improving operations or just producing prettier assets.
A good rule is simple.
- Reject early: Don't pay to render bad inputs.
- Log everything: Every failed file should have a reason.
- Review by channel: A render that works in one listing format can still be wrong for another.
If the team can't explain what got faster, what got cleaner, and what got easier to publish, the pipeline still needs work.
Testing, QA, and a 30-Day Rollout Plan
A small team doesn't need a grand launch. It needs a controlled pilot that proves the workflow can survive a real catalog and a real publishing cadence. Start with one collection, one image standard, and one clear success metric.
A rollout that won't break the team
Days 1 to 10 should focus on a 50-image pilot from a single collection. Pick products with clean source photos and limited pose complexity. Review the outputs manually, flag any items that drift from brand standards, and keep a log of the failures so the same mistakes don't repeat in the next batch.
Days 11 to 20 can widen the test to a full category. That's where edge cases show up, layered garments, awkward crops, accessories, or garments that don't behave well under the selected workflow. The goal is not perfection. The goal is to understand where the system breaks before those breaks reach live listings.
Days 21 to 30 should focus on marketplace reformatting and publishing discipline. The team should confirm that the same processed image can be adapted to the storefront and to marketplace requirements without manual rework every time.
QA needs a human eye and a checklist
The best review process is short and repeatable. Check whether the garment shape is preserved, whether the pose makes sense, whether the output still looks like the original SKU, and whether the final crop matches the channel it's meant for. If a file looks off, send it back to the queue instead of forcing it through.
Practical rule: if reviewers need to explain why an image feels wrong, the batch needs another pass.
On day one, define the measurement frame. On day 30, compare the pilot against the baseline for conversion behaviour, return patterns, and manual effort. If the pipeline didn't reduce work or make listings easier to ship, it's not ready to scale.
If you're ready to turn virtual outfit try on into a batch workflow instead of a hand-edited experiment, start with your messiest collection and build from there. Try MerchLoom on a real catalogue run, test the pipeline on a small set, and see how far your existing product images can go before you need more manual cleanup.
Stop editing product photos one at a time
Upload your catalog or connect your store. Describe the result once. MerchLoom does the rest.
Try MerchLoom