
AI Glasses Try on: A Guide for E-commerce Sellers
Boost sales and cut returns with our guide to AI glasses try on. Learn batch processing workflows, image requirements, and integration for your online store.
You've probably got a folder full of frame packshots, a separate folder of model images, and a product page that still isn't converting the way it should. The issue usually isn't the range, the pricing, or even the traffic. It's uncertainty. Shoppers can't tell whether a frame will sit too wide, look too heavy, or clash with their face shape, so they hesitate.
That hesitation gets expensive fast when you're managing a real catalogue. One hero image per SKU isn't enough for eyewear anymore. Sellers need product shots, on-face try-on visuals, lifestyle placements, marketplace-compliant images, and ad creatives, all while keeping the catalogue consistent across hundreds of listings. AI glasses try on matters less as a novelty and more as an operational system for reducing doubt at scale.
Why Flat Product Photos No Longer Cut It
A shopper lands on a product page for tortoiseshell frames, flips through three clean packshots, and still hesitates. The photos show the hinge, lens width, and temple detail. They do not answer the purchase question. Will these frames look balanced on a real face, or sit heavy and awkward once they are on?
That gap costs sellers money. In eyewear, uncertainty shows up in slower add-to-cart rates, more comparison shopping, and returns with comments like “not flattering” or “different from what I expected.” Flat product photography still has a job to do, but it cannot carry the whole conversion load for this category.
Analysts cited in this summary of virtual dressing rooms point to the same pattern across visual product categories. Shoppers buy faster when they can picture the item in context, on themselves or on someone who feels close enough to their own face shape and style. Eyewear follows that pattern even more strongly because fit and appearance are tied together.
Buyer confidence is now an operations problem
The consumer-facing demo gets the attention. The harder part is what sellers have to build behind it.
For a small catalog, a designer can hand-make a few on-face images and keep things under control. For a real eyewear assortment, that approach breaks fast. Teams need repeatable output across prescription frames, sunglasses, rimless styles, wire frames, low-bridge fits, and new launches. They also need those assets formatted for different channels, approved by merchandising, and mapped to the right SKUs without introducing visual drift.
That usually means producing and maintaining:
- On-face visuals for product detail pages
- Lifestyle images for collection pages and paid campaigns
- Marketplace-ready variants for Amazon, Shopify, and Etsy
- Ad crops and derivatives that stay consistent across placements
The practical rule is simple. Eyewear imagery has to answer two questions at once. What is this frame, and what does it look like when worn?
One successful try-on image does not solve that at catalog scale. Sellers need a production system that keeps frame shape, color, lens treatment, and placement consistent across hundreds of assets. That is why the backend workflow matters more than the novelty of the feature. The operational side of virtual try-on for products determines whether merchandising teams can publish faster, paid teams can test more creative, and customer support sees fewer expectation-based returns.
If the catalog still relies mainly on flat product shots, shoppers are doing too much interpretation on their own. Conversion suffers when buyers have to guess.
From Product Shot to AI-Ready Asset
The fastest way to get bad AI try-on output is to feed the model inconsistent inputs. That usually means low-resolution packshots, crooked frame angles, harsh reflections on lenses, model photos with uneven lighting, or files with no naming discipline. In eyewear, the phrase “garbage in, garbage out” is painfully accurate.
A 2023 National Retail Federation study found that 68% of online shoppers abandon a purchase if product images are inconsistent across a catalogue, and eyewear brands with batch-processed, standardised images saw a 23% increase in conversion rates (National Retail Federation study summary via EyeBuyDirect). That finding lines up with what teams see in practice. Consistency isn't cosmetic. It affects trust.
What your frame images need
Start with the frame assets. Your source photos should be built for extraction, alignment, and reuse.
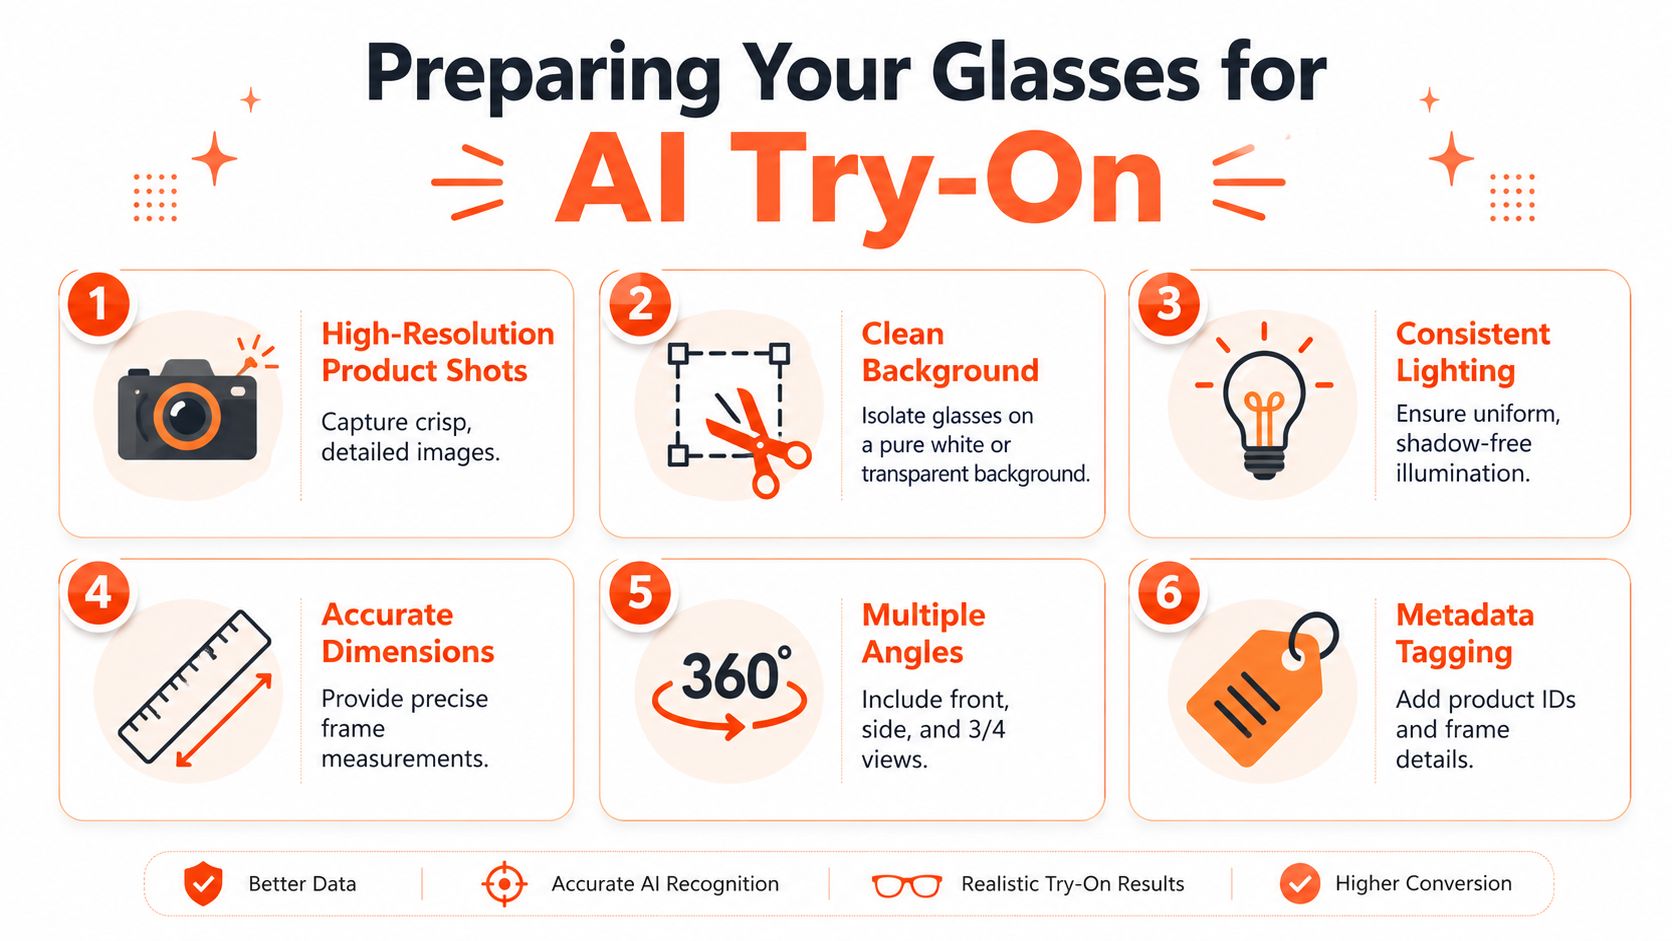
For most sellers, the minimum working set looks like this:
- Front view first: This is the anchor image for most try-on placement. If the frame is rotated or tilted, the AI has to guess too much.
- Controlled background: A pure white or transparent background makes extraction cleaner and reduces edge errors around temples and rims.
- Even lighting: Strong side shadows and specular glare on the lenses make segmentation harder.
- Useful metadata: Include SKU, colourway, frame type, and whether the image shows demo lenses, tinted lenses, or lens-free display frames.
- Multiple angles: Front view matters most, but side and three-quarter shots help with lifestyle assets and ad variations.
- Accurate dimensions: If your asset library includes frame measurements, your team can keep visual scaling more believable across campaigns.
A lot of sellers skip metadata discipline, then pay for it later. If files arrive as random exports with names like IMG_8472-final-final.jpg, your workflow becomes manual immediately.
What your model images need
Model references need just as much care. AI glasses try on works best when the source portrait is easy to map.
Use portraits that are:
- Forward-facing or near-forward-facing
- Well lit, without heavy shadow across the eye area
- High enough quality to preserve facial detail
- Free of obstructions around the brow and temples
- Organised by use case, such as product page, campaign creative, or demographic segment
If the model is already wearing glasses, the system may still work, but the result depends heavily on how well it can remove the existing frames and rebuild the underlying face. That's possible, but it raises the quality bar for the pipeline.
Bad source images don't fail gracefully. They create outputs that look almost right, which is worse than obviously fake.
Batch prep is where time disappears
This is also where manual teams lose entire days. One person can clean a few hero images in Photoshop. That approach collapses when you're preparing a seasonal collection, refreshing product pages, or producing variants for multiple storefronts. Sellers often need a batch process that normalises backgrounds, crops, aspect ratios, and naming before any try-on generation starts.
A structured model library helps too. Teams that already run organised model photo shoot workflows usually have a much easier path to scalable try-on production because the source inputs are already predictable.
For eyewear sellers, AI readiness isn't about one perfect image. It's about whether your whole library is clean enough to process repeatedly without surprises.
How AI Generates a Realistic Try On Experience
A believable try-on image depends on geometry, not just aesthetics. The system has to understand the face, understand the frame, and then make both behave as if they exist in the same scene. If any one of those steps is weak, you get the classic failure mode: glasses that look pasted on.
Modern AI try-on systems rely on Convolutional Neural Networks to identify over 468 facial key points with sub-millimetre precision, achieving frame alignment accuracy exceeding 95% to create a realistic 3D mesh for overlaying frame models. That's the technical foundation behind the result. For a seller, the practical takeaway is simple. Good try-on output comes from systems that track structure precisely, not systems that just place a PNG over a face.
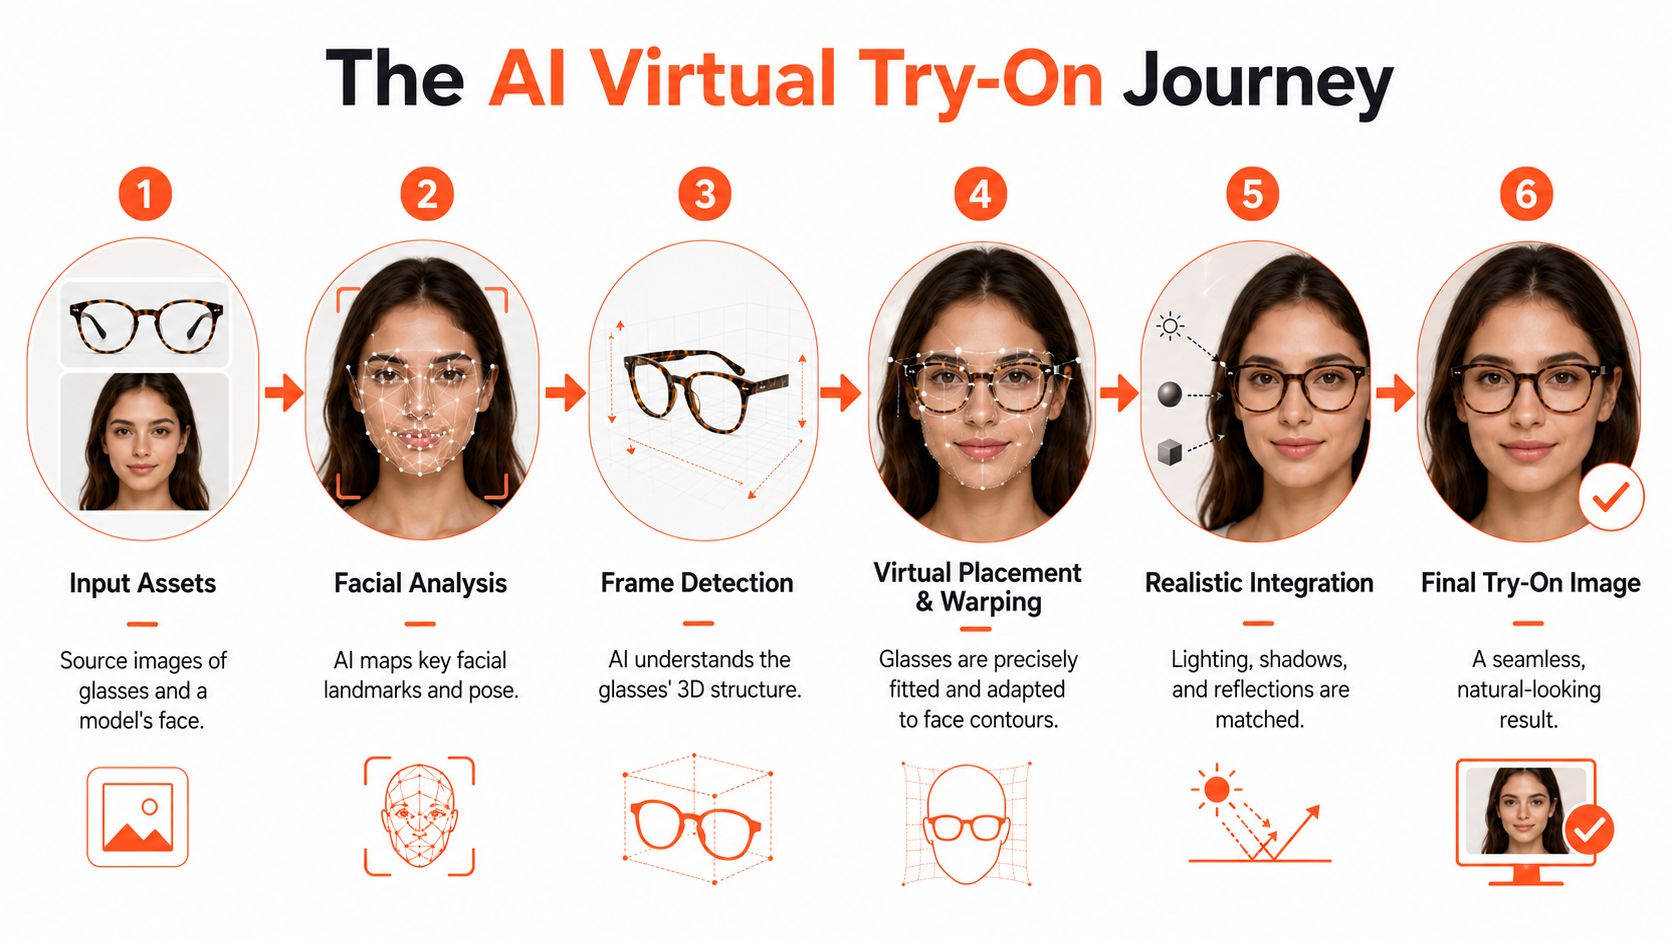
The core stages that matter
Think of the pipeline in four business-friendly steps.
First, the system maps the face. It identifies landmarks around the eyes, bridge, temples, jaw, and head pose. That creates the spatial reference for fitting the frame.
Second, it interprets the glasses asset. A good system doesn't just see “an image of glasses”. It estimates the frame shape, dimensions, depth cues, and how the object should sit relative to the eyes and nose.
Third, it warps and places the frame. The software adapts scale, angle, and perspective so the glasses follow the face naturally.
Fourth, it integrates the lighting and edges. If this stage is weak, the result feels synthetic even when the geometry is correct.
Why existing eyewear is difficult
The hardest cases are model images where the person is already wearing glasses. The system has to remove or occlude the original pair, rebuild what should be visible underneath, and then place the new pair without creating artefacts around the eyes, lashes, or brow line.
That process is often described as inpainting. In practical terms, it's the difference between a polished asset and a visibly edited one. If the underlying removal is poor, the new frame may look fine at first glance but fall apart on zoom.
The easiest way to judge a try-on system is to look at the bridge, the eye line, and the temples. If those three areas feel wrong, the whole image feels wrong.
Prompting still matters
Even with strong geometry, sellers still need control over output style. You may want a clinical catalogue look, a warmer lifestyle feel, or ad creative with more contrast and polish. That's where structured instruction matters. Teams working on optimizing AI performance with prompts often find that cleaner phrasing produces more repeatable outputs, especially when they're generating variations at scale.
For e-commerce teams, that means giving the system constraints, not poetic directions. Use instruction patterns that specify framing, facial angle tolerance, lighting expectations, background treatment, and whether the image is intended for PDP use, collection pages, or paid ads.
If you're evaluating platforms, don't focus only on the prettiest sample. Look at whether the system can turn a frame library and a model library into consistent AI product visualisation workflows without constant manual rescue.
Building Your Scalable Batch Workflow
One polished try-on image proves that the concept works. A production workflow proves that your team can use it. That distinction matters because eyewear sellers rarely need one image. They need a matrix of assets across products, faces, placements, and channels.
A practical batch workflow starts with asset intake, not generation. Your system needs to pull in frame images, model references, and existing catalogue photos from wherever your team already stores them.
Doing this for a whole catalog?
MerchLoom runs background removal, upscaling and AI editing across every product photo you have — one prompt, whole batch. Try 2 batches free, no signup.
Try it free
How the workflow should be organised
The cleanest setup separates assets into buckets with clear roles:
- Frame bucket for product cutouts and packshots
- Model bucket for approved faces and campaign references
- Output rules bucket for channel-specific sizing, backgrounds, and naming
- Review bucket for exceptions that need human approval
This sounds basic, but most catalogue problems start because those roles blur. Teams mix campaign references with marketplace masters, or they overwrite approved outputs with experiments.
A workable example for a real store
Say an eyewear brand is launching a new acetate collection. The team needs:
- product page try-on images for each SKU
- collection page lifestyle variants
- square crops for social
- marketplace-safe exports for listings
- a small set of paid ad creatives using the same frames on the same approved faces
The operational flow should look something like this:
- Import the frame set from the product photography source.
- Identify usable frame images and reject angled or low-quality files.
- Match each frame to approved model groups.
- Generate structured instructions based on use case, such as neutral PDP try-on, warm lifestyle image, or promotional crop.
- Run the try-on pass across the whole collection.
- Send results into post-processing for resizing, background control, and export naming.
- Route exceptions for review instead of stopping the full batch.
That's why the best systems don't act like single-image editors. They behave more like workflow engines. In practice, sellers benefit when a platform can recognise frame images and model or reference images, route them into the correct try-on bucket, create structured edit instructions, and keep the output consistent across many products.
Consistency beats creativity in the first pass
The first production pass should be boring. That's good. You want alignment, repeatability, and easy QA. Save more experimental lifestyle directions for a second pass once the catalogue basics are done.
Operational note: If your team is still renaming files, choosing crops by hand, and writing prompts image by image, you don't have a batch workflow yet.
Later in the pipeline, motion and richer creative can help explain the process to internal teams or agencies. This kind of walkthrough is useful when you're standardising a repeatable method:
Where sellers usually break the process
The common failure points aren't usually in the AI model itself. They're in the handoffs.
A few examples:
- Asset mismatch: The wrong colourway gets paired with the wrong SKU.
- Model drift: Different face libraries get used for different launches, so the storefront loses coherence.
- Prompt drift: The team changes wording between batches and output style starts to vary.
- Channel confusion: The same file gets pushed to PDP, Instagram, and marketplace listings without format adaptation.
That's why repeatable AI batch image editing workflows are more valuable than isolated generation tools. For eyewear sellers, the backend process is the product.
Deploying Try On Images Across Your Storefronts
A finished try-on image still has to survive the demands of commerce platforms. Consequently, many teams discover that a good visual isn't automatically a usable listing asset. The file may look right and still fail on background rules, crop behaviour, or zoom requirements.
Amazon's image requirements mandate a pure white background (RGB 255, 255, 255) and images must be at least 1000 pixels on the longest side, while Shopify favours a square 1:1 aspect ratio and Etsy requires 2000 pixels for zoom functionality (marketplace image requirements summary). If you're selling across channels, that means one try-on asset often needs several controlled exports.
Marketplace Image Requirements for Eyewear
| Platform | Background Requirement | Minimum Resolution | Aspect Ratio |
|---|---|---|---|
| Amazon | Pure white background (RGB 255, 255, 255) | At least 1000 pixels on the longest side | Varies by listing use, but the main requirement is compliance and zoom support |
| Shopify | Store theme dependent, but sellers commonly use clean catalogue backgrounds | Lower-resolution uploads may appear blurred on high-definition mobile devices | Square 1:1 is the default display for catalogue grids |
| Etsy | Clean product image suitable for search and zoom | 2000 pixels for zoom functionality | Flexible, but the image must support listing presentation and zoom |
Placement matters as much as file format
On a product detail page, try-on images work best when they sit close to the primary product media, not buried in a lifestyle gallery several clicks deep. Buyers use them to answer fit and style questions quickly.
For most eyewear stores, the useful structure is:
- Hero image: clean product shot
- Second or third image: on-face try-on
- Later gallery slots: side detail, hinge detail, lifestyle scene, alternate model, and fit comparison
If you lead with a lifestyle image and hide the clean packshot, buyers lose clarity. If you lead with only sterile packshots, buyers lose confidence. The right mix depends on whether the page is optimised for product discovery, marketplace syndication, or paid traffic landing.
Use one master, export many variants
A strong storefront process uses one approved master output, then derives channel-specific versions from it. That avoids creative drift between Amazon, your own Shopify storefront, Etsy listings, email banners, and ad creatives.
For eyewear sellers, the practical deployment list usually includes:
- Marketplace-safe product media
- Shopify square crops for collection pages
- Zoom-capable listing files
- Paid social formats
- Email and landing page variants
The mistake is treating these as separate design jobs. They should come from the same approved source, with controlled resizing and cropping rules. That's how you keep your acetate collection from looking cool and moody in ads but harsh and inconsistent on the PDP.
Common Pitfalls and Measuring Your ROI
The two biggest objections to AI glasses try on are predictable. Sellers worry the output will look fake, and they worry the workflow will become one more production headache. Both concerns are valid. Neither is a reason to avoid it.
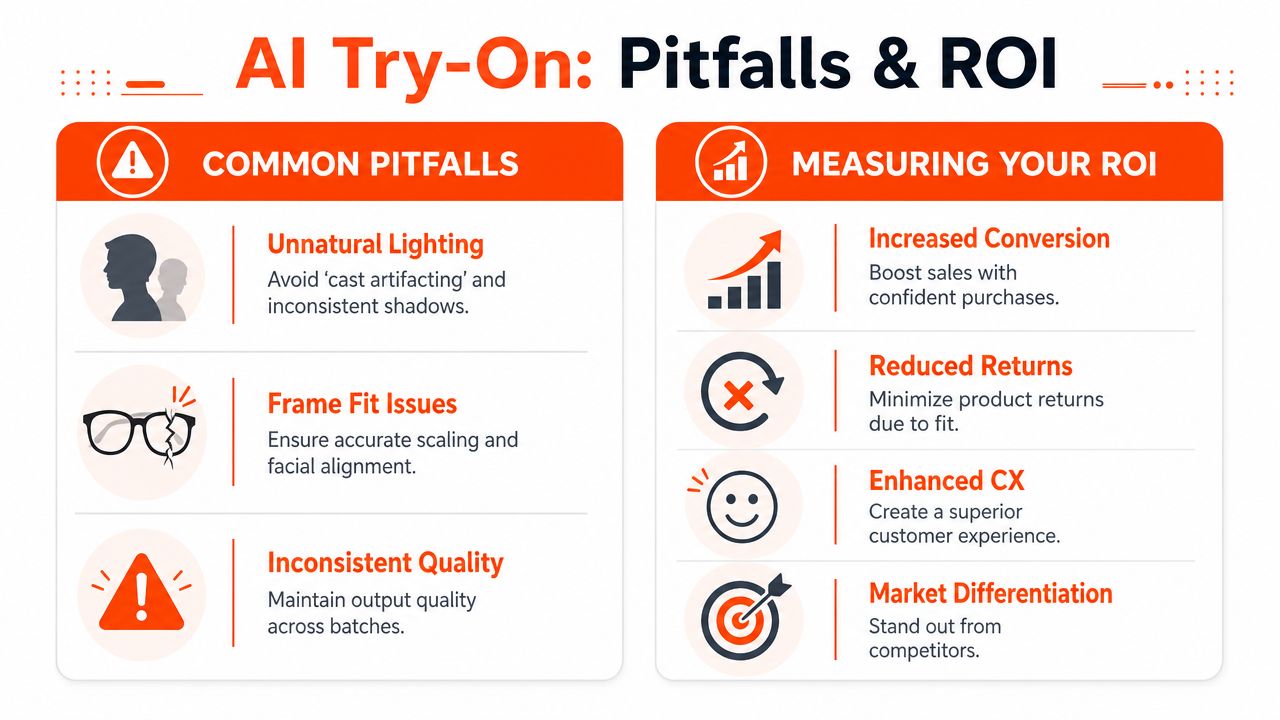
Most failures come from a short list of technical and operational issues. Unnatural lighting can create cast artefacts. Weak face tracking can make frames drift or float. Inconsistent batch settings can leave one part of the catalogue polished and another part visibly synthetic.
Fix the root cause, not the symptom
When the output looks wrong, start with diagnosis:
- Lighting mismatch: Check whether the frame asset and model image belong to completely different lighting conditions.
- Fit errors: Review whether the source frame photo is skewed, cropped poorly, or missing useful dimensional references.
- Eye-area artefacts: If the model wore glasses in the source image, the inpainting step may be failing.
- Batch inconsistency: Look for changes in prompts, model groups, or export presets between runs.
These aren't random glitches. They usually point to a weak input standard or a loose production process.
Sellers get the best results when they treat AI try on like catalogue production, not like a novelty creative tool.
Measure outcomes that finance teams care about
If you want internal buy-in, don't report that the images “look better”. Track business effects tied to the product page and post-purchase experience.
A strong benchmark exists here. Zenni Optical's 2024 launch of its AI try-on feature drove a 34% lift in CA-specific online sales and reduced return rates by 27% in the region, attributed to 85% of users confirming fit accuracy pre-purchase. Use that as a signal for what to monitor in your own operation, not as a promise that every brand will see the same result.
The most useful metrics are:
- Conversion behaviour: compare PDP performance before and after try-on rollout
- Return reasons: look specifically at fit, appearance, and expectation mismatch
- Asset coverage: measure how much of the catalogue has approved try-on media
- Creative reuse: track whether the same approved outputs support storefront, ads, and email
If your team can show clearer product understanding, fewer fit-related complaints, and less manual image work, the business case becomes straightforward. For brands exploring broader try before you buy experiences, AI glasses try on often becomes one of the most practical pieces of the stack because the visual uncertainty in eyewear is so high.
MerchLoom helps eyewear sellers turn scattered frame photos and model libraries into repeatable image workflows. If you need to process full collections instead of editing one image at a time, MerchLoom can organise source assets, build chained AI steps, and produce consistent try-on, catalogue, lifestyle, and marketplace-ready outputs across large batches.
Stop editing product photos one at a time
Upload your catalog or connect your store. Describe the result once. MerchLoom does the rest.
Try it free — no signup