
Master Remove Bg Adobe: E-commerce Workflow 2026
Master remove bg adobe for e-commerce. Our 2026 guide covers Photoshop & Express, batch edits, and scaling workflows efficiently.
You've probably got a folder full of product photos that all need different treatment by tomorrow. One SKU needs a pure white main image for Amazon. Another needs a square crop for Shopify. A third needs a cleaner transparent PNG so the design team can drop it into an ad. That's where most background-removal tutorials stop being useful.
A single clean cutout is easy enough. The primary job is building a repeatable workflow that keeps a catalogue organised, consistent, and fast to publish. If you're still editing one image at a time, background removal isn't just a design task. It's an operations bottleneck.
The E-commerce Seller's Image Challenge
A new seller usually starts with one urgent problem. Remove the messy backdrop from a product shot. Make it look professional. Publish the listing.
An established seller has a different problem. There are hundreds of images from different shoots, different lighting setups, and different product categories. Some need transparent PNGs for design work. Some need white-background exports for marketplaces. Some need crops that look uniform when a collection page loads.
That's why image prep sits so close to store performance. If your listings look inconsistent, shoppers notice. If your assets aren't organised, your team wastes time recreating files, chasing edits, and uploading the wrong version to the wrong channel. If you're still building the store side at the same time, this guide on how to Develop your online store is worth reading alongside your image workflow, because the catalogue, product pages, and image standards all affect each other.
The practical issue isn't only background removal. It's repeatability. Can you take a season's worth of product photography and turn it into assets that meet channel requirements without manually babysitting every file?
What the job usually looks like in practice
A typical batch includes all of these problems at once:
- Simple products: Boxes, bottles, and tools with clean edges that can usually survive an automated cutout.
- Difficult materials: Glass, mesh, faux fur, jewellery chains, and semi-transparent packaging that expose every weakness in an AI mask.
- Mixed output needs: Transparent files for ads, white-background files for marketplaces, and resized images for storefront collections.
- Human inconsistency: Different photographers, different shadows, and slightly different framing across one product line.
If you're training a junior teammate, the fastest win is teaching them what “good enough for a draft” looks like versus what needs hand finishing. This walkthrough on making product photos look professional helps frame that judgement call.
A catalogue doesn't fail because one image is bad. It fails because the entire set doesn't feel consistent.
That's the lens to use for any remove bg Adobe workflow. Not “can it cut out one image?” but “can it keep your whole catalogue clean without creating more cleanup work later?”
The One-Click Fix with Adobe Express
Adobe Express is the fast answer when you need a background gone now. For straightforward products on a clear background, it's the quickest remove bg Adobe option to hand to a seller, marketer, or support teammate who doesn't live in Photoshop.
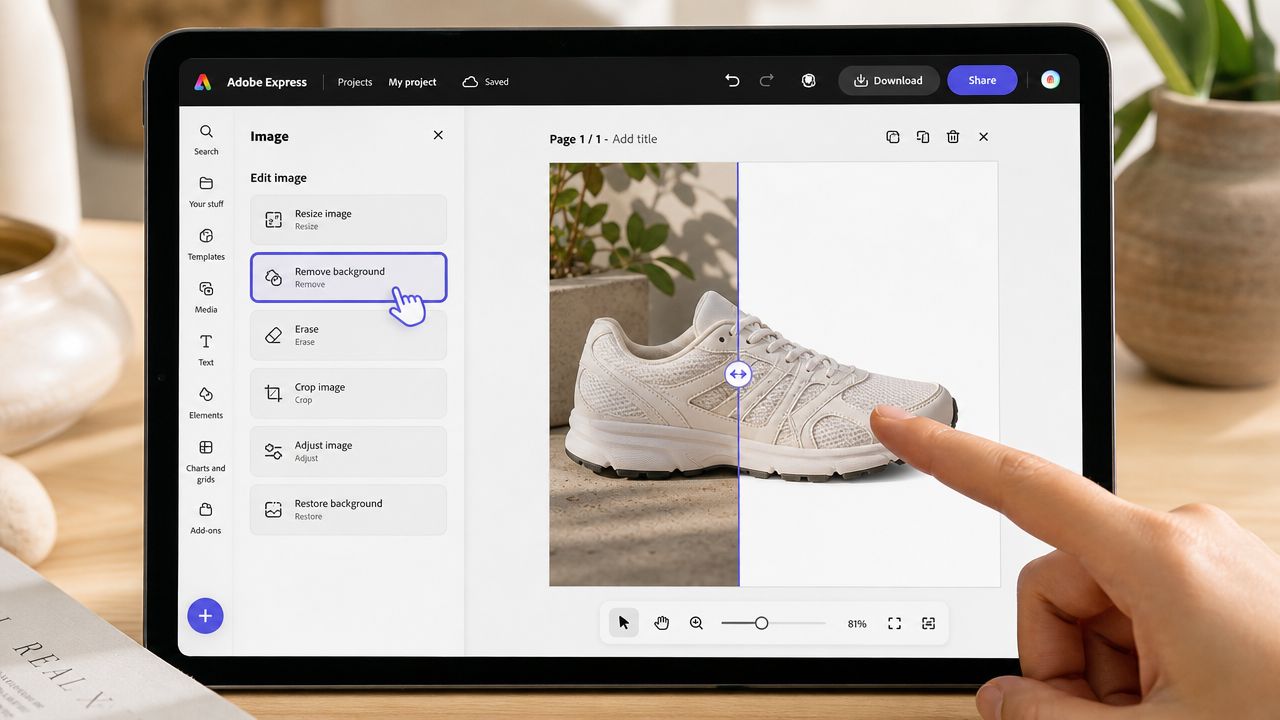
Adobe says the tool supports JPEG, PNG, or WebP files up to 40 MB, automatically removes the background, and lets you download a transparent PNG in seconds without manual selection through its Adobe Express background remover. That matters when someone on the team needs a listing image, social post asset, or quick mockup without opening a full editing workspace.
When Express is the right tool
Use it when the priority is speed:
- Upload the image from your desktop or phone.
- Run the background removal and let the automatic subject detection do the first pass.
- Download the transparent PNG if the cutout looks clean.
- Keep editing if you need to place the product on a new background or build a simple creative.
Adobe positions it as a one-click workflow, but that doesn't mean every output is listing-ready. It's best for clear edge separation, simple silhouettes, and fast content production.
If you want a broader overview of the platform before handing it to a non-designer, this breakdown of the creative AI design tool Adobe Express is a useful orientation piece.
Where it starts to break down
Express is efficient, but e-commerce teams should be realistic about the trade-off. The first pass is often good enough for draft assets, social content, or internal reviews. It's less dependable when the product has fine edges, soft materials, reflective surfaces, or background colour contamination.
For catalogue work, I'd separate images into two buckets:
- Green light for Express: cosmetics tubes, books, packaged goods, and products with hard, obvious edges
- Escalate to manual refinement: apparel details, hair, translucent materials, lace, wires, jewellery, and anything that will be your main hero image
Practical rule: If the customer will zoom in on it, don't trust a one-click cutout without checking the edges at full size.
Adobe also notes that refinement may be needed when edges or fine details are lost. That's the key operational reality. Express is not only automation. It's automation plus light touch-up when the mask misses part of the subject.
For sellers comparing quick tools, this guide to Canva background removal helps put Adobe Express in context. The main difference isn't just brand preference. It's whether the output stays clean enough when you multiply the task across a full catalogue.
Best use inside a real listing workflow
Adobe Express works well as a front-end intake step:
- Urgent one-off edits for product launches
- Social assets that don't need pixel-level perfection
- Draft catalogue cleanup before a designer reviews final images
- Transparent PNG creation for downstream use in ads or storefront graphics
It saves time when speed matters more than precision. It doesn't replace a stricter process for your best-selling SKUs or your primary marketplace images.
Precision Control for Hero Images in Photoshop
For hero images, Photoshop is where you stop hoping the cutout is fine and start controlling it. This is the version of remove bg Adobe that belongs on products people scrutinise closely, especially anything premium, reflective, textured, or expensive-looking.
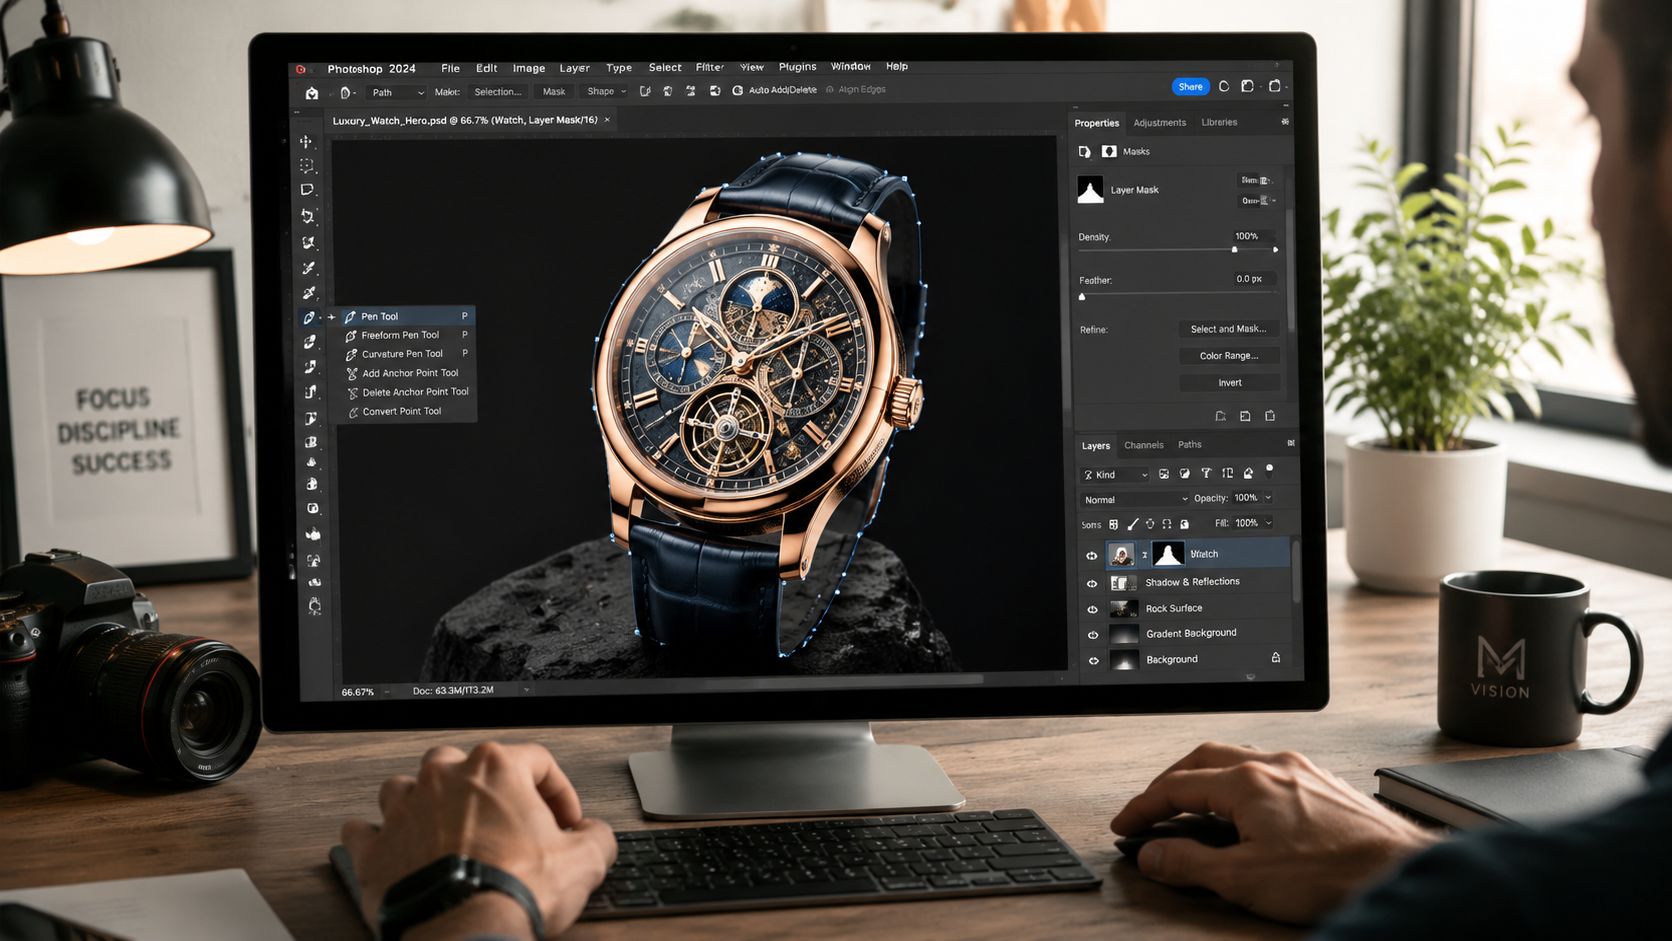
Adobe documents background removal directly inside Photoshop through Quick Actions and the Contextual Task Bar, and shows that users can trigger Remove Background from the Properties panel in its Photoshop remove background workflow. The operational advantage is simple. You can start with the automated cutout, then move straight into retouching without leaving the app.
Start with the fast mask, then inspect hard
For product teams, Photoshop is most efficient when you don't begin manually. Start with the built-in removal action, then inspect the result at real viewing size and zoomed in.
Look at these areas first:
- Outer edges where the old background may leave a fringe
- Interior cutouts such as handles, straps, or negative space inside packaging
- Reflective sections where the mask may carve away highlights
- Soft transitions on fabric, fur, or brushed materials
If the image is headed to a product detail page as the primary hero shot, those edge defects aren't small. They directly affect how polished the product feels.
The tools that actually matter
Photoshop has many ways to isolate a subject, but for commerce work I keep it narrow:
- Layer masks: best default choice because they stay editable
- Select and Mask: the workspace for refining uneven or soft edges
- Pen Tool: best when the product has hard, defined contours and needs a crisp commercial finish
If you're training someone new to manual cutouts, they don't need to learn every selection method at once. They need to know which tool matches the product shape. A rigid bottle or box often responds well to a precise path. A knit jumper does not.
This is a good point to study an actual Photoshop walkthrough before you build your own team standard:
Where manual work earns its keep
Photoshop is slower, but the return is highest on the images that carry the listing. If one main image sells the item, that's where you spend the time. Secondary angles can often tolerate a faster workflow.
A practical review sequence looks like this:
- Run Remove Background from the Properties panel.
- Open the mask and inspect against a contrasting temporary fill layer.
- Refine problem areas with Select and Mask or brush-based mask edits.
- Correct edge contamination before exporting.
- Save a layered master before making final platform exports.
Don't judge a cutout against transparency alone. Drop a black, white, and mid-grey fill behind it. Edge problems show up differently on each.
That's also why non-destructive editing matters. If the merch team later needs a white background version, a transparent PNG, and a tighter crop for mobile collections, the layered file saves you from rebuilding the mask.
For a focused walkthrough on that workflow, this guide to removing a white background in Photoshop is a useful reference.
What Photoshop still doesn't solve on its own
Photoshop gives you quality control. It doesn't automatically solve throughput. If you've got a handful of hero images, that's fine. If you've got a launch batch with many variants, the work quickly turns into file management, action setup, reviews, and exception handling.
That's why I treat Photoshop as the quality-control layer. Not the full catalogue engine.
Automating Background Removal for Batches in Photoshop
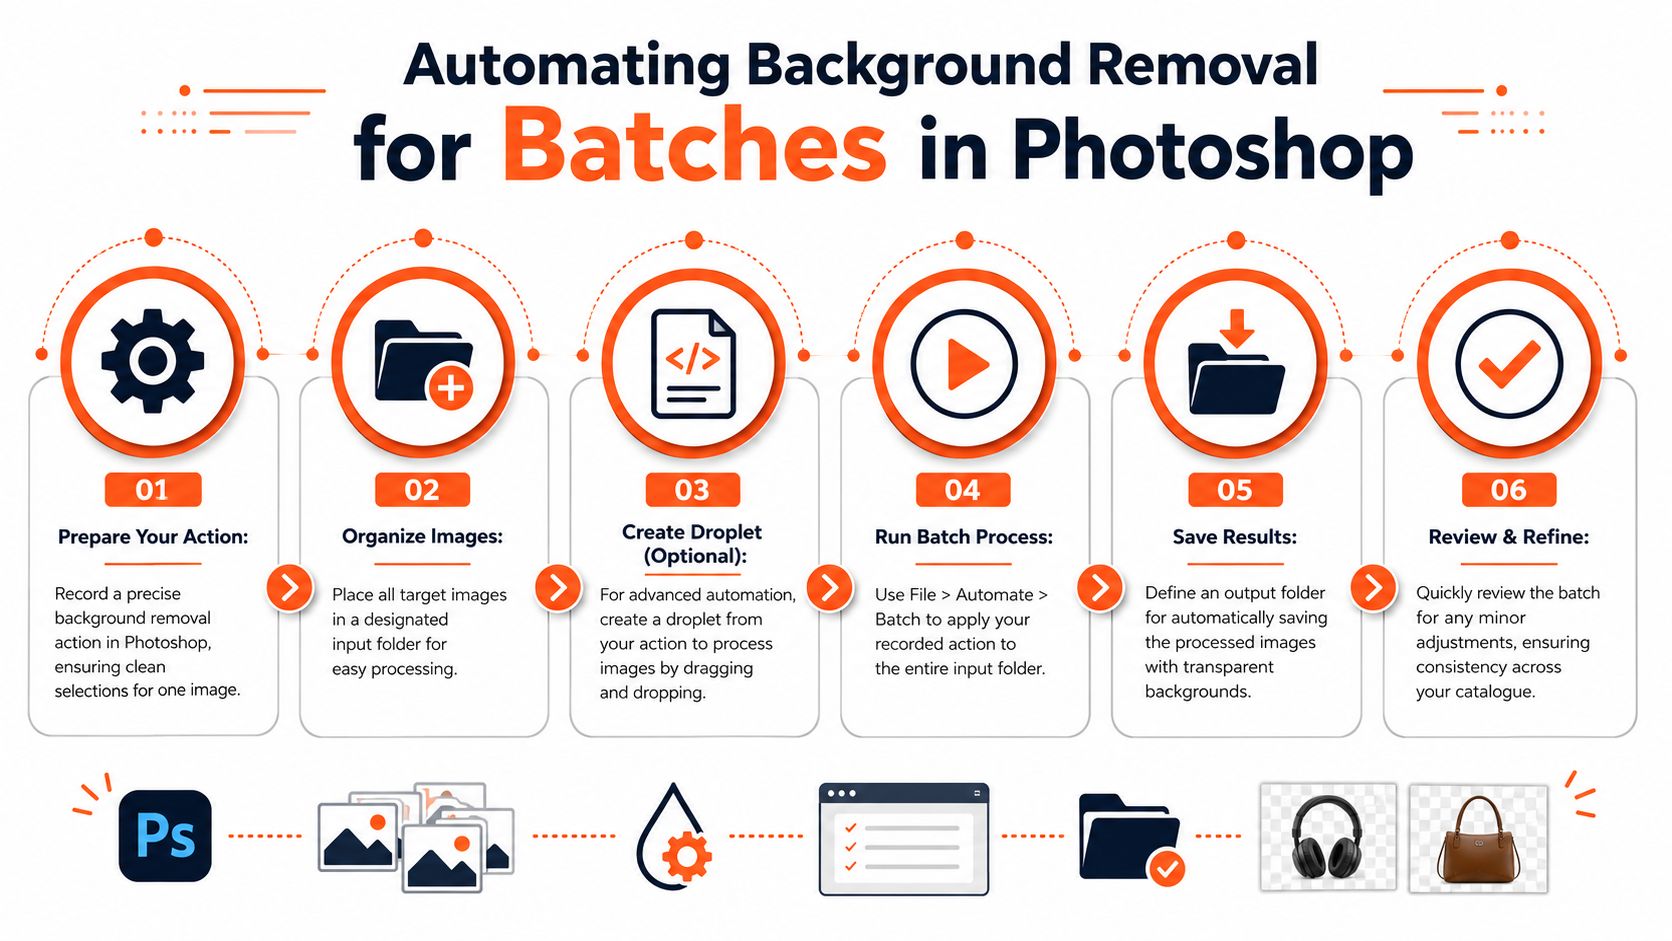
Photoshop batch work is where remove bg Adobe becomes operational instead of purely creative. If your catalogue has dozens or hundreds of files with similar photography conditions, recording a repeatable action is better than assigning someone to click through each image manually.
The goal isn't perfect automation. The goal is consistent first-pass output that your team can review quickly.
Build the batch around one representative file
Pick a product photo that reflects the average batch, not the easiest one. If your sample image is too clean, the action will look better in testing than it performs in production.
A practical action setup
Record an action that does only the steps that are stable across the set. That usually means:
- Open the file
- Duplicate the working layer if needed
- Run the background removal step
- Create or preserve transparency
- Save to the chosen output format
- Close the file
Keep the recorded sequence conservative. Don't bake in crop decisions, aggressive sharpening, or one-off retouching unless every image in the folder was shot under the same conditions.
Organise folders before you automate
Doing this for a whole catalog?
MerchLoom runs background removal, upscaling and AI editing across every product photo you have — one prompt, whole batch. Try 2 batches free, no signup.
Try it freeMost Photoshop batch headaches start before the action runs. Sellers dump mixed files into one folder, launch the batch, and then wonder why outputs are inconsistent.
Use a clean structure:
- Input folder: only the images for this batch
- Output folder: empty before the run starts
- Exception folder: files that need manual cleanup after review
- Master folder: untouched originals
That sounds basic, but it prevents reprocessing mistakes and makes spot checking much faster.
Workflow note: The more similar the images are, the better your batch action holds up. Mixed lighting and mixed product categories create more exceptions.
Run the action as a controlled first pass
Once the action is tested, use File > Automate > Batch to process the folder. Some teams also use droplets, but a standard batch run is usually easier to supervise when you're training staff.
The review phase matters as much as the automation phase. After the run:
- Scan the whole folder in thumbnail view for obvious failures
- Open edge-case products first such as reflective, dark, or fine-detail items
- Check transparent exports against contrasting backgrounds
- Move failures into the exception folder instead of trying to fix them on the fly
This keeps the batch from turning back into one-by-one editing.
Output strategy for marketplaces and storefronts
Background removal isn't the final deliverable. The final deliverable is the right file for the right channel.
A practical export mindset looks like this:
| Output need | Preferred file approach | Why it matters |
|---|---|---|
| Marketplace main image | White-background export | Keeps the listing clean and compliant with common marketplace expectations |
| Storefront design use | Transparent PNG | Makes it easier to reuse the asset in banners, promos, and collection art |
| Secondary product visuals | Background-replaced or cropped version | Helps maintain consistency across category pages |
If you're also doing object cleanup or extending backgrounds elsewhere in the workflow, this explanation of Content-Aware Fill in Photoshop is a good companion reference.
What works and what doesn't
Photoshop batch automation works best when:
- The shoot is consistent
- The products share similar edge complexity
- You only automate stable steps
- A human still reviews the output
It works poorly when:
- The folder mixes apparel, glassware, and boxed products
- The action tries to solve edge refinement automatically
- The team assumes “batch” means “done”
- You need chained tasks after cutout, like reframing and multi-channel exports
That last point matters. Photoshop can batch. It doesn't naturally orchestrate a whole catalogue pipeline.
Advanced Techniques for Flawless Cutouts
Most automated failures follow the same pattern. The subject is mostly isolated, but the edges are wrong. That's why the best production workflow is often a two-stage process. Start with AI selection, then clean the mask manually. PixelBin's overview notes that common issues include haloing, lost detail, and the need for tools like Smart Radius and colour spill correction, which usually means per-image cleanup after the first pass in its article on background removal refinement.
A seller who understands that early will make better workflow choices. Automation gets you to the rough cut. Finish quality still comes from edge control.
Hair, fibres, and fuzzy textures
Soft detail breaks crude masks first. Knitwear, faux fur, fringes, and brush-like textures often come back with clipped edges or a fake-looking outline.
In Photoshop, the fix usually starts in Select and Mask:
- Use Smart Radius when the edge changes from hard to soft across the same object
- Switch to the Refine Edge tools only where the automatic mask loses detail
- Output to a layer mask so you can keep editing without damaging the original
The important part is restraint. If you over-refine the entire edge, you often create new noise around sections that were already clean.
Clean cutouts aren't made by pushing every slider harder. They're made by isolating the exact edge problem and correcting only that area.
Haloing and colour spill
One of the most common e-commerce defects is a faint rim from the old background. White studio setups leave a light halo. Coloured setups can contaminate the product edge with unwanted colour.
That matters more than many teams realise. On a white product page, the fringe may disappear. On a darker collection banner or ad creative, it becomes obvious.
For those files, use a review sequence:
- Place the cutout over dark and light temporary backgrounds
- Inspect the contour at higher zoom
- Use colour spill correction or decontamination carefully
- Clean the remaining edge with a soft brush on the mask
- Recheck after export
Transparent and reflective products
Glass, glossy plastics, and polished metal often confuse background removal because the object itself contains background-like information. The tool may treat reflections as empty space or erase subtle contours that define the product.
That's where a fully automated mindset fails. You may need to preserve some highlights that look like background and rebuild parts of the mask manually. For premium catalogue images, I'd rather keep a touch more edge information and refine it than accept a technically “clean” cutout that makes the product look thinner, flatter, or cheap.
A triage system that saves time
Not every bad mask deserves the same amount of labour. Use three categories:
- Accept: minor defects that won't be visible in the final listing context
- Refine: issues that affect perceived quality but can be fixed quickly
- Rebuild: masks that fail structurally and need more deliberate manual work
That triage keeps your team from overspending effort on secondary images while still protecting hero assets.
The standard to teach new editors
A junior editor often focuses on whether the background is gone. A strong editor asks different questions:
- Does the edge still look like the product?
- Did the mask remove important material detail?
- Is there spill from the original backdrop?
- Will this still look clean on a different background later?
That's the true quality bar for remove bg Adobe work in commerce. Not just isolation, but believable isolation.
Scaling Beyond Adobe for Full Catalogue Automation
Once the catalogue gets large enough, Adobe workflows start showing a hard limit. They're excellent for single-image speed and selective precision. They're less efficient when the job is “take this whole collection, remove backgrounds, generate marketplace-ready versions, resize for each channel, and keep the machine free for other work.”
That's where the distinction between batch editing and workflow automation starts to matter.

Where Adobe still fits, and where it doesn't
Photoshop and Express are strong tools. But catalogue operations usually need more than one transformation. A typical seller doesn't just remove a background. They also need to reframe, resize, generate alternate versions, and route outputs to the right destinations.
That creates friction in local-tool workflows:
- You tie up a workstation while large batches run
- You manage folders manually across each processing stage
- You review exceptions outside a central pipeline
- You repeat the same setup for each new collection
For growing stores, that overhead becomes part of the cost of content production.
Comparison of methods
| Method | Best For | Scalability | Quality Control |
|---|---|---|---|
| Adobe Express | Fast single-image edits and simple cutouts | Limited for catalogue-scale workflows | Light touch-up after automation |
| Photoshop manual workflow | Hero images and difficult products | Low for large catalogues | Highest control |
| Photoshop actions and batch runs | Repetitive folders with similar shots | Moderate | Good first-pass consistency, but exceptions still need review |
| Chained AI workflow platforms | Full collections that need multiple processing steps | High | Depends on workflow design and review checkpoints |
This is also where operational priorities overlap with storefront performance. Clean, correctly sized imagery helps your store, but image handling is only part of the equation. If your team is also tightening page performance, Grumspot's Shopify speed checklist is a practical companion resource.
Why chained workflows are the next step
A catalogue-scale system should process collections, not isolated files. It should also handle the order of operations intelligently. If the workflow removes the background first, then reframes, then prepares final outputs, the team avoids a lot of repeated handling.
That's the practical appeal of a platform built around connected image pipelines instead of standalone edits. You're not just asking for a cutout. You're defining a repeatable job.
For sellers evaluating that model, this overview of AI image workflow automation is worth reading because it explains the shift from ad hoc edits to chained processing logic.
The operational decision
For a small set of images, Adobe is enough. For a catalogue launch, seasonal refresh, or migration across sales channels, local editing often turns into a queueing problem. Someone has to run the jobs, watch the outputs, sort the failures, and build the next export set.
That's manageable at low volume. It becomes expensive at higher volume because staff time gets absorbed by process handling rather than judgement-heavy image review.
If your work still depends on hero-image perfection, keep Photoshop in the stack. If your problem is moving whole collections through repeatable steps, you'll eventually need a system designed for that scale.
If your team has outgrown one-by-one editing, MerchLoom is built for the catalogue side of the problem. It runs repeatable AI image workflows across full collections, connects to the sources sellers already use, and handles chained tasks like background removal, reframing, and channel-specific output without forcing everything through a local manual process.
Stop editing product photos one at a time
Upload your catalog or connect your store. Describe the result once. MerchLoom does the rest.
Try it free — no signup