
Professional Pictures LinkedIn: Boost Your Profile 2026
Create stunning professional pictures linkedin for 2026. Discover efficient batch workflows to produce consistent, high-quality headshots for your profile.
You already know what happens when one image drags down a listing. Buyers may never read the bullets. They see the first photo, make a judgement, and move on.
The same thing happens on LinkedIn.
A lot of strong sellers, studio operators, and product photographers run tight image workflows for Amazon, Shopify, Etsy, and wholesale lookbooks, then leave their own profile with a rushed crop, uneven light, or an old conference snap. That mismatch creates friction. If your catalogue looks disciplined but your profile picture looks improvised, partners notice.
For e-commerce operators, professional pictures linkedin isn't a vanity task. It's brand control. Your profile photo sits at the front of supplier conversations, partnership outreach, agency hiring, creator recruiting, and B2B sales. Treat it like a core asset, not a personal afterthought.
Your LinkedIn Headshot Is Your Most Important Product Image
A retail buyer clicks from your company page to your profile before replying. A platform partner checks your profile after your outreach lands in their inbox. A recruiter, agency owner, or supplier contact does the same. In each case, the photo loads before your experience, recommendations, or featured work gets read.
Your LinkedIn headshot is doing the job of a primary product image. It sets expectation for quality, consistency, and control.
The quality standard should match the rest of your brand system
Successful sellers already know how presentation affects conversion. A strong listing image does three things fast. It identifies the subject, removes friction, and reassures the buyer that the operator behind the listing has standards.
A headshot works the same way in B2B. Clean framing helps people register your face quickly. Consistent styling makes your profile feel aligned with your site, deck, and catalogue. Good light and sharp capture reduce the small hesitation that weak images create.
That hesitation matters.
LinkedIn profile photo research reports large visibility gaps between profiles with professional images and profiles with weak or missing photos, including much higher profile views and more recruiter outreach (LinkedIn profile picture statistics). The exact multiplier matters less than the operational takeaway. Better image quality increases the chances that the right people stop, assess, and respond.
Poor headshots create the same trust problem as poor listing images
Experienced operators rarely lose credibility because they chose a casual outfit or a simple setup. They lose it because the image looks unmanaged.
An old event crop, mixed lighting, a cluttered background, or soft focus tells viewers the presentation layer was handled last. For a seller who runs disciplined product pages, that creates an avoidable mismatch. If your catalogue says precision but your profile says improvisation, people notice.
Use the same filter you already apply to product photos. If an image would not pass as a main listing photo because it distracts from the subject, it should not represent you either. The same logic behind images with white background for product clarity applies here. Remove distractions first, then let expression, posture, and styling do the branding work.
Treat the file as reusable brand collateral
A LinkedIn headshot seldom stays on LinkedIn. It gets pulled into speaker bios, pitch decks, About pages, proposal covers, partner directories, press requests, and internal team pages.
That changes how the image should be managed. This is not a one-off portrait you happen to like. It is a brand asset that needs to be usable, repeatable, and easy to process alongside the rest of your visual library.
Sellers already manage product imagery in batches because batch workflows protect consistency and save time. Apply that same discipline here, and your professional image starts working like the rest of your catalogue.
Planning Your Headshot Shoot Like a Product Batch
A seller updates a strong About page, tightens their wholesale deck, and sharpens their product imagery, then leaves LinkedIn represented by a rushed crop from last year. The mismatch is immediate. Buyers, partners, and recruiters read that gap the same way they read inconsistent listing photos. As a workflow problem.
Treat the shoot like a small catalog run. Set the spec first, then capture against it.
Start with a brand brief, not a camera
Before you shoot, define what the image needs to do across channels.
A founder pitching retail buyers needs direct, commercial polish. An operator speaking to logistics teams may want authority with less formality. A consultant selling strategy to established brands often needs a look that feels clear, steady, and expensive without feeling staged.
Write a short brief in the same format you would use for a product batch:
| Decision area | What to define |
|---|---|
| Visual tone | Approachable, technical, premium, creative, straightforward |
| Wardrobe | Neutral layers, brand-aligned colours, no distracting patterns |
| Background style | Plain wall, soft neutral tone, subtle office context |
| Usage | LinkedIn, team page, speaker bio, partner decks |
| Consistency need | Solo headshot now, team headshots later |
That last row affects the whole setup. If you may need matching team photos later, choose a lighting style, background, and crop that can be repeated without friction.
Plan for consistency across the whole asset set
A single good frame is not enough if it breaks the rest of your brand system.
Your headshot appears next to your store bio, founder note, pitch deck, podcast guest card, and event listing. If those touchpoints show different lighting, different crops, or a different level of polish, the brand starts to look assembled from leftovers. Sellers already know this problem from mixed product galleries. Quality drops when the visual standard moves around.
A simple planning method keeps the batch usable:
- Choose one look for the session. Separate use cases can justify multiple looks, but decide that upfront.
- Pick one background family. Neutral backgrounds hold up better across LinkedIn, speaker pages, and PDFs.
- Set crop intent before shooting. Head-and-shoulders survives platform crops with fewer surprises.
- Build a short shot list. Straight-on, slight turn, small smile, neutral expression, and one version with extra negative space.
This is asset management, not portrait luck.
Borrow from your product pre-production habits
The same habits that keep a catalog efficient also improve headshots. Reference frames, test shots, and simple approval criteria save reshoots.
Use a prep checklist before the session starts:
- Wardrobe check: Steam it, test it on camera, avoid tight patterns and shiny fabrics.
- Background test: Remove clutter, check edge contrast, and watch for color cast.
- Skin tone test: Confirm the light keeps skin natural instead of gray, orange, or flat.
- Platform review: Test a square crop because LinkedIn will not use the full frame the way your camera roll does.
If you need a cleaner setup, use the same approach behind a white photoshoot background setup for controlled, repeatable images. The goal is the same as a product batch. Start from a controlled baseline so editing stays fast and output stays consistent.
The best headshot shoots look plain at this stage. That is a good sign.
Planning feels less creative than shooting, but it accomplishes commercial objectives. It gives you a reusable brand asset, reduces retakes, and keeps your professional image aligned with the consistency and quality standards you already enforce across your catalog.
Your Headshot Capture Workflow Using Existing Gear
You already know what happens when one product image in a catalog looks off. Buyers notice the inconsistency before they read a word. Your LinkedIn headshot works the same way. It is a front-facing brand asset, and the capture stage should be handled with the same control you use for a clean product batch.
Build a simple set you can repeat
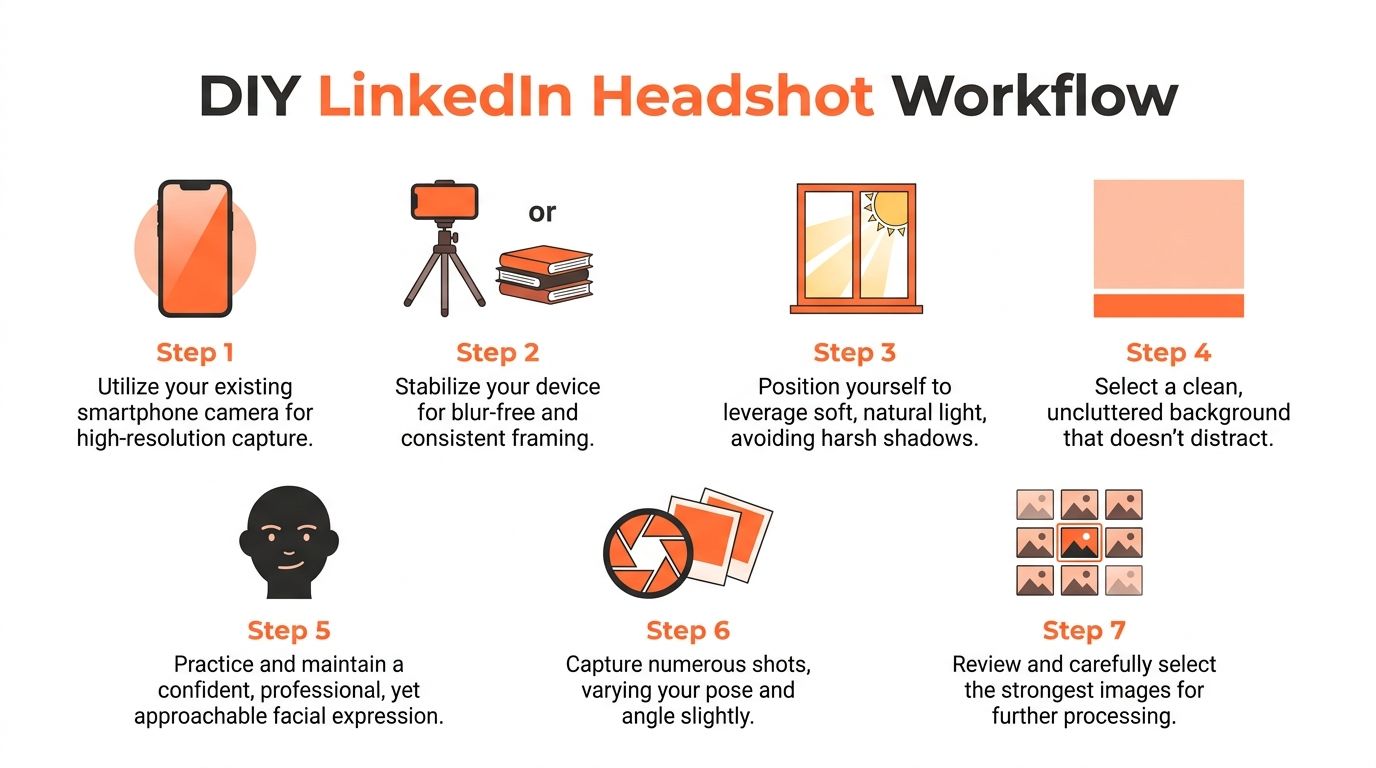
Existing gear is enough. A phone with a decent rear camera, a stable mount, window light, and a plain background can produce a file that holds up well on LinkedIn.
Repeatability matters more than fancy equipment.
Set the phone at eye level. Step far enough from the background to avoid hard shadows and to separate your face from the wall. Stand slightly off the window instead of directly in harsh light so skin texture stays natural and exposure stays easier to manage. Clean the lens before you start. That one habit fixes more softness problems than people expect.
Your setup should deliver three things:
- Even light across the face
- A background with no visual distractions
- Consistent framing from shot to shot
A tripod helps, but a shelf, stacked boxes, or a clamp mount works if it keeps the phone steady and level. The standard is the same as a product setup. Stable inputs make editing faster.
Frame for LinkedIn, not for your camera roll
A headshot can be sharp and still fail if the crop breaks on-platform. LinkedIn displays your image small, circular in some contexts, and alongside dozens of other faces. That changes how you should capture.
Fill the frame with your head and upper shoulders. Leave enough room for a square crop, but do not leave so much empty space that your face loses dominance. Use a timer or remote trigger so you can keep posture relaxed instead of reaching back to tap the phone between frames.
Guidance tied to LinkedIn profile performance associates a strong professional photo with profiles that receive 21 times more profile views and 9 times more connection requests (best LinkedIn headshot guidance).
A capture sequence that works like a batch
Run the shoot in controlled passes, the same way you would capture a product line with small variant changes.
- Start with the baseline. Take five to eight frames with direct eye contact, relaxed shoulders, and a neutral expression.
- Adjust angle only. Turn your torso slightly left or right while keeping camera height, lighting, and background unchanged.
- Adjust expression only. Move from neutral to a slight smile, then to a warmer version that still looks credible for your role.
- Check rejects fast. Remove frames with blink, blur, focus misses, or uneven exposure.
- Repeat the winning setup. Once one combination works, capture more of it before changing anything else.
This is the part many professionals skip. They get one acceptable frame and stop. In catalog work, that would be inefficient. In headshots, it creates the same problem. Too little selection room later.
What helps and what creates rework
| Helps | Creates rework |
|---|---|
| Plain wall with separation | Busy room or cropped event photo |
| Eye-level camera position | Low desk angle |
| Soft side window light | Overhead household lighting |
| Head and shoulders filling the frame | Full torso shot that needs a hard crop |
| Controlled set of variations | One rushed selfie |
If you want a softer background without changing rooms, use blur carefully. Phone portrait modes can work, but edge handling around hair, glasses, and shoulders needs a quick review before you keep the file. A practical method is covered in this guide on blurring a background on iPhone without making the cutout look artificial.
Props hurt more than they help. Expression, posture, and clean light carry the image.
Doing this for a whole catalog?
MerchLoom runs background removal, upscaling and AI editing across every product photo you have — one prompt, whole batch. Try 2 batches free, no signup.
Try it freeKeep the source files clean
Capture files that can survive light processing. Avoid beauty filters, aggressive portrait effects, heavy skin smoothing, or unusual color profiles. Those shortcuts create the same workflow problem you see in poor supplier images. The file may look acceptable at first glance, but it falls apart once you crop, correct, and publish across platforms.
Clean source files give you options. Clean options keep the whole brand system consistent.
The E-commerce Seller’s Headshot Processing Pipeline
Once you've captured a batch, don't fall into the usual trap of opening one file, tinkering for too long, and hoping it works.
A seller's advantage is workflow thinking. You already know how to turn a folder of imperfect source files into a consistent finished set. Apply that same discipline to your headshots.
Think in passes, not in one-off edits
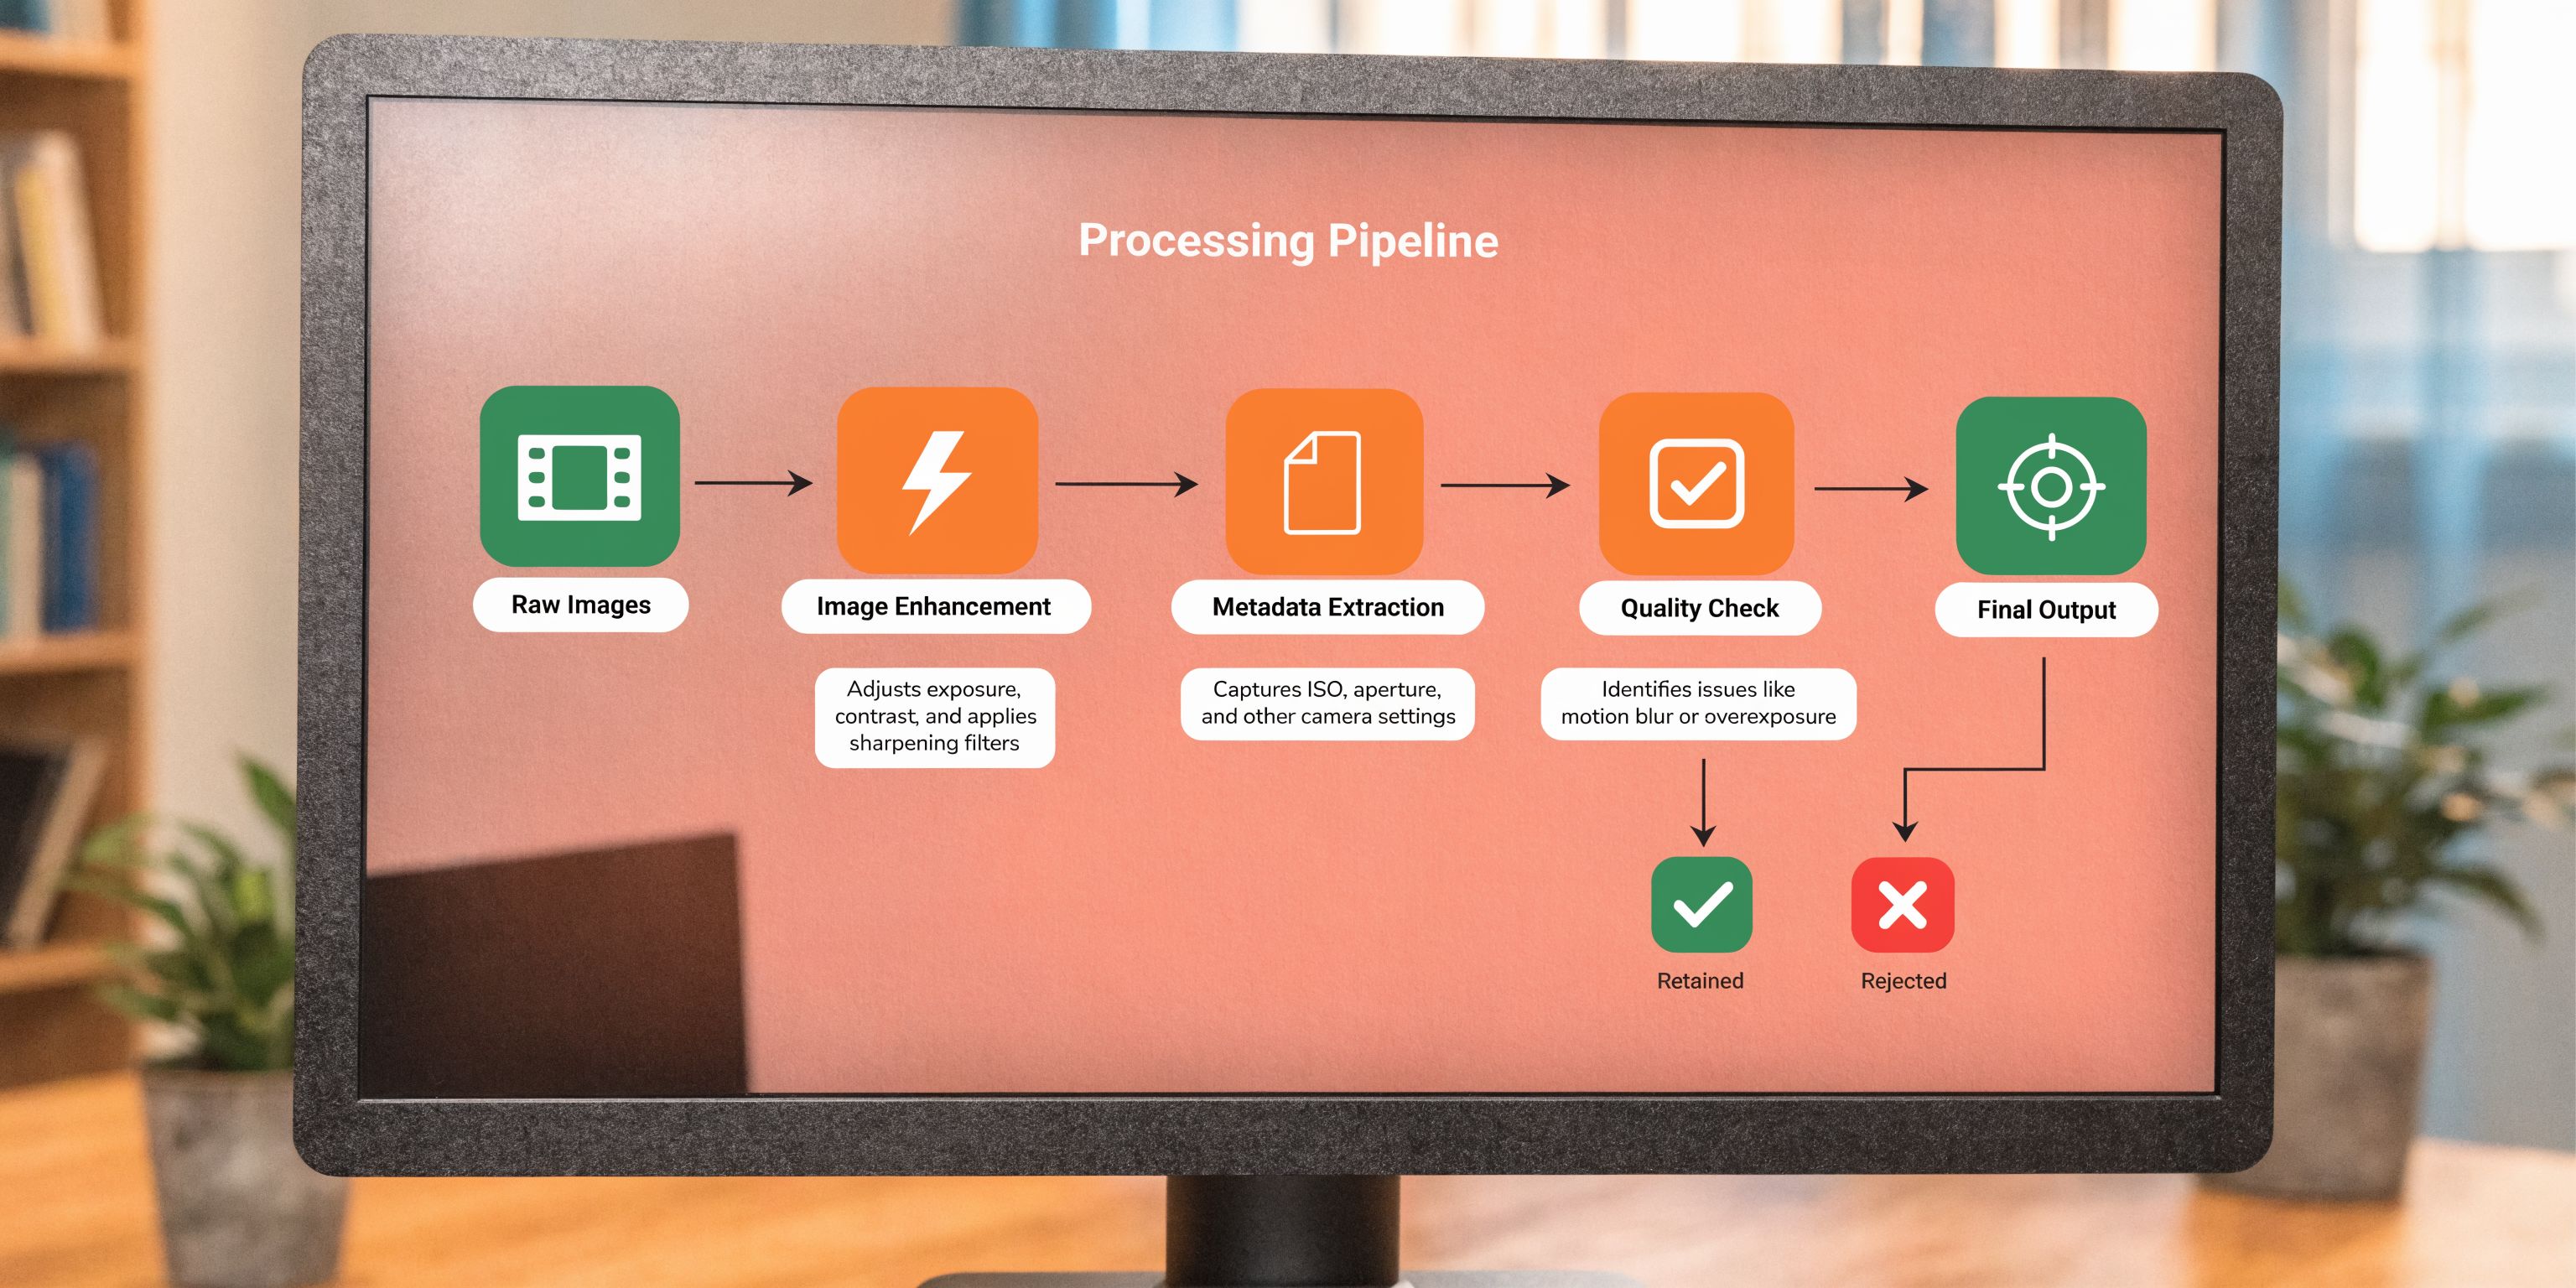
A strong headshot pipeline follows the same order as a product image workflow:
| Pipeline step | What it fixes |
|---|---|
| Background cleanup | Removes clutter and standardises the scene |
| Smart crop | Fits the square display and keeps the face dominant |
| Light balancing | Corrects mild shadows and uneven exposure |
| Colour refinement | Keeps skin tone believable and consistent |
| Resolution check | Ensures the export holds up cleanly |
This sequence matters because each step affects the next. If the crop changes late, the composition can break. If colour correction happens before background cleanup, you may end up correcting pixels you'll remove anyway.
What to edit lightly and what to leave alone
Headshots fail when people treat them like beauty composites instead of business images.
Use a light hand on the parts that affect professionalism:
- Background: Clean it up. Simplify it. Don't make it look fake.
- Exposure: Fix shadows that distract from the eyes.
- Crop: Centre the subject without making the frame feel cramped.
- Sharpness: Recover clarity if needed, but don't overcook skin texture.
Leave these alone or handle them very carefully:
- Facial features
- Skin texture
- Obvious reshaping
- Stylised filters
The finished image should look like you on a good day, not like a generated approximation of you.
Edit for consistency first. Edit for flattery second.
Build a repeatable batch workflow
If you've shortlisted five to ten files, process all of them through the same steps before choosing a final image. That makes comparison fair.
Here, tools built for batch image work are useful. MerchLoom can run chained AI pipelines across image collections, so you can process a small headshot set the same way you'd handle product files, with steps such as cleanup, reframing, and enhancement applied in sequence. For sellers who already think in batches, that's a more practical model than manually rebuilding edits file by file. Resolution checks also matter at export, especially if you want one version for LinkedIn and another for a bio page, which is the same general problem covered in resolution in AI image workflows.
Compare candidates like listing variants
Don't pick the winner while zoomed in at 200%.
Evaluate the set the way a buyer or partner will see it:
- Thumbnail test: Which image reads best small?
- Trust test: Which one feels most natural?
- Brand fit test: Which one matches your store, site, and role?
- Reuse test: Which image could also work on a team page or deck?
That last test is important. The strongest LinkedIn photo is the one with the broadest professional reusability.
A note on AI background swaps and relighting
These tools are useful when the source image is already solid. They are not magic for weak captures.
If your expression looks forced, no pipeline fixes that. If the light is uneven, relighting may help but can also flatten the image. If the crop is too tight, smart reframing can't invent missing shoulders cleanly.
Use AI to standardise and refine. Don't ask it to rebuild a failed shoot. Sellers know this instinctively from product photography. The cleanest outputs come from boring, well-controlled inputs.
Finalizing and Publishing for Maximum Visibility
By this point you should have a small set of processed images that all work. That's a better place to be than hunting for one “perfect” frame.
The final stage is selection, export, upload, and asset management. Treat it like final QC before pushing new listing images live.

Choose the image that feels most believable
The best professional pictures linkedin aren't the most dramatic. They're the ones that make a fast, clean, credible impression.
Use this decision filter:
- Looks like you now: Not a flattering relic from years ago.
- Feels calm on first glance: Nothing distracting, strained, or over-posed.
- Survives the round crop: Eyes, chin, and shoulders still sit well.
- Matches your business position: A seller, operator, or photographer should look aligned with the work.
If two options are close, pick the one with slightly less editing. Authenticity tends to age better than polish.
Export with platform use in mind
LinkedIn's minimum format guidance from the earlier capture source is built around a specific square dimension, but in practice it is wise to keep a higher-quality master export and then generate platform-specific versions as needed. Save one organised folder with clear filenames for:
| File version | Use case |
|---|---|
| Square master | LinkedIn profile photo |
| Larger clean export | Speaker bio and press requests |
| Team page version | Website headshot block |
| Alternate crop | Decks, guest posts, partner pages |
A quick resolution review before export helps avoid soft uploads or over-compressed derivatives. The same practical issue comes up in broader image handling work around resolution in AI.
Build a reusable asset library
At this stage, sellers feel the payoff.
Instead of one headshot living on your phone, you now have a small approved image set that can support multiple channels without rework. That removes friction every time someone asks for a photo. It also keeps your public-facing presence consistent across LinkedIn, Shopify team pages, media kits, and wholesale material.
A finished headshot isn't just uploaded. It's filed, named, and ready for reuse.
Good asset hygiene matters here. Keep the selects in one folder. Archive the source batch separately. Note which version is the current approved profile image. If your team grows, repeat the same workflow so everyone appears under the same visual system.
A professional image only helps when it's easy to deploy.
Your Professional Image Is Now to Spec
The useful shift isn't “take a nicer photo.” It's broader than that.
You applied the same operating principles you already trust in catalogue work. You planned the look, captured a controlled batch, processed the files consistently, and published an image that fits the platform instead of fighting it. That's why this approach works for e-commerce people. It doesn't depend on artistic luck. It depends on workflow.
What changed
Your LinkedIn photo is no longer a random personal image.
It's now:
- Consistent with your brand
- Usable across channels
- Built from a repeatable process
- Strong enough for B2B first impressions
That matters because your business brand and your professional presence aren't separate anymore. Suppliers look you up. Prospective hires look you up. Agencies, marketplaces, creators, software reps, and buyers do the same.
Why this method fits sellers
Sellers don't need more one-off creative tasks. They need systems that reduce repeated effort.
A headshot handled like a miniature product batch does exactly that. You invest once, keep the files organised, and reuse the outputs everywhere they belong. The result is cleaner than improvising each time and faster than restarting from zero every quarter.
If your listings are already to spec, your profile should be too. Anything less creates a gap between the quality of your business and the way you present the person behind it.
If you want to handle headshots with the same workflow discipline as catalogue images, MerchLoom is built for that style of work. You can run structured image pipelines on small or large batches, keep outputs consistent across platforms, and avoid rebuilding the same editing steps every time a new photo is needed.
Stop editing product photos one at a time
Upload your catalog or connect your store. Describe the result once. MerchLoom does the rest.
Try it free — no signup