
Images with White Background: A Guide for High-Volume Sellers
Create stunning images with white background to boost e-commerce sales. Master batch processing for your product catalog. Stand out online!
For those of us in the e-commerce trenches, images with a white background aren't just a nice-to-have; they're a fundamental part of the job. They form the backbone of a clean, consistent storefront that builds trust and lets products speak for themselves. But when you’re facing a mountain of new inventory, getting that clean look across hundreds of photos isn't an artistic exercise—it's a logistical challenge that can make or break your workflow and your sales.
Why White Backgrounds Are a Seller's Secret Weapon

When you're processing a new shipment of 200 items, every minute counts. Creating images with a clean white background isn't just about following rules; it's about making a strategic choice that puts a silent, powerful sales tool to work for you. It cuts through the visual clutter, making your product the undeniable focus.
Think about your own experience as a shopper. A page with a clean, consistent grid of products signals professionalism. You trust it more. A messy page with a jumble of different, distracting backgrounds? It creates friction and doubt before a customer even clicks on a listing. This isn't just theory; it's the reality of online selling.
The Psychology of Simplicity
A white background acts as a neutral canvas, allowing a customer's eyes to focus on a product’s true colours and details without distraction. It’s a simple visual cue that communicates quality. When a buyer is scrolling through a sea of options, your product on a crisp white field stands out because of its clarity. That’s often all it takes to turn a scroll into a sale.
This is especially true in Canada’s competitive e-commerce space. With online sales hitting $69.4 billion, visual quality was named a key factor in 78% of consumer buying decisions. It's no surprise that 92% of the top-performing listings on Amazon.ca feature products on pure white backgrounds, a change that has reportedly led to a 45% jump in conversion rates for those listings.
The goal is to remove any friction between the customer and the sale. A distracting background is friction. A clean, white background is a smooth, direct path to "Add to Cart."
Gaining a Competitive Edge at Scale
For sellers with big catalogues, the real challenge isn't just editing one photo perfectly. It’s about getting that same professional look across an entire collection of hundreds, or even thousands, of different items. The biggest hurdle is consistency. Trying to edit each photo one by one is a surefire way to burn out and end up with mixed results. You need a workflow that can actually scale with your business.
This is where understanding the why helps you figure out the how. Once you realize that a white background is a strategic asset, you can start building processes to deliver it efficiently across your entire catalog.
- Boosts Professionalism: Instantly makes your whole storefront look more polished and trustworthy.
- Enhances Product Focus: All attention goes straight to the item’s details, texture, and colour.
- Ensures Marketplace Compliance: Helps you meet the strict requirements of platforms like Amazon.ca without any last-minute panic. If you want to get the perfect shot right from the start, check out our guide on creating a pristine white photoshoot background.
The real secret weapon isn't the white background itself—it's having a system to produce it reliably and consistently across your entire inventory. This is where automated tools become so valuable, transforming what was once a daunting manual task into a simple, repeatable process for your whole catalog.
Navigating Marketplace Rules for Your Entire Catalogue
If you sell on more than one platform, you know the drill. It feels like you're juggling completely different rulebooks, especially when it comes to your product photos. What looks perfect on your Shopify store might get flat-out rejected by Amazon.ca. This isn't just a minor headache; it's a massive roadblock when you’re staring down a catalogue of hundreds of new photos.
The real challenge is what I call the 'batch problem.' How do you create images with white backgrounds that meet every single platform's unique demands, all without sinking countless hours into tedious, one-by-one edits? The solution is to change your mindset. Stop thinking about single images and start planning for your entire collection from the get-go.
The Big Three Marketplace Requirements
While the rules can seem endless, most Canadian sellers are primarily dealing with three major players: Amazon.ca, Shopify, and Etsy Canada. If you understand what they want before you start editing, you can build a workflow that scales. Let’s break down their typical demands.
Amazon.ca: The King of Strictness: Amazon is notorious for its rigid image guidelines. For your main product photo, they require a pure white background. And they mean pure white—RGB 255, 255, 255. An 'almost white' or light grey just won't cut it. Get this wrong, and you risk your listing being suppressed, which is a killer for sales.
Shopify: Your Store, Your Rules (Mostly): On your own Shopify store, you have more creative freedom. A clean white or light neutral background isn't a hard requirement, but it’s still the gold standard for a professional look. The most important thing here is consistency. A uniform background across your products builds a polished, trustworthy storefront that keeps customers browsing.
Etsy Canada: Where Quality and Detail Win: Etsy is all about showing off the craftsmanship. They encourage high-resolution images that let shoppers zoom in on the fine details of handmade or vintage items. While they don't mandate a white background, it's highly recommended for your primary photo to make your product pop in a crowded search feed. A common requirement is for images to be at least 2000px on the longest side.
Trying to juggle these specifications by hand is a surefire path to burnout. Imagine editing a photo for Amazon’s pure white, then re-editing it for Etsy’s higher resolution, then cropping it into a square for your Shopify theme. Now, do that for 500 products. It's just not a sustainable way to run a business.
The real pain point for sellers isn't just meeting one platform's rules. It's creating a single, master set of images that can be automatically adapted for all platforms without re-doing the work.
Marketplace Image Requirement Cheat Sheet (2026)
To help you get organized, here’s a quick-reference table that lays out the common requirements for the big players in Canada. Use this to plan your photography and editing pipeline from the start so you only have to do the work once.
| Platform | Background Requirement | Minimum Resolution | Aspect Ratio |
|---|---|---|---|
| Amazon.ca | Pure white (RGB 255,255,255) | 1000px on longest side | Flexible, 1:1 (square) recommended |
| Shopify | Recommended, not mandatory | 2048 x 2048px for zoom | 1:1 (square) is common for themes |
| Etsy Canada | Recommended, not mandatory | 2000px on shortest side | 4:3 is common |
As you can see, the requirements conflict just enough to be a real problem. You need a system that can take one master photo and spit out multiple variations on demand.
This is exactly where an automated workflow becomes a game-changer. Tools like MerchLoom let you process entire image collections through chained AI pipelines. Simply upload your entire photoshoot at once, and set up a sequence to first remove the background, then generate a perfectly square version for Shopify, and finally a separate high-resolution version for Etsy—all from a single job. To take things even further, see how a high-definition photo converter can give your images an extra edge. For anyone dealing with the multi-platform batch problem, this kind of automation is the only way to go.
How to Photograph Products for Easy Background Removal

Let’s be honest. When you’re staring down a bin of 200 new products, most photography advice goes right out the window. You're not trying to win an award; you're trying to get clean shots for your store without spending a lifetime in Photoshop. The secret is to shoot for the edit.
Think of it like this: your camera captures the raw ingredients, and your editing software is the kitchen. The better your ingredients, the faster and easier it is to cook up a great final image. A few tweaks to how you shoot can make automated background removal a dream, especially when you need perfect images with a white background.
Set Up for Consistent Lighting
Inconsistent lighting is the single biggest enemy of efficient batch editing. When the light changes even slightly between shots, an AI tool has to guess all over again, leading to flaky results. You’ll see a shadow vanish in one photo but remain stubbornly in the next. Consistency is everything.
Don't worry, you don’t need a fancy studio for this. You just need a simple, repeatable setup.
- Use Artificial Light: Natural light is a trap for batch work. The sun moves, clouds roll in, and the colour of the light changes constantly. These subtle shifts will wreak havoc on your edits. A couple of affordable LED panel lights are a fantastic investment.
- Position Your Lights Consistently: Place one light on each side of your product, both at a 45-degree angle. Use tape to mark their positions on the floor. Now you have a setup you can recreate perfectly, day or night.
- Use a Tripod: This one is non-negotiable. A tripod ensures your camera stays in the exact same spot, giving you a uniform angle and distance for every single shot.
Choose a Contrasting Backdrop
Now for a tip that might feel a bit backwards: if you plan to automate background removal, don't shoot on a pure white background. AI tools identify the edges of your product by looking for contrast. The sharper the contrast, the cleaner the cut.
When an AI sees a white product on a white background, it's like trying to find a polar bear in a snowstorm. The edges get blurry and the results are often messy, with parts of your product accidentally removed.
Instead, use a solid-coloured background that stands out against your product. A simple sheet of medium grey or even light blue poster board can work wonders. This gives the AI a clear, crisp line to trace, resulting in a much more accurate cutout. The goal isn't to get the final background in-camera; it's to make the AI's job as easy as possible. This is a game-changer for products with tricky details or reflective surfaces. To take it a step further, you can even blur the background in your original shot to really make your subject pop.
Leave Space for Cropping and Reframing
When you're in the zone, it's tempting to fill the entire frame with your product. Fight that urge. Always leave a generous buffer of empty space around every side of your item.
This "breathing room" is crucial for your workflow later on. It gives automated tools like MerchLoom the flexibility to intelligently reframe your image for different platforms—creating a perfect square for your Shopify store and a vertical rectangle for Pinterest—without awkwardly chopping off part of your product. By shooting a little wider, you create a single master image that can be effortlessly repurposed everywhere.
Choosing Your Editing Workflow: Manual vs. Automation
You've got your raw product photos. Now for the part every seller dreads: turning those hundreds of shots into perfect, marketplace-ready images with a white background. This is where so many e-commerce operations get bogged down. The path you choose here will directly impact your speed, your costs, and your ability to grow.
As a seller, you’re looking at three main ways to get this done. Each comes with its own trade-offs, not just in money, but in time—the one thing you can't get back. Let's look at what these paths feel like in the real world.
The Manual Grind: Single Image Editing
This is where almost everyone starts. You open an image in a program like Photoshop or a free alternative like GIMP, and you get to work, meticulously tracing your product to erase the background. It gives you absolute control, down to the last pixel.
But that level of control comes at a steep price. This hands-on approach completely falls apart once you’re dealing with more than a few products. If you have 500 new items to list, editing each one by hand is a surefire recipe for burnout. The time commitment is staggering, keeping your images consistent becomes a nightmare, and your business grinds to a halt while you play digital artist. It's a workflow that actively fights against growth.
The Outsourcing Dilemma: Hiring Help
When sellers realise the manual grind just isn't sustainable, they often look to outsourcing. You can hire a freelancer or an agency to handle the tedious edits for you. This frees up your time, which is a huge win. But it brings a whole new set of problems: unpredictable costs and frustrating delays.
Outsourcing can get expensive, fast. To give you some perspective, 2023 surveys from the Canadian Photographers Association found that manual editing costs averaged $12 per image. For high-volume sellers, like thrift resellers on Mercari CA processing thousands of images a month, that kind of expense is a non-starter. Even if you find a cheaper service, you're now on someone else’s schedule, which can mean delays right when you need to get new listings live. You can always explore a more budget-friendly approach by learning to remove backgrounds with GIMP yourself, but you still run into the same time-sink issue with large batches.
Doing this for a whole catalog?
MerchLoom runs background removal, upscaling and AI editing across every product photo you have — one prompt, whole batch. Try 2 batches free, no signup.
Try it freeThe Automation Advantage: In-House Batch Processing
This leads us to the third, and most scalable, option: bringing the work back in-house with smart automation. This is where you use a tool designed for the realities of e-commerce—one built for batch processing. Instead of tackling one image at a time, you process an entire collection at once.
That's the entire philosophy behind MerchLoom. It's not just another background remover; it’s a system for building chained AI pipelines. You can drop in a folder of 300 photos and tell the AI to run a specific sequence of edits on every single one:
- Step 1: Remove the background from all images.
- Step 2: Intelligently reframe them into perfect squares for your Shopify theme.
- Step 3: Upscale the reframed images to meet Etsy's 2000px requirement.
- Step 4: Add a subtle, realistic shadow to give them some depth.
This pipeline approach is the fundamental shift sellers need to make. It moves your workflow from "one image at a time" to "one collection at a time," solving the scalability problem that plagues manual editing and the cost/delay issues of outsourcing.
A 2025 study of WooCommerce Canada users confirmed just how powerful this is, finding that batch-processed white background images boosted listing approvals by 63%. Agencies using similar workflows also reported 40% time savings. By sequencing tasks intelligently—like removing the background first to shrink the file size before other edits—MerchLoom dramatically cuts down on compute needs, which saves you money on every single batch. It's the best of all worlds: the control of manual editing, the time savings of outsourcing, and the consistency only a machine can deliver, all at a fraction of the cost. You can explore more research on white background statistics to see just how much of an impact it can make.
Alright, let's move past the theory and get our hands dirty by building an automated workflow that solves a real-world e-commerce problem. This is where you graduate from editing photos one by one to processing entire collections in a single go. Frankly, it’s the difference between being a photo editor and being a business owner.
Imagine you're a vintage clothing seller who just photographed 150 unique pieces. The raw photos are decent, but they’re shot on a grey background and need a lot of work before they're ready for your store. You sell across Shopify, Etsy, and occasionally eBay.ca, and each one has its own finicky image requirements. Tackling this manually would take days. With an automated pipeline, it takes minutes.
A Real-World Pipeline Example
You can use a tool like MerchLoom to chain together a series of AI editing steps that runs on every single one of your 150 images automatically. Think of it as creating the perfect recipe for your product photos, then applying that recipe to a whole batch of ingredients at once.
Here’s what that pipeline would look like for our vintage clothing seller:
- Start: Upload your folder containing all 150 raw photos.
- Step 1: Remove Background: This is the crucial first step. The AI gets to work removing the grey backdrop from every image, leaving you with clean cutouts on a transparent background.
- Step 2: Add White Background: Next, you fill that transparent area with pure white (RGB 255, 255, 255). This instantly meets Amazon's strict rules and gives every photo that clean, professional look.
- Step 3: Resize for Shopify: You can duplicate the results from the previous step and apply a smart-cropping function to create perfectly square 1:1 aspect ratio images that look fantastic in your Shopify theme.
- Step 4: Upscale for Etsy: In a parallel step, you can take those original white-background images and upscale them to hit Etsy's 2000px minimum for its powerful zoom feature.
This infographic shows exactly how automation fits into the bigger picture of your editing options.
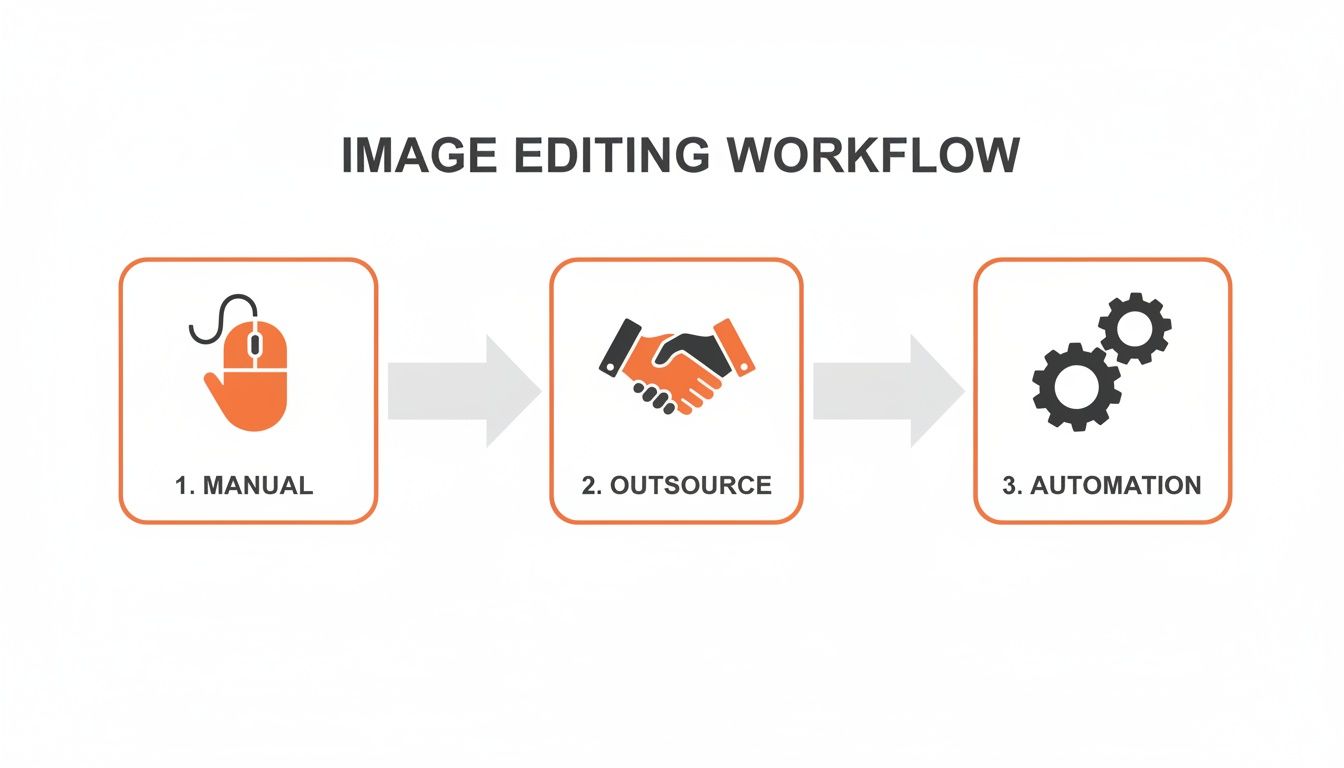
The key takeaway here is simple: automation is the only path that lets you affordably and consistently scale up your image production as your business grows.
Working Smarter, Not Harder
The real genius of this pipeline approach isn't just the speed—it's the efficiency. Notice the order of the steps. We remove the background before doing anything else. This simple choice has a massive impact on your costs.
By removing the background first, you shrink the amount of data the AI has to process in later steps. When you upscale an image, you're only upscaling the product itself, not a giant, data-heavy background. This smart sequencing can save up to 87% on processing costs.
With just one upload, those 150 photos now generate perfectly formatted images for all your sales channels at the same time. The headache of re-editing and re-uploading for each site is gone. This is how you reclaim your time to focus on what actually grows your business: sourcing great products and selling them.
The Impact On Your Bottom Line
This isn't just a technical exercise; it's a direct path to better performance and more sales. According to a 2024 Shopify Canada analysis, listings with clean, white-background images achieve 2.7x higher click-through rates. Data from eBay.ca shows that these images can boost final bids by as much as 29%.
For agencies and photographers in cities like Toronto, who might handle 500+ images every week, pipeline automation is the only way to stay competitive. You can discover more insights about these e-commerce analytics to see the full picture.
And once your core product shots are done, you can get even more creative. For another great way to enhance your product visuals, learn how you can use an AI image combiner to create compelling collages and lifestyle shots from your newly edited images.
Troubleshooting Common Batch Processing Issues
Let’s be realistic. Even the most carefully built automated workflow is going to hit a snag occasionally. That’s just what happens when you’re pushing hundreds, or even thousands, of images through a system at once. The real skill isn't in creating a flawless system—it's in knowing how to spot and fix problems on the fly, without your entire day going off the rails.
We’ve all had that sinking feeling. You kick off a batch of 500 product photos for background removal, come back later, and find that half of them are a complete mess. Maybe the AI got confused by weird shadows or it completely butchered the delicate edges of a product. It's an incredible waste of time and, depending on the tools you use, a lot of money right down the drain.
How to Handle Tricky Products in Bulk
Some products are just notoriously difficult for automated tools. Items with fine details, transparent surfaces, or fuzzy textures can easily trip up an AI if the original photograph isn’t crystal clear.
You’ll run into this with products like:
- Furry or Fluffy Items: Think of a faux-fur coat or a soft plush toy. The thousands of tiny, soft edges are a nightmare for an algorithm to separate cleanly from the background.
- Transparent or Glass Objects: Glassware, acrylic furniture, or anything in clear packaging can be a real challenge. The AI often struggles to tell the difference between the object itself and what’s visible through it.
- Complex Jewellery: Fine chains, intricate metalwork, and sparkling gemstones create patterns that can lead to messy, incomplete, or blocky cutouts.
The best defence here is a good offence. As we talked about earlier, shooting for maximum contrast is your secret weapon. A sharp, well-lit photo against a background that’s a completely different colour gives the software the best possible chance to get it right.
You don't need a perfect edit on the first try. You just need a system that lets you catch a bad edit before it multiplies across your entire catalogue.
The Value of Real-Time Quality Control
This is where a smarter, more reactive workflow completely changes the game. The old way of batch processing was basically a "fire and forget" mission. You'd start the job, cross your fingers, and hope for the best. If the results were bad, you’d already paid for the entire failed batch.
Modern tools should offer more control. A platform like MerchLoom, for example, lets you see your results in real-time as the pipeline is running. This is a huge leap forward for quality control. Instead of waiting for all 500 images to finish processing, you can watch the first 5 or 10 as they come through.
If you spot an issue—let's say the AI is consistently erasing the chain on a necklace—you can pause the job instantly. You haven't wasted your credits on the other 490 images. This gives you a chance to figure out what's wrong, maybe adjust your original photos or tweak a step in your pipeline, and then restart the job for the remaining images with confidence.
This simple ability to preview and pause turns a potential disaster into a minor course correction. It's a workflow designed for the messy reality of e-commerce, not some perfect, idealized lab environment.
Common Questions About Batch Image Editing, Answered
Once you're ready to move beyond editing photos one by one, a few big questions always pop up. Let's dive into the practical, no-fluff answers for automating your workflow for those clean images with a white background.
Will AI Background Removal Work for My Complex Products?
Yes, absolutely. Modern AI has gotten surprisingly good at handling tricky edges, even on things like delicate lace or fluffy fur. The real key isn't the AI alone; it's what you feed it. Giving the software a high-quality photo with clear contrast between your product and the background is what allows it to lock onto a clean edge.
For those especially difficult items, my advice is always to run a small test batch of 5-10 images first. A tool like MerchLoom lets you see the results almost instantly. If they aren’t quite right, you can pause the job, tweak your lighting or camera angle, and try again without wasting credits on your entire photo shoot.
Is It Better to Pay for a Subscription or Pay-As-You-Go?
This comes down to your business's rhythm. If you have an inconsistent flow of products—maybe you're a vintage reseller who gets large inventory drops sporadically—a pay-as-you-go model is almost always the smarter choice. You only pay for what you process, so you aren't bleeding money during slower months.
On the other hand, subscriptions can make sense for bigger operations with a steady, predictable, and high volume of images every single month. For most small to medium-sized sellers, though, the flexibility of paying as you go is a massive advantage.
For sellers with fluctuating inventory, paying per image means your software costs scale directly with your revenue. You’re never paying for a service you aren't using.
How Do I Ensure Colour Consistency Across Hundreds of Images?
Getting consistent colour is a two-step game. It all starts at the source: the photoshoot. You have to use the exact same lighting setup and camera settings for the entire batch of photos. This gives you a uniform, predictable starting point for every image.
Then, you let your processing pipeline do the heavy lifting. After the background is removed, you can add a step like "Auto Enhance" or "Colour Correction" to your workflow. By applying the same enhancement profile to every single image, you guarantee that the final colour and white balance are identical across the board.
Ready to stop wasting time on manual edits and start building scalable workflows for your entire catalogue? Try MerchLoom today and see how easy it is to process your first batch of images for free. Learn more at merchloom.ai.
Stop editing product photos one at a time
Upload your catalog or connect your store. Describe the result once. MerchLoom does the rest.
Try it free — no signup