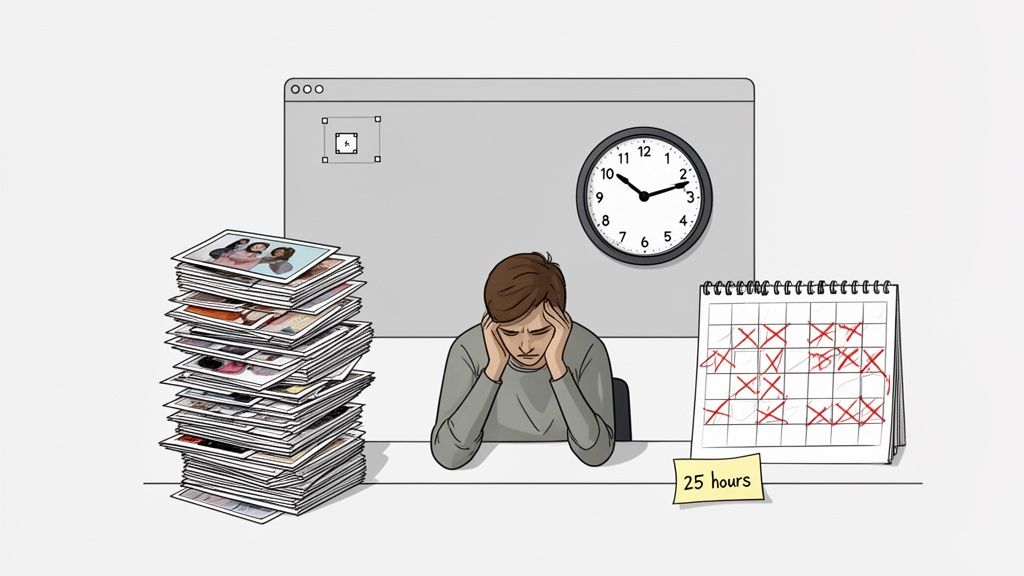
You’ve got a new batch of product photos for your Shopify store, but they’re all shot against a messy, distracting background. To get that clean, professional look that actually sells, you need to remove it. You open up GIMP, a powerful and free tool, ready to get to work.
But just ten photos in, you’ve already burned two hours. You’re painstakingly tracing the fiddly edges of a necklace, zooming in and out, undoing mistakes, and you still have 490 images left in the queue. The “free” software is starting to feel incredibly expensive.
This is the hidden cost of manual editing. Every hour you spend tracing pixels is an hour you’re not spending on marketing, customer service, or finding your next best-selling product.
The True Cost of ‘Free’ Background Removal in GIMP
Those hidden costs show up fast. You suddenly find yourself spending an entire evening meticulously tracing the fiddly edges of just one or two products. That “free” software starts feeling pretty expensive when you realize you’re sinking hours into YouTube tutorials just to master its advanced selection tools.
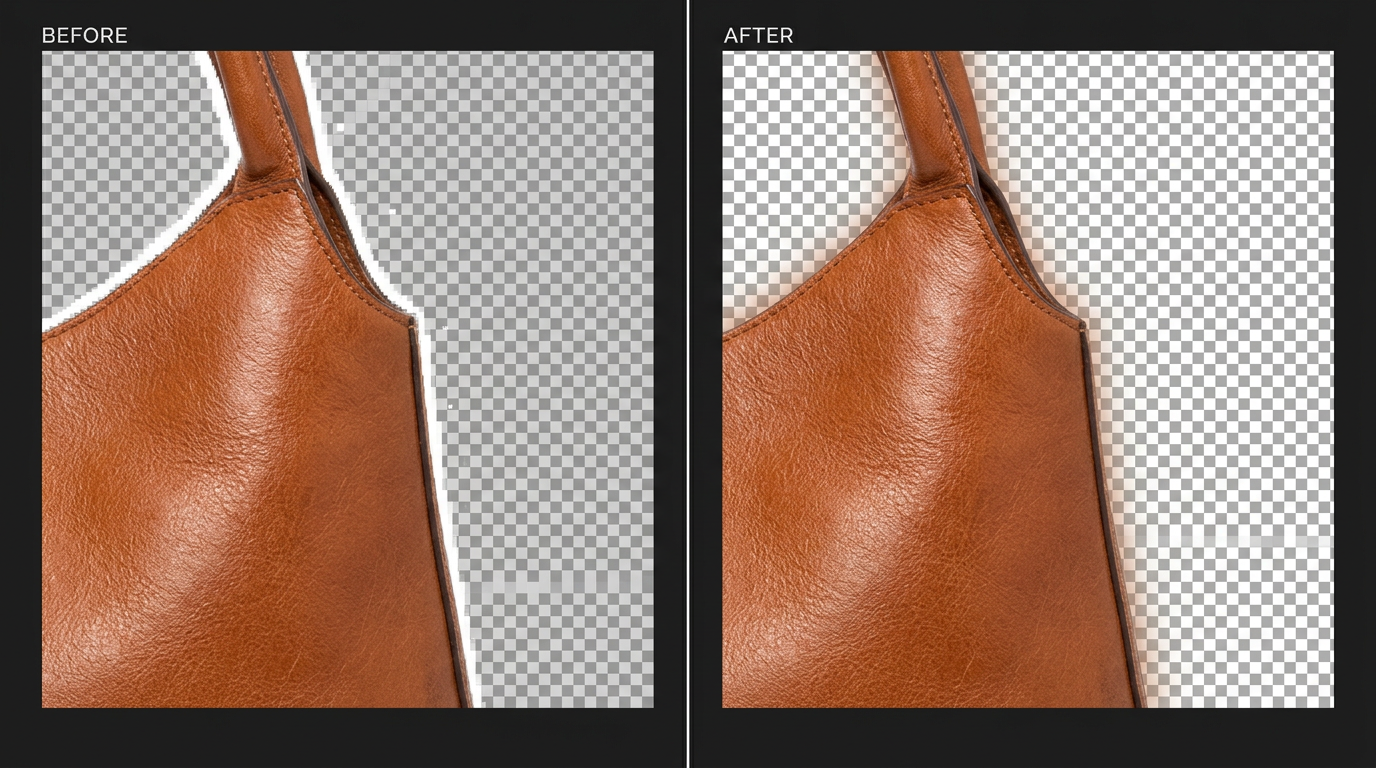
Before/After: The Manual Editing Grind
Let’s walk through a real-world scenario. You have a photo of a new bicycle for your store, shot in a cluttered garage. To get a professional cutout in GIMP, it will take an experienced user about 20 minutes.
Before:
- A single product photo against a busy, distracting background.
- Estimated edit time: 20 minutes of manual path-tracing.
After:
- The same product on a clean, transparent background, ready for Shopify.
- Actual time spent: 20 minutes of clicking, nudging selections, and cleaning up stray pixels.
Now, do the math for a small batch of 100 new product shots. That’s 2,000 minutes. Or over 33 hours of mind-numbing, repetitive clicking. We’re talking more than four full 8-hour workdays spent on a single, boring task.
For a growing Shopify store, 33 hours spent on manual editing is time you’re not spending on marketing, talking to customers, or finding your next winning product. The opportunity cost of ‘free’ can be absolutely massive.
The Scaling Problem You Can’t Ignore
This time-suck becomes a genuine business crisis as you grow. What happens when your catalogue hits 500 products? That’s 165 hours of manual editing. The dream of saving money by dodging paid software evaporates, replaced by a huge operational bottleneck that brings your entire launch schedule to a grinding halt.
Then there’s the problem of consistency. The quality of your cutouts starts to vary wildly from one photo to the next, depending on your patience that day or how complex the product is. This lack of uniformity can make your whole storefront look amateurish.
Look, GIMP is a fantastic tool for a one-off creative project. But it was never built for the high-volume, repetitive work a modern e-commerce brand demands. To see just how much faster an automated tool can work, it’s worth checking out the transparent pricing and time savings of a service built for this exact job. It’s not a Photoshop replacement; it’s a specialist for background removal, AI editing, and upscaling.
Quick Selections for Simple Product Images
Let’s be honest, when you have a mountain of product photos to get through, you’re not looking for the most complicated, multi-step process. You’re looking for a quick win. And if your product shots are simple—a dark object on a clean, solid white background—GIMP has a couple of tools that feel like magic.
These are your go-to options for straightforward jobs where speed is more important than pixel-perfect precision. They work by grabbing pixels of a similar colour, which can save you a ton of time compared to tracing an object by hand.
The Fuzzy Select Tool
The Fuzzy Select Tool, which you might know as the “Magic Wand” from other programs, is usually the first thing people try. You just click on the background, and GIMP instantly selects all the connected pixels that look the same. For the right kind of image, it’s incredibly fast.
The secret to taming this tool is the Threshold setting. Think of it as a leash. A low threshold keeps the selection tight, only grabbing colours almost identical to where you clicked. Crank the threshold too high, and it gets aggressive, “bleeding” into your product, especially if there are subtle shadows or reflections.
A common trick is to hold the Shift key while clicking on any parts of the background the first click missed. This adds to your selection. Once the whole background is highlighted, just hit the Delete key, and it’s gone. You can see how this works for some of the clean, simple items in our January product showcase.
The Select by Colour Tool
But what happens when the background isn’t all one connected piece? Picture a wicker basket or a donut. The Fuzzy Select tool will only grab the background you click on, leaving you to Shift-click inside every single hole. That’s where the Select by Colour Tool saves the day.
Instead of just selecting adjacent pixels, this tool finds every pixel of that colour anywhere in the image. One click on the white background selects the area around the donut and the bit inside the hole. It’s a huge time-saver. Just like the Fuzzy Select tool, you’ll need to play with the threshold to get it right without eating into your product.
But here’s the hard truth: these tools are blunt instruments. The moment your background colour even remotely resembles your product’s colour—think a beige sweater on an off-white wall—you’re in for a world of hurt. You’ll get a jagged, messy outline that looks completely unprofessional. It’s a dead giveaway of an amateur job, and it can instantly tank your brand’s credibility. They’re a great place to start, but you’ll hit their limits fast.
Mastering Precision Tools for Complex Photos
So, you’ve tried the quick tools. The Fuzzy Select and Select by Colour are fantastic shortcuts when you’re dealing with a simple object on a clean, solid background. They feel like magic.
But what happens when the magic runs out? What about the fuzzy knit sweater, the intricate chain on a piece of jewellery, or the semi-transparent edge of a glass vase? This is where the quick tools fall apart, leaving you with jagged edges and a blotchy mess. It’s time to graduate to GIMP’s more powerful—and yes, significantly more time-consuming—methods.
Let’s be honest: these precision tools demand patience. Lots of it. When you’re just starting, expect to spend a solid 20-30 minutes on a single complex image. It’s a serious time investment, but it’s the only way to get a professional, clean cutout for tricky products without leaving GIMP.
This decision tree can help you figure out which tool to reach for based on what you’re trying to edit.
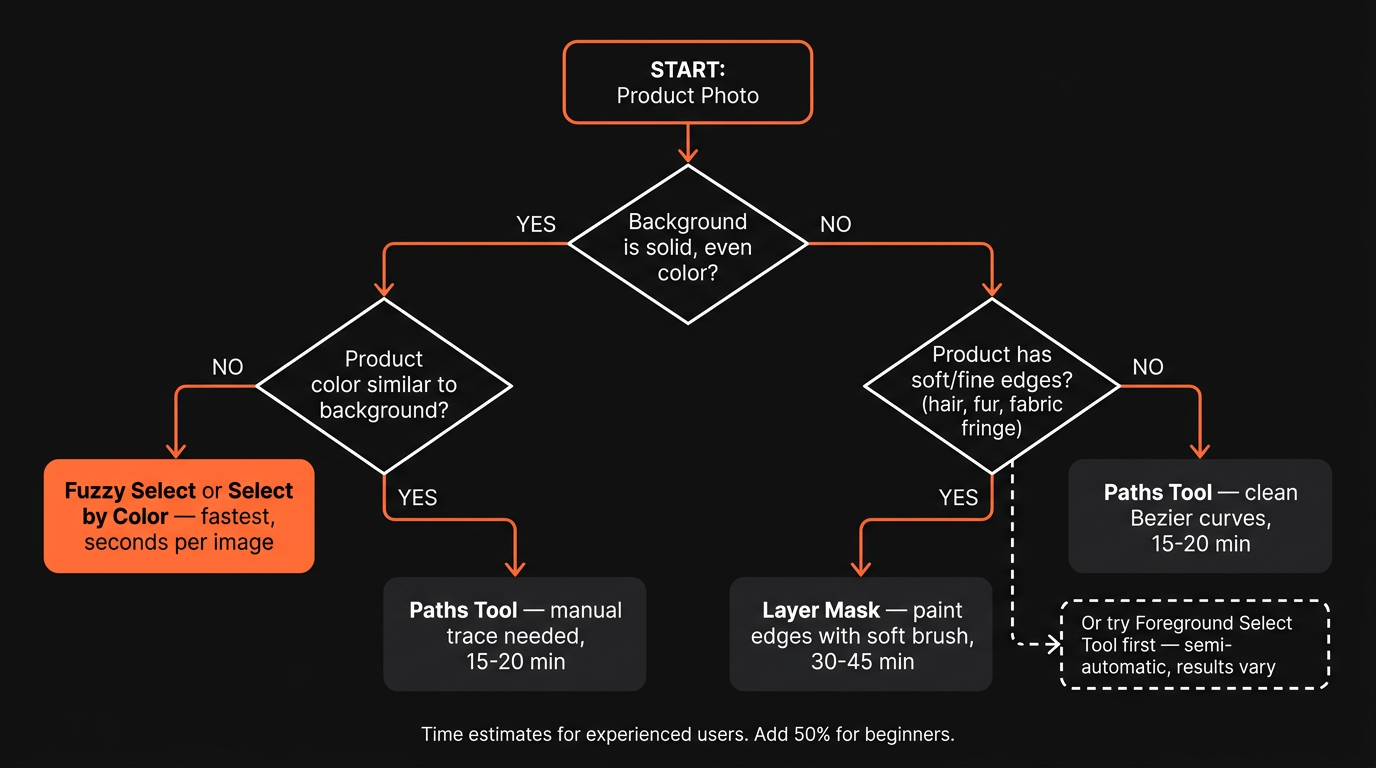
As you can see, the path forks pretty quickly. Simple, sharp edges? The quick tools might work. Anything with soft edges, busy backgrounds, or similar colours between the subject and background? You’re heading into precision territory.
Before/After: A Complex Product
Let’s take a photo of a model with long, flowing hair. This is a nightmare for quick selection tools.
Before:
- A portrait with complex edges (hair) against a multi-colored background.
- Manual GIMP time: 30 minutes using Layer Masks and careful brushing.
After:
- A clean cutout with natural-looking hair, but it took half an hour of meticulous work for one single photo.
- AI time: 5 seconds. Cost: $0.05. The result is just as good, if not better. You can test this exact scenario at merchloom.ai.
Using the Paths Tool for Clean Edges
The Paths Tool is your best friend for products with smooth, hard edges. Think electronics, bottles, books, or modern furniture. Instead of trying to select pixels, you’re basically tracing your product’s outline by creating a series of anchor points.
You click to place a point, then click and drag to create the next one, bending the Bezier curves between them until they perfectly hug the shape of your product.
It’s a slow, meticulous dance of click, drag, adjust. You’ll be placing dozens, sometimes hundreds, of points for a single object. Once you’ve traced the entire outline and closed the path, you convert it into a selection, invert that selection, and hit delete. While it feels tedious, the result is an incredibly clean and precise line that other tools just can’t replicate on defined shapes.
Non-Destructive Editing with Layer Masks
Now, try using the Paths Tool on a person’s hair, a fluffy scarf, or a pet portrait. The result is an unnatural, cut-out-with-scissors look. That’s where Layer Masks come in.
Think of a layer mask as a special stencil attached to your image layer. Painting on this mask with black hides parts of the image, while painting with white reveals them. Grey tones create transparency.
This technique is completely non-destructive. You aren’t permanently deleting a single pixel from your original image. If you mess up, you just switch your brush colour and paint the area back in. By using a soft-edged brush, you can gently “paint away” the background, creating a much more natural, soft transition around tricky subjects like hair and fur.
The Foreground Select Tool
GIMP’s Foreground Select Tool is a different beast altogether—a semi-automated hybrid that tries to intelligently separate your product from its background.
First, you draw a loose, rough outline around the object you want to keep. It doesn’t have to be perfect.
Next, you switch to a brush mode and “paint” over the parts of the image you want to keep, helping GIMP understand what constitutes the foreground. The tool then analyzes the colours and textures to create a selection. While it sounds much faster, it often requires a lot of manual cleanup and can be unreliable on very complex images. It’s a good tool to try when you have a reasonably well-defined subject but don’t want to commit to the full Paths Tool process.
Key Takeaway: While these precision tools in GIMP are undeniably powerful, they expose a fundamental trade-off. You can achieve professional-quality results on difficult images. But it comes at the direct cost of your time—a resource that, for any growing business, quickly becomes far more valuable than a software subscription fee. You can find more tips on product photography and editing in our other guides for e-commerce sellers.
Refining Edges and Exporting for E-Commerce
Getting that initial selection is a huge win, but it’s the last 10% of the job that separates a jarring, amateur cutout from a seamless, professional product image. This is where you polish the rough spots and make your product look like it actually belongs on your store, not like it was just pasted on top with digital scissors.
Skipping this step is a classic rookie mistake. It’s what leaves you with that faint, glowing “halo” of the old background, or edges so sharp they look unnatural. These tiny details make a huge difference in how customers see your brand’s quality.
Smoothing Out the Rough Spots
Once you have your active selection—those “marching ants” outlining your object—there are two commands you’ll use constantly. You can find both under the Select menu.
- Feather Edges: This is your secret weapon for natural-looking cutouts. It softens the transition between your subject and the transparent background. A tiny feather of just 1-3 pixels is usually all it takes to remove the harshness without making your product look blurry.
- Shrink/Grow Selection: That annoying “halo” effect? It usually happens because your selection accidentally grabbed a few pixels of the old background. The fix is simple: use
Select > Shrinkand pull the selection inward by 1 or 2 pixels. It’s a brilliant little trick to tighten the border and kill that distracting fringe.
These two tweaks take just a few seconds, but they’re absolutely essential when you need to remove a background in GIMP for your e-commerce listings.
The Most Important Final Step: Exporting Correctly
You’ve spent all this time creating the perfect cutout, only to upload it to your Shopify store and see it sitting on a solid white block. It’s a hugely common—and frustrating—problem for new GIMP users. This happens for one of two reasons.
First, your image layer might not even support transparency. To fix this, head over to your Layers Panel, right-click the image layer, and select Add Alpha Channel. This is how you tell GIMP that the layer is allowed to have transparent areas.
Second, and most importantly, you have to export your file in a format that actually supports transparency. JPEGs do not. You absolutely, positively must export your image as a PNG file.
When you’re ready, go to File > Export As.... Give your file a name that ends in .png, something like blue-tshirt.png. When the export dialogue box pops up, just leave the default settings and click Export. This guarantees your transparent background is preserved, making your product look perfect on any website or marketplace.
When Manual GIMP Editing Is No Longer Sustainable
You’ve spent the entire morning wrestling with just ten product photos, and you can still see the faint halos of the old backgrounds. You take a quick glance at your ‘to-do’ folder—only 490 images left. This is the breaking point. It’s the moment every growing Shopify store owner hits when “free” software starts feeling incredibly expensive.
The skills you’ve painstakingly learned to remove a background in GIMP are valuable, no question. But they don’t scale. Let’s do the painful math. Using our earlier estimate of 20 minutes per image, tackling a 500-product catalogue demands 166 hours of focused, tedious labour. That’s more than four full-time work weeks you’re not spending on marketing, customer service, or finding your next winning product.
The True Cost of Manual Editing at Scale
This isn’t just about lost time; it’s about lost momentum. While you’re tracing pixels, your competitors are launching new collections and spinning up ad campaigns. Your manual editing process has become the bottleneck that’s choking your brand’s ability to react and grow.
The financial trade-off becomes glaringly obvious pretty quickly. For example, some market studies show a significant gap between time spent and value created. One analysis found that while open-source tools saved creators money on software, the lost time was valued at nearly triple the savings. You can read more about these creator economy trends to see just how wide that efficiency gap is.
That’s the brutal reality of scaling with manual tools. The savings are an illusion. The real cost is measured in stalled growth and missed opportunities—a price far higher than any software subscription.
When your brand’s growth depends on speed and consistency, every hour spent on repetitive tasks is an hour you can’t get back. The table below puts the trade-off into stark perspective for a typical batch of 100 product images.
Manual GIMP Editing vs MerchLoom AI for 100 Product Images
| Metric | Manual GIMP Method | MerchLoom AI |
|---|---|---|
| Time Investment | 33 hours of focused work | Under 5 minutes |
| Monetary Cost | $0 (if doing it yourself) | $5 (at $0.05 per image) |
| Opportunity Cost | ~4 full workdays lost | Negligible |
| Consistency | Varies by image and editor fatigue | Perfectly consistent across all 100 images |
| Result | 100 edited images in several days | 100 edited images in minutes |
The numbers speak for themselves. The time saved isn’t just a convenience; it’s a fundamental shift in how you can run your business.
And here’s what happens when the AI doesn’t get every image perfect—because no tool does, 100% of the time. Instead of starting over or opening GIMP for the exceptions, you select the ones that need another pass, import them back as inputs to a new pipeline, and run different settings. The output of one pipeline is a valid input to the next. This iterative loop means you’re not betting everything on a single run—you refine until every image is right, without re-uploading or starting from scratch.
A Practical Alternative for Growing Brands
So, what’s the move when you’re facing a mountain of images? You need a process, not just a tool. This is where services built for e-commerce workflows come in. Instead of sinking 166 hours and four weeks into those 500 images, you could turn to an AI tool like MerchLoom.
That entire batch of 500 images could be processed for just $25 (at our rate of $0.05 per background removal) and be ready for you in minutes, not weeks. The results are clean and consistent across your entire catalogue, with no variation in quality from the first photo to the last. There are no subscriptions and your credits never expire.
This isn’t about replacing your skills; it’s about redirecting them where they have the most impact. By automating the repetitive 90% of the work, you free yourself up to focus on creative direction, marketing, and strategy.
See for yourself how the AI handles tricky items like fuzzy sweaters or intricate jewellery. Upload one of your own problem images—no account or credit card needed to see the result. It’s built to solve the core problems of time, cost, and inconsistency, letting you get back to actually building your brand.
MerchLoom interactive demo — batch processing product photos in real-time
Burning Questions About GIMP for Product Photos
If you’ve spent any time trying to remove a background in GIMP, you’ve probably run into a few walls. Here are some of the most common frustrations we hear from sellers and creators who are looking for a better way.
For a one-off hero shot for your homepage? It’s a perfectly fine choice. But when you’re facing a catalogue of 200 products, that manual process just doesn’t scale. It’s slow, tedious, and it’s tough to keep the quality consistent. The time it takes to get one photo just right in GIMP is enough to process your entire catalogue with a dedicated AI tool.
1. Your layer is missing an Alpha Channel. Think of this as giving the layer permission to be transparent. You can fix this by right-clicking your layer in the Layers panel and selecting Add Alpha Channel. If it’s greyed out, you already have one.
2. You’re saving it as the wrong file type. You’re probably saving it as a JPEG, which doesn’t support transparency. To keep that clear background, you have to export your file using
File > Export As... and make sure you save it as a PNG.This one small issue can completely derail a product launch. A clean, transparent PNG is absolutely essential for professional e-commerce listings that need to look sharp on any background colour.
An AI tool like MerchLoom, on the other hand, was built for this. It’s been trained on millions of images with exactly these kinds of complex edges—hair, fur, even see-through objects. It automatically identifies and isolates all those fine details in just a few seconds, giving you a clean result without any manual brushing. You can see it for yourself by dropping a tricky photo onto the interactive demo at merchloom.ai—no account needed.
Some tech-savvy users might install third-party plugins or try to write scripts, but these are often a massive headache to set up. They also tend to fail unless you’re working with a batch of nearly identical images against a perfectly simple background. This limitation is a huge bottleneck for sellers and is one of the core problems that purpose-built AI services were designed to solve, letting you process hundreds of different images in a single upload.
Instead of spending another day tracing pixels, you can have your entire product catalogue ready for your store in minutes. MerchLoom processes your images for just $0.05 per background removal, with no subscriptions and credits that never expire.