
Product Photos for Ecommerce That Convert at Scale
A practical workflow for product photos for ecommerce at catalog scale, from setup and shooting to batch editing and marketplace-ready output.
You've got a folder full of product shots, a listing deadline, and no desire to edit the same background two hundred times. The first image looks bright, the next looks gray, and a third has the product sitting too low in the frame. That inconsistency is rarely caused by one bad photo. It starts before the shutter is pressed.
Treat product photos for ecommerce as a catalog pipeline. Lock the studio, camera, shot list, file naming, batch edits, quality checks, and marketplace exports. Buyers use images to judge products quickly. Independent industry summaries report that 75% of online shoppers rely on product photos, while 9 out of 10 say high-quality photos are among the most important buying factors. The same summary connects high-resolution images with a 94% higher conversion rate than low-resolution images. The practical lesson is simple. Make the system repeatable before you make it elaborate.
Setting Up a Studio That Holds Up Across a Full Catalog
You're shooting 200 SKUs in two days. Every product needs to look as though it came from the same studio, even if the items range from jewelry to kitchenware. A fixed setup saves more time than trying to repair inconsistent shadows, angles, and color later.
Start with a 60 x 60 cm shooting surface or larger. Use a white sweep for primary listing images, with the curve taped flat so it can't shift between products. Put the table far enough from the wall that the background doesn't collect hard shadows. Leave at least 1.5 m of clearance behind the table.
Lock the physical setup
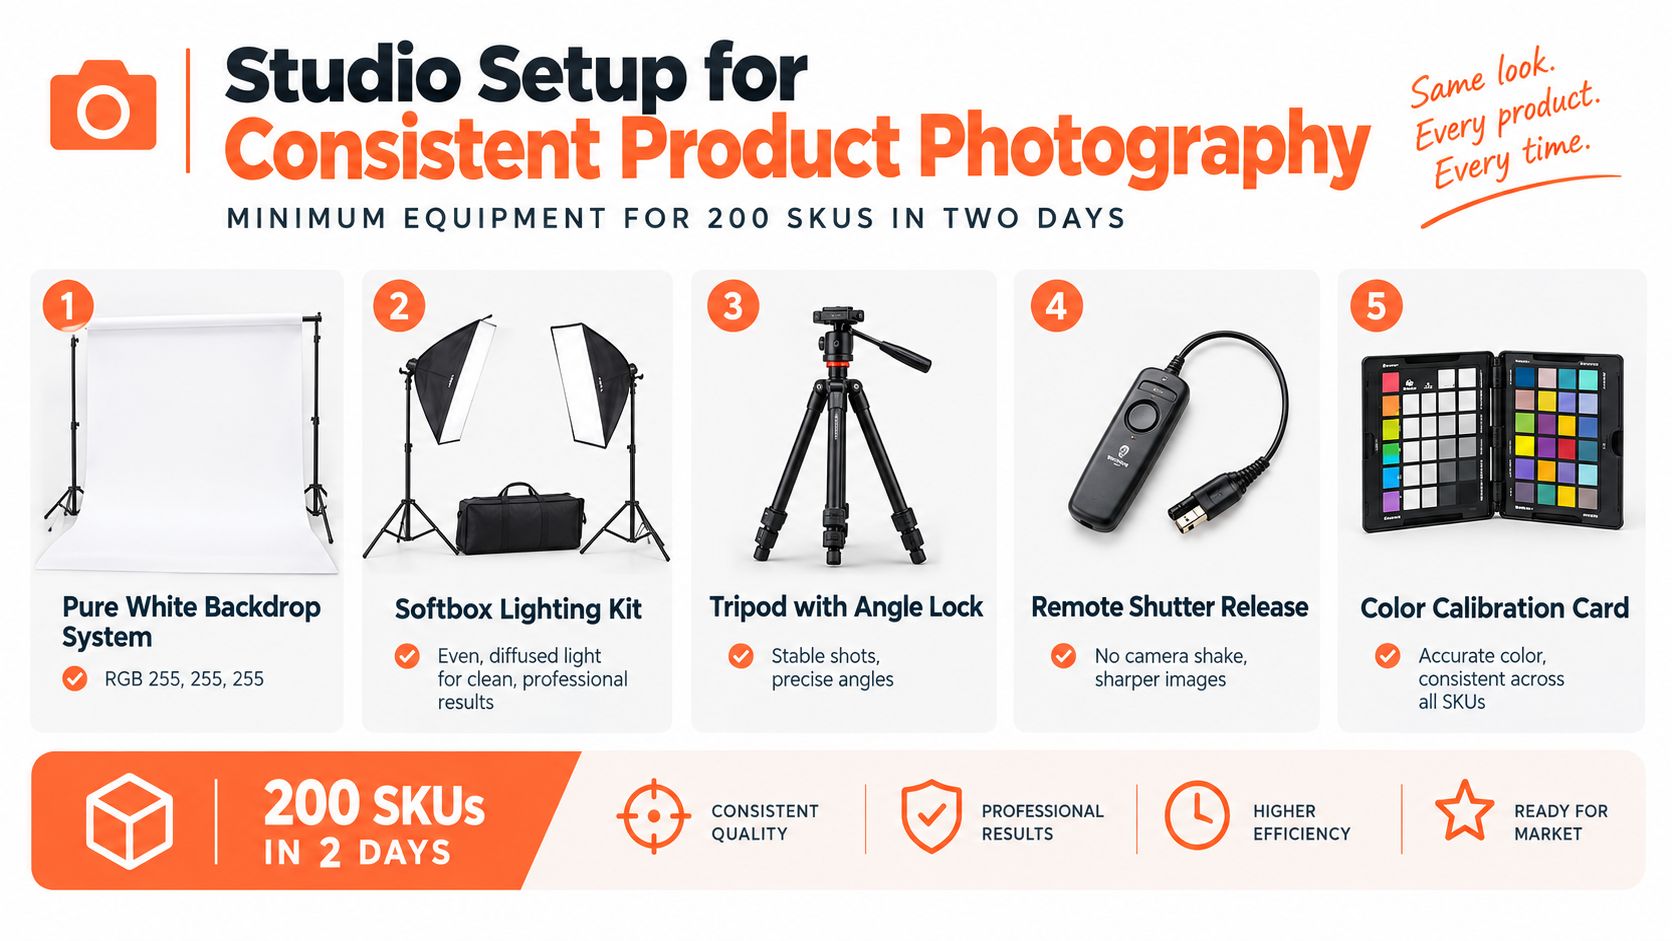
Use the smallest kit that gives you repeatable results:
- Lighting: Two softboxes, or one overhead LED panel. Keep both lights at fixed distances and equal heights. A light moved a few centimeters changes reflections on glossy packaging.
- Camera support: A tripod with a repeatable head position. Mark the tripod legs and head angle with tape.
- Product placement: Add a taped floor mark for the center of the product. Use a staging tray so props, labels, and accessories don't drift between SKUs.
- Remote capture: A remote shutter release prevents the camera from moving when you press the button.
- Color reference: Keep a color calibration card beside the set for the first frame of each lighting session.
Use diffuse window light only if you can control it throughout the shoot. Don't combine daylight with an LED panel or flash. Mixed color temperatures create catalog-wide color drift, and correcting it later becomes slower than fixing the room.
Keep cables against the wall or under the table. Loose cables get nudged, and a changed light position can affect every remaining SKU. Practical budget product photography tips can help you choose inexpensive supports and surfaces without sacrificing repeatability. For backdrop placement details, see this guide to setting up a studio photo backdrop.
Practical rule: If a variable can change between SKUs, physically lock it. Camera height, light distance, surface, background roll, and product position should all have a mark.
The cheapest setup is the one that prevents rework. A phone can work if it stays on the same tripod, at the same height, with fixed exposure and white balance. A more expensive camera won't rescue a moving table or mixed lighting.
Camera Settings, Lighting, and Backgrounds Decided Once
Don't decide exposure separately for every product. Choose a baseline, test it on the largest and smallest items in the batch, then record the values on a one-page settings card taped to the desk.
Shoot in RAW and use manual mode. Set ISO 100. For products under 30 cm, start at f/8. Use f/11 for larger products when you need more depth of field. Set shutter speed to 1/125s with continuous LED lighting or 1/200s with strobes. Fix white balance at 5500K, or create a custom setting against a gray card.
A 50 mm lens works for general products. A 60 mm macro lens is useful for small items, texture, labels, and fine details. Keep the camera angle and focal length fixed for the hero series. Changing lenses halfway through a catalog alters perspective and makes sibling products look mismatched.
Use one lighting pattern
Place two softboxes at equal distances, roughly 45 degrees from the product. This gives you a repeatable key and fill pattern. For reflective products, test a 90-degree overhead box and use a white reflector on the shadow side. The reflector should soften the dark side, not create a second bright hotspot.
Use a white sweep for primary images. Choose mid-gray when the product is white or when color comparison matters. Reserve black or lifestyle surfaces for secondary images. Don't use a different primary background for each SKU. Marketplaces and collection grids expose those changes immediately.
Save the processing headroom
Set output to sRGB. Use one picture profile across the catalog, with sharpening and noise reduction kept low enough to leave room for batch processing. Record the camera body, lens, aperture, shutter, ISO, white balance, light arrangement, and background in the settings card.
| Variable | Small products (<30 cm) | Large products | Reflective products |
|---|---|---|---|
| Aperture | f/8 | f/11 | f/8 or test at f/11 |
| Lens | 50 mm or 60 mm macro | 50 mm | 50 mm |
| ISO | 100 | 100 | 100 |
| Shutter with continuous LED | 1/125s | 1/125s | 1/125s |
| Shutter with strobes | 1/200s | 1/200s | 1/200s |
| White balance | 5500K or custom | 5500K or custom | Custom against gray card |
| Output | sRGB, low sharpening | sRGB, low sharpening | sRGB, low sharpening |
For lighting arrangements that handle reflective surfaces and small product details, use this practical guide to product photography lighting. The setting card matters more than memory. After a long shoot, small undocumented changes become expensive batch corrections.
The Reusable Shot List for Every Product
A shot list should be a fixed sequence, not a creative decision made seven hundred times. Print it, put it on a clipboard, and read from the top for every SKU. The shooter should only need to decide whether the surface is clean, the label is legible, and the product is positioned correctly.
Use six fixed frames:
- Hero front: Product at a 90-degree angle on pure white.
- Three-quarter view: A 45-degree angle that shows depth.
- Straight side profile: Useful for thickness, silhouette, and hardware.
- Top-down flat lay: Shows shape, pattern, arrangement, or opening.
- Detail close-up: Focus on texture, stitching, finish, controls, or a key feature.
- Scale reference: Place the item beside a ruler or familiar reference object.
Add a seventh slot for packaging or an in-context lifestyle image when the category needs it. Don't force lifestyle imagery into every listing. A clean hero helps a marketplace shopper identify the item, while a context image helps explain use, size, or fit.
Keep framing predictable
Fill 80% to 85% of the frame with the product for the marketplace hero. Keep it dead center on the long axis, and leave two finger-widths of padding inside the crop lines. That buffer protects the item when a channel reframes the image for a mobile grid.
The extra views should answer different questions. Buyers need to see scale, texture, packaging, and hidden features, not six nearly identical angles. Listings with multiple images outperform single-image listings in compiled ecommerce statistics, and products with seven or more images convert about 1.6 to 2.4 times better than products with one image, according to this product-photo statistics summary. Treat that as a reason to cover information gaps, not as a reason to duplicate angles.
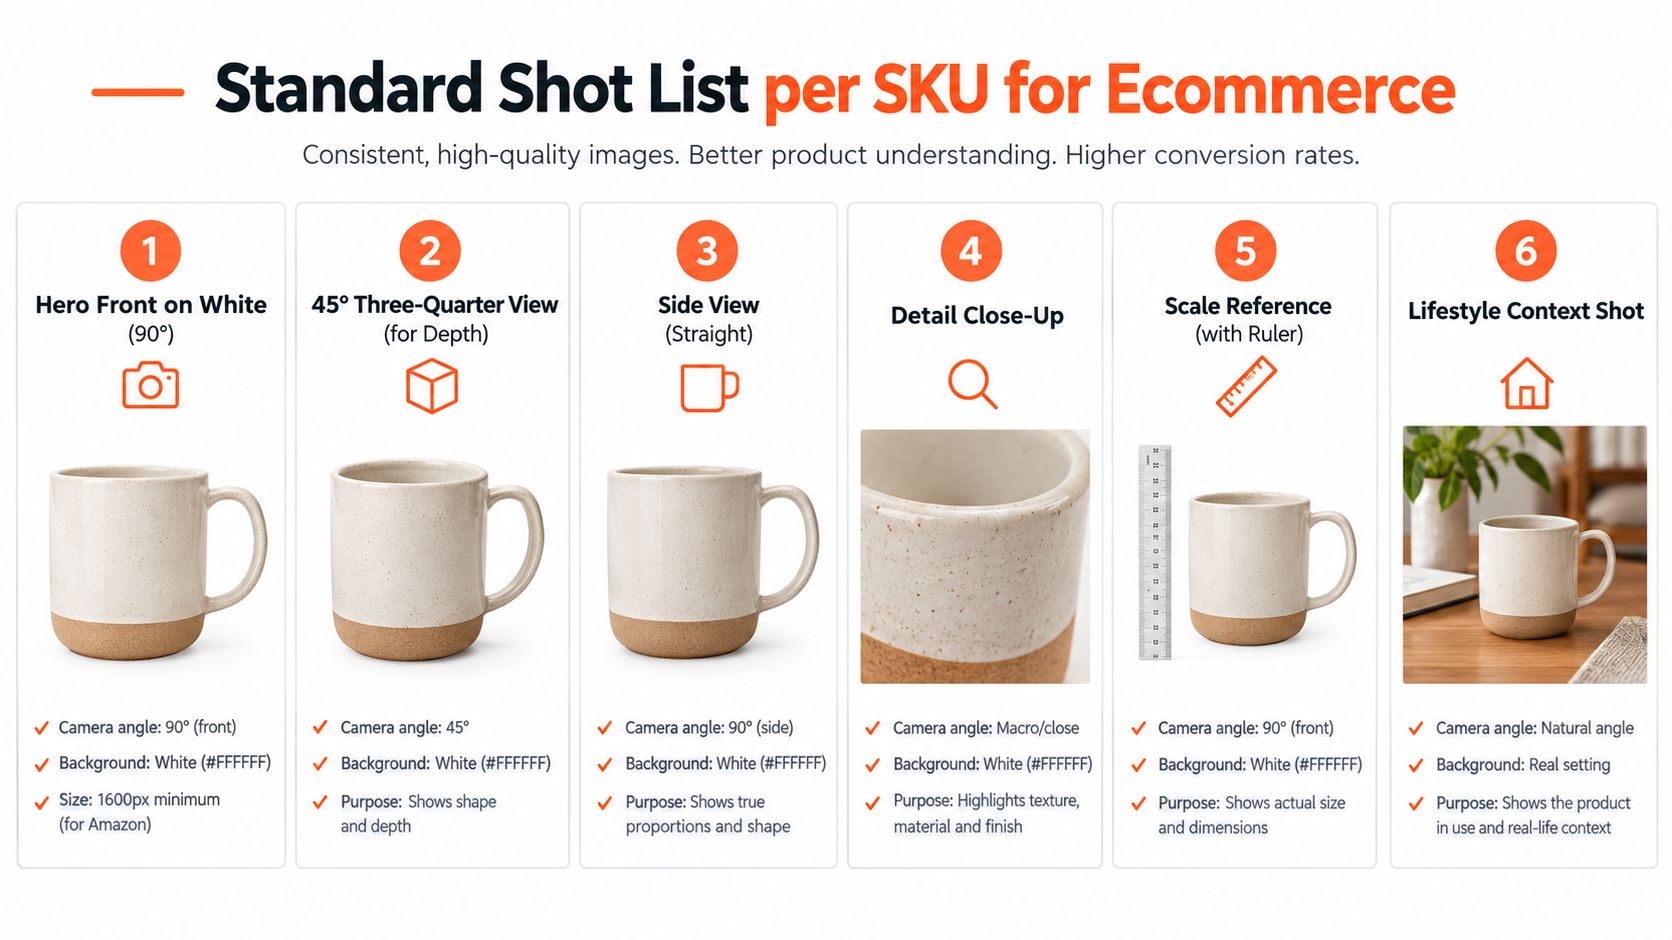
The list becomes the contract between capture and editing. If every SKU has the same six slots, missing images are visible before the files reach your store. For category-specific variations, use this reference on product photoshoot styles for ecommerce.
The sequence works best when the product stays on the mark and the camera stays locked. Capture the hero first, then rotate or reposition the product for the remaining views. Don't move the tripod unless the shot list calls for a genuine size change.
Doing this for a whole catalog?
MerchLoom runs background removal, upscaling and AI editing across every product photo you have — one prompt, whole batch. Try 2 batches free, no signup.
Try it freeMarketplace Specs You Have to Bake In Before Export
A catalog pipeline fails at export when one master image is forced into every channel. Amazon, Etsy, Shopify, and eBay apply different image rules, so retain a high-resolution master and generate channel presets from it. Set a shared working standard first, then isolate platform-specific crops, backgrounds, and file settings.
For a broad catalog, start with a 2000 px long edge, sRGB color, JPEG quality between 80 and 90, and a square or 4:5 hero ratio. These settings support consistent batch output, but they do not replace checking each marketplace before upload.
| Spec | Amazon | Etsy | Shopify | eBay |
|---|---|---|---|---|
| Primary size rule | At least 1000 px on the longest side, with 1600 px or more preferred for zoom and display | 2000 px on the shortest side is commonly required in current guidance | Square images are commonly recommended at 2048 x 2048; platform accepts up to 4472 x 4472 | At least 500 px on the longest side |
| Primary background | Pure white, RGB 255, 255, 255 | White, lifestyle, or contextual images can be used according to image role | Choose a consistent catalog background | No logo, border, or text overlays |
| Hero framing | Product should fill about 85% of the frame | Keep the item clear and easy to inspect | Use a consistent 1:1 ratio | Keep the full product visible |
| Working format | sRGB JPEG or platform-approved file | JPG, PNG, or GIF | Square output, sRGB | JPG or platform-approved file |
| Export approach | Dedicated white-background preset | Dedicated size and crop preset | Square master or preset | Overlay-free preset |
Amazon's own guide requires the main image to use a pure white background with RGB values 255, 255, 255. Images below 500 px on the longest side cannot be uploaded, and Amazon recommends 1000 px or more for customer experience. Validate Amazon's image requirements before building the preset. For Amazon zoom behavior, keep the longest edge at 1600 px or more, as detailed in this guide to Amazon listing image size.
Etsy guidance is commonly summarized as 2000 px on the shortest side. Shopify's square workflow can accept images up to 4472 x 4472. Use This Etsy product photo size guide and this Shopify product image guide when configuring those presets.
Apply EXIF stripping, consistent filenames, and watermark rules inside the export action. A filename such as SKU_color_view_channel.jpg is easier to audit than IMG_4821.jpg. Keep the master RAW and high-resolution edited master separate from channel files. If garment specifications are part of the catalog, best AI tech pack generators can support adjacent documentation, while image export rules remain controlled by the marketplace presets.
Batch Editing Pipeline from Raw to Listing-Ready
Run inexpensive checks before expensive processing. A batch editor shouldn't upscale a file that should have been rejected at intake.
Process in a fixed order
- Cull rejects. Filter by file size and exposure histogram. Reject any RAW under 2 MB, and reject frames with clipped highlights on a white card.
- Remove the background. Do this while the file is still small and the subject mask can be created cleanly. Background removal before upscaling also prevents the upscaler from enlarging unwanted edges and halos.
- Reframe. Apply the target aspect ratio, center the product, and add the same padding to every SKU.
- Correct color. Use the gray card reference for white balance, normalize exposure, and apply one sharpening pass tuned for web display at 72 dpi.
- Upscale last. Once the background and color are correct, the upscaler sees clean edges rather than a messy original background.
- Export presets. Send the finished image through the marketplace actions defined earlier, including naming and file-format rules.
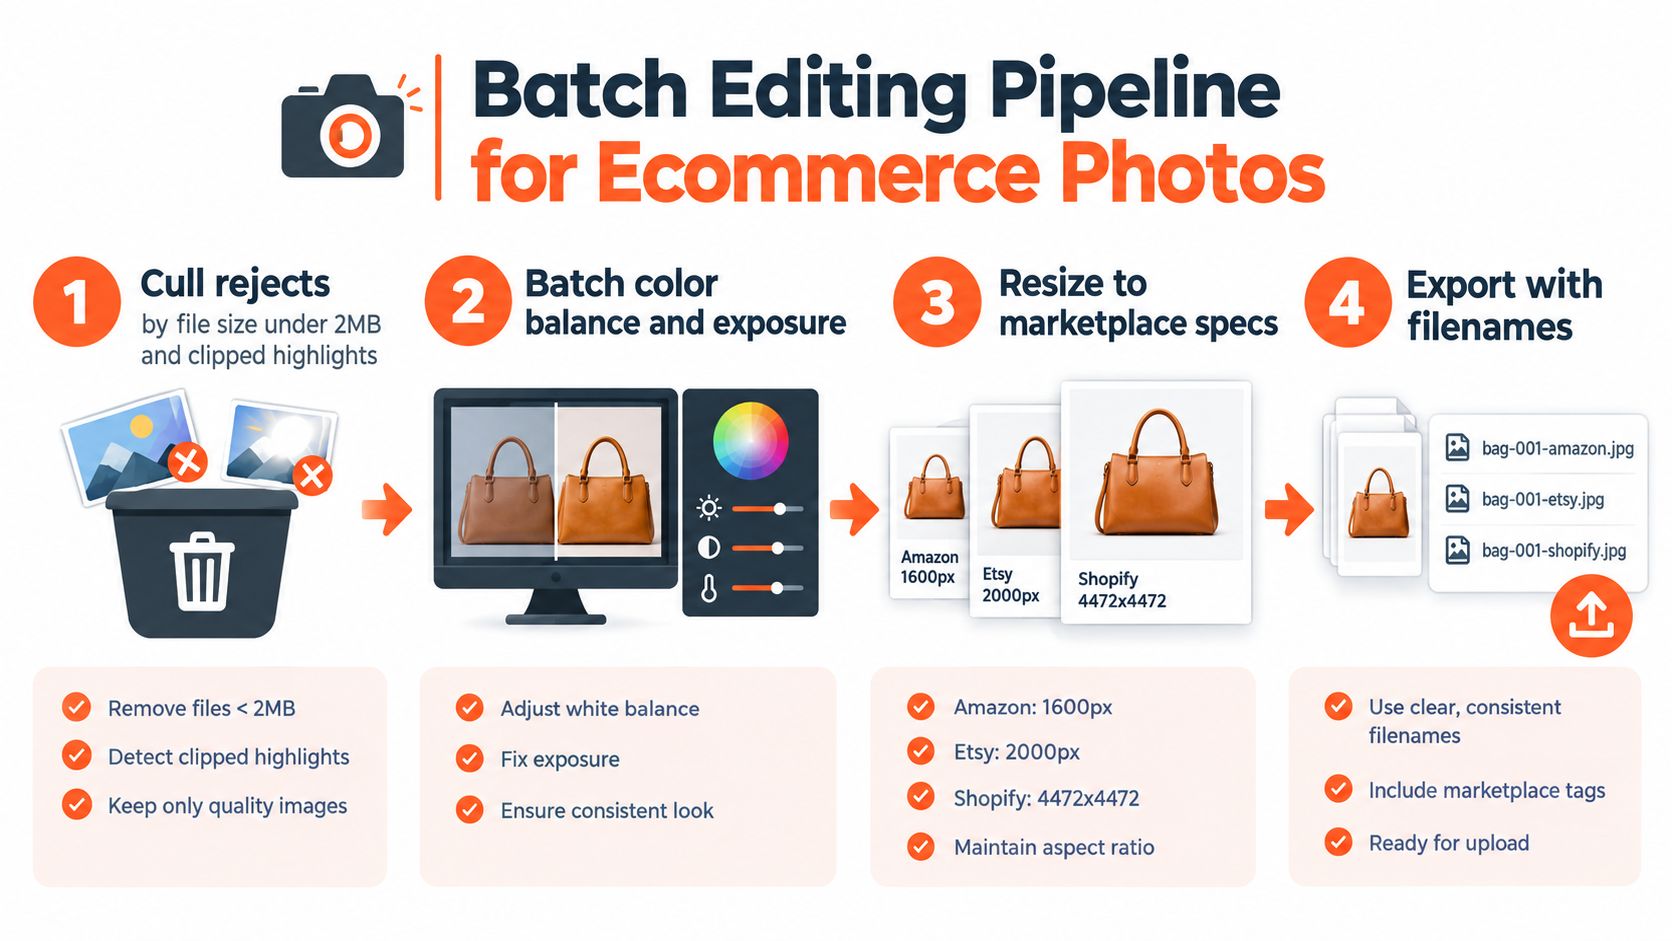
The order matters because each later step depends on the previous one. If you crop before background removal, the mask may cut into the item. If you upscale before color correction, you spend processing time on pixels you'll later alter. If you export before reframing, the same SKU can receive different padding across channels.
Batch principle: One action should perform one predictable job. Chain the actions in the same order every time.
Run each stage as an action, droplet, or saved workflow. The exact software matters less than the sequence. A file should never bypass the background step because it “already looks close enough.” That exception is how catalog drift starts.
Use a source folder, a working folder, a reviewed folder, and a channel-export folder. Keep the SKU in every filename and never overwrite the RAW. When a marketplace rejects one file, you should be able to identify the source, the preset, and the failed stage without reopening the entire catalog.
QA, Iteration, and Where AI Batch Tools Fit In
Quality assurance should sample the batch, not force you to inspect every image at full size. Pull 5 to 10 random SKUs from each batch and check the failures that create the most rework:
- Background: Confirm the Amazon hero is pure white, RGB 255, 255, 255.
- Edges: Check that handles, straps, corners, and hair-like fibers aren't cut off.
- Color: Compare sibling SKUs for white-balance drift and inconsistent product color.
- Preset: Confirm dimensions, crop, filename, color space, and destination match the channel.
Log each failure with a short tag such as background-gray, edge-cut, color-drift, or preset-mismatch. If the same tag appears more than once, repair the action that caused it. Retouching individual files hides the underlying problem and guarantees another round of manual work.
Freeze what passes
AI batch tools fit inside this workflow, not above it. MerchLoom can run background removal, background replacement, reframing, color correction, and upscaling across a catalog through chained AI pipelines instead of one image at a time. You can review AI batch image editing workflows when deciding which stages to automate.
AI output still needs human review. Masks can miss transparent edges, reflections, fine jewelry, or loose fibers. Generated lifestyle scenes can also introduce details that aren't part of the actual product. Use AI for repeatable processing, then keep the sampling step and marketplace presets under your control.
If three consecutive batches pass without a white-balance miss, lock the preset. Don't keep adjusting a passing workflow because a new control looks interesting. Change only the stage connected to a logged failure. The system improves by freezing what works and correcting what fails.
MerchLoom is pay-per-image, with credits that never expire, and the first images can be tried with no account. It isn't a full Photoshop replacement, and it doesn't remove the need to inspect outputs. Its useful role is running the same background, framing, color, and upscale instructions over hundreds of files while you review the sample.
The Repeatable Loop and a Pre-Shoot Checklist
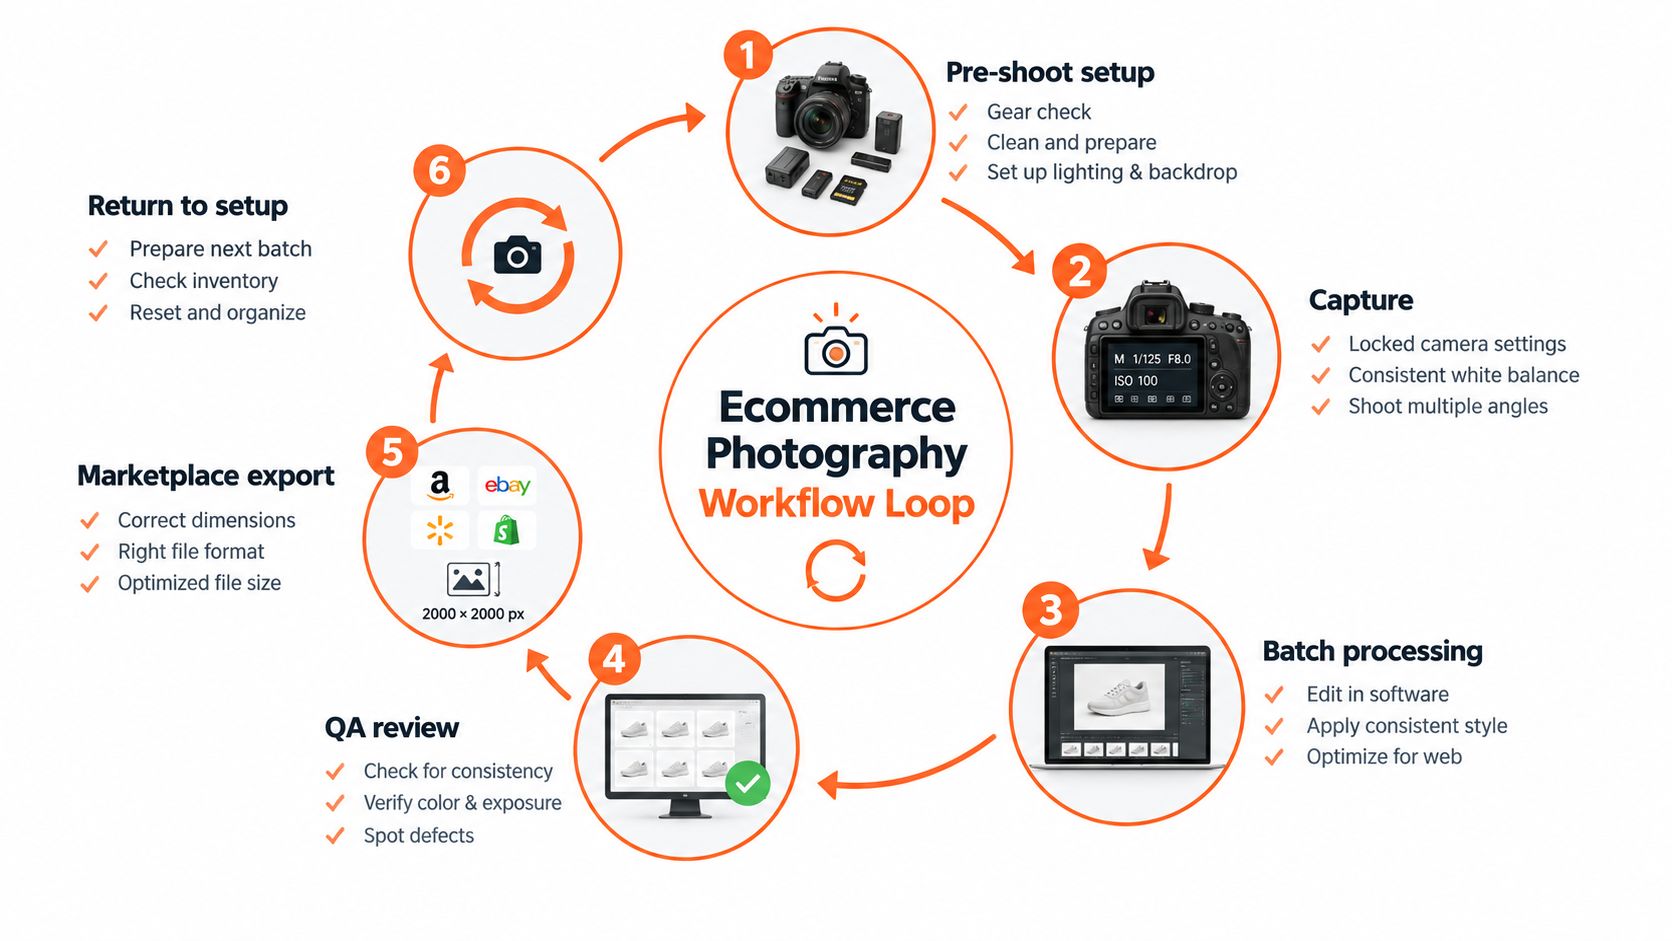
The full system is a closed loop:
- Pre-shoot setup: Clear the table, check the backdrop, place the tripod, test the lights, and label the products.
- Capture: Use the locked camera settings and repeat the shot list for every SKU.
- Batch processing: Cull, remove backgrounds, reframe, correct color, upscale, and export in that order.
- QA: Sample the batch and log defects by type.
- Marketplace export: Apply the correct dimensions, background, filename, and file-format preset.
- Reset: Return the table, camera, lights, staging tray, and files to the documented starting state.
This loop keeps decisions out of the middle of the shoot. You decide the lighting ratio, camera settings, background rules, and shot list once. Later reshoots should happen because a product is damaged, misrepresented, or out of focus, not because one marketplace file has different padding from another.
A simple workload model makes the constraint visible. A 100-SKU shoot with a 6-shot list, a 12-second-per-image editing pass, and a 2-minute QA window fits inside a 25-hour work week. That calculation doesn't include capture, setup, product handling, or failed reshoots, so use it as a planning frame rather than a promise. The value comes from exposing where your time goes.
Pin this beside the shooting table
- Space: Shooting surface is clear, the white sweep is taped, and there is 1.5 m behind the table.
- Gear: Lights, tripod, remote shutter, reflector, staging tray, and color card are ready.
- Settings: RAW, manual mode, ISO 100, aperture, shutter, white balance, lens, and sRGB output are recorded.
- Shot list: Hero, three-quarter, side, top-down, detail, scale, and selective context frames are marked.
- Files: SKU naming is loaded, RAW backup destination is confirmed, and folders are empty for the new batch.
- Processing: The batch preset is loaded in the correct order.
- Export: Amazon, Etsy, Shopify, eBay, or store destination is confirmed before processing begins.
For a full catalog, the best setup isn't the one with the most equipment. It's the one you can reset tomorrow and reproduce without guessing. MerchLoom can run the chained AI stages across a collection, while your checklist, saved presets, and human QA keep the result accurate.
MerchLoom lets you import product photos, run chained AI workflows for background removal, reframing, color correction, upscaling, and marketplace-ready exports, then review the results across a full collection. Try your first images with no account, pay per image with credits that never expire, and visit MerchLoom to process your next catalog batch.
Stop editing product photos one at a time
Upload your catalog or connect your store. Describe the result once. MerchLoom does the rest.
Try it free — no signup