
Amazon Listing Image Size: The Complete Reference for 2026
Get the latest Amazon listing image size requirements for 2026. Our guide covers pixel dimensions, zoom, file types, and batch processing for perfect listings.
Your Amazon listing images should be at least 1,000 pixels on the longest side if you want zoom to work, and 2,000 × 2,000 pixels is the practical target for sharp, reliable product presentation on Amazon. If you're processing more than a handful of SKUs, the primary job isn't editing one photo well. It's getting an entire catalogue into a consistent, compliant format without creating a mess of mismatched crops, backgrounds, and file types.
Most sellers don't struggle because the rules are hard to find. They struggle because the rules are easy to break at scale. One supplier sends tall images, another sends wide crops, your photographer exports TIFFs, someone on the team saves PNGs with off-white backgrounds, and suddenly you're fixing the same issue across hundreds of files.
That's why Amazon listing image size is really an operations problem, not just a design problem. You need a repeatable standard for Amazon, while still keeping one eye on Shopify's square presentation and Etsy's common 2000px workflow. If you're managing collections instead of one-off listings, a batch-first process matters more than any single retouching trick. For a broader view of listing quality beyond imagery, Next Point Digital on Amazon product optimization is a useful companion read, and if your bottleneck is sheer volume, this piece on e-commerce image automation is relevant.
Your Guide to Amazon Image Compliance at Scale
A realistic Amazon workflow starts with a messy folder, not a perfect asset library. Supplier photos arrive in mixed aspect ratios. Studio shots come back as large files that still need cropping. Older catalogue images look acceptable one by one, then fall apart when you upload a full category and realise every listing presents the product at a different scale.
The hard part is consistent application. Amazon's image rules are easy to find. The operational problem is enforcing those rules across dozens or thousands of SKUs without creating rework for the content team.
For Amazon Canada, the practical floor is simple. Main images need enough resolution to support zoom, and Amazon's own guidance for product detail page images sets clear expectations around image quality, file format, and presentation standards (Amazon Product Detail Page Rules). In day-to-day catalogue management, that means building around a repeatable house standard instead of treating each image as a one-off edit.
The baseline I use for scale looks like this:
- Set one master crop standard for each product type
- Export Amazon-ready square images at 2,000 × 2,000 pixels where source quality supports it
- Keep subject sizing consistent across variants and related SKUs
- Create approved master files first, then generate marketplace-specific exports in batches
That approach prevents a common catalogue problem. One SKU fills 90 percent of the frame, the next sits at 55 percent, and a third has an off-white background that passes internal review but gets flagged after upload. None of those mistakes is difficult to fix once. Fixing them across 400 listings is expensive.
Large catalogues need image handling that works like an operations system. Batch rules for canvas size, background colour, file naming, and output format reduce avoidable variation before the files ever reach Seller Central. Teams using e-commerce image automation workflows usually see the benefit in consistency first, then in speed.
Image compliance also connects to listing quality as a whole. Clean visuals help, but they work best when titles, bullets, and backend attributes are aligned with the same standard. For that broader process, Next Point Digital on Amazon product optimization is a useful companion read.
The goal is not to get images accepted once. The goal is to keep the catalogue compliant, consistent, and easy to maintain every time new SKUs, seasonal updates, or supplier replacements come in.
Amazon Image Requirements Quick Reference Table
Use this table as an operations reference, not just a design checklist. In a large catalogue, the point is to set batch rules once, then push hundreds of files through the same standard without rechecking every SKU by hand.
Amazon Canada Image Specifications 2026
| Attribute | Requirement | Recommendation for Batches |
|---|---|---|
| Longest side minimum | Amazon will accept smaller images, but very small files create a weak customer experience and limit detail on the product page | Set your export preset well above the minimum so low-resolution supplier files get flagged before upload |
| Zoom activation size | Zoom requires enough pixel density on the longest side, as noted earlier in the article | Treat zoom-capable size as the real minimum for production files |
| Optimal size | A square export around 2,000 × 2,000 pixels is a practical default for many catalogues | Use this as the standard batch output for square listings unless the source image cannot support it cleanly |
| Sweet spot range | Larger files can improve on-page sharpness, but oversized exports add weight with little practical gain | Keep most catalogue images in a controlled mid-range and reserve larger exports for products where detail matters |
| Main image background | Main images need a true white background | Standardize background cleanup with a repeatable white background workflow for Amazon product photos instead of manual touch-ups one file at a time |
| Product fill | The item should occupy most of the frame without being cropped awkwardly | Apply one framing rule across related SKUs so search results look consistent by brand and product family |
| File size limit | Amazon caps image file size, so bloated exports can fail even when dimensions are correct | Export compressed JPEGs for Amazon unless another channel requires transparency |
| Accepted formats | Amazon supports common web image formats | Standardize on JPEG for batch exports because it keeps files lighter and easier to manage at scale |
| Colour space | Images should be exported in sRGB for reliable web display | Build colour conversion into the export preset so supplier files do not slip through in mixed profiles |
| Total image slots | Listings can include a main image plus several supporting images | Create a fixed image set by category so teams know exactly which views, detail shots, and lifestyle frames to prepare |
The operational trade-off is simple. Bigger files and stricter preprocessing take more time up front, but they reduce upload failures, inconsistent thumbnails, and last-minute rework across the catalogue.
For teams refining image standards beyond compliance, high-converting Amazon product images is a useful benchmark for what strong execution looks like after the technical basics are under control.
Mastering the Main Product Image
A main image issue rarely shows up on just one SKU. It usually appears across a full parent-child set, a supplier drop, or an entire seasonal refresh. One weak standard on framing or background cleanup can turn into dozens of suppressed listings, mismatched thumbnails, and a lot of avoidable rework.

For Amazon Canada, the main image has one job first. It must meet marketplace rules before it tries to sell anything. That means a pure white background, a product that fills most of the frame, and no added graphics, badges, props, or text. Teams handling large catalogues need those checks built into the workflow, not left to individual judgement during upload.
Where main images fail in real catalogues
The common problems are operational, not creative.
- Background drift shows up when supplier photos look white on-screen but export with off-white or grey values.
- Inconsistent framing happens when similar SKUs are cropped at different scales, so thumbnails look messy in search results.
- Uneven source quality creates a catalogue where some hero images are sharp and others look like rushed replacements.
- Promotional clutter appears when teams add icons, copy, or packaging elements that belong in secondary images instead.
If you want a visual benchmark after the compliance basics are handled, high-converting Amazon product images shows the level of polish strong listings usually reach.
A good main image feels controlled. The product is the only thing competing for attention.
Standardize the output before you upload
At scale, the main image should come from a repeatable template. Use one canvas ratio, one centring rule, one subject scale range, and one export preset for every SKU group that shares a visual format. That keeps variation listings looking related and cuts down on manual fixes during listing prep.
White background cleanup also needs a batch process. Teams working across multiple photographers or supplier feeds should not be correcting edge halos and shadow contamination one file at a time. A practical reference is this guide to creating a white photoshoot background for product listings, especially if your source files arrive in mixed lighting conditions.
A short walkthrough helps show what clean execution looks like.
Essential Rules for Main Images
- Start with the best source image available. Clean lighting, defined edges, and accurate colour reduce correction time across the whole batch.
- Crop for search visibility. The product should feel prominent in thumbnail view without looking cramped or clipped.
- Keep related SKUs visually consistent. Parent-child listings should look like one catalogue standard, not a mix of supplier habits.
- Reserve selling overlays for secondary slots. Main images are for compliance and clarity first. Features, comparisons, and usage context belong elsewhere.
The practical trade-off is straightforward. Tighter preprocessing takes more time at the start, but it prevents bulk upload failures and keeps the catalogue looking coherent once hundreds of listings are live.
Using Secondary and Lifestyle Images to Sell
Once the main image earns the click, secondary images do the selling work that the hero shot can't. These images allow buyers to answer practical questions: What does the texture look like? How big is it in real use? What problem does it solve? How does it fit into a room, outfit, desk setup, or routine?
That doesn't mean every listing needs the same image sequence. It means every listing needs a purpose-built image mix.
The four useful secondary image types
Detail shots are for texture, material, closures, stitching, finish, ports, seams, labels, or packaging elements. They reduce ambiguity. A cookware brand might use them to show handle construction and interior coating. A backpack brand might use them for zips, straps, and laptop sleeve access.
Infographic-style images are for clarity. They're where text overlays, callouts, and visual explanations belong. Use them to highlight compatibility, dimensions, included components, or setup basics. Keep them readable on a phone screen and avoid turning them into cluttered spec sheets.
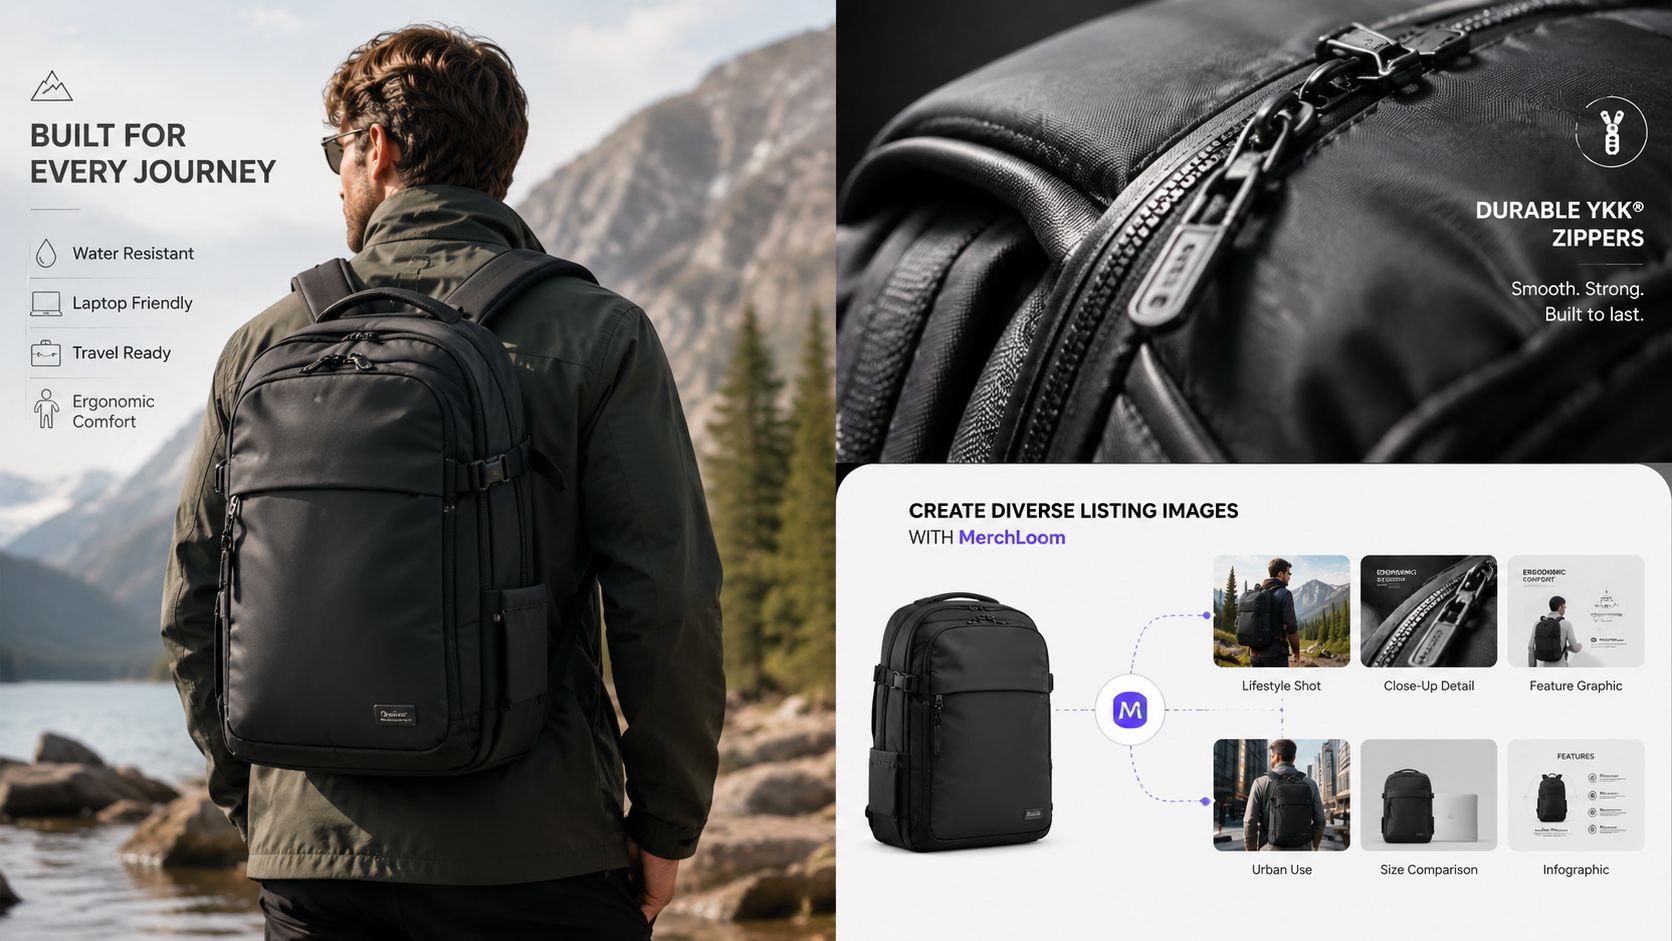
Lifestyle images do something different. They help buyers picture ownership. A lamp on a side table, a bottle in a gym bag, a blanket on a sofa, a lunch container on an office desk. The point isn't decoration. The point is context.
Comparison or scale visuals can also help, especially when the product's physical presence isn't obvious from a clean cutout alone.
Use one source image more than once
Sellers can often work more efficiently than they realise. A single clean product photo can feed multiple asset types if it's extracted well and framed properly. The same source image can become:
- A marketplace-safe main image on white
- A detail-led crop for texture or component visibility
- A lifestyle placement in a realistic scene
- An infographic panel with controlled text overlays
- A reusable visual for ads or social posts
For sellers trying to avoid a separate photoshoot for every variation, AI product lifestyle image generator workflows are relevant because they turn existing product photos into contextual scenes without rebuilding the whole visual process from scratch.
Buyers don't need more images. They need images that remove doubt.
Batch consistency matters more than creativity
The trap with secondary images is over-design. One listing ends up looking polished, the next looks rushed, and the brand starts to feel inconsistent. That usually happens when each SKU gets treated as a standalone creative project.
A better approach is to define a repeatable sequence across the catalogue. For example, one close-up, one use-case image, one feature graphic, one scale image, one packaging or included-items image, and one lifestyle frame. The exact order can vary by category, but the structure should stay stable.
That's what keeps hundreds of SKUs manageable.
Decoding Technical Specs Pixels Ratios and File Types
Catalogue teams usually feel the pain here first. A supplier sends mixed files, one studio exports in TIFF, another in PNG, and half the SKU set is cropped differently. The listing team then wastes hours fixing avoidable issues one image at a time.
Doing this for a whole catalog?
MerchLoom runs background removal, upscaling and AI editing across every product photo you have — one prompt, whole batch. Try 2 batches free, no signup.
Try it free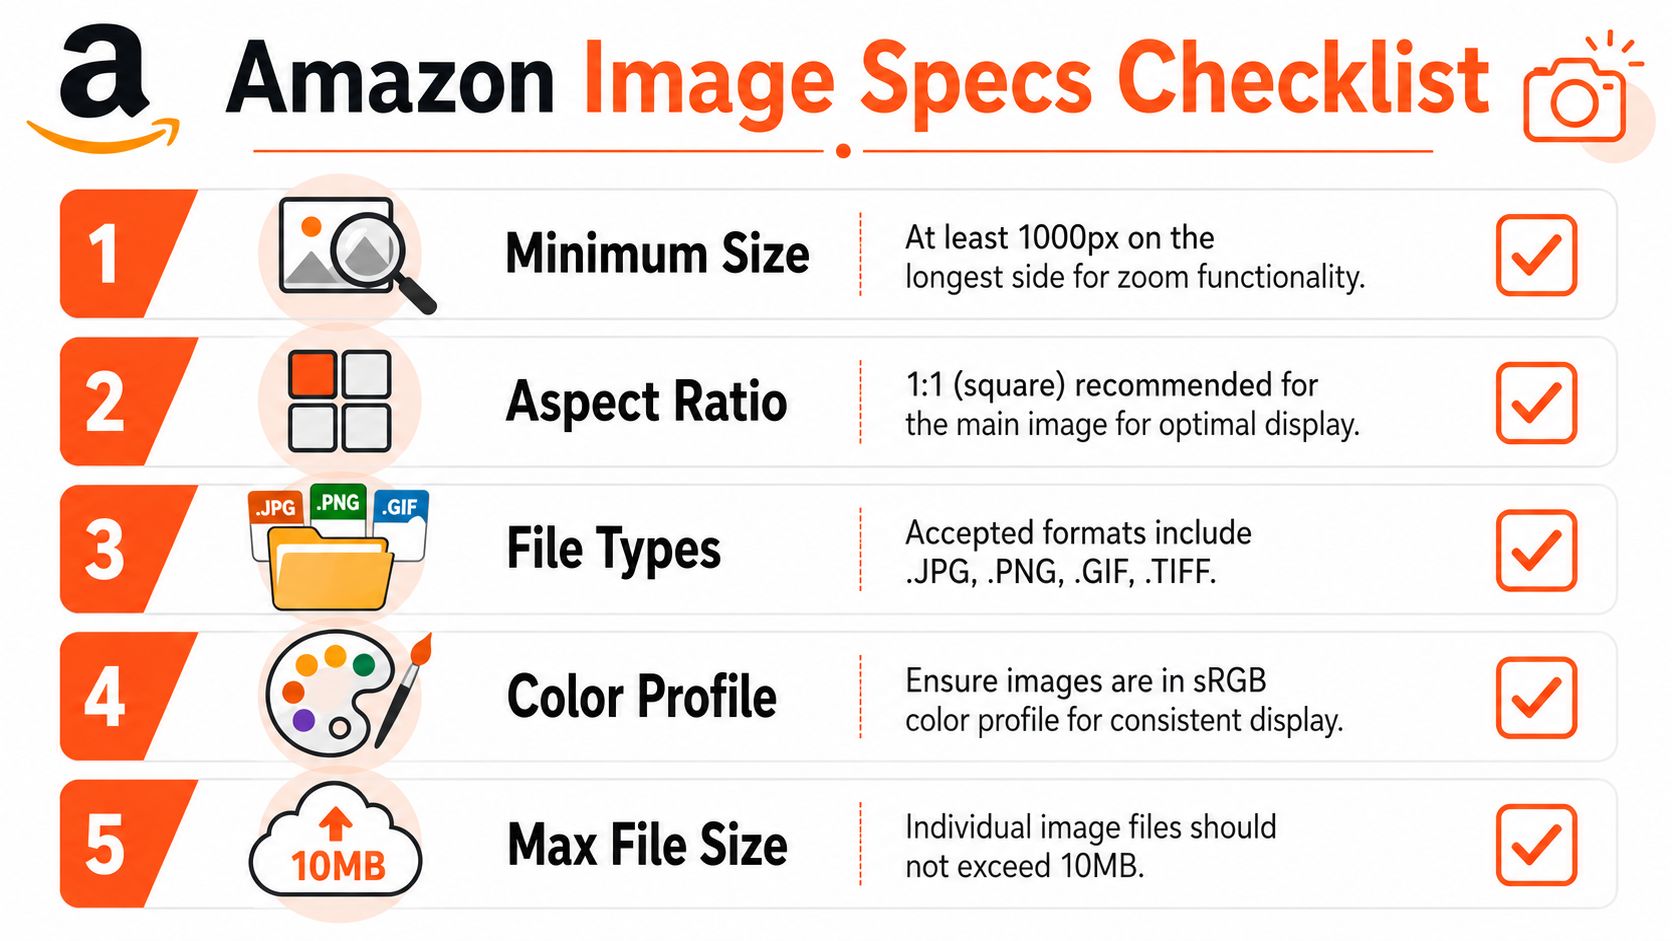
The technical rules are simple. The operational problem is consistency across a large catalogue.
Pixels and zoom
Amazon accepts small files, but accepted is not the same as usable. As noted earlier, the platform minimum and the zoom threshold are different. An image can pass upload checks and still fail the customer test if product details soften the moment someone tries to inspect stitching, texture, print quality, or finish.
That is why batch QA should start with pixel dimensions, not file names or folder labels. In practice, I treat low-resolution files as intake problems, not editing problems. If the source is weak, resizing only standardises the weakness across more listings.
For catalogue work, set one house standard for exports and enforce it automatically. That keeps one supplier's undersized images from slipping into an otherwise clean product line.
Aspect ratio and framing
Square framing remains the safest standard for Amazon operations because it reduces exception handling. A consistent 1:1 ratio keeps crops predictable, makes templates easier to reuse, and gives merchandising teams fewer manual decisions.
That matters even more in batch workflows.
If every image arrives in a different ratio, the team has to choose between inconsistent framing or manual recropping at scale. Neither option is efficient. A fixed square output gives automation tools a stable target, which is exactly what large catalogues need.
If your team still checks dimensions manually, the confusion often starts with DPI. DPI affects print, not Amazon display size in the way many handoffs assume. This guide on how to check the DPI of an image clears up the difference between pixel dimensions and print settings.
File formats, colour profile, and weight
Amazon supports common image formats, including JPEG, PNG, TIFF, and GIF. For day-to-day listing operations, that does not mean every format deserves a place in your final export workflow. Amazon's own image requirements pages in Seller Central are the right reference point for accepted formats and colour handling, and sRGB is the safe default for marketplace use.
Here is the practical reading for production teams:
| Technical choice | Practical reading |
|---|---|
| JPEG | Best default for Amazon exports. Small enough to handle in bulk and usually strong enough for product detail when exported properly |
| PNG | Fine for layered source assets or graphics. Usually unnecessary for final product photo exports |
| TIFF | Useful as an archive or retouching source. Too heavy and inefficient for routine listing uploads |
| GIF | Supported, but rarely the right final format for standard catalogue images |
Standardise the export recipe once and apply it across the full image set. Teams managing hundreds of SKUs should not be deciding format, crop, compression level, and colour profile by memory or personal preference.
Batch processing earns its keep. Tools such as MerchLoom are useful because they let teams resize, convert, rename, and prepare images in bulk, instead of cleaning up technical mismatches SKU by SKU. That is the difference between a catalogue that stays compliant and one that slowly drifts into exceptions.
Optimizing Images for Zoom and Mobile Experience
A catalogue can be technically compliant and still underperform on the page. I see this often with large Amazon uploads. The files meet the minimum, but shoppers pinch, zoom, and scroll on mobile only to find soft detail, cramped crops, or text that collapses at thumbnail size.
For Amazon operations, the safer production standard is to prepare main images large enough to support clear zoom and clean mobile rendering, then apply that standard across the full catalogue. Amazon's own image guidance states that zoom is enabled when the image is at least 1,000 pixels on the longest side, and many sellers work above that floor to preserve detail on modern devices. In practice, 2,000 by 2,000 pixels is a reliable default for batch exports because it gives teams room for zoom without creating oversized files that slow handling in production.
The primary issue is inspection. Shoppers use product images to check texture, finish, stitching, closures, print quality, edges, and included components. If those details blur during zoom, the listing creates doubt at the exact point where the image should remove it.
Mobile makes the standard tighter. The screen is smaller, but the image carries more of the selling job. Feature callouts, packaging details, and angle shots have to stay readable on a phone before they ever reach desktop. A square image with disciplined cropping usually holds up best because it fills the mobile frame predictably and keeps the product centred.
For teams managing hundreds or thousands of SKUs, this cannot depend on manual judgement in Photoshop. Set a house standard for canvas size, crop position, and export quality, then run it in bulk. A repeatable batch product photo editing workflow prevents one brand line from getting crisp zoom-ready images while another slips through with marginal files.
One caution matters here. Upscaling helps standardise mixed source files, but it does not restore missing detail. If the original shot is soft, underlit, or framed badly, a larger export only gives you a bigger weak image. The scalable fix is to catch low-quality source assets early, before they enter the Amazon-ready batch.
A Sample Batch Processing Workflow for Amazon
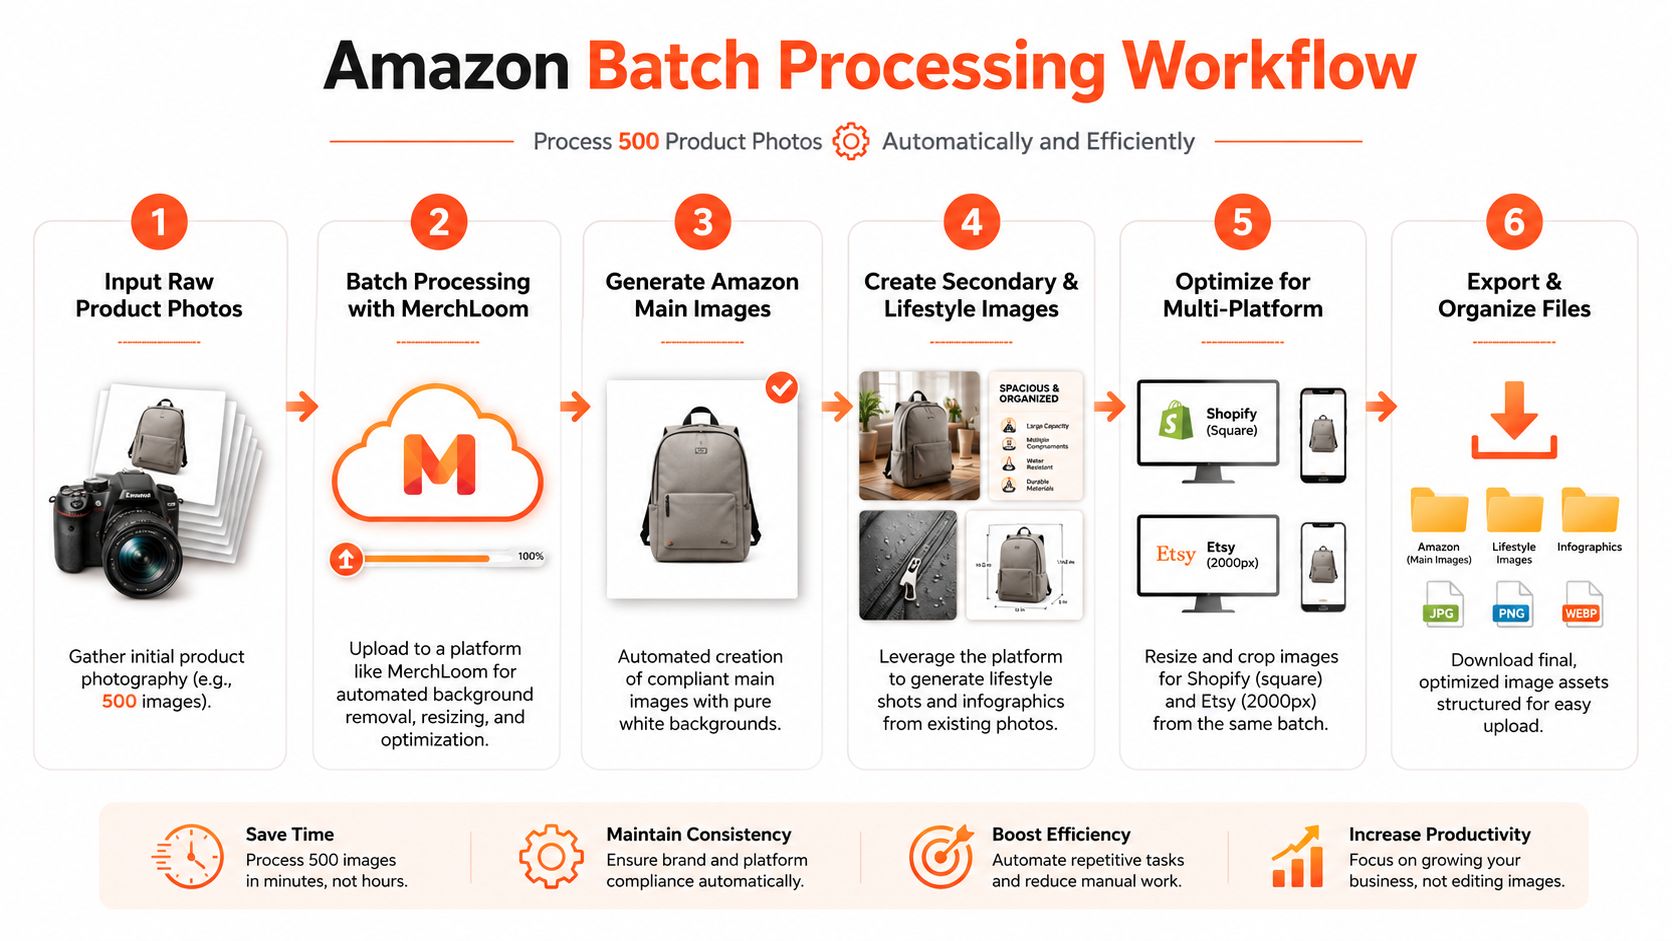
A catalogue drop with 600 SKUs can go sideways fast if every image gets handled like a one-off creative job. The teams that stay on schedule use a fixed production flow, then run the whole batch through it with clear rules for naming, framing, export, and QA.
Here is the workflow I use when a large product image set needs to be made Amazon-ready.
Step sequence that holds up in real operations
- Ingest raw files from one source of truth. Pull from a structured folder, cloud drive, DAM, or storefront export. Keep SKU names, variant codes, and parent-child relationships intact.
- Sort images by role before editing. Flag likely main images, secondary detail shots, packaging views, and lifestyle assets so each file gets the right treatment.
- Standardise the background for main-image candidates. Apply the same white-background rule across the batch instead of fixing files one by one.
- Crop to a square canvas using preset framing rules. Keep products centred, consistent in scale, and visually balanced across related SKUs.
- Run bulk QA checks before export. Catch missing files, odd crops, clipped edges, and obvious source-quality problems before they reach listing teams.
- Export to Amazon-ready output specs. Set format, compression, naming, and destination folders in one pass.
What the export stage must control
Export is where a scalable workflow either holds together or creates rework. Amazon accepts common web image formats, and Seller Central documentation also sets limits on file handling, including a maximum file size per image in many upload contexts, so teams need preset export rules rather than manual judgement on every SKU. Amazon's image file format and filename guidance is a better operational reference than a generic resizer page.
The practical choice for most catalogues is JPEG. It keeps files lighter, uploads faster, and is easier to standardise across thousands of listings. PNG and TIFF still have their place, usually earlier in the production chain or for specific source-asset needs, but they often create heavier files than Amazon listing teams want to manage at scale.
Set the export stage to control four things every time:
- Compression settings that keep file size in range without softening visible detail
- Format conversion so mixed source files end in one upload-ready standard
- Colour consistency so whites, shadows, and product tones do not shift between product lines
- Folder structure and naming so replacements and bulk uploads map cleanly to SKUs
For larger catalogues, a batch product photo editing workflow gives operations teams one repeatable system instead of hundreds of small editing decisions.
Multi-platform output from the same batch
The stronger model is one master workflow with channel-specific outputs branching from it. Clean the source file once, approve the crop logic once, then export different versions for each destination.
That usually means:
- Amazon main images on pure white
- Amazon secondary images with context, infographics, or feature callouts
- Shopify product images with consistent catalogue presentation
- Etsy exports sized to the team's standard marketplace template
- Ad and social assets that reuse the same approved product cut-out with different framing
This matters most when the catalogue changes often. Packaging updates, seasonal variants, bilingual labelling, and new bundles all create revision work. If each sales channel has its own disconnected image process, every update takes longer, version control gets messy, and old assets stay live longer than they should. A shared batch workflow keeps the library maintainable.
Fixing Common Image Rejections in Bulk
A catalogue gets rejected in patterns. Fifty parent-child listings fail for the same background issue, a supplier upload introduces undersized files across one brand, or a team member drops secondary images into the main slot during a rushed refresh. At that point, the work is operational, not creative.
As noted earlier, if a whole image set misses Amazon's technical floor for zoom or main image presentation, the problem usually sits in the export recipe, template, or approval flow. Fixing files one by one hides the underlying fault and guarantees the same rejection comes back on the next batch.
The common rejection patterns
Background failures usually come from mixed source quality, different clipping standards, or inconsistent white balancing between editors and tools.
Framing failures show up when one SKU fills the canvas properly and the next sits too small, too low, or off-centre because the crop was handled manually.
Resolution failures often start upstream. Supplier packs, legacy libraries, and screenshots get pulled into active listings without a rule that blocks weak source files before export.
Main-image content failures happen when a lifestyle or infographic asset is copied into the hero slot instead of a clean product-only image.
One repeated error across a catalogue calls for one repeatable correction.
How to correct them without creating more cleanup later
Go back to the highest-quality source available. Reworking rejected JPEGs usually adds compression, soft edges, and inconsistent results, especially if different team members handle different subsets of the same catalogue.
Then fix by image class, not by SKU:
- Background issue across many SKUs. Reprocess the full main-image batch with one approved white-background rule and one QA check for clipping edges and shadow handling.
- Resolution issue across a product family. Re-export from the best source files using one standard output preset, then separate images that still fail because the original asset is not salvageable.
- Framing inconsistency. Apply one square canvas, one centring rule, and one target product fill range to the whole batch.
- Wrong asset in the main slot. Rebuild hero images from raw product shots, then keep lifestyle, infographic, and comparison graphics mapped only to secondary positions.
Large-catalogue discipline is critical. The team needs batch rules, exception handling, and a review queue that isolates problem SKUs instead of forcing the whole catalogue through manual fixes again.
If you're tired of fixing Amazon images one SKU at a time, MerchLoom is built for the batch reality of e-commerce. It lets you import entire product collections from the tools you already use, run chained AI workflows for background cleanup, reframing, upscaling, lifestyle generation, and multi-platform exports, then review results as they process. That's useful whether you're cleaning up one listing or standardising a full catalogue for Amazon, Shopify, and Etsy.
Stop editing product photos one at a time
Upload your catalog or connect your store. Describe the result once. MerchLoom does the rest.
Try it free — no signup