
Product Photography Lighting for E-commerce at Scale
Practical product photography lighting setups and workflows for e-commerce sellers. Studio and DIY recipes, modifiers, and batch consistency for catalog scale.
You've photographed the products, filled the memory card, and opened the first folder to find five different whites, three shadow directions, and a color cast that changes from one image to the next. That's manageable for five listings. It becomes a production problem when you're preparing hundreds or thousands for Amazon, Etsy, Shopify, eBay, WooCommerce, Poshmark, or Depop.
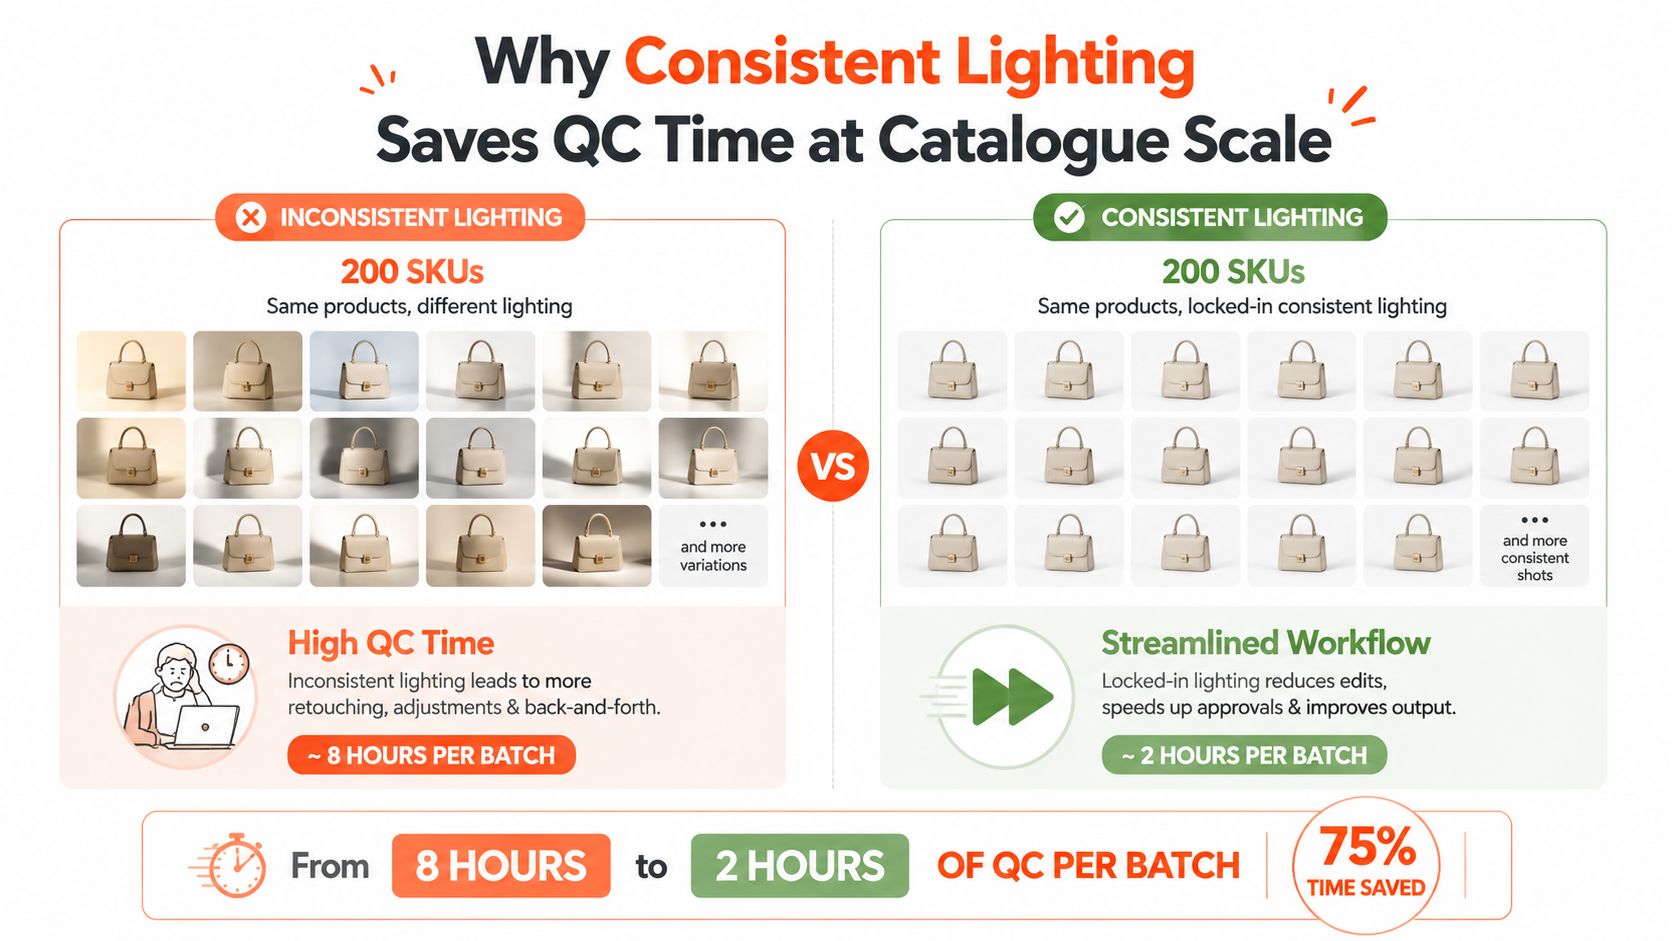
Start by locking the light before you shoot the catalogue. Fix the key-light position, use a 2:1 key-to-fill ratio, and set a white-balance reference around 5500K. The specific gear matters less than repeating the same geometry, exposure, and color target from the first SKU to the last.
Why Product Photography Lighting Matters at Catalogue Scale
A catalogue shoot behaves more like data collection than a creative portrait session. Every frame carries variables that affect the next production step: brightness, color temperature, shadow direction, background tone, and product position. Once those variables drift, background removal, color correction, cropping, and retouching turn into manual decisions instead of repeatable actions.
Shoppers assess product pages quickly. An independent analysis referencing Salsify's visual commerce research and Baymard's usability findings reports that 93% of online shoppers prioritize visual appearance, 85% say visual authenticity affects trust, and that users can form a judgment about a page's usefulness in as little as 0.67 seconds. The same analysis reports 15–40% conversion-rate lifts for products photographed with consistent, professionally balanced lighting compared with products shot under ambient or suboptimal light. Those figures do not guarantee the same result for every catalogue. They do show that brightness, shadow control, texture, and accurate color function as commercial signals, not decoration.
For a batch, build a setup that can be checked rather than remembered. Mark the camera and key-light stand positions on the floor, record the light height, and keep the product table at a fixed distance from the background. Photograph a color reference before the first product and after any change to the setup. If the reference shifts, pause production and correct the cause before adding more files to the queue.
Lock the variables before the first SKU
Use this production baseline:
- Key position: 45 degrees from camera-left, at a fixed height and distance.
- Fill relationship: 2:1 key-to-fill, keeping the fill side dimensional without flattening the product.
- White balance: Start at 5500K, then verify with a color target.
- Camera: Manual exposure, tripod, fixed focal length, and tethered preview.
- Background: One sweep or surface, cleaned and replaced when it develops marks.
The target is visual continuity across image 1, image 200, and image 2,000. A batch-processing workflow for product images can apply consistent rules only when the source files already share a stable visual baseline. That handoff is cleaner when lighting, exposure, framing, and color have been audited before processing begins.
Controlled product illumination developed as photographers moved beyond sunlight-only work. A historical summary records 1839 as the year L. Ibbetson used oxy-hydrogen light, or limelight, to photograph microscopic objects. The exposure fell from about 25 minutes in normal daylight to about 5 minutes with artificial light, as described in this historical account of early artificial-light photography. The production lesson remains practical: controlled light removes weather and daylight changes from the workflow.
Practical rule: If you cannot describe your lighting recipe on one page, it is not repeatable enough for a large catalogue.
Natural Window Light vs Continuous LEDs vs Strobes
Window light can produce attractive images with very little equipment. It also changes while you work. The sun moves, clouds pass, and the light entering the room shifts in direction and intensity. A fixed shoot window and blackout curtains can reduce that variation, but the setup is still tied to the room and the day.
For a large batch, window light works only when you treat it as a controlled production resource. Keep the table, camera, and product distance fixed. Close other windows. Record the shooting period. If the light changes visibly on the tethered preview, stop the batch rather than trying to correct every file later.
Continuous LEDs are easier to audit. You can see the highlight on a glossy bottle or the shadow under a shoe before pressing the shutter. That preview is useful when you're learning modifiers, and it helps with jewelry, screens, and reflective electronics where a small change in angle can create a large glare patch. Choose daylight-balanced fixtures, keep their color temperature fixed, and don't mix them with window light unless you've tested the combination.
Strobes provide high output and short flash duration. That helps freeze hanging apparel, soft goods that shift between shots, or products that need a narrow aperture for front-to-back sharpness. The trade-off is measurement. You'll need a flash meter or a reliable test-trigger routine, and you must make sure every frame fires consistently.
| Source | What works | What fails at batch scale |
|---|---|---|
| Window light | Low cost, visible texture, natural falloff | Weather and sun movement change exposure |
| Continuous LED | Live shadow preview and stable operation | Lower output can limit aperture or shutter choices |
| Strobe | High output and motion control | Requires disciplined triggering and exposure checks |
A useful rule is to choose the source with the lowest variance across the full shooting day, not the source that produces the prettiest test frame. A window may win for a short collection. A continuous LED or strobe usually gives you more control when the catalogue spans multiple product families.
For general principles about shaping light around people and objects, this guide to natural headshot lighting offers useful context. The same ideas about source size, direction, and shadow softness carry over, but e-commerce adds stricter requirements for repeatability and color matching.
A Repeatable Studio and DIY Setup You Can Lock In
Build the studio version around fixed marks, not memory. Place a 100 × 150 cm softbox at camera-left, 45 degrees from the product and 1.2 m away. Set it as the key and adjust its output until the white sweep exposes correctly at f/8 and ISO 100.
Put a 60 × 90 cm fill softbox at camera-right, 1.5 m away. Cut its output to half so the fill remains weaker than the key. Add a strip light with a grid behind the product for a controlled rim, then place a white foamcore board below the table as a kicker for dark lower edges.
The distances are starting marks, not laws. What matters is that you record them and return the stands to those marks after moving them. Use tape on the floor and a small diagram in the production log.
The lower-cost version
A DIY setup can follow the same lighting logic. Use a 100W daylight LED panel through a 1 × 1 m diffusion frame as the key. Put a second LED panel on the opposite side at half power for fill. Use white foamcore to return light into the edge or rear of the product instead of adding another fixture.
Both versions should use a curved sweep, a tripod, and tethered capture. Put a color checker in the first frame of every batch. That frame gives you a reference for white balance, exposure, background tone, and the relationship between key and fill. It also gives whoever processes the files a clear starting point when the catalogue is divided into multiple sessions.
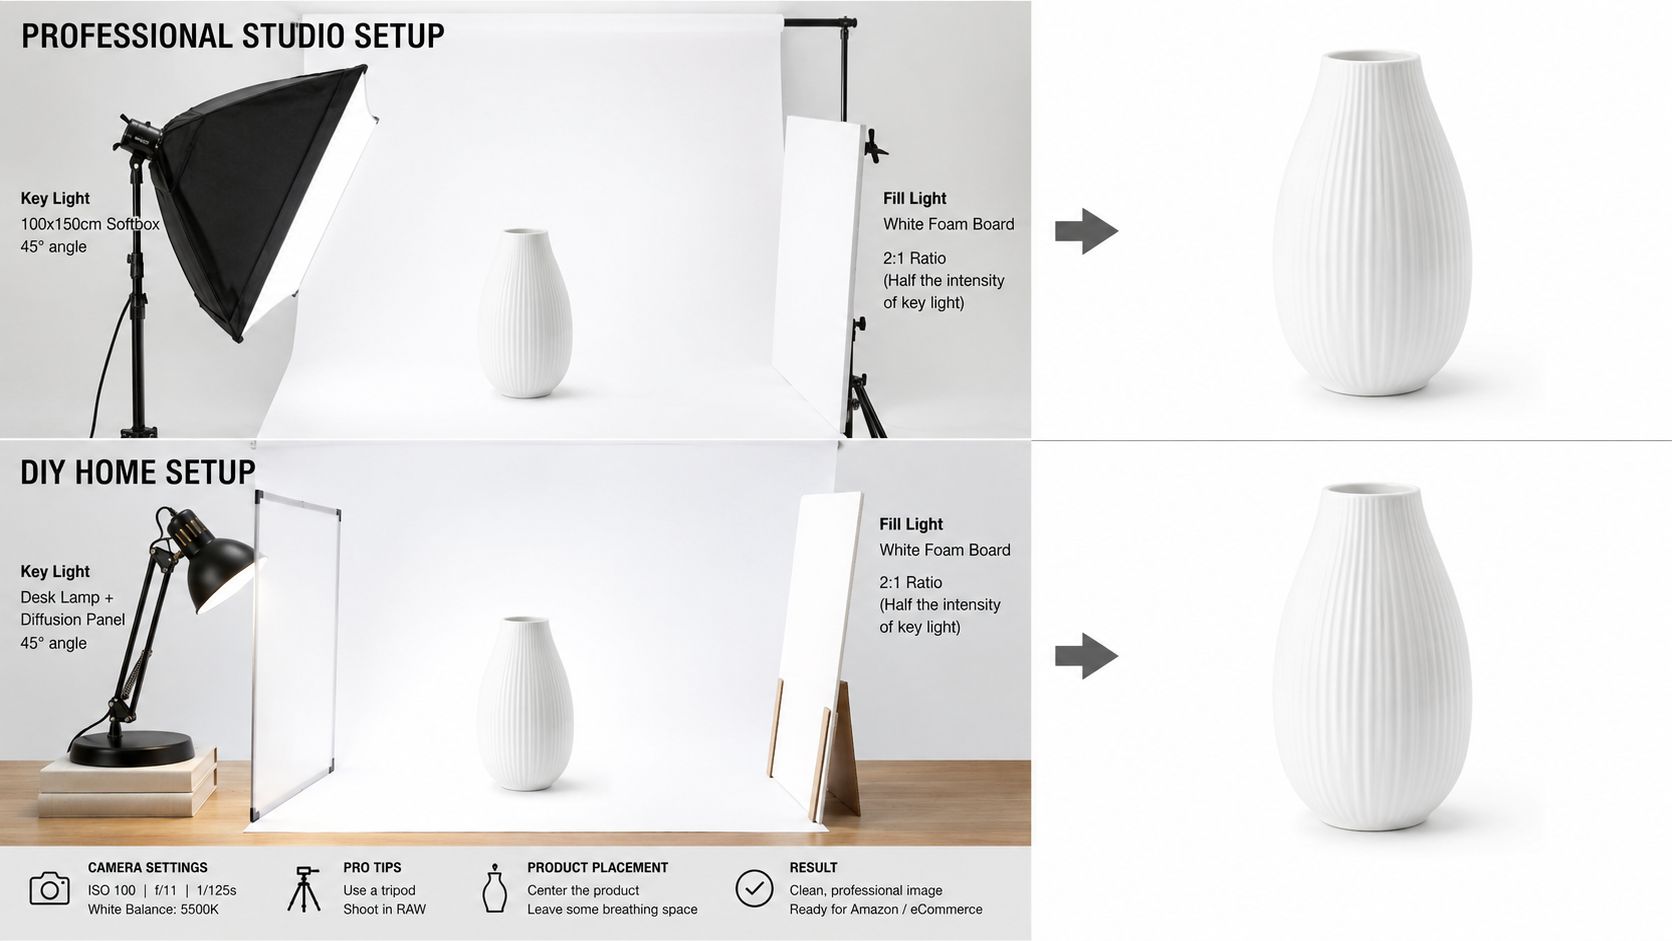
The curved sweep matters because it removes a hard horizon line. Keep the product far enough forward that the background light doesn't spill onto its edges. For a practical reference on choosing and using a clean studio photo backdrop, focus on the sweep as part of the lighting system, not as a separate styling choice.
Production note: A cheaper setup with fixed marks is more useful than expensive lights that move between every product family.
Your production log should include fixture type, distance, height, power setting, camera height, lens, aperture, shutter speed, ISO, and white balance. If you later need to rebuild the setup, those notes are faster than examining a finished file and guessing.
If you're also building a content system to explain products or attract store traffic, a resource on video-led acquisition for SaaS can help separate the image-production workflow from the distribution workflow. Keep those systems distinct. Your lighting recipe should serve the catalogue first.
Lighting Recipes by Product Type
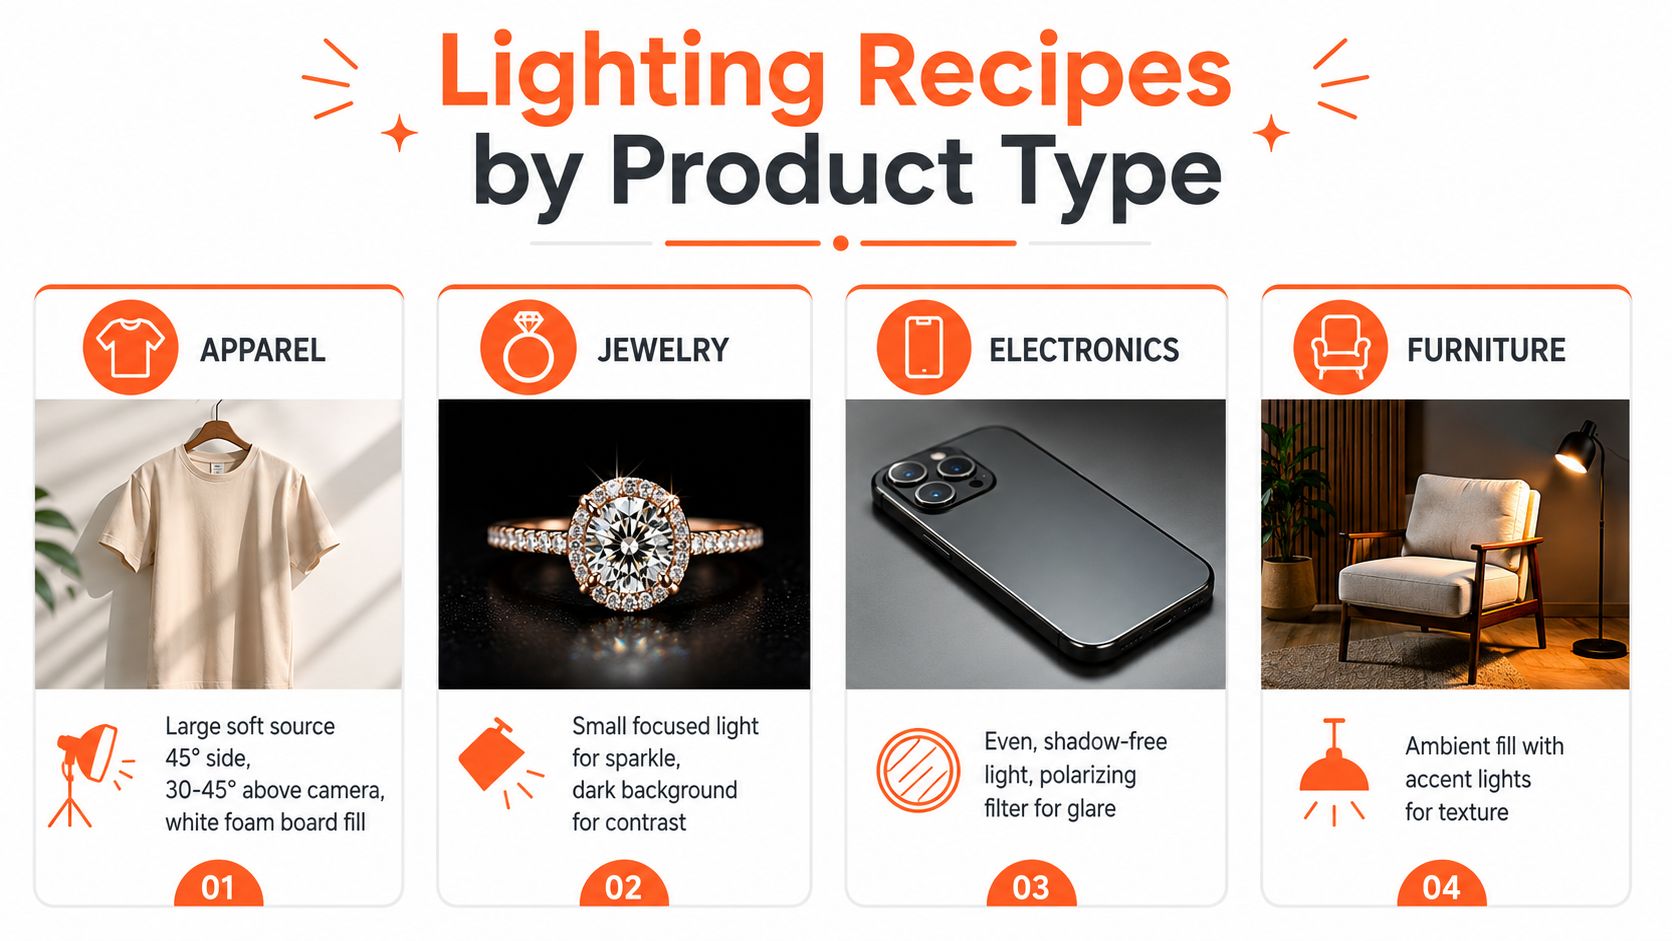
Different surfaces need different controls. A matte cotton shirt, a chrome appliance, and a glass cosmetic bottle can all sit in the same catalogue, but they don't respond to the same light placement.
For apparel, use a large soft source 45 degrees to one side and 30–45 degrees above the camera. Place white foam board opposite the key for fill. Keep the background 1–1.5 m behind the subject so the garment remains separated from the sweep. The large source reveals folds without creating hard, distracting shadows. For flat lays, raise the source and watch for uneven brightness across the corners.
Jewelry needs a reflective-surface override. Use a strip box or two small diffused lights rather than one frontal lamp. Add polarizing filters where the equipment supports them, then position white and black cards to shape the reflections. A white card can create a clean line on a metal edge. A black card can define the outline of a silver ring against a bright reflection.
Electronics need broad sources on both sides. Flag the lights so they don't appear as bright rectangles in a glossy phone housing or screen. Add a narrow rear light only when the edge needs separation. Keep the screen angle consistent across the batch, because a small rotation can change a dark display into a large glare patch.
Soft goods benefit from broad, even illumination. Shape stuffed items before shooting, then use a gentle rear source instead of a hard rim. The goal is to retain texture and form without making fabric edges look cut out.
Doing this for a whole catalog?
MerchLoom runs background removal, upscaling and AI editing across every product photo you have — one prompt, whole batch. Try 2 batches free, no signup.
Try it free| Product family | Source positions | Modifiers and controls | QC signal |
|---|---|---|---|
| Apparel | Key 45 degrees to one side, above camera | Large softbox, white foam board, controlled background distance | Fold detail and even garment brightness |
| Jewelry | Two small diffused sources or a strip box | Polarizing filters, white and black cards | No uncontrolled hot spots on metal or stones |
| Electronics | Broad sources on both sides | Flags, diffusion, optional narrow rear light | Screen and housing remain readable without glare |
| Soft goods | Broad frontal or side illumination | Large diffusion, gentle rear source | Texture remains visible across the product |
A two-light setup is sufficient when the product is matte, the shape is simple, and the background separates cleanly. Add flags when a reflective surface shows the fixture. Add grids when light spills onto the background or creates unwanted edge brightness. Add a third light when the background, product, and edge separation need independent control.
Background color changes the exposure decision. White backgrounds need enough light to look clean, but too much spill can erase pale product edges. Dark backgrounds absorb more light and can make black products disappear unless you create a controlled rim or reflection. Keep background decisions consistent within each product family, and record them as part of the recipe.
Small items often need tighter control because a minor reflection can cover a large part of the frame. Use this small-item product photography guide when adapting the setup for rings, cosmetics, accessories, or small hardware.
Camera and Exposure Settings for Batch Consistency
Set the camera for repeatability first. Use a tripod, manual mode, ISO 100, 1/125 second, and f/8 as the starting point. Adjust light power before changing the camera, unless the product size or required depth of field demands a different aperture.
Set the fixtures around 5500–5700K, then shoot RAW. Use the same color temperature across the batch. Mixing a window, a warm room lamp, and a daylight LED creates color correction work that a preset can't reliably solve.
Before the first product, photograph a gray card or X-Rite ColorChecker. Capture a blank background frame as well. Record aperture, shutter speed, light power, source distance, camera height, lens, and white balance in a production log.
Read the frame, not just the meter
Check the histogram and highlight warnings. Then inspect the product corners, bright labels, white fabric, metallic edges, and the background. A frame can have an acceptable overall histogram while clipping the most important product detail.
White products need special attention. Protect the highlights, but confirm that the weave, seams, embossing, and silhouette remain visible. If the sweep clips into a featureless white block, reduce spill or move the product farther from the background instead of trying to restore missing detail in editing.
Use a fixed shot template for product size and focus distance. A small item shouldn't fill the frame differently from its neighbors unless the listing requires it. Name files with a predictable structure that includes the SKU and view, such as a product identifier followed by front, side, detail, or lifestyle. Consistent naming prevents the lighting team, editor, and marketplace export from losing track of the same item.
Your preflight check should be short:
- Camera lock: Tripod, height, focal length, and focus mode are fixed.
- Color target: Gray card or ColorChecker is clean and ready.
- Exposure: ISO, shutter, aperture, and light power match the recipe.
- Power and storage: Batteries, tether cable, and memory have been checked.
- Test frame: Background and one representative product pass the histogram and detail review.
For a focused explanation of the color decision behind this process, use this white-balance guide for product photography. The practical point is simple: set the reference once, then protect it through the batch.
Platform Specs and Lighting Decisions That Save Retouching
Platform requirements should influence capture, not just export. Leave enough space around the product for alternate crops, keep the camera height fixed, and light the background before you start processing hundreds of files.
Amazon's main product image uses a pure white background, RGB 255,255,255, and the image should be at least 1000 × 1000 pixels, with 1600 × 1600 pixels recommended for zoom, according to this marketplace image-size guide. The brief's production requirement also calls for the longest side to be 1600 pixels or more, so capture a generous master rather than framing tightly in camera. A clean sweep and even background exposure reduce masking and edge repair.
Etsy recommends listing photos at 2000 pixels on the shortest side in a square frame, as outlined in this Etsy image-size reference. Shopify accepts product images up to 4472 × 4472 pixels, with square images strongly recommended, according to this Shopify product-image guide. Keep a large square master so one capture can support multiple storefront layouts.
| Platform | Background or frame requirement | Minimum or working resolution | Capture margin |
|---|---|---|---|
| Amazon | Main image pure white, RGB 255,255,255 | At least 1000 × 1000 pixels, 1600 × 1600 recommended for zoom | Leave room for a clean square crop |
| Etsy | Square listing presentation | 2000 pixels on the shortest side | Keep the product prominent but not tight |
| Shopify | Square images recommended | Up to 4472 × 4472 pixels | Preserve generous space for theme crops |
A stable 5500–5700K setup, fixed camera height, and uncluttered sweep reduce dust removal, masking, and color correction. Don't over-sharpen glossy products. Retain highlight headroom because compression can make clipped edges look harsher.
Use this handoff order:
- Approve the RAW masters and preserve the originals.
- Apply the locked color and crop recipe in a batch workflow.
- Generate marketplace-sized derivatives from the approved master.
- Check a sample from the beginning, middle, and end of the batch.
The output should be platform-ready without changing the visual identity of the catalogue.
QC, Color Management, and Handing Off to a Batch Workflow
Lighting doesn't finish when the shutter closes. At catalogue scale, the recipe becomes a contract between the person shooting, the person processing, and the platform receiving the files.
Shoot an X-Rite ColorChecker in the first frame of every session and set a custom white balance. Compare setup photos before approving a run. Look for tonal drift in the 18% gray reference and check the RGB values of three catalogue-wide swatches. The exact values depend on your products and profile, but the reference points must remain stable.
Build a QC loop that catches drift early
Use a short audit before processing the full folder:
- Color: Compare the target frame with the last approved session.
- Tone: Check the gray reference and product highlights.
- Shadow: Confirm the direction and strength match the recipe.
- Background: Inspect corners for gradients, spill, and color casts.
- Detail: Zoom into glossy edges, pale products, labels, and texture.
A usability study cited in this product-photography lighting guide identifies insufficient image quality as the top complaint on product pages and reports poorly lit photos as the primary issue in 58% of reviewed cases. Treat that as a reason to audit exposure, color, and shadows before a batch enters retouching.
Save the RAW files alongside a locked JPEG preset and a consistent master folder. Use filenames that batch tools can parse. The handoff package should include a contact sheet, the lighting recipe card, and the color profile used.
MerchLoom can run chained AI pipelines across a collection instead of processing one image at a time. You can import existing product images, apply repeatable background, crop, color, or resolution steps, review the output, and adjust the workflow when human inspection finds an error. It isn't a full Photoshop replacement, and AI output still needs review, especially around reflective edges, fine detail, and unusual products.
The best lighting setup for a large catalogue is the one your team can rebuild without guessing.
When the source files match, the batch workflow can apply the same rules across the folder. That's the payoff of product photography lighting at scale. Your recipe protects the catalogue from avoidable variation, and every QC check defends that recipe.
MerchLoom lets you import product images, build chained AI pipelines, and run repeatable edits across a full collection instead of one file at a time. Try the first images with no account, then use its pay-per-image credit system, with credits that never expire, by visiting MerchLoom.
Stop editing product photos one at a time
Upload your catalog or connect your store. Describe the result once. MerchLoom does the rest.
Try it free — no signup