
How to Photograph Small Items for E-commerce
How to photograph small items - Master photographing small items for e-commerce. Get scalable workflows, batch processing tips, and consistent results for your
If you're trying to work out how to photograph small items, you're probably not dealing with one necklace, one pin, or one watch strap. You're dealing with a tray full of them, a deadline, and a growing folder of images that still need cropping, background cleanup, colour correction, renaming, and resizing for three different platforms.
That changes the job completely.
Small-item photography for e-commerce isn't mainly a camera problem. It's a workflow problem. The sellers who stay sane aren't the ones chasing one flawless hero shot. They're the ones who build a repeatable system that produces clean, consistent listing images across an entire catalogue.
The Real Challenge Photographing Small Items
Most advice on small product photography treats the shoot like a one-off craft exercise. Set up a ring, tweak the light, adjust the angle, take your time. That works if you're photographing a single item for a portfolio.
It falls apart when you have to list dozens of SKUs this week.
For online sellers, the primary bottleneck isn't usually knowing that soft light looks better than harsh light. It's keeping angle, crop, white balance, and file output consistent across a whole batch without spending your evenings fixing preventable mistakes. That matters in a market this large. The U.S. Census Bureau reported California retail e-commerce sales at $87.8 billion in 2023, which is why repeatable image workflows matter far more than one-off photo tips for sellers operating at catalogue scale, as noted in Etsy's guidance on shooting products for online selling.
Practical rule: Treat your photo setup like a packing station, not a creative playground. If the process changes from item to item, your editing load multiplies.
Small items make this more difficult, not less. A minor focus miss is obvious on a ring. A tiny dust speck on enamel jewellery suddenly looks huge. Reflective surfaces pick up room colour, your shirt, and the edge of the light source. If you improvise for every item, you'll create a catalogue that feels disjointed even when each image looks acceptable on its own.
That's why the better question isn't just how to photograph small items. It's how to photograph them reliably, in a way that still works when product count climbs.
Three mindset shifts help:
- Think in batches, not singles. Shoot groups of similar products together so setup changes stay minimal.
- Optimise for consistency, not novelty. Buyers need clear information first. Variety in framing usually hurts more than it helps.
- Solve problems upstream. Every lighting or composition issue you prevent during capture saves time across the full image set later.
Once you start thinking like a production manager, the rest becomes easier.
Building Your Scalable Home Studio
A scalable setup doesn't need to be expensive. It needs to be stable.
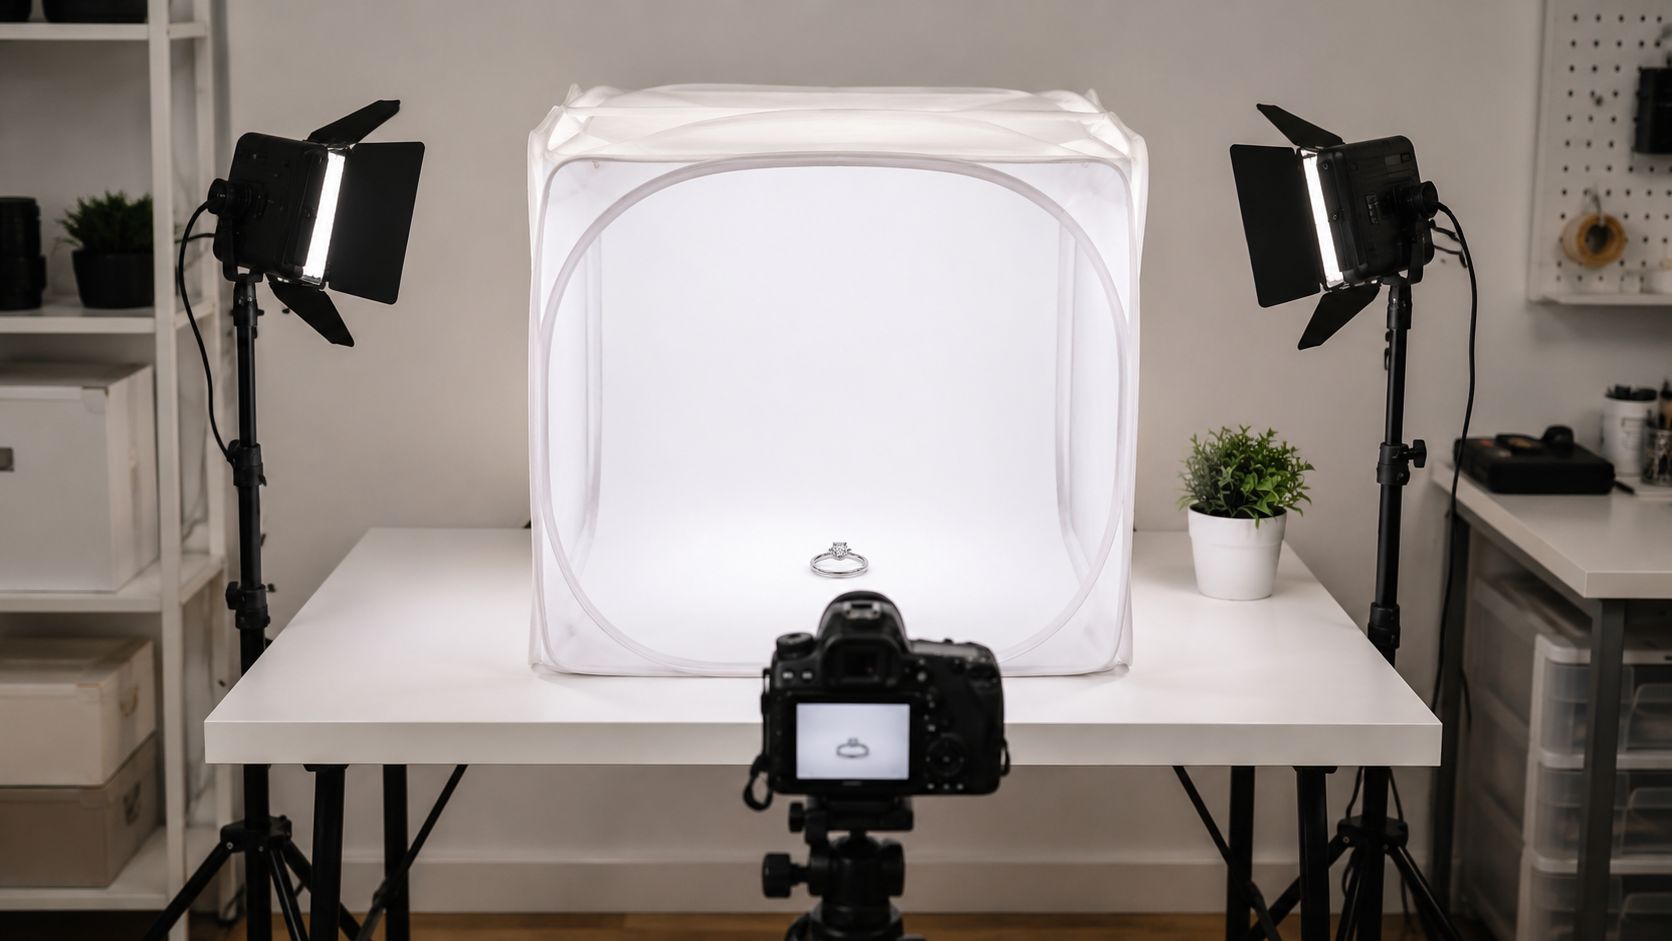
If your lighting changes with the weather, your product colour shifts from morning to afternoon. If your camera angle moves every time you pick it up, your crops won't match. If your background wrinkles, every file needs extra retouching. The fix is simple. Build a small set that stays as unchanged as possible from batch to batch.
What to lock down first
Start with the pieces that remove variables:
- A tripod: A tripod is essential for small items. It keeps framing repeatable and lets you use slower shutter speeds without introducing shake.
- One lighting system: Use either a diffused north-facing window with a white bedsheet or a dedicated light box. Mixing natural and artificial light creates uneven colour and is one of the fastest ways to complicate editing.
- A simple white background: Continuous paper, white card, or a clean shooting sweep all work if they stay smooth and neutral.
- A fixed shooting surface: Use the same table, same height, and same camera position every session.
For sellers building a small indoor setup, it helps to think of the background as part of the workflow, not decoration. A practical guide to choosing a clean, repeatable surface is this overview of a studio photo backdrop.
The studio should be boring
Good catalogue photography is repetitive on purpose.
A flashy setup with changing props, shifting daylight, and multiple improvised surfaces might produce one strong image. It won't produce a coherent collection. For small goods like jewellery, cosmetics, pins, collectibles, cables, or accessories, the winning setup is usually the one that looks almost unchanged every time you use it.
Keep the product at least 6 inches away from a white background to reduce unwanted reflections and help the background stay cleaner in camera.
That spacing matters more than many sellers realise. Push the object too close to the backdrop and you'll often get grey falloff, reflected edges, or a shadow line that then has to be cleaned up later.
A practical home layout
You don't need a dedicated commercial studio. You need a repeatable corner.
A workable arrangement looks like this:
- Table against a wall or stable surface
- Background sweep taped or clipped into place
- Tripod position marked on the floor
- Light box or diffused light source fixed in one place
- Product placement mark on the shooting surface
That last point saves a lot of time. A tiny pencil mark or removable tape guide where the item sits helps keep your framing consistent across a full run. When every product starts from the same physical position, your later cropping becomes far easier.
Camera Settings for Batch Photography Consistency
The fastest shoot is the one where you stop touching the settings.
Small items tempt people to fiddle. One item is silver, one is matte black, one is translucent, one is glossy, so the seller keeps adjusting everything from shot to shot. That usually makes the catalogue less consistent, not more. For batch work, you need a baseline that covers most products well and only changes when there's a clear technical reason.
The settings template that holds up
A strong starting point for small-item e-commerce photography is a tripod, aperture priority mode, an aperture between f/7.1 and f/16, and ISO between 100 and 200. Shooting in RAW is also critical because JPEGs can reduce editability for colour correction by 40 to 60%, which becomes a real bottleneck once you're processing batches instead of single files, as summarised in this guide to getting your photo in HD.
That setup works because each setting solves a specific batch problem:
- Aperture priority mode keeps depth of field under control without slowing you down with full manual recalculation for every item.
- f/7.1 to f/16 helps keep the whole product sharp, which matters when even slight softness makes a small object look cheap or unclear.
- ISO 100 to 200 keeps noise low so your background and product edges stay cleaner in editing.
- RAW capture gives you room to correct exposure and colour across a set without breaking the files.
If the camera is tripod-mounted, a slow shutter speed can be fine. A stabilised setup around 1/13 second is a practical example of where slow capture still works because the camera isn't moving.
E-Commerce Small Item Camera Settings Cheat Sheet
| Setting | Recommended Value | Reason for Batch Work |
|---|---|---|
| Mode | Aperture priority | Keeps depth of field consistent while reducing manual adjustments |
| Aperture | f/7.1 to f/16 | Helps keep the full item sharp |
| ISO | 100 to 200 | Minimises noise and preserves clean edges |
| Format | RAW | Gives more room for colour and exposure corrections |
| Support | Tripod | Prevents camera shake and keeps framing repeatable |
| Shutter speed | Slow is acceptable when stabilised | Supports clean exposure without handheld blur |
What not to change constantly
White balance causes more catalogue inconsistency than many sellers expect. If you're using one controlled light source, set a custom white balance and leave it alone for the whole batch. If you keep switching between auto decisions, silver can swing blue, cream can drift yellow, and a collection that should look unified starts to feel mismatched.
JPEG is fine for casual snapshots. It's a poor choice for a product batch you know you'll need to standardise later.
Another common mistake is using handheld shooting because the item is small and the camera feels close enough. For small products, tiny movement matters. Handheld shots of small items result in a 50% higher incidence of blur, which wipes out the benefit of a high-resolution sensor.
When to break the template
You don't need a new setup for every product. You do need judgement.
Change the settings only when the product itself demands it, such as highly reflective jewellery, clear acrylic, or something with extreme thickness that needs focus stacking or a different lighting angle. Even then, keep the change isolated. Create a second preset for that product type rather than improvising each time.
That's the difference between a workable system and a pile of exceptions.
Staging and Composition for Online Marketplaces
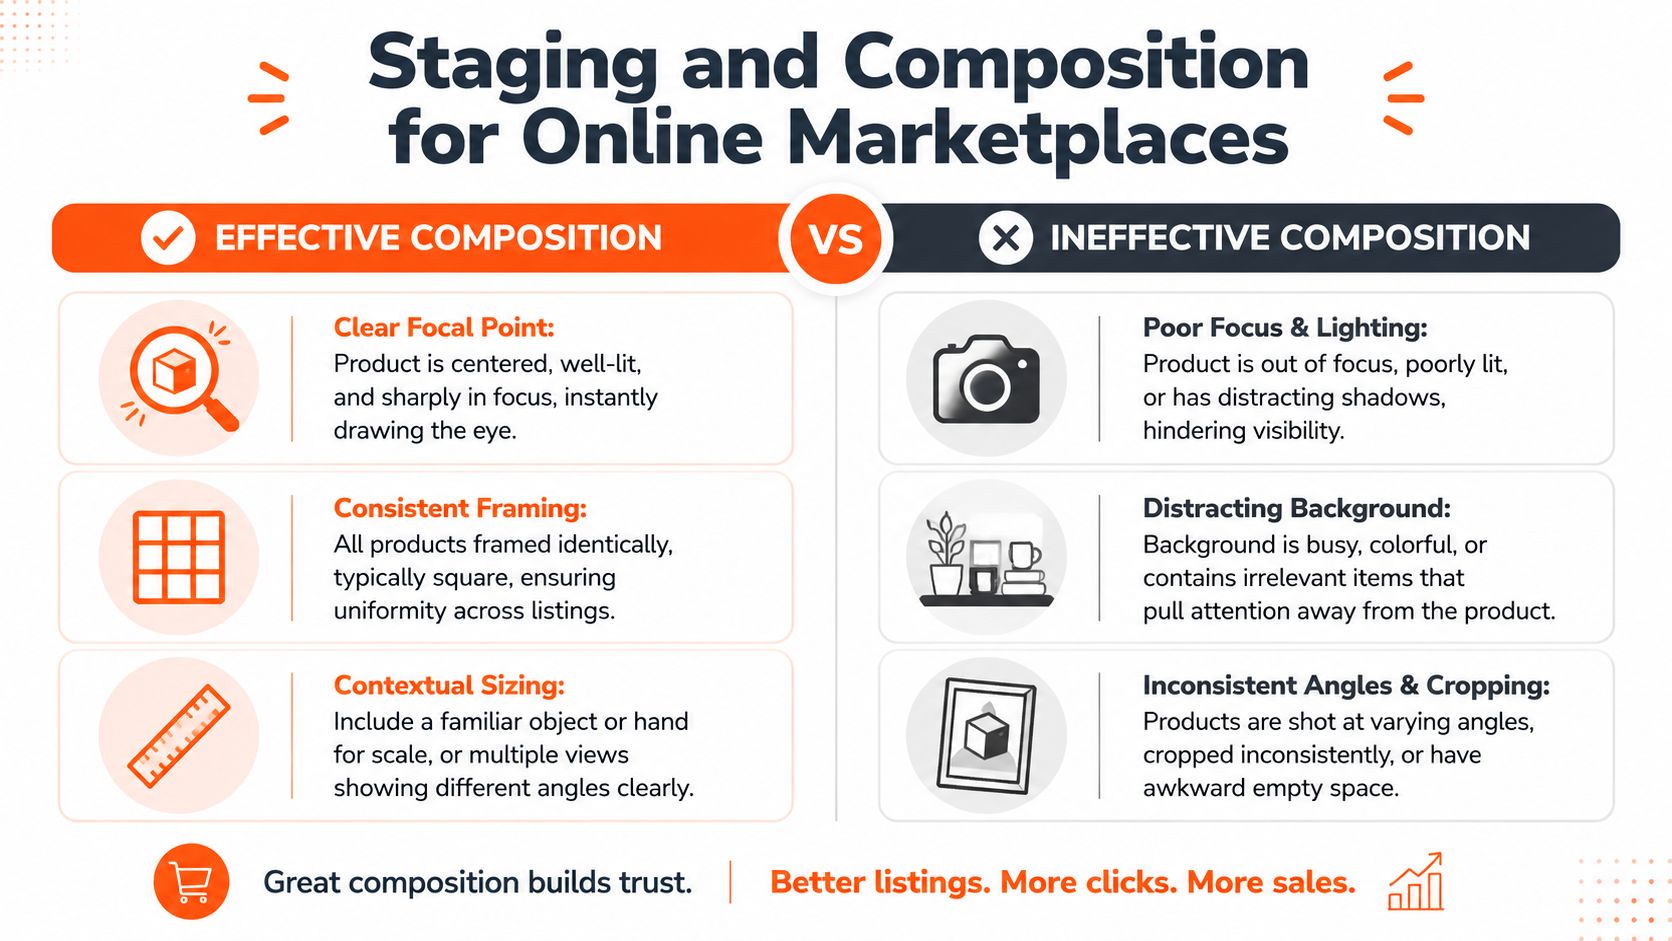
Composition for e-commerce isn't about showing your artistic range. It's about making the product readable, comparable, and trustworthy.
For small items, buyers inspect details quickly and often on a phone screen. If the framing is too loose, they can't see enough. If it's too tight, they lose shape and context. A useful rule of thumb cited from Google is that the product should occupy 75% to 90% of the frame, which keeps the item visually dominant while still preserving enough breathing room for clean presentation in listings and thumbnails, according to this summary of product photography framing guidance.
Framing is product data
That 75% to 90% target is especially useful because it gives you a repeatable standard. Instead of guessing whether an image feels close enough, you can judge it by whether the object is filling the frame properly.
For catalogue work, that consistency matters more than clever variation:
- Centre the item predictably unless the platform requires a different crop.
- Leave similar margin around each product so collection pages look organised.
- Use the same aspect ratio per destination, even if you export platform-specific versions later.
Doing this for a whole catalog?
MerchLoom runs background removal, upscaling and AI editing across every product photo you have — one prompt, whole batch. Try 2 batches free, no signup.
Try it freeIf you want a second version for a lifestyle image or social placement, make it separately. Don't let the main listing image become ambiguous.
Multi-angle beats one dramatic close-up
Items with complete multi-angle coverage see 30% higher engagement rate, which is why a reliable angle list often outperforms one technically impressive hero image.
A practical sequence for small items is:
- Front view
- Back view
- Side profile
- Three-quarter angle
- Detail close-up
- Scale or in-use view when relevant
That last image matters more than many guides admit. Macro can be useful, but it isn't automatically the right answer. An extreme close-up can show texture beautifully while hiding scale, wearability, clasp design, thickness, or how the item sits in real life.
A more balanced approach is to combine detail shots with context. Advice on photographing small goods often recommends using a hand or real environment to show scale, and that trade-off is especially relevant for jewellery and reflective objects, as discussed in this article on photographing small things with context.
A simple way to stay consistent
Use placement guides.
A tiny removable mark where the product base sits, and a second guide for its top edge or centreline, makes a huge difference across a long session. If you also need alternate backgrounds later, this consistency helps tools built for AI product staging produce cleaner, more predictable outputs from the same base images.
Buyers don't reward photographic cleverness if they can't tell what they're purchasing.
For small-item listings, clarity wins.
The Efficient Batch Capture Workflow
Most sellers waste time by finishing one product completely before starting the next. They place item one, shoot all angles, review it, adjust a light, shoot detail shots, then move on. That feels tidy. It's slow.
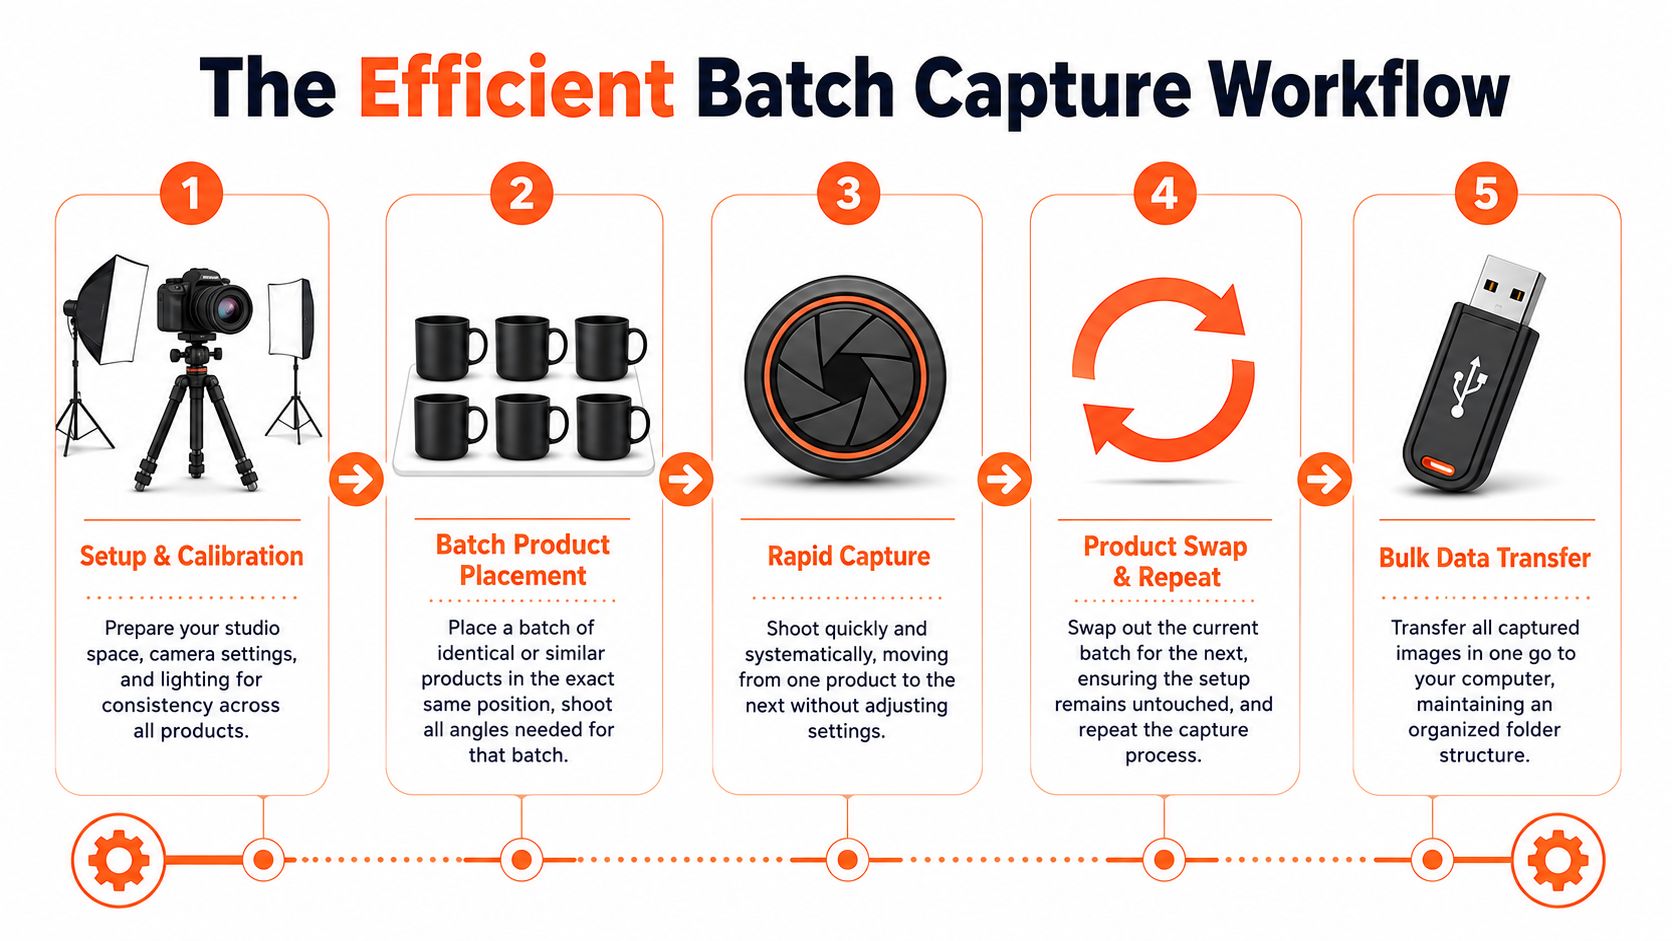
The faster method is an assembly line. Keep the camera and lights fixed, then move products through the set in a repeated sequence.
Shoot by angle, not by item
A practical production run looks like this:
- Prepare the batch first. Clean, sort, and group similar products before the camera comes out.
- Capture the main angle for everything. Do every front-facing shot in one pass.
- Rotate or reposition all products. Then do every side or three-quarter angle in one pass.
- Finish with detail and context images. Leave the exceptions until the standard set is done.
This cuts wasted movement. You're not rethinking the setup every few minutes. You're repeating a small number of actions across the whole batch.
Keep review inside the workflow
Don't wait until the end of the day to inspect files on a larger screen.
Tethered shooting helps because it lets you check focus, dust, framing, and reflections immediately on a laptop instead of trusting the camera LCD. That matters with small items, where a tiny miss becomes obvious later and often forces a reshoot.
A useful video walkthrough of product shooting workflow is below:
Organise before you import
The capture workflow doesn't end when the shutter stops.
Use a folder structure that reflects the shoot logic. For example, separate by date, product group, and angle set. Rename files in batches if your camera or import software allows it. If you dump everything into one folder with default camera names, the editing stage becomes slower before you've made a single adjustment.
A simple pattern helps:
- Batch folder by product family
- Subfolders or tags for angle types
- Clear naming before export
- One review pass for rejects before editing
Busy sellers save real time. The more decisions you make once, the fewer you repeat hundreds of times.
Post-Processing at Scale with AI Workflows
The manual editing model breaks first.
Open image, crop, clean dust, correct colour, remove background, export square, make another version for a different platform, repeat. That's manageable for five files. It's brutal for five hundred. The issue isn't only effort. Manual editing also makes consistency harder because each image receives slightly different treatment.

Manual editing versus workflow editing
The practical divide looks like this:
| Manual approach | Workflow approach |
|---|---|
| Edit one image at a time | Process a collection with the same rules |
| Make repeated decisions | Define the process once |
| Inconsistent crops and backgrounds | Standardised output across the batch |
| Separate exports for each platform by hand | Generate platform-specific versions from one source set |
That shift matters for marketplaces because each destination tends to want something slightly different. One version may need a pure white background for Amazon. Another may need a square crop for Shopify. Another may need a larger listing image for Etsy. If you do that by hand for every file, post-production becomes the true cost centre of the shoot.
For a broader look at where automation fits into e-commerce editing, this piece on AI for product image workflow is a useful companion read.
What an AI batch pipeline should actually do
A useful workflow tool shouldn't just remove backgrounds. It should let you define a sequence and run it over the full collection.
That sequence might include:
- Background removal for all clean studio captures
- Background replacement to pure white for marketplace listings
- Consistent reframing to square output
- Colour normalisation across one product batch
- Multiple exports for different storefront requirements
One option built around that model is AI image workflow automation. MerchLoom is designed for running chained image-processing steps across collections rather than editing files one by one. That's the useful distinction for sellers dealing with catalogue volume.
Batch processing only works if capture was consistent
AI helps most when the input set is disciplined.
If every product is shot from a different height, with different shadows, different colour temperature, and inconsistent crop, the software has to compensate for chaos. If the images were captured in a stable system, batch processing becomes much cleaner and more predictable.
The cheapest edit is the one you never need to make.
That's why the full workflow matters. Controlled capture and automated post-processing aren't separate ideas. They're the same production strategy seen from two different stages.
From Photoshoot to Profitable Listings
Once your process is stable, product photography stops being a weekly drag on the business. It becomes part of a listing system.
A controlled studio setup, fixed camera template, angle-based capture routine, and batch editing workflow give you something far more useful than one attractive image. They give you repeatability. That means faster launches, fewer inconsistencies across your catalogue, and less time lost to cleanup work that shouldn't have existed in the first place.
Strong images still need strong merchandising. After the photos are done, it helps to review which products convert and which listings underperform. A practical place to start is this guide to understanding sales performance, especially if you're trying to connect image quality with product-level results. And once your visuals are consistent, the next bottleneck is often the copy. Structured listing copy can be optimized with tools built for AI product description.
The point isn't to become more artistic. It's to become more organised.
If you're photographing small products regularly, MerchLoom is worth considering as part of the post-processing side of that system. It's built for running repeatable image workflows across full batches, which reflects how e-commerce sellers manage collections, not just one photo at a time.
Stop editing product photos one at a time
Upload your catalog or connect your store. Describe the result once. MerchLoom does the rest.
Try it free — no signup