
Get Your Photo in HD: A Guide for E-commerce Sellers
Learn to create or convert any product photo in HD. This guide covers camera settings, batch processing, and marketplace rules for Amazon, Shopify, and Etsy.
You've probably had this week already. A product shoot is done, the folder is full of raw files, Amazon wants white backgrounds, Shopify needs a clean grid, Etsy listings look soft on zoom, and someone on your team says, “Can we just make every photo in HD?”
That request sounds simple. In practice, it usually means rebuilding the entire image pipeline so one good product shot can turn into many compliant, sharp, listing-ready assets without manual rework on every SKU.
Why a Photo in HD is a Process Not a File
A seller with ten products can still get away with editing image by image. A seller with a growing catalogue can't. Once you're managing colour variants, seasonal updates, bundle listings, and channel-specific crops, “HD” stops meaning a big file and starts meaning a repeatable output standard.

What sellers usually mean by photo in HD
In e-commerce, a photo in HD usually needs to do four jobs at once:
- Look sharp on modern screens so product details don't break down after compression
- Meet marketplace rules so listings aren't rejected or visually inconsistent
- Support cropping and reuse across different shapes and placements
- Build trust by showing the item clearly, without noise, muddy edges, or strange colour shifts
That's different from exporting the largest JPEG you can.
A useful way to think about this is that HD is a business outcome, not a camera setting. A file can be technically large and still fail in the places that matter most. It might have poor edge separation after background removal, awkward framing in square crops, or softness introduced by resizing in the wrong order.
A sharp product image isn't the same thing as a usable catalogue asset. Usable means consistent, compliant, and easy to repurpose.
The scale problem is easy to underestimate. For California-based e-commerce brands, visual competition is intense. More than 3.2 billion images are shared online every day according to Light Stalking's photo statistics roundup. That matters because your product imagery doesn't compete only with other sellers. It competes with everything else a buyer scrolls past.
Why one-by-one editing breaks down
Manual editing fails first on consistency, then on speed.
One editor crops a hero shot slightly tighter than the last batch. Another removes backgrounds with a different edge tolerance. A third exports files with the wrong colour profile or forgets the marketplace version. The result is a catalogue that looks assembled, not organised.
If you're trying to sort out whether enlargement and upscaling are the same job, MyImageUpscaler's comparison insights are useful because they separate simple size increase from detail-preserving enhancement. That distinction matters when you're deciding what to fix at capture stage and what to leave for later processing.
A better model is to define your target outputs first, then build the workflow backwards from there. That's the difference between editing photos and operating an image pipeline. If you want a practical breakdown of that mindset, this guide to an HD photo converter workflow is a solid reference point.
Capturing Product Photos for Maximum Flexibility
Most HD problems start before editing. They start at the shoot.
If the original file is underexposed, slightly blurred, badly framed, or inconsistent across the set, every downstream step gets harder. Background removal becomes less clean. Colour correction becomes more aggressive. Upscaling has to fix too much.
Start with one reliable master image
For catalogue work, the goal isn't artistic variety. It's repeatable capture.
Use a fixed setup for each product family. Same camera position. Same lens. Same lighting pattern. Same distance from subject where possible. That consistency gives batch tools a cleaner input and reduces the number of exceptions you need to handle later.
A simple capture checklist usually matters more than fancy gear:
- Lock the camera position with a tripod so framing stays stable across SKUs
- Keep lighting constant so white products don't shift warm and black products don't lose definition
- Leave crop room around the subject so you can adapt later for square, portrait, and marketplace-specific formats
- Shoot multiple angles systematically rather than improvising the order for each item
Resolution discipline at capture stage
For high-quality image preparation, a practical benchmark is to capture at the camera's highest native setting and preserve at least 300 PPI, which Adobe considers high resolution in its guidance on high-resolution images.
That doesn't mean every marketplace displays images at 300 PPI. It means your master file keeps enough detail for cropping, resizing, and print-oriented use cases without forcing rescue edits later.
Practical rule: Shoot the cleanest, largest master you can manage consistently. Downstream versions should be derived from that file, not rebuilt from smaller exports.
A lot of casual advice about photo in HD skips this point and jumps straight to enhancement tools. That's backwards for product teams. Good automation needs stable inputs.
What works on real product shoots
The easiest wins are boring, and that's why they work:
- Neutral backdrop first: A simple setup gives you cleaner edges and fewer retouching artefacts later. If you're refining your home or small-studio setup, this guide to a studio photo backdrop covers the practical side well.
- Maximum-quality RAW or JPEG: If you already know how to process RAW reliably, use it. If not, use the highest-quality JPEG your camera offers and keep exposure controlled.
- Consistent white balance: Don't let auto settings drift between items in the same batch.
- Controlled reflections: Shiny packaging, jewellery, and glass fail fast when highlights blow out.
What doesn't work is trying to “fix it later” on every file. That approach turns a manageable batch into a queue of exceptions.
Here's the operational truth. The better your source image, the less your HD workflow has to invent. That's when resizing, edge cleanup, and sharpening remain subtle instead of destructive.
The Core Workflow for Batch Image Processing
A good photo in HD for e-commerce isn't produced by one tool. It comes from the order of the steps.
That order matters because each stage affects quality, cost, and how many files you can process without supervision. Sellers often get into trouble by doing expensive enhancement too early, or by creating one master output and trying to force it onto every platform.
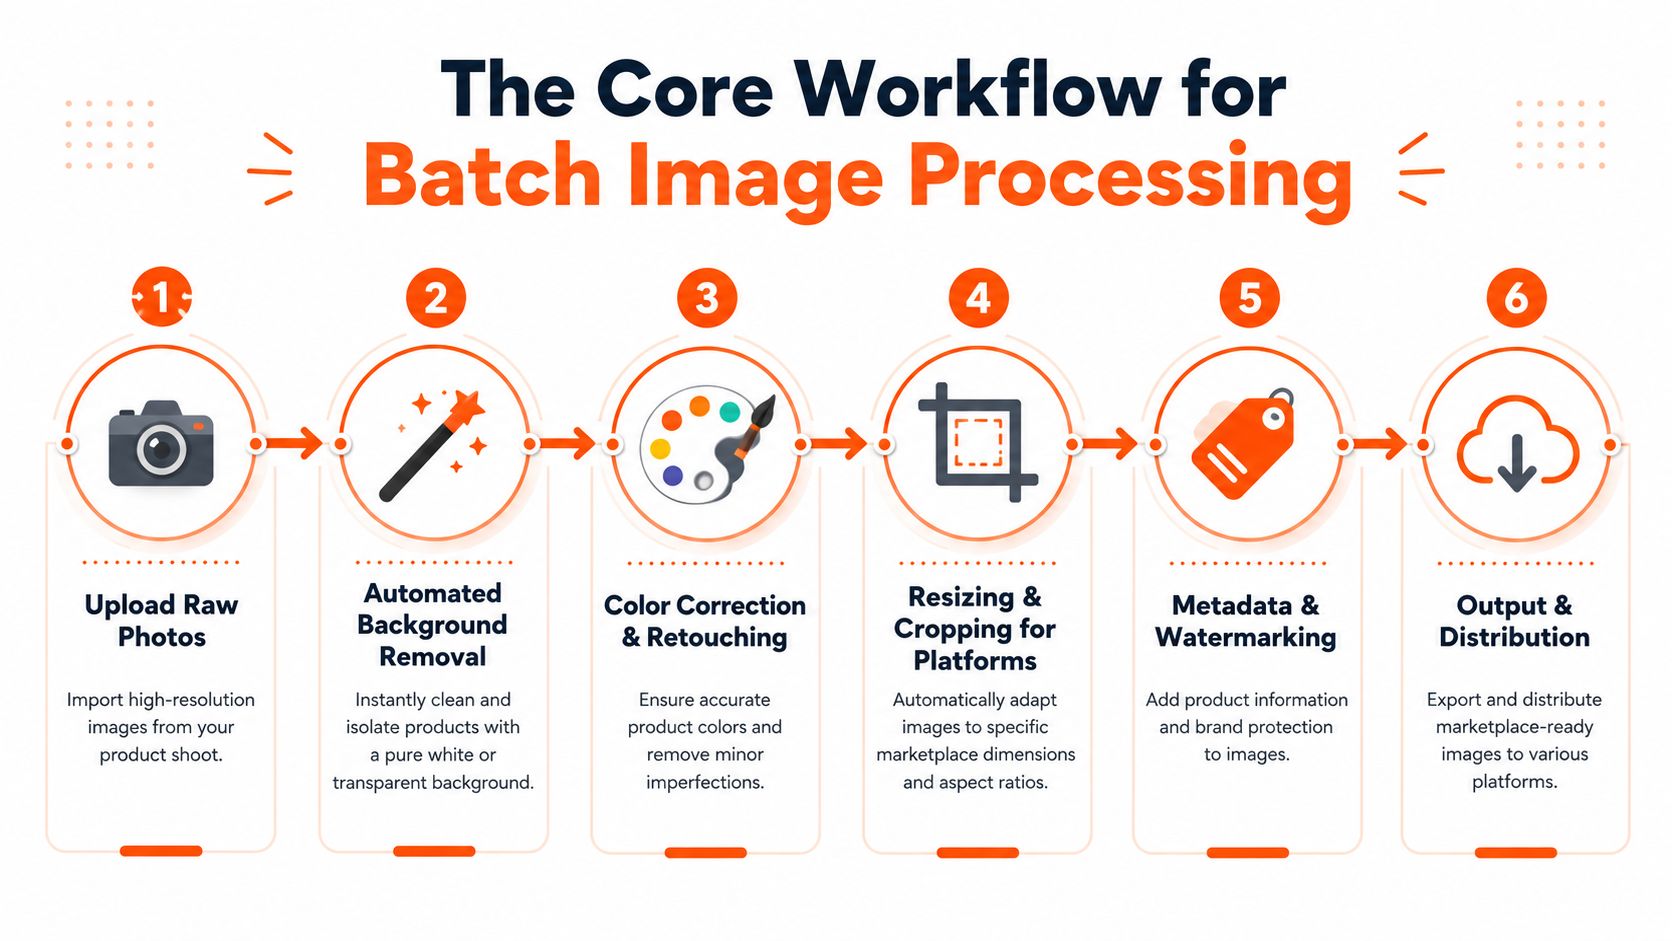
The sequence that holds up at catalogue scale
For most product catalogues, the workflow should look something like this:
Ingest the raw files
Pull images from the shoot folder and sort them by product, angle, and variant. Don't start editing until naming and grouping are clean. Messy inputs create messy exports.
Remove or isolate the background
Many listing assets become usable. Clean isolation also makes later reframing easier because the product sits predictably in the canvas.
Correct colour and minor defects
Adjust exposure, white balance, dust spots, label glare, or small inconsistencies. Keep this restrained. Product images should become accurate, not stylised.
Resize and crop for specific channels
Create separate outputs for white-background marketplaces, branded storefronts, and social formats instead of one compromise file.
Apply sharpening or upscaling only where needed
This should serve the target output, not the editor's preference.
Export with the right filenames and formats
Final delivery matters. If the naming convention, format, or folder structure is wrong, the workflow still fails.
Why the order matters
A critical optimisation in batch image processing is reducing pixel count before expensive steps. Microsoft's announcement about HD Photo described the format as offering up to 2x JPEG compression efficiency, half the file size, and region-of-interest decoding in certain scenarios, which is useful context when thinking about compression efficiency and processing order.
The practical takeaway isn't that you need that format for every workflow. It's that processing smaller, cleaner files at the right point in the chain saves bandwidth and compute.
Here's the mistake I see often. Teams upscale first because they think bigger means better. Then they remove the background, crop aggressively, and export smaller files anyway. They paid the cost before knowing the final frame.
Clean first, standardise second, enlarge last if the output actually needs it.
That principle is especially useful when you're handling hundreds of images and several output sets per SKU.
One master image, many business uses
A product image doesn't only live on a listing page. It can show up in a collection grid, carousel, ad creative, comparison tile, email block, or marketplace gallery. That's why channel-specific derivatives matter.
If you're planning image sets beyond the standard hero image, these e-commerce product carousel strategies are worth reviewing. They're a good reminder that image sequencing affects how buyers understand the product, not just how the file looks in isolation.
Doing this for a whole catalog?
MerchLoom runs background removal, upscaling and AI editing across every product photo you have — one prompt, whole batch.
Try MerchLoomA repeatable batch workflow should account for that by generating families of assets rather than one “final” export. For sellers handling volume, this matters more than any single-image trick. A useful operational reference for that mindset is this guide to batch product photo editing.
A simple workflow table
| Stage | Main goal | Common mistake |
|---|---|---|
| Raw intake | Organise source files | Editing before sorting |
| Background work | Isolate subject cleanly | Bad edges on shadows or transparent items |
| Colour correction | Keep product accurate | Over-editing to make items look unreal |
| Cropping and resize | Match platform display | Using one crop for every channel |
| Upscaling or sharpening | Preserve detail where needed | Enlarging before final framing |
| Export | Deliver listing-ready assets | Wrong filenames, formats, or aspect ratios |
That table looks basic. It saves a lot of wasted effort.
Automating Your Image Pipeline to Save Time and Money
Once the workflow is stable, the next bottleneck is labour. Someone still has to run the steps, check outputs, export variants, and repeat the process on the next collection.
That's where automation starts paying for itself in time saved and in fewer catalogue inconsistencies.
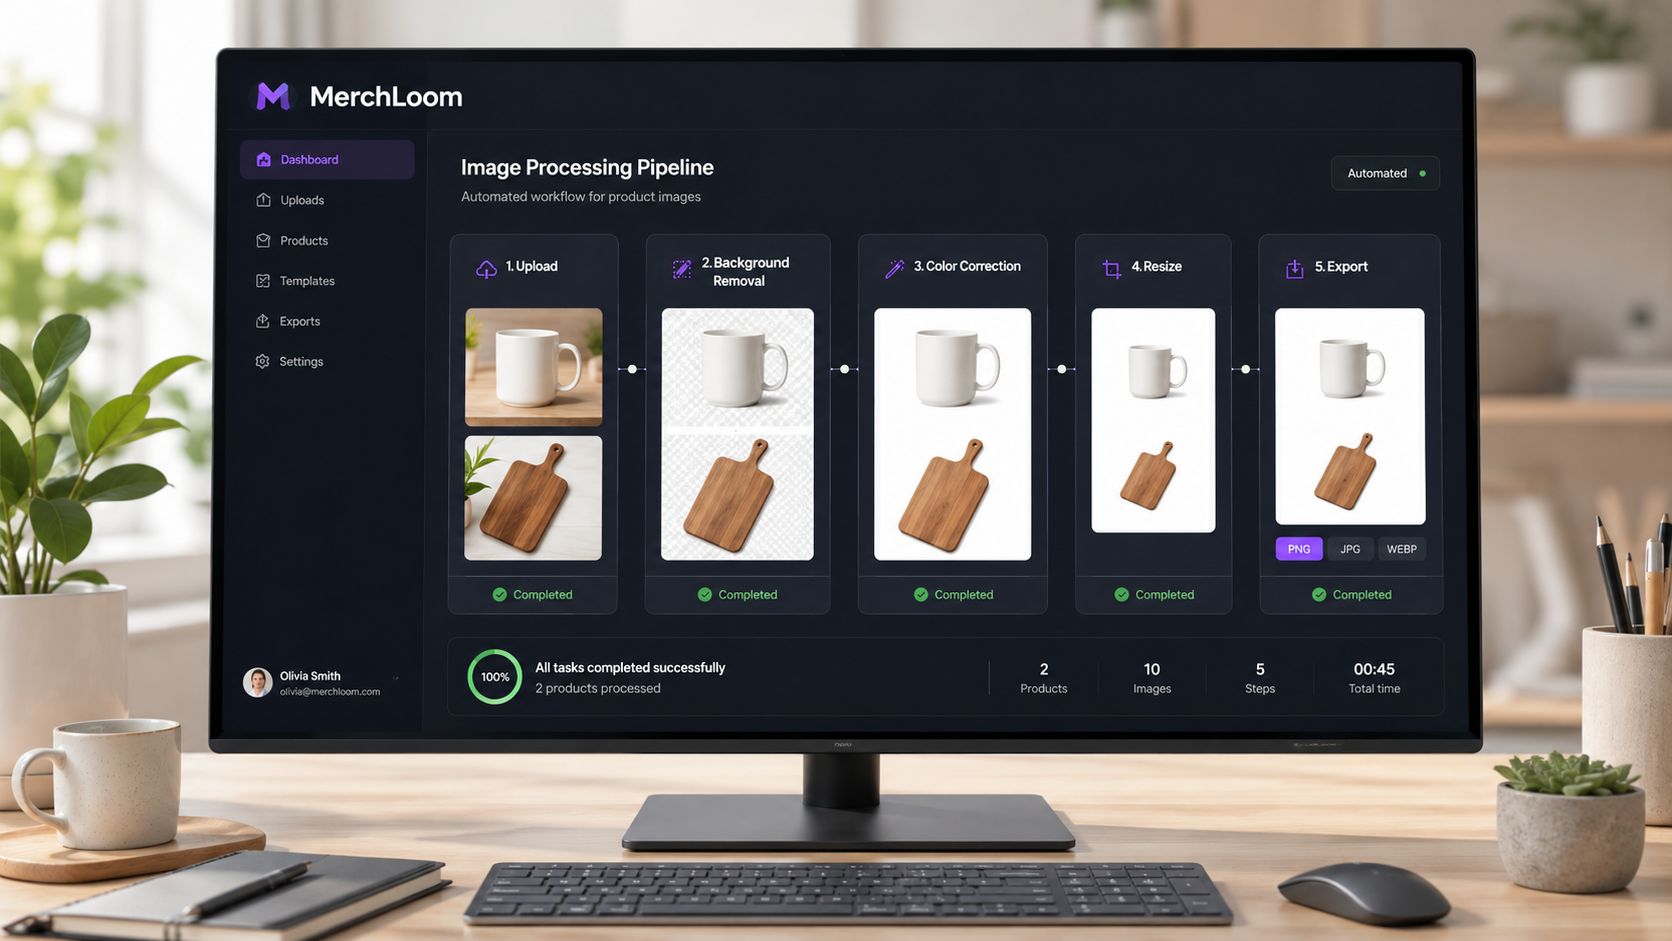
Build workflows, not editing sessions
Manual editors think in images. Operators think in rules.
A useful automated setup usually includes:
- A source connection such as cloud storage, a commerce platform, or a shared folder
- A defined sequence for background removal, colour correction, resizing, and export
- Platform outputs that create separate image sets for each sales channel
- Quality review points so a human can spot failures before the whole batch finishes
That shift is the primary productivity gain. You stop asking, “How do I fix this photo?” and start asking, “What should happen to every photo of this type?”
One option in that category is MerchLoom, which processes image collections through chained AI workflows rather than one-off edits. In practice, that means you can describe a result in plain language, then run it across a catalogue. If you want to see what that looks like operationally, this article on AI image workflow automation is the relevant reference.
Where automation helps most
The biggest wins usually come from the repetitive jobs people are worst at doing consistently:
- Background standardisation across hundreds of files
- Reframing into square, portrait, and marketplace-specific crops
- Batch export logic so the right outputs land in the right folders
- Collection-level consistency across a seasonal drop or vendor upload
Here's a useful walkthrough of how image automation fits into product workflows:
The real savings don't come from editing faster. They come from removing decisions that shouldn't be repeated.
That's also where casual users benefit. Even if you're only fixing one product shot today, it helps to work in a way you can reuse later. Most stores don't stay small.
Meeting Image Specs for Amazon Shopify and Etsy
The last mile is where many good images fail. A file can be sharp, well-lit, and professionally retouched, then still underperform because it doesn't fit the way the platform displays it.
Each channel asks for something different. That's why one master image should produce multiple exports.
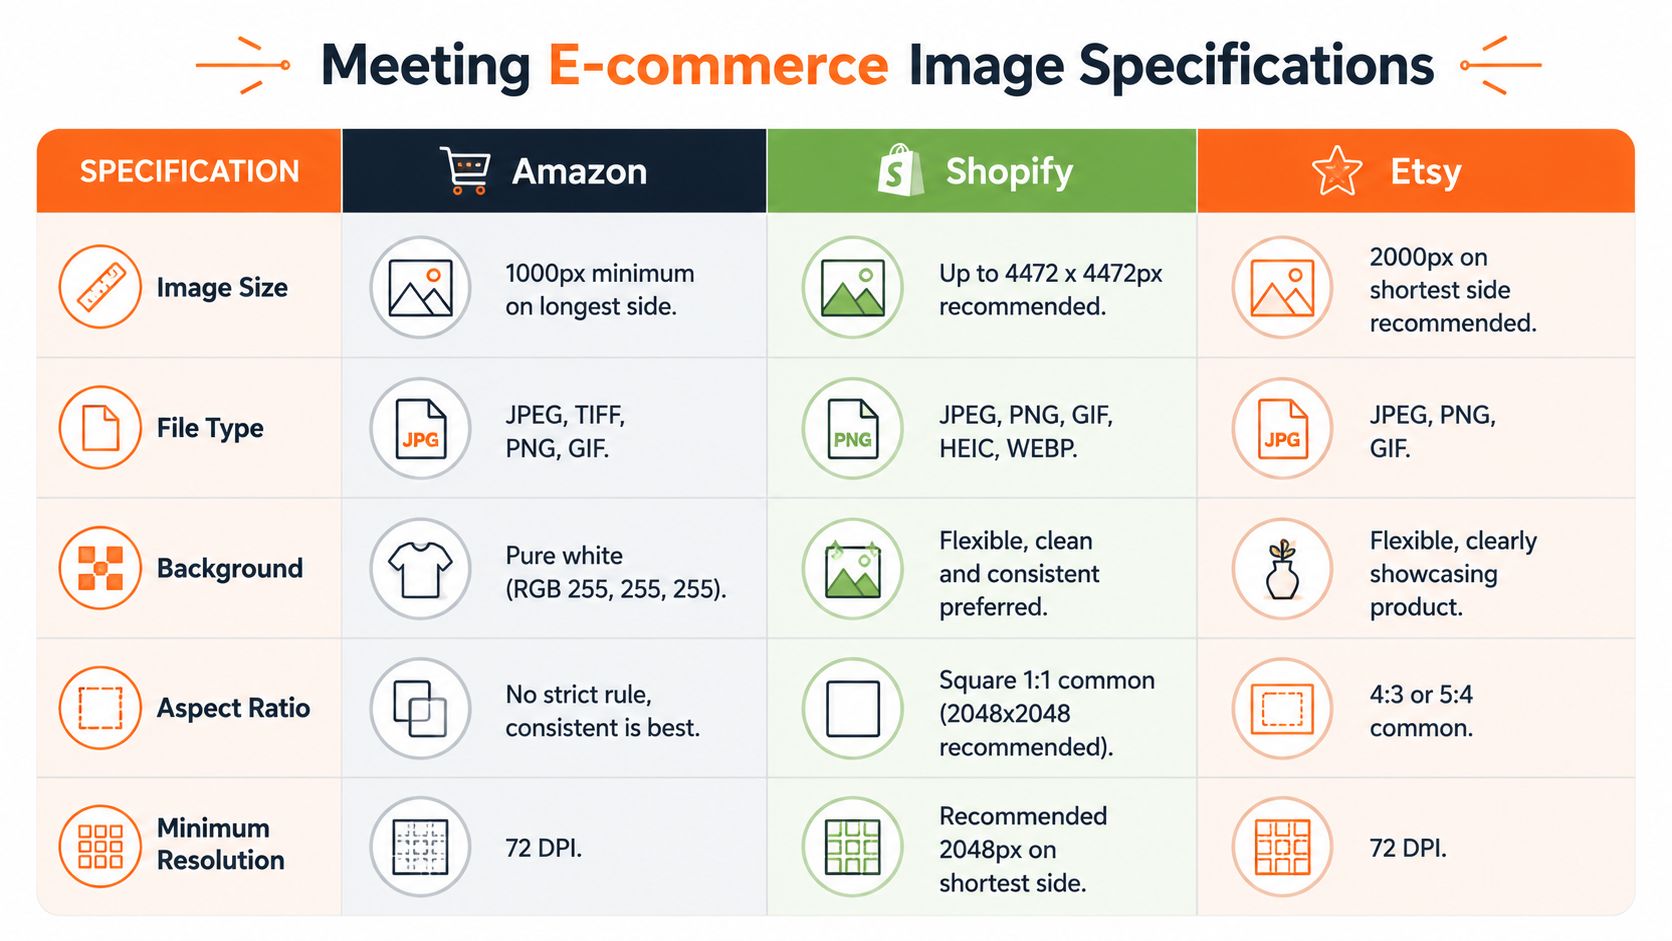
Side-by-side requirements
| Platform | What matters most | Typical risk |
|---|---|---|
| Amazon | Clean compliance and white background | Rejection or weak gallery presentation |
| Shopify | Consistent grid appearance | Uneven collection pages |
| Etsy | Detail visibility and close-up usability | Soft-looking handmade or vintage items |
Amazon
Amazon is strict where it counts operationally. Your main image needs a pure white background for many categories, and your framing needs to make the product easy to identify at a glance.
For sellers building those assets at scale, this guide to Amazon product image size requirements is the practical version of the problem.
What usually works on Amazon:
- A centred hero image with generous but not excessive margins
- Uniform white background output across the full catalogue
- Minimal visual clutter in the main image
What usually fails:
- Greyish backgrounds that looked white in your editor
- Tiny products in oversized canvases
- Inconsistent framing from item to item
Shopify
Shopify gives you more flexibility, but that freedom can make stores look messy fast. Your product grid, collection pages, and featured blocks all benefit from a stable aspect ratio.
The best Shopify image strategy is often less about a single spec and more about visual order. This guide on mastering Shopify visuals for conversion is helpful for understanding how image shape affects storefront presentation.
A few practical rules matter here:
- Choose one primary aspect ratio for the catalogue and stick to it
- Create separate crops for banners or lifestyle placements
- Keep subject scale consistent so adjacent products don't jump around visually
Etsy
Etsy listings often need the image to do more explanatory work. Buyers want to inspect texture, finish, and handmade detail. That means your source image needs enough clarity to survive platform resizing and still hold up when viewed more closely.
A lot of sellers treat Etsy as the relaxed platform and upload whatever they have after Amazon and Shopify are done. That's the wrong order. Etsy often rewards stronger close-up detail and better contextual imagery.
If one master file has to serve Amazon, Shopify, and Etsy, frame it for flexibility first. Then export separately for each destination.
The real takeaway
The technical target for a photo in HD changes by platform, but the operational answer stays the same. Keep one strong source file, then generate channel-specific versions from a controlled workflow. Trying to make one export serve every storefront usually creates a file that's acceptable everywhere and ideal nowhere.
Moving Beyond HD to Smarter Image Workflows
The phrase photo in HD sounds like a file request. For online sellers, it's really an operations question.
Can you take a raw product shot, keep the subject accurate, remove distractions, adapt it to each platform, and do that across a full catalogue without rebuilding the process every time? That's what matters. Sharpness is part of the answer, but it isn't the whole answer.
The strongest teams don't rely on editing stamina. They rely on structure. They shoot consistently, keep one high-quality master, process in the right order, and export different versions for different channels. That's how they stay fast without letting image quality drift across the catalogue.
Casual users can borrow the same logic. Even if you only need one image today, treat it like a master asset. Keep room for crops. Don't over-edit. Save a clean version before platform-specific exports. That one habit prevents a lot of future rework.
For catalogue-scale sellers, the bigger shift is mental. Stop treating every image as a fresh task. Treat images as inputs to a system. Once you do that, tools become less about editing and more about operations. That's the point where better image handling starts saving actual time, reducing repeat work, and making listings look more organised across every sales channel.
If you're tired of turning the same raw shots into the same marketplace variants by hand, MerchLoom is worth a look. It's built for batch image workflows, so you can process full product collections, define outputs for different channels, and turn one clean source image into listing-ready assets without managing every file one by one.
Stop editing product photos one at a time
Upload your catalog or connect your store. Describe the result once. MerchLoom does the rest.
Try MerchLoom