
Photography E Commerce Guide to Scale Your Catalog Fast
Photography e commerce guide for sellers scaling catalogs. Shoot, format for Amazon, Etsy, Shopify, batch edit and QA hundreds of images fast.
You've got 200 product photos in a folder, and none of them quite match. Some products sit high in the frame. Others are tiny. A few have gray backgrounds that looked white on your screen. After editing, you still need versions for Shopify, Etsy, Amazon, and your own store. That's the photography e commerce problem. It isn't taking one attractive picture. It's producing a catalog that stays accurate, consistent, and publishable.
Start with a master standard before opening an editor. Decide the background, crop, frame fill, source dimensions, file format, and required views for every SKU. Then shoot, clean, resize, enhance, export, and review in that order. This prevents expensive rework when the same asset must serve Amazon, Etsy, Shopify, eBay, WooCommerce, Poshmark, or Depop.
Why Catalog Scale Changes Everything About E Commerce Photography
A batch can look acceptable in isolation and still fail as a catalog. One shirt sits tight in the frame, another has excessive empty space, and a third carries a warmer color cast. On a product grid, those differences make the store look disorganized. Mixed crops slow comparison, while inconsistent color can make shoppers question whether the item matches its description.
At catalog volume, the unit of work is the production pipeline, not the individual image. Every SKU needs a reliable path from capture to approved marketplace asset. If that path changes between products, corrections multiply and file mistakes become difficult to trace.
Industry analyses report that high-resolution product photos can convert about 94% better than low-resolution images, while professional-quality product photography can raise conversion rates by roughly 33% in some surveys, according to PixelPanda's product photography statistics guide. Treat these figures as directional benchmarks, not a promise for every catalog.
Coverage matters as well. Listings with multiple images often outperform single-image listings, and one cited benchmark reports that richer product views can lift purchase completion by 65% on large fashion platforms such as ASOS. That figure is discussed in the same PixelPanda research. The operational takeaway is clear: plan a complete image set instead of producing only a hero shot.
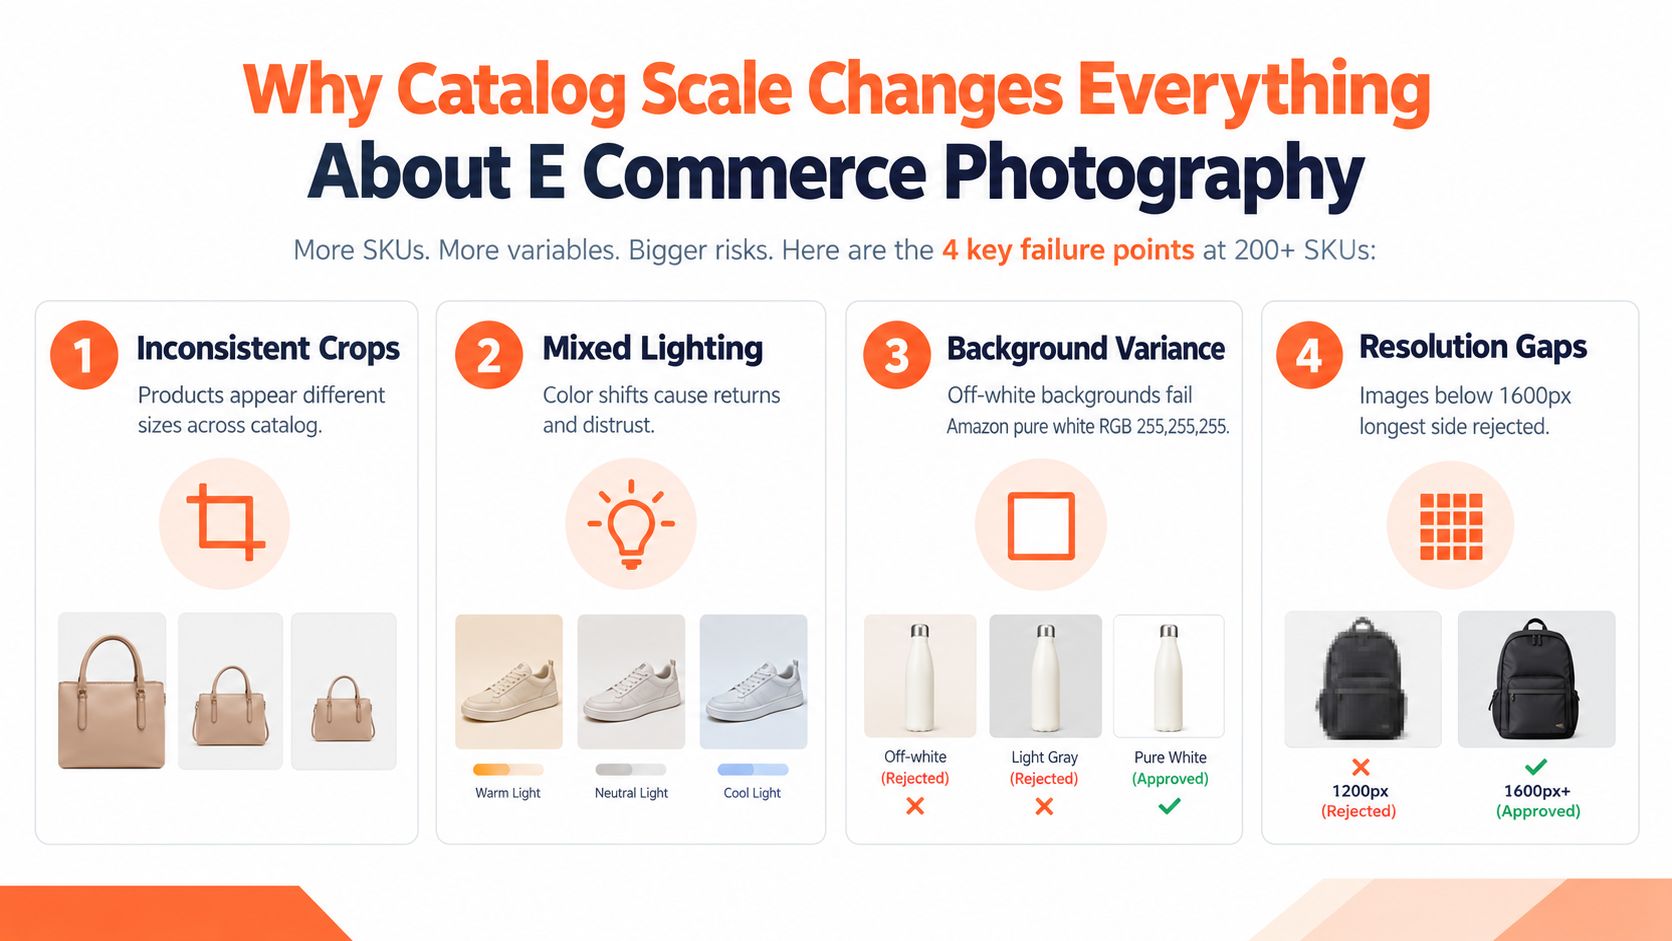
The failures appear downstream
Catalog errors often begin before editing:
- Capture drift: The camera moves, lighting changes, or products sit at different distances.
- Naming errors: Files lose their SKU connection when similar products are photographed together.
- Compliance failures: The background is off-white, the file lacks sufficient resolution, or a crop removes a key feature.
- Pipeline rework: You upscale a dirty image, remove its background, then discover that the crop no longer works.
Marketplace requirements should shape the workflow before the first shot. Amazon, for example, requires main images with a pure white background, the actual product only, and enough resolution for zoom. The Headline Marketing Agency product photography guide provides a practical overview of those requirements.
Set the order once: label the SKU, capture the master, create the required views, apply channel rules, edit, inspect, and route approved files. Keeping that sequence stable reduces rework across hundreds of images and makes failures easier to locate.
Shooting for Batch Consistency Not Just One Good Photo
Your camera position should be boring. That's a strength.
Mount it on a tripod. Mark the tripod position on the floor. Mark the product position on the table. Keep the lens height, distance, and angle fixed for the main image. If you change the setup for every SKU, your editor will spend the batch correcting choices that should have stayed stable during capture.
Use a clean sweep or neutral background with no visible horizon line. Keep the light source in the same position and use the same exposure approach for the complete collection. Natural light changes during a shoot, so it creates color and shadow drift that's difficult to remove later.

Build a repeatable capture set
For each SKU, capture a defined group of views:
- Main image: A clean, front or three-quarter view prepared for the strictest marketplace.
- Alternate angles: Back, side, top, or underside views that remove uncertainty.
- Detail views: Material, stitching, controls, texture, labels, or other selling points.
- Scale view: Use context when dimensions aren't obvious from the product alone.
- Lifestyle view: Show the item in use only when the scene adds useful information.
The exact set depends on the product. A handbag needs interior and hardware details. A speaker needs controls and ports. Apparel needs front, back, fit, and fabric views. Don't force every SKU into an identical creative package, but keep the file structure and naming system identical.
Practical rule: Capture variation in the product views, not variation in your technical setup.
A square master frame works well for catalogs because it can be reused across collection pages, listing templates, and feeds. Leave enough space for later reframing, but don't make the product so small that it loses useful detail. For soft goods, steam creases before shooting. For reflective products, move the light or reflector instead of trying to erase harsh highlights afterward.
Use a shot list tied to SKU names. Photograph one product, verify the label, then move to the next. If you shoot several similar items without a checkpoint, colorways and sizes are easy to mix up.
For lighting placement and repeatable setup decisions, keep a written reference such as this MerchLoom product studio lighting guide. The value isn't the document itself. It's having one setup that another person, or you six months later, can reproduce.
Before moving into post-processing, inspect a small group of masters side by side. Check product size in frame, shadow direction, white balance, and sharpness. Fix the capture setup before processing the full collection. Batch editing can repeat a good decision quickly, but it can also repeat a bad one across every SKU.
Marketplace Formatting Rules You Must Build Into the Workflow
Marketplace requirements should shape the pipeline before retouching begins. If the background, frame, or file size is wrong, a polished image can still fail review or lose the zoom experience.
Use the strictest destination as the starting point. Then create channel-specific derivatives from the approved master instead of editing separate originals for every marketplace.
| Marketplace | Background and Framing | Minimum Size and Format |
|---|---|---|
| Amazon | Main image uses pure white RGB 255,255,255, shows the actual product only, and the product should typically fill at least 85% of the frame | Longest side 1600px or more for the workflow target, JPEG preferred, with the source guidance also identifying 1000 pixels on one side for zoom and a longest side not below 500 pixels |
| Etsy | Use a clean, readable product presentation with enough detail for listing crops and zoom | Minimum 2000px on the shortest side |
| Shopify | Square master images keep crops and zoom behavior consistent across storefront templates | Up to 4472 × 4472 pixels, with 2048 × 2048 pixels as a practical square target |
Amazon's official product image requirements should be your compliance reference for Amazon listings. The source specifies pure white RGB 255,255,255 for main images, actual product-only presentation, zoom-supporting resolution, and the typical 85% frame-fill expectation.
Preflight before expensive edits
Run these checks first:
- Background: Confirm the background is pure white where required. Off-white walls and gray corners can pass casual inspection but fail a strict check.
- Frame fill: Make sure the product is large enough without clipping handles, soles, sleeves, or packaging.
- Dimensions: Preserve a high-resolution master. Export Etsy at the required shortest-side size and prepare the Amazon version around the longest-side target.
- Shape: Keep Shopify masters square at 2048 × 2048 pixels unless you have a reason to work closer to its 4472 × 4472 pixel ceiling.
- Format: Use the accepted file type for the destination. Don't let a batch export create a mixture of formats.
- Overlays: Remove text, logos added in editing, props, and decorative elements from Amazon main images.
This order matters. Background cleanup can change the visible edges. Reframing can alter the product's apparent size. If you upscale first, you may spend processing time on pixels that will later be cropped away.
A single master set also makes reuse easier. Store the original, the cleaned master, and each marketplace export separately. Never overwrite the source file. Keep the SKU, color, size, view, and channel in the filename so you can identify a bad derivative without opening every image.
For a channel-specific explanation of the Amazon workflow, use Amazon product image requirements for sellers. Build the checks into your export preset or spreadsheet. Manual memory fails when you're moving through hundreds of files.
Batch Post Processing That Saves Time and Cost at Scale
The order of operations determines how much work the batch performs.
A practical sequence is:
Doing this for a whole catalog?
MerchLoom runs background removal, upscaling and AI editing across every product photo you have — one prompt, whole batch.
Try MerchLoom- Remove the background and clean visible dust or distractions.
- Reframe and crop the product.
- Correct color and exposure.
- Sharpen or upscale only when needed.
- Export channel-specific files.
- Review the completed batch.
Background removal comes first because it reduces the amount of image data that later steps need to process. An image with a distracting background contains many pixels that have no value in the final catalog asset. Removing that material before enlargement keeps the expensive step focused on the product and its useful edges.
The same principle applies to cropping. Don't upscale empty margins that will be discarded. Don't sharpen a crop you'll later replace. Each step should prepare a smaller, cleaner input for the next one.
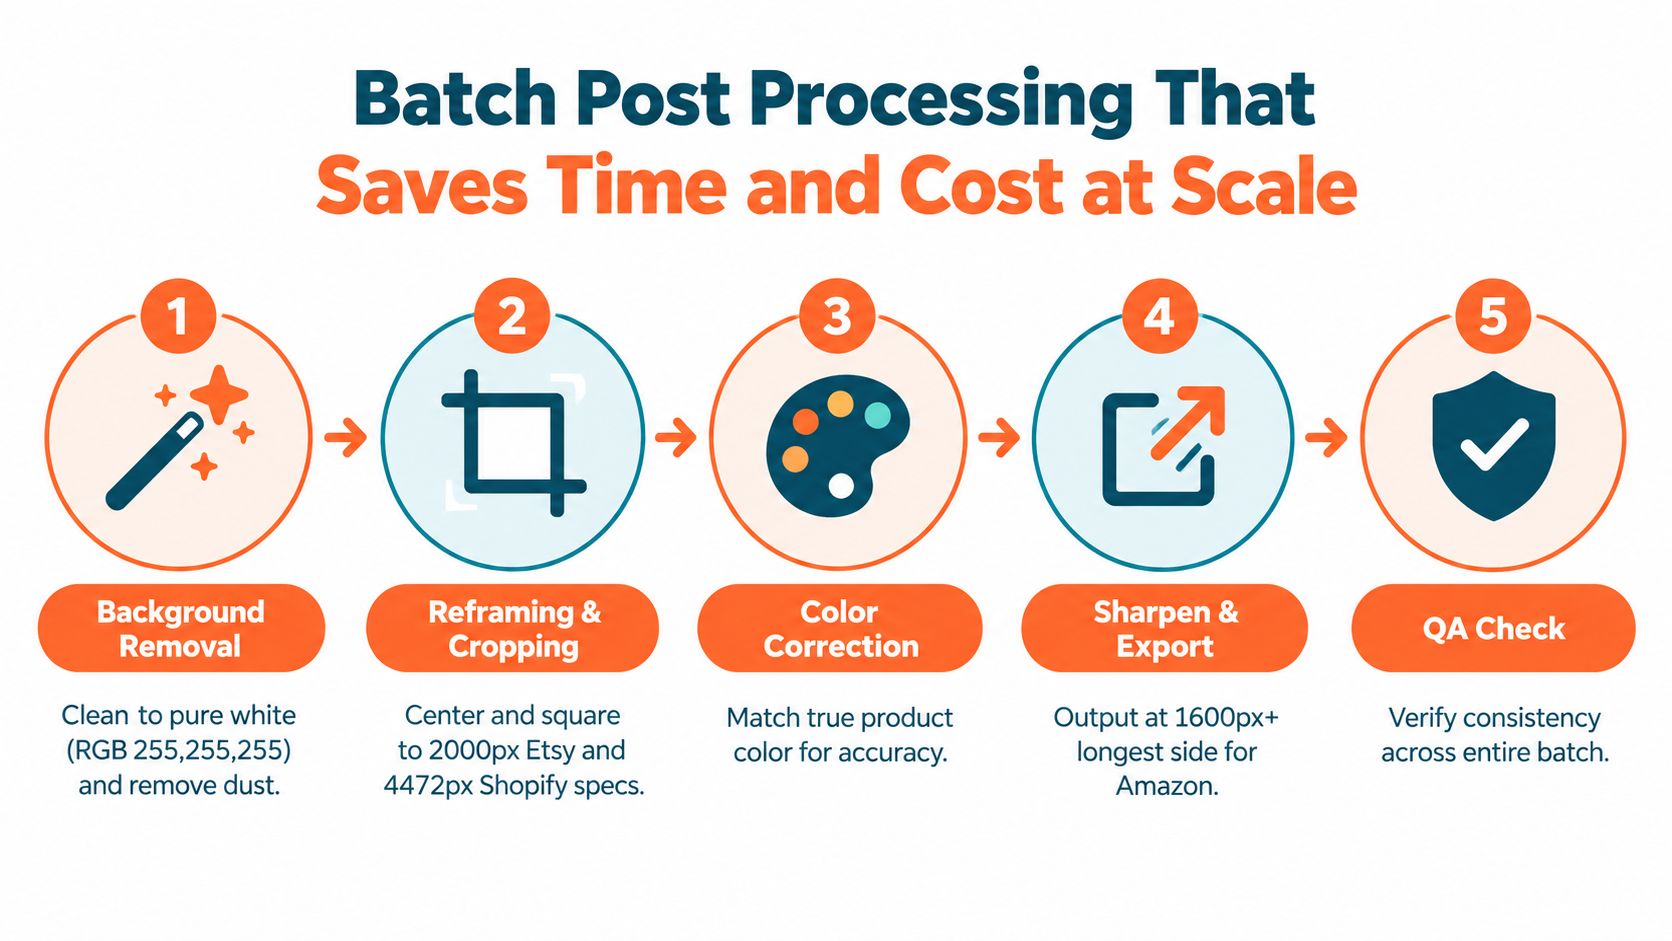
Use one pipeline for repeated decisions
A plain-English AI pipeline can apply the same instruction to an entire collection. For example, the workflow can identify the product edge, remove the original background, place the item on pure white, center it inside a square frame, correct obvious color drift, and export the required sizes.
That doesn't mean the output is automatic or infallible. Transparent products, fine chains, hair, mesh, glass, white products, and reflective metal still need human review. A batch process saves time by repeating the standard cases and isolating exceptions. It doesn't remove the need to inspect them.
MerchLoom can run chained AI pipelines across a full collection instead of one image at a time. You can try the first images with no account, and its pricing is pay-per-image with credits that never expire. That model fits a seller who processes seasonal catalogs or irregular SKU groups rather than editing one file manually or committing to a recurring subscription.
Where the workflow usually breaks
The most common mistakes are sequencing mistakes:
- Upscaling before cleanup: You enlarge background clutter and pay to process pixels you'll remove.
- Color correction before background replacement: A gray background can distort the correction and shift the product color.
- Cropping by eye: Every SKU receives a different product scale, even when the source setup was consistent.
- Exporting only at the end: You discover too late that one channel needs a different square frame or minimum dimension.
- Skipping a test group: A bad instruction runs through the entire collection before anyone notices.
Process a small representative group first. Include a dark item, a white item, a reflective item, a textured item, and a product with thin edges. Compare the results against the original before starting the complete batch.
For a deeper workflow reference, see AI batch image editing for ecommerce catalogs. Keep the pipeline short enough to understand. A complicated chain is harder to troubleshoot when one step introduces halos, color changes, or incorrect shadows.
Cost control: Crop and clean first. Enlarge only the pixels that will actually appear in the listing.
Save outputs into predictable folders. Use separate directories for originals, clean-masters, amazon, etsy, shopify, and qa-fixes. If you revise the pipeline, create a new version rather than replacing approved files. That gives you a clear rollback path when a marketplace rejects an export or a customer reports a color mismatch.
Choosing Between Clean Catalog Shots and Lifestyle Scenes
A clean catalog image and a lifestyle image answer different buyer questions.
The catalog shot answers, “What exactly am I buying?” It shows shape, color, finish, and included parts without visual noise. A lifestyle scene answers, “How might this fit into my space, outfit, routine, or gift?” Both can help, but using the wrong one as the main image can create confusion.
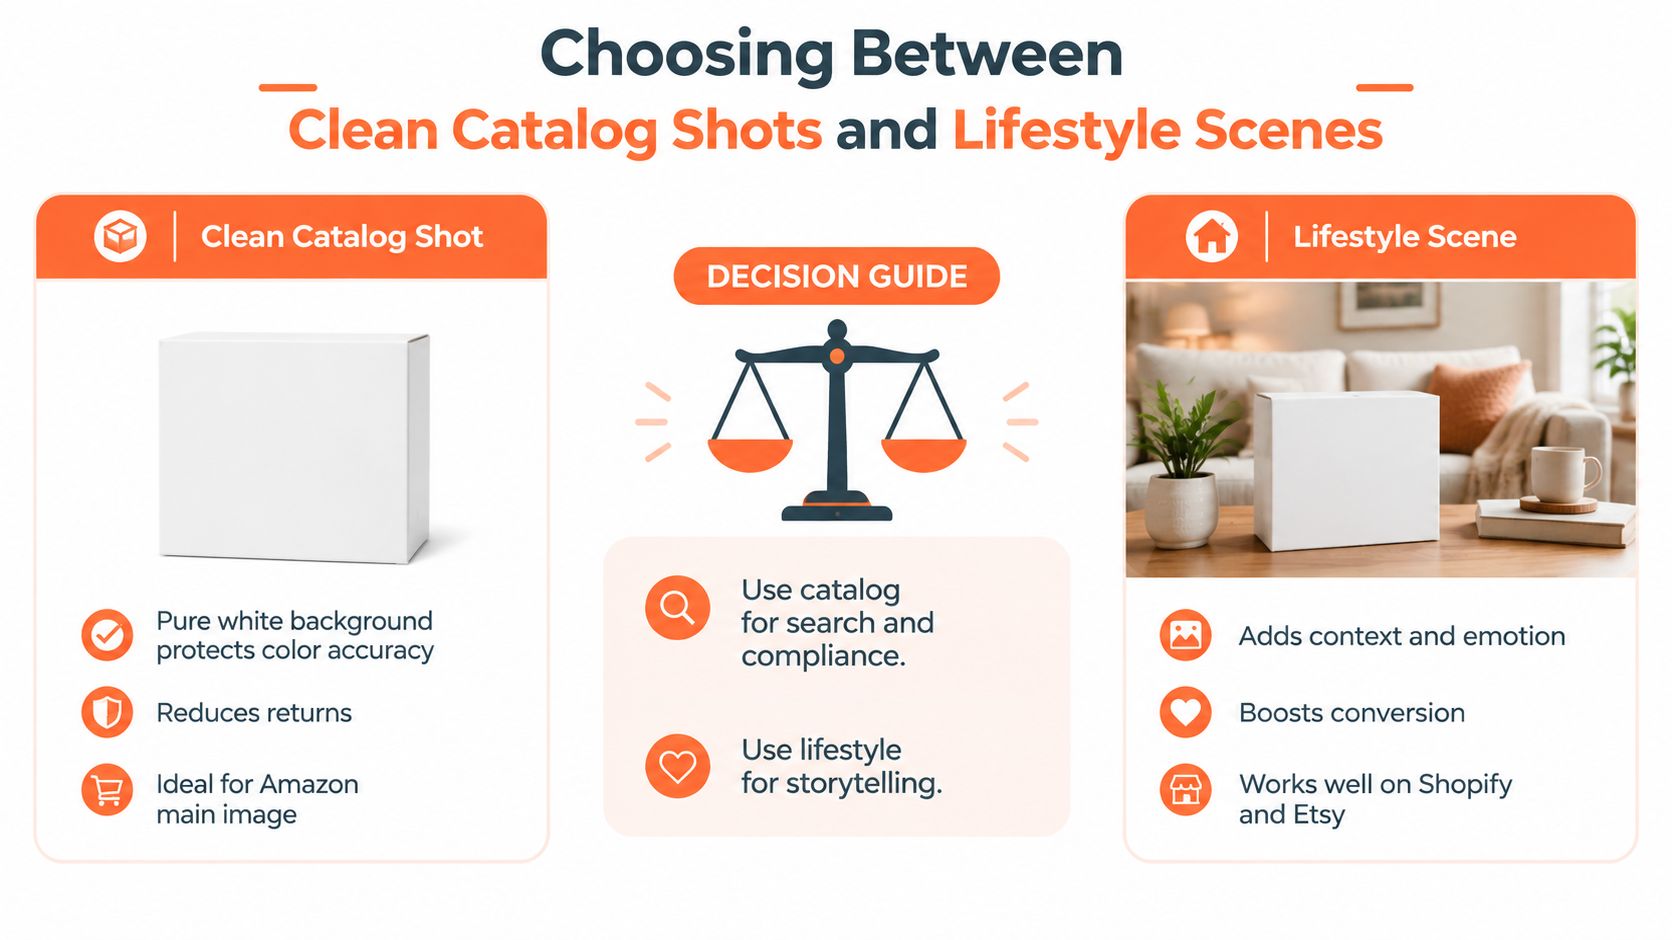
Keep the clean shot when accuracy carries the sale
Plain backgrounds work best when shoppers need to inspect material, color, construction, or condition. This is especially important for apparel, cosmetics, electronics, jewelry, replacement parts, and used goods. A marketplace search result also benefits from a consistent visual field because shoppers can compare products quickly.
For Amazon main images, compliance takes priority. Props, text overlays, decorative backgrounds, and context scenes can create a problem even if the scene looks attractive. Use the clean product view first, then add permitted alternate views where the channel allows them.
Lifestyle scenes make more sense when scale or use is difficult to understand from a product-only image. Furniture looks different in a room. Wall decor needs a sense of proportion. Clothing benefits from seeing fit and movement. A kitchen item can be easier to understand on a counter than isolated against white.
Add context without changing the product
A generated or photographed scene should preserve the product's actual color, proportions, surface, and construction. If the scene makes a cushion look larger, changes a garment's drape, or turns a warm beige into a cool gray, it may increase attention while weakening trust.
For catalogs such as best POD wallpaper niches, context can help shoppers judge how a pattern works across a room. But the scene should support the product rather than compete with it. Keep the camera angle, lighting direction, and visual temperature consistent across related designs.
Use a simple decision rule:
- Search and compliance: Lead with the clean catalog shot.
- Color-sensitive products: Use neutral lighting and avoid heavy scene grading.
- Size-sensitive products: Add a scale or room context image.
- Emotion-led products: Add lifestyle imagery after the factual product view.
- Used or vintage products: Show flaws and condition directly. Don't retouch them away.
- Marketplace-restricted listings: Follow the destination's main-image rules before adding creative variants.
The ecommerce product photoshoot styles guide can help you map styles to product types. Store lifestyle variants as separate assets. That lets you use the clean version on a marketplace, the lifestyle version on Shopify, and both in ads without rebuilding the catalog.
QA Integration and Reuse That Keeps Your Catalog Shippable
A batch is finished only when the files are correct, named correctly, and connected to the right listings.
Review the output in contact sheets or a grid, not only one file at a time. Side-by-side comparison exposes drift quickly. Look for one product that is smaller than the rest, one background that is slightly gray, or one colorway that has received a different correction.
Use a fixed QA checklist
Check every batch for:
- SKU identity: The image matches the product, variant, size, and view.
- Background purity: Amazon main images use RGB 255,255,255 where required.
- Frame fill: The product is centered and has enough presence without clipped edges.
- Resolution: Amazon exports meet the 1600px longest-side workflow target, Etsy files meet 2000px on the shortest side, and Shopify masters follow the selected square standard.
- Color accuracy: The image still represents the physical product under neutral viewing conditions.
- Edge quality: No halos, missing straps, jagged transparent areas, or artificial shadows.
- Variant consistency: Related colors and sizes use the same crop and camera perspective.
- File naming: The channel, SKU, variant, and view are clear from the filename.
Create an exception folder for files that fail QA. Don't stop the entire catalog for one difficult image, but don't publish it just because the rest of the batch passed.
Connect approved files to the places you already use
Your storage system should reflect how listings are published. Depending on your setup, approved files may move into Shopify, WooCommerce, Amazon S3, Cloudinary, Google Drive, or Dropbox. Keep the clean master separate from compressed derivatives so a future seasonal refresh can start from the best available source.
A product image library also needs version control. The product image library management guide is useful for planning folders, naming conventions, and reuse rules. Use the same approved asset for product pages, collection tiles, email campaigns, ads, and social posts when the crop is suitable. Create a derivative when the placement needs a different ratio or text-safe area.
MerchLoom can sit between existing image sources and the batch workflow, importing catalog files, running repeatable processing steps, and returning outputs for review. It uses pay-per-image credits that never expire, but you should still review AI results manually before publishing.
MerchLoom lets you import product photos from sources such as Shopify, WooCommerce, Google Drive, Dropbox, Amazon S3, and Cloudinary, then run chained AI workflows across a full collection. Try the first images with no account, review the results, and visit MerchLoom to prepare consistent marketplace and storefront assets without editing every file individually.
Stop editing product photos one at a time
Upload your catalog or connect your store. Describe the result once. MerchLoom does the rest.
Try MerchLoom