
Mannequin for Clothes: A Seller's Guide to Perfect Photos
Choose the right mannequin for clothes and streamline your product photography. Our guide covers types, styling, and batch image processing for e-commerce.
You've already done the hard part. The stock arrived, the collection is ready, and you carved out time to shoot it. Then the images hit your folder and the problems show up fast. One knit looks structured, the next one sags. A dress looks clean in one frame and twisted in the next. By the time you start editing, you're not fixing photos. You're compensating for an inconsistent setup.
That's why the right mannequin for clothes matters more than most sellers think. It isn't just a display prop. It's the physical standard that determines shape, drape, framing, and how much cleanup your images need later. If the garment sits well on the form, the digital work gets easier. If it doesn't, every listing downstream becomes slower.
For sellers managing large catalogues, that connection matters. You're not making one hero image. You're building a repeatable system for marketplaces, collection pages, ads, and resized outputs. If you need a broader baseline for cleaner product imagery, this guide on how to make product photos look professional is useful background before you tighten the mannequin side of the workflow.
Introduction From Inconsistent to Iconic Product Shots
Most catalogue inconsistency starts before the shutter clicks. Sellers often blame lighting, editing, or the camera body, but the first variable is usually the garment support. A shirt on the wrong torso collapses at the shoulder. A blazer on a too-small form caves in at the chest. A dress on a glossy mannequin throws reflections that become a masking problem later.
That matters because e-commerce images rarely stay in one format. The same source photo may need to serve a white-background marketplace listing, a square storefront crop, and a social asset. If the original shape is weak, each new crop makes the weakness more obvious.
A good mannequin creates repeatability. The collar sits in the same place. The waistline lands where you expect. Hems can be levelled quickly. Once you have that consistency, batch editing starts to work the way it should. Background removal gets cleaner. Reframing stays aligned. Colour correction behaves predictably because the file set was shot under controlled conditions.
Practical rule: If you keep fixing the same styling problems in post, your physical setup is underbuilt.
The sellers who move fastest usually don't chase perfection in editing. They remove variation before the images ever reach the computer.
Choosing the Right Mannequin for Your Workflow
The right mannequin depends less on taste than on volume, garment mix, and how you publish. A seller shooting t-shirts for marketplace listings has different needs from a boutique shooting dresses for a branded Shopify store. The form you choose affects setup time, camera angle, masking difficulty, and how easily you can keep a catalogue visually organised.
Four common options
Full-body mannequins work well when you need a complete silhouette. They help with dresses, outerwear, coordinated sets, and any category where the total shape matters. The downside is editing friction. Legs, arms, and bases create more edges, more shadows, and more space to crop around.
Torso mannequins are usually the fastest option for tops. They're easier to dress, easier to store, and simpler to frame tightly. For high-volume catalogue work, that speed can matter more than showroom realism.
Dress forms are useful when fit is the priority. They're especially practical for tailoring, sewing, alterations, and small brands developing samples. They can also work for photography if the finish is neutral and the stand stays out of frame.
Ghost mannequins are built for the invisible-mannequin look. They can produce a clean, premium result without a live model, but they usually require more than one shot per garment and cleaner file organisation from the start.
| Mannequin Type | Best For | Batch Processing Impact |
|---|---|---|
| Full-body | Dresses, coats, full looks | More masking, more crop variation |
| Torso | Tees, shirts, knitwear, cropped listings | Faster shooting, easier centring |
| Dress form | Samples, tailoring, fit-led presentation | Good shape control, may need stand cleanup |
| Ghost mannequin | Premium apparel listings with hollow-form look | More shots per SKU, cleaner final presentation |
Fit matters more than style
Sizing mistakes create avoidable post-production. According to Houston Fixtures' mannequin sizing guide, standard female mannequins are typically size 4–6 (about 32-24-34) and standard male mannequins are typically a size 40R suit. When the form doesn't match your sample size, garments can look loose, the drape gets distorted, and catalogue photos misrepresent fit.
That's the point many sellers miss. The mannequin isn't there to look elegant by itself. It's there to make the garment look correct. If your inventory runs smaller, bigger, cropped, oversized, or heavily structured, the base form has to serve that reality.
Match the form to the editing method
If your catalogue depends on quick white-background outputs, a torso or ghost mannequin usually creates fewer problems than a dramatic retail-style full body. If you need model-free images that still show contour, ghost forms are often worth the extra capture step. If your product line changes constantly and speed is the bottleneck, torso forms are hard to beat.
For sellers balancing mannequin shots with model-led imagery, this guide on models for photo shoots is a useful companion when deciding which categories need a person and which work better on a form.
A mannequin that saves two minutes on set and adds ten minutes in editing is the wrong mannequin.
Optimizing for Photos Materials Finishes and Sizing
A mannequin can be technically the right type and still be wrong for photography. The surface, material, and base size all affect the file quality you get. These choices don't just change how the setup looks in the studio. They change how reliably you can process a whole collection later.
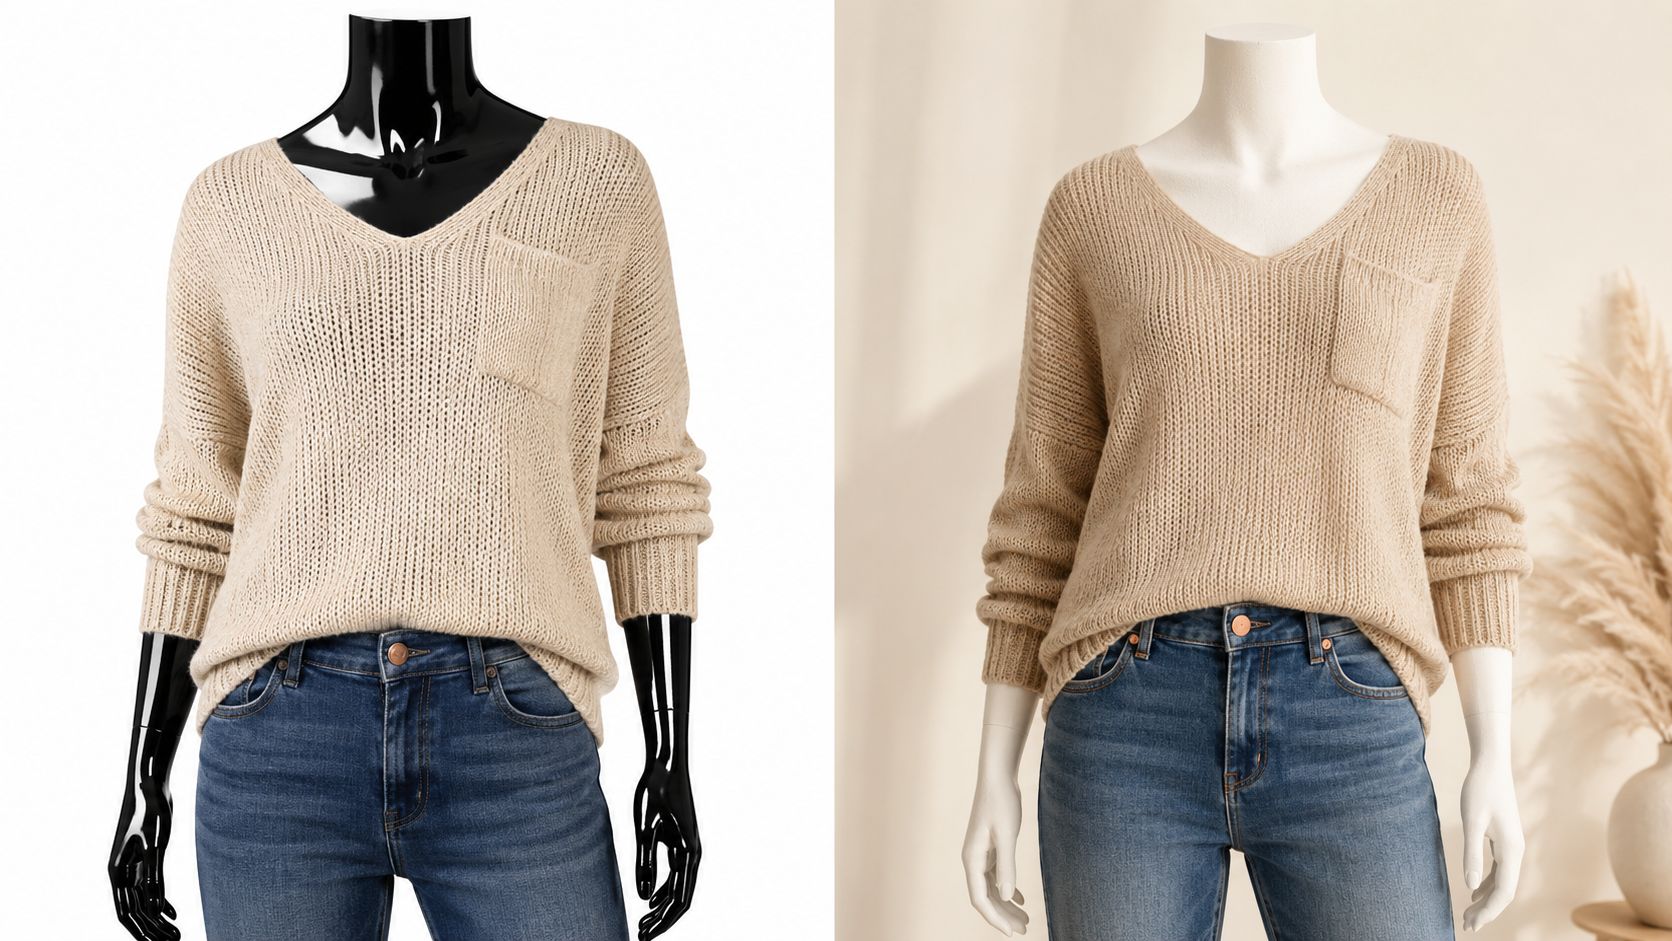
Matte finishes save editing time
Glossy surfaces belong in visual merchandising, not in most catalogue photography. Black lacquer, polished plastic, and reflective skin-tone finishes create bright hotspots and uneven edge definition. Those are exactly the artefacts that make masking and glare removal harder.
A matte white or matte grey finish is usually the safer choice. It reflects light more evenly, keeps edges readable, and won't introduce random bright patches into a batch. If glare is already showing up in your test frames, this walkthrough on removing glare from a photo helps with cleanup, but the better fix is preventing it at capture.
Material choice affects handling
Fibreglass is common because it balances structure and manageable weight. Plastic can be durable and easier to move around, which matters if you're shooting alone or resetting your setup often. Fabric-covered forms can help with pinning and tailoring, but they may need more cleaning discipline if you photograph light garments.
The most practical material is the one your team can handle consistently without chipping it, scratching it, or dreading every wardrobe change. A technically premium mannequin that slows every changeover is a poor production tool.
Sizing is a measurement problem
The strongest historical work on mannequins treats them as sizing tools, not just props. In an American Alliance of Museums discussion on the subject, the 1980s development of adjustable fibreglass mannequins by Wacoal for the Kyoto Costume Institute is identified as a key milestone because those forms were grounded in standardised historical sizing and body measurement logic, not generic display styling. You can review that reference in the AAM community discussion on mannequin design and sizing.
That same logic applies to e-commerce. If the shoulder width is off, your neckline won't sit right. If the bust point is wrong, a dress front can look strained or empty. If the hip shape is off, side seams shift.
Use padding when needed, but start with the closest possible base. A mannequin that is almost right is workable. A mannequin that is the wrong basic body block will keep generating bad files.
Prepping Garments to Minimize Post-Production
The fastest editing trick is still basic garment prep. Sellers who skip it usually pay for it three times. First during shooting, then during retouching, then again when the product grid looks uneven.
Build one repeatable styling standard
Treat the first garment in a batch as the template. Get the shoulder line right. Level the hem. Check the collar spread. Pin only from hidden points. Once that look is clean, repeat it across every similar SKU.
A simple prep sequence works well:
- Steam first: Don't pin wrinkles into place. Remove them before you shape the garment.
- Lint and inspect: Small fibres, loose threads, and pet hair become far more obvious on marketplace-white backgrounds.
- Dress from the top down: Set shoulders and neckline before you adjust waist or hem.
- Pin from the rear or interior: Keep clips and tension marks out of obvious side edges.
- Add shape selectively: Tissue or light batting can help sleeves, collars, and hoods hold form.
If you shoot textured accessories, trim, or novelty fabrics, steam technique matters. This practical guide to faux fur steaming techniques is worth keeping on hand because aggressive heat can flatten or distort pile.
Start with the smallest workable base form
One sizing rule matters more than most. You can pad a mannequin to make it larger, but, as noted in this YouTube discussion on choosing and fitting dress forms, “you cannot make that mannequin smaller.” That limitation matters for any seller carrying multiple sizes, especially in a market where Canadian apparel sales were about C$74.8 billion in 2024 in the same referenced source context.
That's why I usually advise sellers to buy for their smallest core sample size, then build outward with padding where needed. It's more forgiving for photography and far easier to standardise across categories.
The garment should look naturally fitted, not stretched into submission.
What usually fails on camera
Three prep habits create problems again and again:
- Over-clipping the back: This sharpens the front but creates tension lines around buttons and side seams.
- Ignoring the inside: Collars, cuffs, and plackets often shift because the interior wasn't aligned before the front was smoothed.
- Treating every garment the same: A soft knit needs different handling from a structured blazer.
Good prep won't make every item perfect. It will make every item predictable, and that's what batch workflows need.
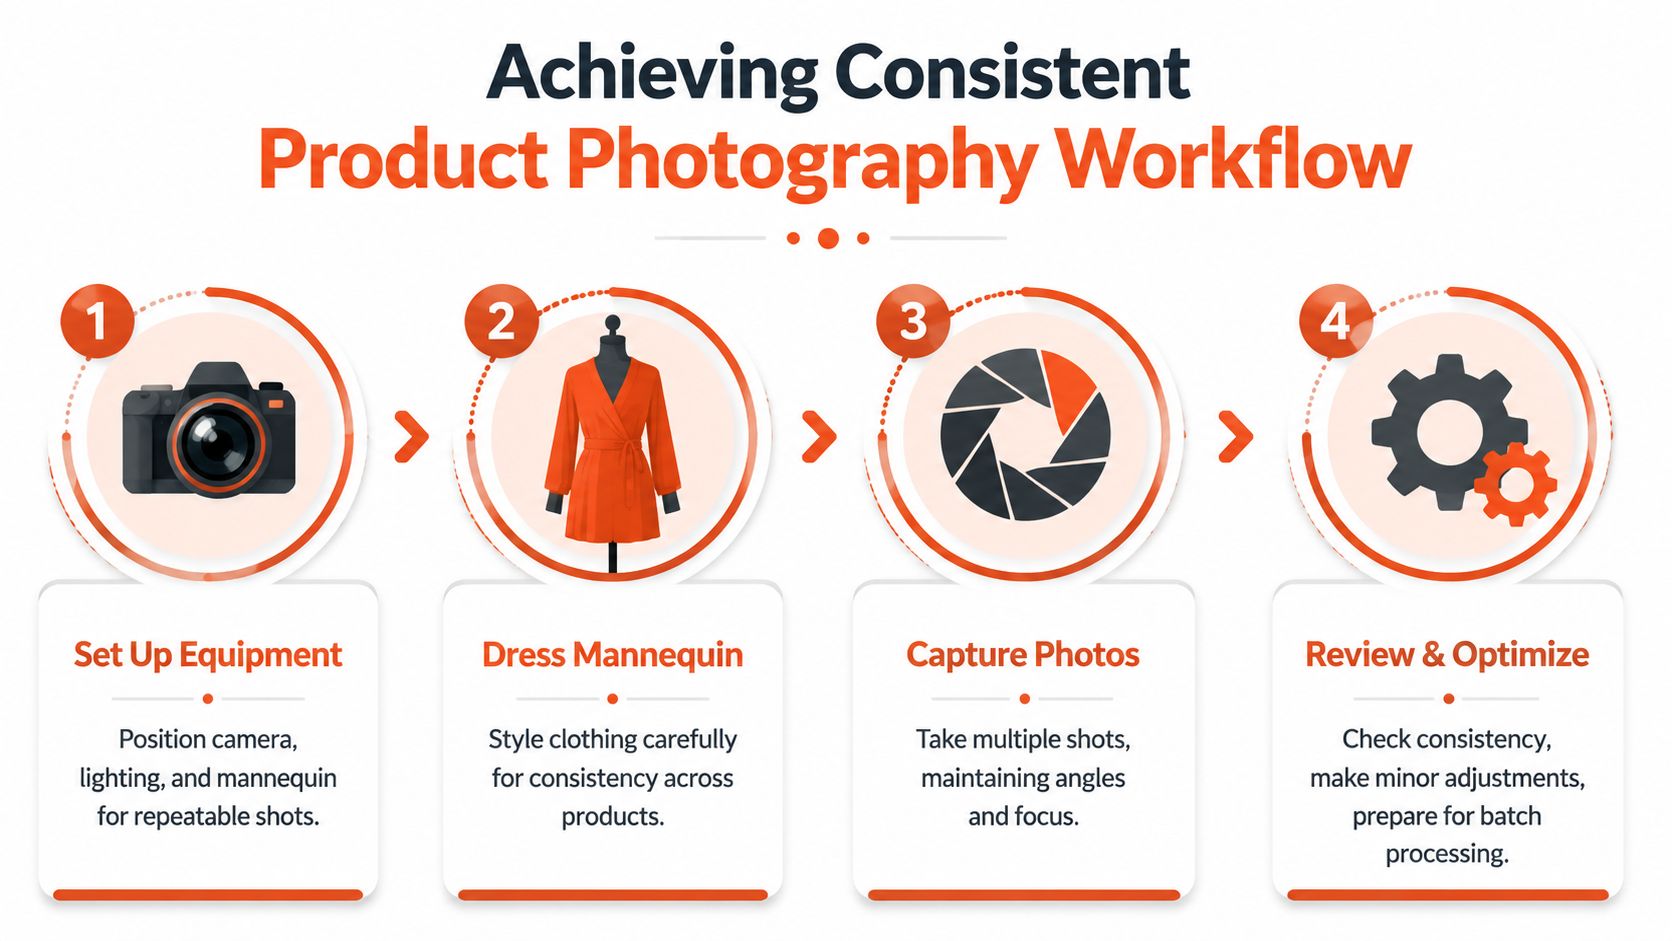
Creating a Consistent Photography Setup
Catalogue photography rewards discipline more than creativity. One strong image doesn't solve a store problem. A hundred visually aligned images do. That's why the setup has to be repeatable enough that someone else on your team could walk in, follow the marks, and produce the same result.
The mannequin has been part of clothing presentation for a very long time. Historical references note that ancient Egyptian tailors used wooden or clay figures to test garments, and that long continuity into retail display and e-commerce photography is one reason mannequins remain such a durable merchandising tool, as outlined in this history of mannequins overview. The tool is old. The workflow around it is what modern sellers need to tighten.
Doing this for a whole catalog?
MerchLoom runs background removal, upscaling and AI editing across every product photo you have — one prompt, whole batch. Try 2 batches free, no signup.
Try it freeLock the physical positions
Mark your floor. Mark the tripod legs. Mark the mannequin base. Once those positions are fixed, framing drift drops sharply.
Keep these elements stable:
- Camera height: Use one set height for tops, one for dresses, and one for lower-body products if needed.
- Subject distance: Don't move closer because one item feels small. Reframe later if necessary.
- Turn angle: Face the form dead-on unless angled shots are part of the standard for every SKU.
Standardise the light before the first batch
Even basic lighting can work if it stays consistent. A simple key and fill arrangement is enough for many sellers, with a controlled back or separation light if your background and garment tone are too similar. If you need a practical primer, Jimmy Clemmons Photographer's piece on artificial lighting is a solid reference for understanding placement and control without overcomplicating the setup.
Then lock the camera settings. Don't let auto white balance decide that one cream sweater is warm and the next one is cool. Don't let auto ISO shift grain levels across a batch.
Use one background logic
The cleaner the background, the easier the next stage. A continuous paper sweep, neutral wall, or controlled backdrop all work if they stay visually simple and evenly lit. This guide on choosing a studio photo backdrop is useful if your current background keeps introducing shadows, texture noise, or cleanup headaches.
If your raw files don't already look like they belong together, batch editing won't magically make them coherent.
A workable shooting standard usually includes front, back, and one detail crop at fixed distances. Once you establish that rhythm, the catalogue starts to feel organised before editing even begins.
The Digital Workflow From Raw Photo to Marketplace Ready
Once the shoot is finished, the operational question appears. Can you turn a folder of raw mannequin images into listing-ready assets without touching every file by hand? If the answer is no, the bottleneck hasn't moved. It has just shifted from the studio to the computer.
Organise the batch before you edit
Start with naming and grouping. Keep front, back, detail, and alternate views structured the same way for every product. If one SKU has six files and the next has three with random names, automated workflows become fragile fast.
A practical structure usually includes:
- Product identifier first: Keep filenames tied to SKU or product handle.
- View label second: Front, back, side, detail.
- Colourway or variant last: Useful when one garment appears in several shades.
This sounds boring, but it's what lets you process at collection scale instead of image scale.
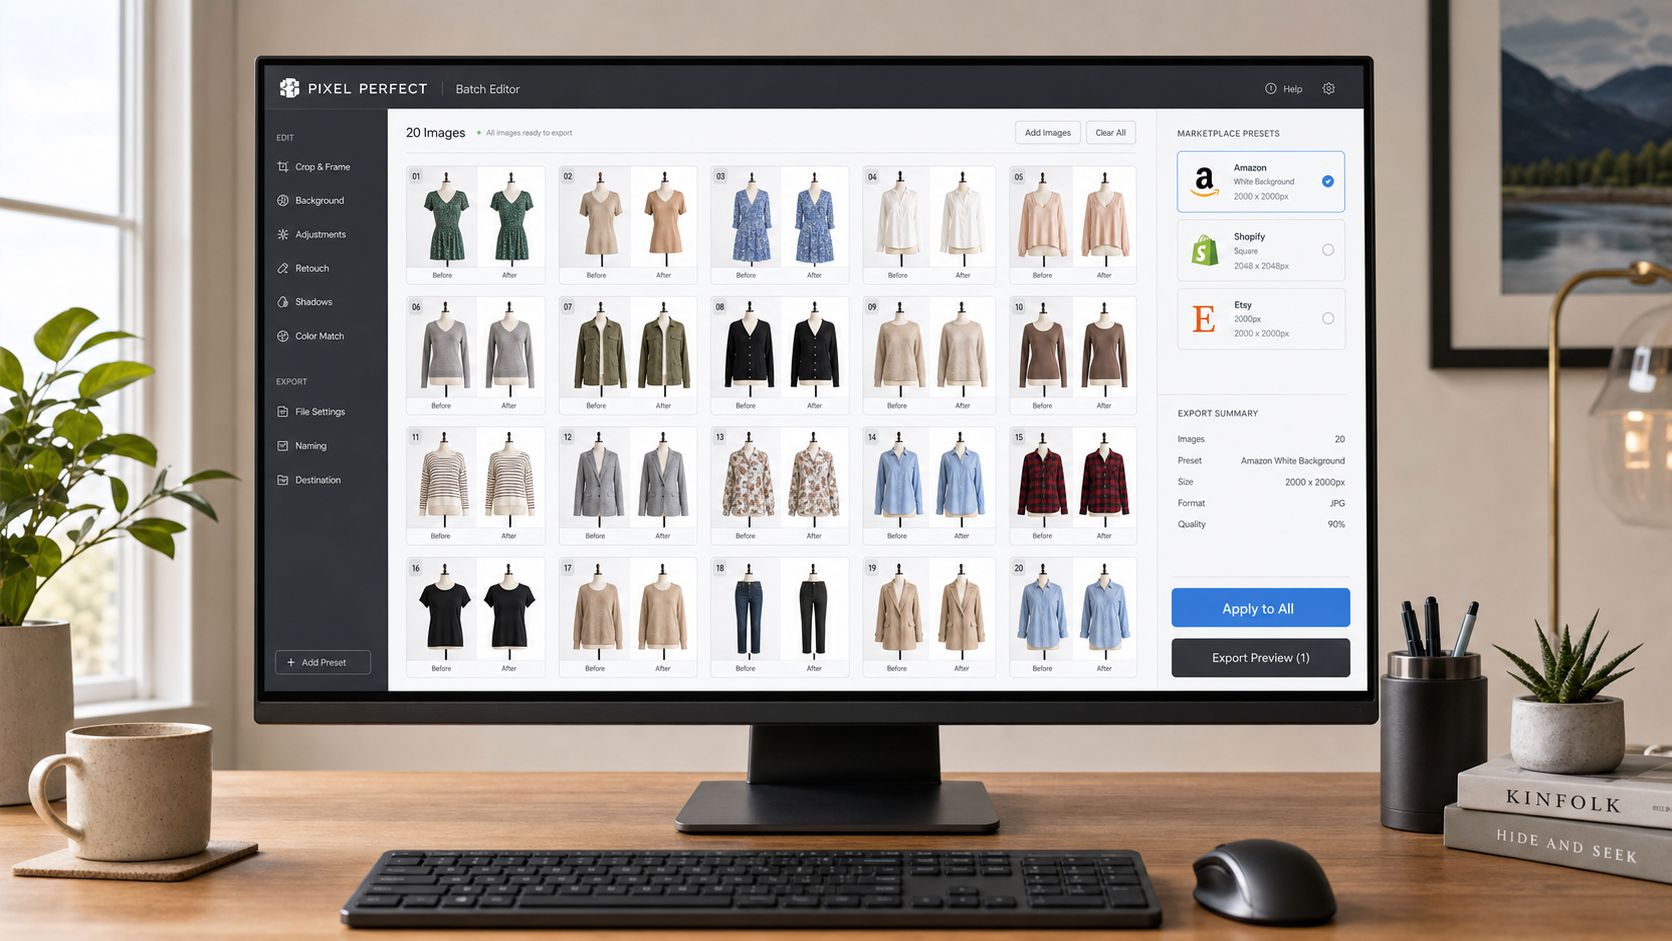
Build one repeatable processing chain
When the shoot was consistent, the edit can be consistent too. Typical steps include background removal, colour balancing, edge cleanup, reframing, and export into the dimensions each sales channel expects. A shirt shot on the same mannequin, at the same distance, under the same lights becomes much easier to process as a batch than as isolated one-off files.
For catalogue-scale sellers, tools built for AI batch image editing become practical. MerchLoom is one example. It lets sellers import product images from existing sources and run chained workflows across an entire collection, such as removing backgrounds, reframing for Amazon white backgrounds, creating square Shopify crops, or exporting larger Etsy-friendly images from the same source set.
Good raw photos reduce AI mistakes
Automation works best when the garment edge is clear, the colour is stable, and the form is centred. It struggles when a black dress disappears into a dark mannequin edge, when one SKU is underexposed, or when collars shift wildly from shot to shot.
That's why the physical mannequin choice keeps showing up in digital outcomes. A matte torso with reliable sizing creates cleaner masks. A consistently prepped blouse sits in the frame the same way every time. Those things sound small on set. At batch scale, they're the difference between review-and-approve and endless exception handling.
Clean inputs don't guarantee perfect outputs. They do make good automation possible.
For single-image sellers, manual editing is still manageable. For anyone processing seasonal drops, resale intake, or marketplace catalogues with hundreds of files, repeatable pipelines matter more than retouching skill.
Buying Storing and Maintaining Your Investment
A mannequin is one of those tools that feels optional until you price the labour caused by not having a reliable one. For small Canadian retailers, smart sourcing matters because online presentation still carries weight while budgets stay tight. In that context, Mannequin Madness notes that e-commerce represented 6.6% of total retail trade in April 2025 according to Statistics Canada, which is a useful reminder that digital listings still justify careful asset decisions.
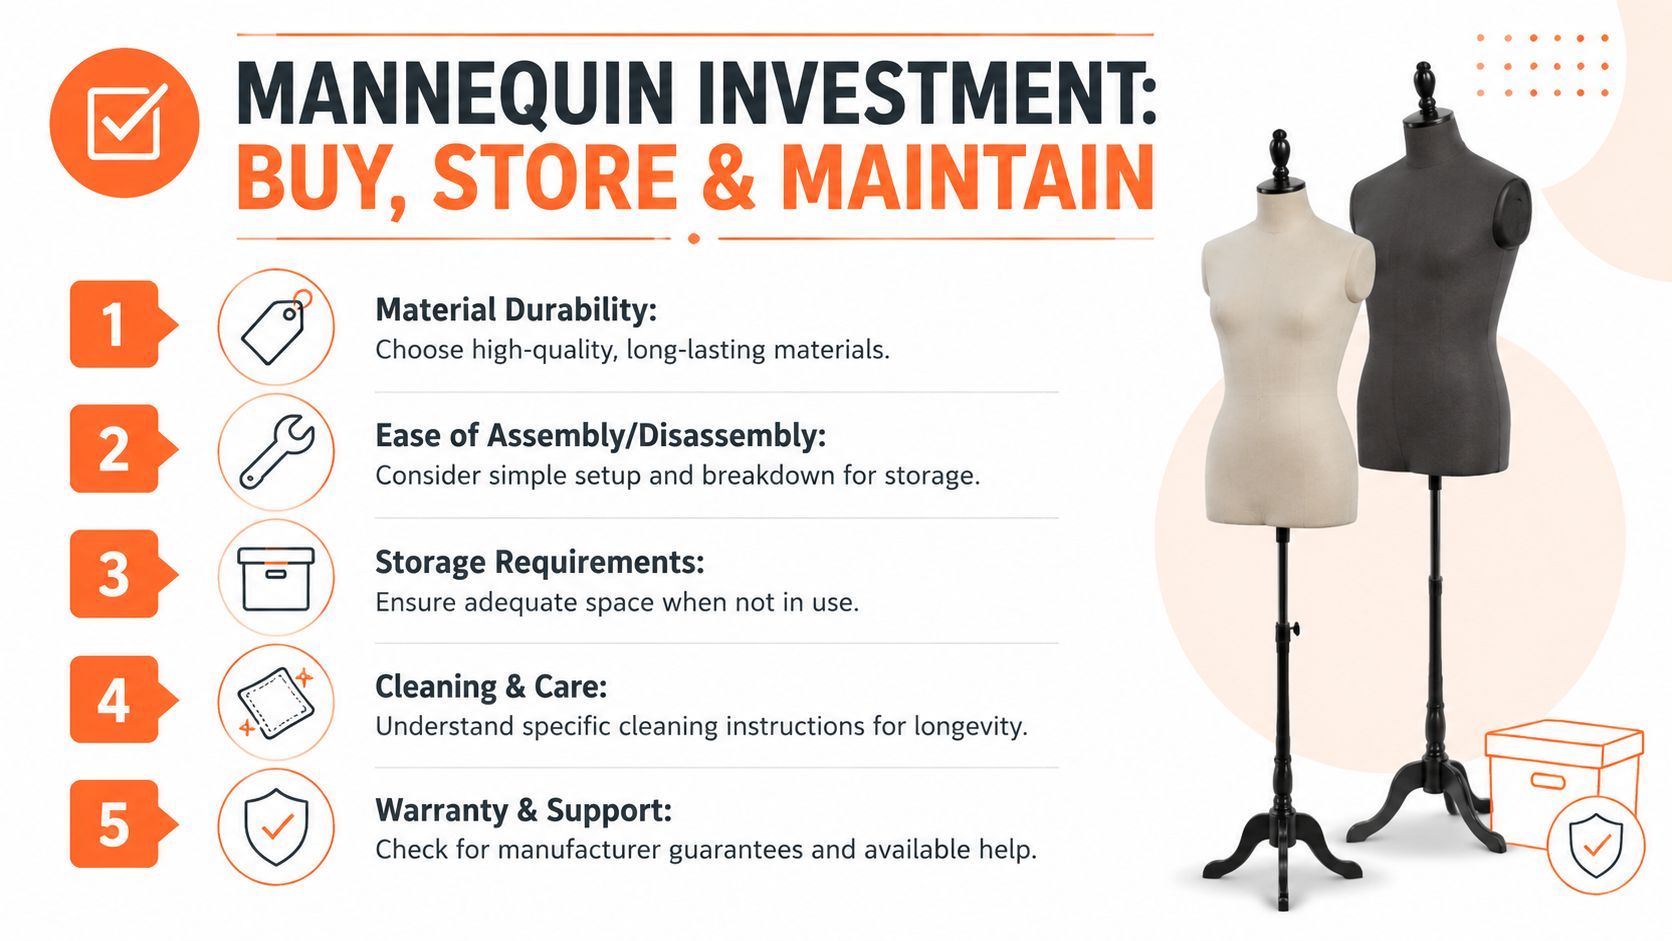
What to check before you buy
New and used mannequins can both work. The right choice depends on your tolerance for cosmetic wear and missing parts.
Use this checklist:
- Base stability: Wobbly stands slow shooting and make hems inconsistent.
- Surface condition: Chips, cracks, and glossy repair patches often show up on camera.
- Assembly completeness: Missing arm caps, neck blocks, or hardware become daily irritations.
- Body proportion: Ignore the label and look at shoulders, bust or chest, waist, and hip shape.
- Handling effort: If it's awkward to dress, your team will avoid using it properly.
A used mannequin is often the better operational buy if the structure is sound and the finish is still photo-friendly.
Here's a practical video walkthrough to review before purchasing or rebuilding part of your setup:
Storage and maintenance routines
Don't lean mannequins bare against walls where shoulders and noses get scuffed. If arms detach, store them in labelled bags or bins with matching hardware. Wipe surfaces regularly with a gentle cleaner that won't leave shine or residue.
If your studio doubles as stock space, off-site overflow can help. For businesses that cycle fixtures, props, and seasonal packaging, these MG Self Storage business options are a useful model for thinking about how to separate active production gear from backup equipment.
Keep one working standard
The best maintenance habit is consistency. Keep one mannequin as the main production form and use backups only when needed. Once sellers start mixing forms with slightly different shoulders or torso lengths, the catalogue starts drifting visually.
A mannequin doesn't need to be beautiful. It needs to be dependable.
Frequently Asked Questions
Do I need a full-body mannequin for clothes photography?
Not always. If you mainly sell tops, knitwear, or cropped apparel, a torso is often faster and easier to process. Full-body forms make more sense when leg line, total silhouette, or coordinated outfits matter.
Is a dress form good enough for e-commerce photos?
Sometimes. It works well when fit and garment shape matter more than a retail-style look. Just make sure the stand, fabric covering, and body proportions won't create extra cleanup work.
What's the best mannequin colour for batch editing?
Usually matte white or matte grey. Neutral, non-reflective finishes produce cleaner edges and fewer glare problems, which makes automation more reliable.
Can one mannequin handle multiple clothing sizes?
Within limits. You can pad a smaller base form outward for selected garments, but you can't reduce a mannequin that starts too large. That's why the base size matters so much.
Should I shoot ghost mannequin or keep the mannequin visible?
It depends on your catalogue standard. Visible mannequins are faster to shoot. Ghost mannequin outputs can look cleaner and more premium, but they require more capture and more structured editing.
If your mannequin setup is already giving you cleaner, more consistent raw files, the next step is making the editing side just as repeatable. MerchLoom is built for that catalogue-scale stage. You can import existing product images, run batch workflows across collections, and generate marketplace-ready outputs for channels that all want different crops, backgrounds, and dimensions.
Stop editing product photos one at a time
Upload your catalog or connect your store. Describe the result once. MerchLoom does the rest.
Try it free — no signup