
Macro Product Photography for E-Commerce at Catalog Scale
Shoot and process macro product photography at catalog scale. Covers gear, lighting, focus stacking, batch workflows, and how to automate it across your store.
Your Friday deadline is close, and the catalog still has hundreds of products sitting in boxes. You don't need one beautiful macro image. You need a repeatable setup that can produce 500 consistent product photos, keep texture and finish believable, and leave you with files that work on Shopify, Etsy, Amazon, eBay, WooCommerce, Poshmark, or Depop.
Start by fixing the camera position, product position, lighting, and naming system before you shoot the first SKU. Macro photography magnifies small differences. A lens moved slightly, a product rotated inconsistently, or a changed white balance will make the catalog look assembled from unrelated shoots.
Product imagery now functions as a core commerce asset. One industry estimate places the e-commerce product photography segment at about US$163.91 million in 2025, with a projection of US$275.4 million by 2030 at an 11.6% CAGR, and describes the segment as roughly 45% of commercial photography demand (industry market overview). Another compilation reports that 75% of online shoppers rely on product photos, 9 out of 10 consider high-quality photos an important buying factor, and high-quality images can produce a 94% higher conversion rate than low-quality images (product photography market data). Your workflow deserves the same attention as your storefront.
Gear and Lens Choices That Hold Up Across a Catalog
For a large catalog, buy stability before buying resolution. A reliable tripod, fixed working distance, and repeatable focus movement will improve more images than replacing a capable camera body.
A 90–105 mm dedicated macro lens is the practical default. It gives you working distance for jewelry, small hardware, cosmetics, and packaging without forcing the front of the lens against the subject. A macro-capable zoom works when products vary widely in size and you need faster framing changes, but a prime macro lens usually makes repeatable positioning easier.
Extension tubes and close-up filters can be sensible when you already own a compatible lens. Use them for a short campaign or a narrow product range. They're cheaper than buying another lens, but they can reduce working distance and make focusing less predictable across mixed SKUs.
The minimum station
Build the station around fixed reference points:
- Camera and tripod: A tethered DSLR, mirrorless body, or any camera with dependable live view is sufficient. The body matters less than stable mounting and consistent file capture.
- Tripod head and focusing rail: A sturdy tripod prevents frame drift. A focusing rail gives you controlled movement for stacks and repeatable camera-to-product distance.
- Sweep table: Use a small tabletop sweep for flat lays and front-facing packshots. Mark its center and the product's normal placement.
- Background boards: Two-sided foam board gives you quick white, gray, and black options without changing the whole station.
- Lighting: Buy lights new if possible. Consistent output and color are more valuable than a bargain fixture.
- Calibration card: Buy a new gray or color reference card. A stained or faded card can corrupt every image in a batch.
You can buy tripods, rails, and older macro primes used if they're mechanically sound. Check that the tripod locks firmly, the rail moves without backlash, and the lens focuses cleanly. For 500 SKUs, a realistic starter budget is a lean tabletop setup, not a full commercial studio. Spend first on the lens, support, and lights. Skip decorative props until the catalog images are consistent.
For visual references while planning close-up compositions, find macro close up templates can help you map detail angles before the shoot. For small-item placement and framing, use this practical guide to photograph small items before you create your station marks.
Macro gear comparison for catalog shoots
| Option | Best For | Pros | Cons | Approx. Cost |
|---|---|---|---|---|
| 90–105 mm macro prime | Mixed small products and repeatable detail shots | Sharp close focus, useful working distance, consistent framing | Less flexible for larger products | Varies by brand and condition |
| Macro-capable zoom | Catalogs with varied product sizes | Faster reframing, fewer lens changes | Less predictable close-focus behavior | Varies by lens |
| Extension tubes | Existing lenses and short campaigns | Low-cost way to increase close focus | Reduced working distance, less convenient setup | Low to moderate |
| Close-up filter | Occasional detail images | Fast to attach, inexpensive | Can reduce optical quality and edge sharpness | Low |
| Focusing rail | Focus stacks and fixed stations | Precise movement, repeatable frames | Adds setup time and needs a stable tripod | Moderate |
| Sweep table and foam boards | Flat lays and standard listings | Cheap, fast resets, consistent backgrounds | Limited for large products | Low |
Lighting and Styling for Small Products
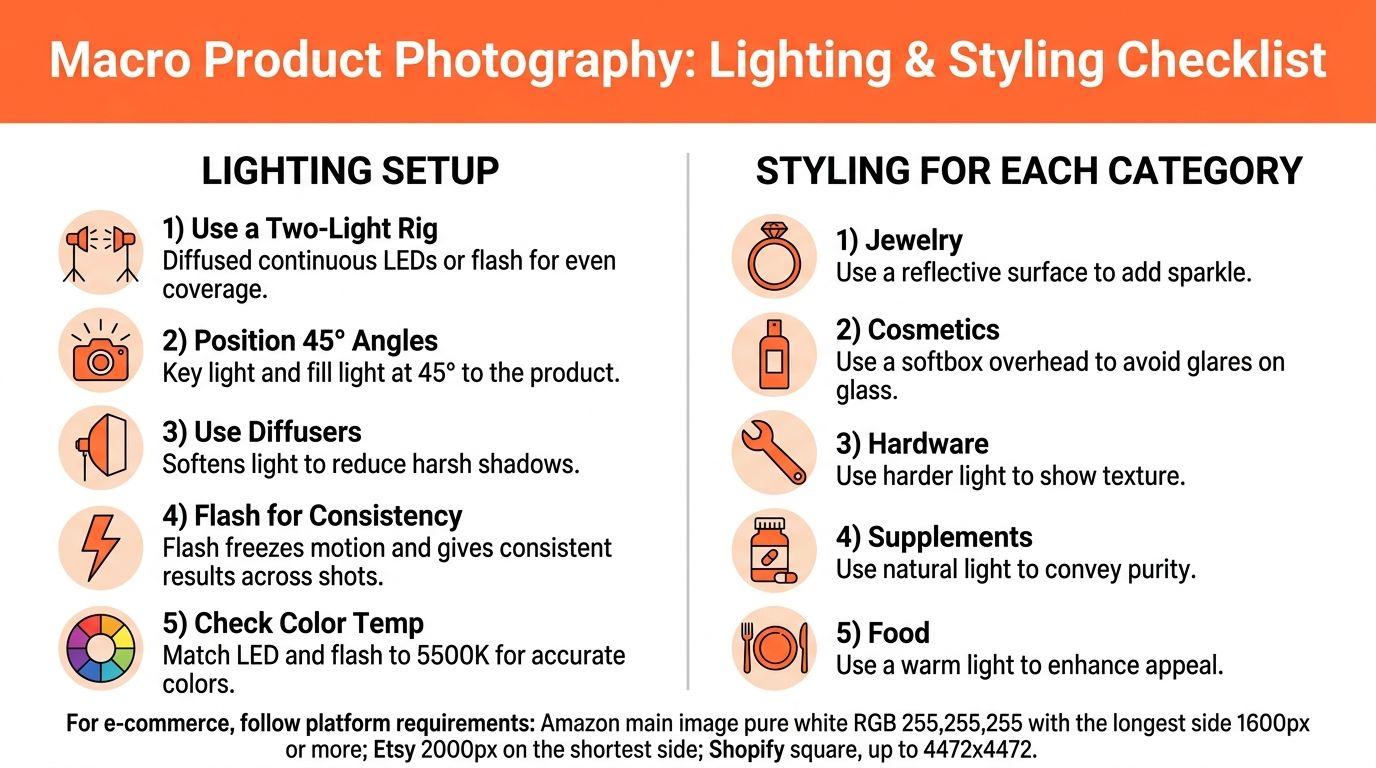
Use one lighting arrangement for most of the catalog, then make controlled adjustments. A two-light rig with diffused continuous LEDs or flash gives you a stable starting point for jewelry, cosmetics, hardware, supplements, and food.
Place the key light at roughly a 45-degree angle to the product and the fill light on the opposite side. Diffuse both sources. A small softbox works for tiny objects, while a larger source creates smoother reflections on metal, glass, and glossy packaging. Flash is useful when you need identical exposure across a long session. Continuous LED lighting makes live-view placement easier, but match the color temperature of both lights and keep the setting fixed.
A ring light can reduce setup time for flat, front-facing objects. It can also create a circular reflection in bottles, polished metal, and jewelry. Don't use it as your default catalog light. Use it only when the reflection is acceptable or when the product needs a centered, shadow-lighting treatment.
Build the styling surface once
Start with white acrylic or a curved paper sweep for standard listings. White acrylic helps with clean reflections under jewelry and cosmetics. Black velvet provides a controlled contrast variant for dark metal, pale products, or premium detail images, but it attracts dust and shows every fiber at macro distance.
Use white foam board as a reflector. Use black board as negative fill when the product looks flat and needs a darker edge. Keep each board on a marked stand so an assistant can return it to the same position after every SKU.
Transparent products need side or rear lighting that reveals edges without blowing out the center. Metallic items need broad diffused sources, because small hard lights create distracting bright spots. Textured products benefit from a slightly more directional source that skims across the surface, but don't change the whole rig for every item. Move one light modestly, record the position, and use that variation for the category batch.
Reset rule: Keep the product, boards, cloth, air blower, tweezers, gray card, and cleaning brush within reach. The station should return to its marked state before the next SKU.
Before each product, remove dust, straighten labels, check seams, and inspect the frame at live-view magnification. Shoot a reference angle for the category, then repeat it. A useful best lighting setup for accessories can help when reflective accessories expose weaknesses in your arrangement. For a practical lighting workflow that can be repeated across products, use this guide to product photography lighting.
Camera Settings and Focus Stacking for Sharp Detail
A catalog shoot fails when every SKU needs a new setup. Lock manual exposure, manual focus, fixed white balance, and one picture style or RAW profile before capturing the first frame. Keep ISO between 100 and 200. With flash, choose a shutter speed within the flash sync range. With continuous light, use a stable shutter speed while the camera stays locked.
Start at f/8. Use f/11 only when the product needs more depth and the lens still resolves fine detail. A smaller aperture does not solve every macro problem. Beyond roughly f/11, diffraction can reduce detail (macro focus-stacking workflow). At 1:1 magnification with a 100 mm lens, the usable focus zone may be only about 0.6 mm wide, so aperture alone cannot keep a thick object sharp.
Make stacking a standard capture step
Use a focusing rail for relief, lettering, raised stitching, curved surfaces, and any product with visible thickness. One documented workflow uses a 15-frame stack with 0.1 mm focus steps (focus-stacking technical reference). Treat that as a starting point for a shallow, controlled subject. Deeper products require more frames and greater rail travel.
Set the camera parallel to the main product face. Begin at the nearest important detail, then move through the subject until the far edge is covered. Manual focus keeps the focus path consistent across a category. Autofocus can select a different plane from one SKU to the next, creating uneven sharpness in a batch. Keep adjacent frames about 50% overlapped so the merge retains enough shared detail. Use the macro documentation workflow as a reference for repeatable capture and alignment.
Use the table as a production baseline. Adjust frame count and step size only when the product depth requires it, not because each object looks slightly different.
Focus stacking settings by product type
| Product Type | Aperture | Frame Count | Step Size (mm) | Overlap |
|---|---|---|---|---|
| Flat labels and packaging | f/8 | 1–5 | 0.5 | 50% |
| Thin jewelry | f/8 | 8–15 | 0.1–0.5 | 50% |
| Rings and raised hardware | f/8–f/11 | 15–25 | 0.1–1 | 50% |
| Textured cosmetics caps | f/8 | 15–30 | 0.1–1 | 50% |
| Deep small objects | f/8–f/11 | 25–40 | 1–2 | 50% |
Start every SKU category from the same focus position. A rail gives the cleanest repeatability. Rail-less stacking works with a locked camera and manual focus, but merging requires closer inspection. Handheld stacking belongs to rough social content, not a catalog that must match across hundreds of products.
Doing this for a whole catalog?
MerchLoom runs background removal, upscaling and AI editing across every product photo you have — one prompt, whole batch. Try 2 batches free, no signup.
Try it freeShoot tethered so files enter the correct batch folder immediately. Capture a gray-card frame before each batch and use it to correct white balance. If the output remains soft, apply this repeatable fix for blurry photos before reshooting the category.
Batch Shooting Workflow for Hundreds of SKUs
Treat the shoot like a production line. Leave the station assembled overnight if you can. Tape the tripod feet, sweep-table center, product position, and light stands. When the setup moves, every comparison becomes harder and the next day's images stop matching the previous day's images.
Sort products into batches of 10 to 20 SKUs by category, finish, size, or lighting behavior. Don't mix polished jewelry with matte packaging if it forces constant changes. Keep products with similar reflections and depth requirements together.
Prepare the files before the camera comes out
Create the folder structure first:
- Category folders: Use names such as
rings,serums, orhardware. - SKU folders: Give every product one permanent folder.
- Angle folders: Separate
hero,detail-01,detail-02,back, andscale. - Review folder: Send rejects and uncertain frames somewhere separate from approved output.
Name files as soon as they land on disk with a pattern such as {category}_{sku}_{angle}. A name like rings_R102_detail-01 is searchable and survives handoffs. Camera-generated names won't help when you're reviewing thousands of frames late in the week.
Capture the same asset set
For each SKU, shoot a hero image, three detail macros, a back view, and a scale shot. The detail frames should answer a buyer's questions: What does the grain look like? Is the stitching clean? Does the finish show scratches, pores, or a coating? Macro works best when it proves something useful, not when it magnifies a random surface.
Take one gray-card reference frame at the start of every batch. Keep the card in the same light as the products, then remove it before the actual capture. This gives you a correction reference without placing a color target in every listing image.
Catalog rule: Cull while you shoot. If a frame misses focus, shows dust, or has a crooked label, reject it before the next product enters the station.
A tethered laptop makes this practical. Check focus at high magnification, confirm the file name, and move the product only after the image passes. Your aim isn't to avoid every reshoot. It's to catch failures while the product and lighting are still in front of you. A batch-processing workflow can help organize this handoff, especially when you learn what batch processing means.
Post-Processing and Platform-Specific Export Sizes
Keep the original RAW files. Build one correction workflow for each lighting batch, not a new edit for every product. Start with the gray-card reference, correct white balance, then adjust exposure, contrast, and color. Apply those settings across the batch and inspect the first, middle, and last products before exporting everything.
Macro images punish inconsistent sharpening. Sharpen after resizing, at the final output size. Don't apply one aggressive sharpening setting to every source file. A small texture detail can look clean on a large image and brittle after a tight crop. Check edges, lettering, fibers, and reflective highlights at the size buyers will see.
Export from presets, not memory
Create separate presets for Amazon, Etsy, and Shopify. Use sRGB for storefront images unless a platform specifically requires another profile. Keep square crops for the main catalog where the storefront layout calls for them, but preserve a portrait or detail crop when the product needs vertical framing.
Amazon Handmade requires a pure white main-image background, RGB 255,255,255, and Amazon says images should be at least 1,000 pixels on either height or width to enable zoom. Amazon also says images must not exceed 10,000 pixels and must not be less than 500 pixels on the longest side (Amazon Handmade image requirements). The content requirement supplied for your catalog also calls for an Amazon main image with the longest side at 1,600 pixels or more, so use that as your working production target while checking the live category rules before upload.
Etsy recommends listing photos with at least 2,000 pixels on the shortest side (Etsy image-size guidance). Shopify community guidance describes uploads up to 4,472 × 4,472 pixels, with files up to 20 MB, and recommends 2,048 × 2,048 pixels for square product photos (Shopify image-size guidance).
Platform export specs for macro product photos
| Platform | Min Dimensions | Aspect Ratio | Format | Background |
|---|---|---|---|---|
| Amazon | Use the catalog target above and verify category rules | Marketplace framing | JPEG or platform-supported format | Main image pure white RGB 255,255,255 |
| Etsy | 2,000 pixels on the shortest side | Listing crop chosen for the product | JPEG | Product-appropriate, clean background |
| Shopify | 2,048 × 2,048 recommended square export | 1:1 square | JPEG | Storefront-consistent background |
Use a practical image optimization guide to review file weight, cropping, and web delivery before uploading a full collection. Export one test SKU per platform first. Check the zoom, mobile crop, white background, and text legibility. Then run the approved presets across the remaining catalog.
Automating the Whole Workflow Across Your Catalog
Once your camera settings, naming convention, correction preset, and export sizes are fixed, automation becomes useful. It can't rescue poorly focused source files, inconsistent product angles, or misleading retouching. It can remove the repetitive middle work after you've made the creative and technical decisions.
Chain the workflow in this order:
- Import: Pull files from the shoot folder, cloud storage, or store connection.
- Cull: Separate approved, rejected, and review images.
- Correct: Apply the batch develop preset and color reference.
- Crop: Create the required hero and detail framing.
- Process: Remove or replace backgrounds, clean minor distractions, or upscale only where the source supports it.
- Export: Write marketplace-specific files into predictable folders.
- Review: Inspect a sample from every category before publishing.
Native catalog software can handle presets, renaming, and exports. Stores with 500 or more active SKUs often need a separate batch workflow for background work, reframing, and repeated AI processing. The important distinction is pipeline order. Remove backgrounds before upscaling when appropriate, because smaller intermediate files can reduce processing cost. MerchLoom describes this ordering as capable of saving up to 87% in certain workflows (product photo automation workflow).
Keep human review in the pipeline
AI output still needs inspection. Macro detail can expose generated edges, altered textures, incorrect labels, and reflections that weren't present in the source. Review the product silhouette, branding, color, stitching, hardware, and any area that makes a factual promise to the buyer.
MerchLoom can run chained AI pipelines across an imported collection instead of processing one image at a time. You can try the first images with no account, then use a pay-per-image model with credits that never expire. It isn't a full Photoshop replacement, and you should approve the outputs before they reach a marketplace.
The useful target is a repeatable collection workflow. A new batch should enter through the same source folder, receive the same correction and export logic, and finish in platform-ready directories without manual file shuffling. Build the pipeline around your approved SKU folders, then reuse it for every seasonal drop.
Use the same station, naming pattern, camera presets, and review checkpoints for your next catalog batch. Try your first macro product images in MerchLoom without an account, then run the approved pipeline across a collection with pay-per-image credits that never expire.
Stop editing product photos one at a time
Upload your catalog or connect your store. Describe the result once. MerchLoom does the rest.
Try it free — no signup