
Lay Flat Photography for E-Commerce Sellers
Master lay flat photography with batch-ready workflows, camera settings, and AI processing tips for Amazon, Shopify, and Etsy listings.
You're probably staring at a folder full of product shots that looked fine on the day, then fell apart the moment they hit a marketplace grid. One frame leans warm, the next one goes blue, and half the batch won't crop cleanly into Shopify, Amazon, or Etsy without a fight. Lay flat photography solves part of that problem, but the key win is building a repeatable image system that keeps hundreds of SKUs looking like one collection.
Why Lay Flat Photography Works and Where It Breaks Down
The first time a seller notices the pattern, it is usually ugly. A 200-item shoot lands in the edit folder, and the white balance is all over the place, with a dozen surfaces, props, and camera positions trying to tell different stories. Lay flat photography earns its keep because the overhead view gives you clean geometry that is easy to crop, easy to standardise, and easy to read on a phone.
It also matches how digital retail behaves in Canada. Online retail sales have moved sharply enough that product presentation has to support constant merchandising rather than occasional hero shots. For that reason, a top-down frame stays useful for fashion, beauty, and lifestyle listings that need to look orderly across channels.
Where it works
A flat lay works best when the product needs clarity more than drama. Apparel, accessories, skincare, stationery, and small goods all benefit from a top-down composition because the buyer can read shape, grouping, and colour quickly. The standard lens range of 35mm to 50mm helps reduce distortion while keeping the subject proportionate, which is exactly what you want when the same image might need to work in a grid, a marketplace listing, and a storefront banner (Adobe flat lay photography guide).
It is a format built for repeatability. One overhead setup can produce a clean base image for multiple channels, then hold up when the crop changes from marketplace square to storefront banner to social placement.
Practical rule: if the shot has to survive multiple crops, flat lays are useful because the composition can be re-framed without destroying the product's read.
Where it breaks
Flat lays struggle when the buyer needs depth cues, fit reference, or material realism. Soft apparel, chunky knitwear, and anything with drape often needs an on-model or in-context shot to sell the texture and weight properly. Even a well-arranged overhead image can underperform if it is treated like the hero shot when it should really sit in support.
That is the operational problem most guides skip. The question is not how to make one attractive image, it is how to make hundreds of images feel like they came from the same hand, on the same day, under the same rules. If you want a tighter baseline for small-item capture, this practical small-item photography guide is a useful companion.
Planning the Shoot Before You Touch the Camera
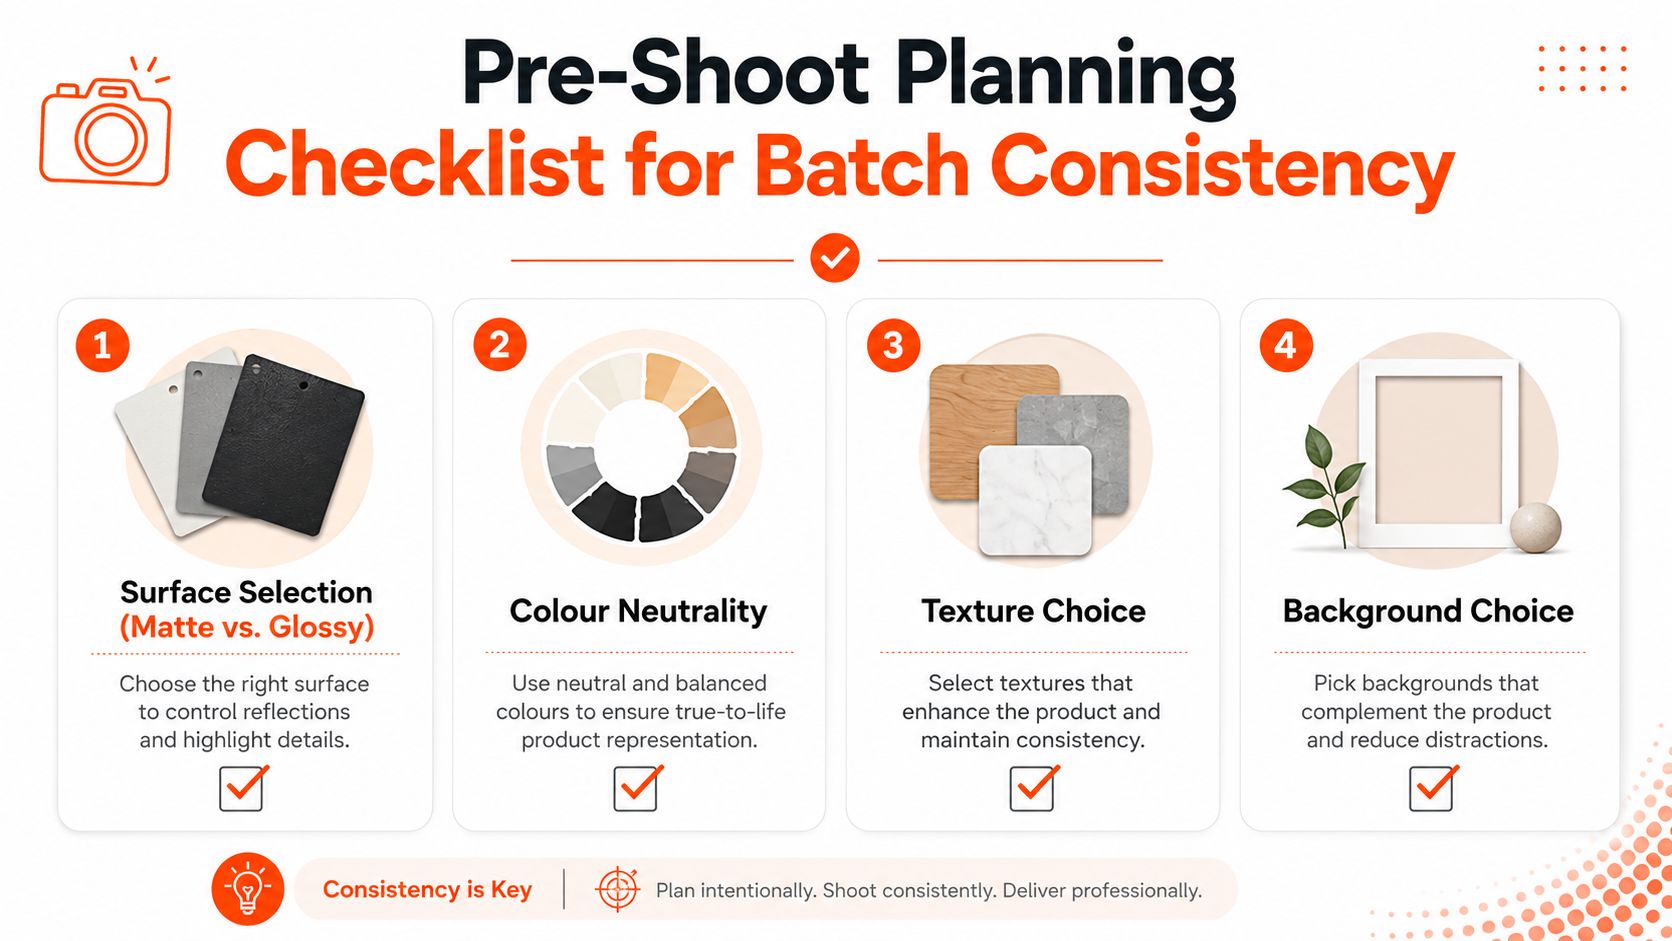
The set falls apart before the shutter ever fires if the scene is not fixed. Flat lay work scales when the surface, background, crop, and camera height are decided once, then reused across the batch. Improvising from one product to the next is how a catalogue ends up looking like several brands sharing the same table.
Lock the surface and background first
Choose the surface for repeatability, not taste. A matte surface is usually safer than a glossy one because it behaves more predictably under changing light, and colour neutrality matters more than decoration when you are processing a whole collection. A neutral background also gives you more room later, especially when a single base image has to be repurposed for Amazon, Shopify, and social placements.
Keep the set simple enough that it can survive repetition. A busy backdrop may look clever on the first SKU and tired by the twentieth. If you need a reference point for a controllable surface setup, this studio backdrop guide is useful to keep nearby while you build the table.
Build one layout grid and stick to it
Pick a hero position and use it for the whole run. The hero item should sit in the same place in frame, with supporting objects placed around it in a way that still leaves a clean crop on every channel. That consistency matters because batch editing works best when the source compositions already account for square, portrait, and marketplace crops.
Camera height matters more than people think. For a higher-end setup, place the camera at least 2 feet above a 3×3-foot arrangement, then add about 15% extra height so you keep room to crop and straighten later. That extra space gives you room when a product shifts a few centimetres or a prop needs to be nudged after the test frame (Replica Surfaces technical setup guide).
Working habit: one written shoot template beats ten good intentions. List the surface, background, hero position, prop set, and target output format before the first frame, then reuse the template session after session.
If you need a cleaner crop strategy from the start, this centring guide helps keep the composition logic consistent across listings. A printed checklist also keeps the pre-shoot routine honest, and this four-step infographic is a useful reminder of the order that prevents drift when the batch starts to run long.
For photographers using a DigiDevice camera filter advice approach, it is easier to keep the whole set predictable when the filter choice is made before styling begins. A filter decision changes how highlights behave, so it belongs in the planning phase, not halfway through the shoot.
Lighting and Camera Settings That Survive a Batch
Lighting has to stay boring in the best way. A north- or east-facing window gives you a clean base, and a single soft source from the side keeps shadows readable without turning every SKU into a custom lighting problem. Put a white bounce card opposite the key light so the batch stays consistent even when products differ in colour, reflectivity, or texture.
Set manual exposure and manual white balance before the first frame. A practical capture range is ISO 100-400, f/5.6 to f/8 for flatter products, or f/11 to f/16 when depth of field needs to hold across the whole layout, with RAW capture so you can correct the batch without damaging colour data (Luciano Biondi flat lay guide). Keep shutter speed at 1/125 second as a workable floor, and move to 1/250 second if vibration, floor movement, or a lighter stand starts to show up in the frame (The School of Photography flat lay tutorial).
Phone shooters need the same discipline
Phones work for catalogue batches if the setup is locked down. Use a tripod mount, lock exposure, lock focus, and avoid digital zoom. The overhead frame still needs the same geometric control as a DSLR shot, because a batch only looks unified when framing stays put from SKU to SKU.
Alignment checks are where sloppy sessions get expensive later. Verify true perpendicular placement with a bubble level or a digital levelling app, since even a small tilt creates visible distortion that batch edits cannot fully repair. The same logic applies whether you are shooting on a camera or a phone, and DigiDevice camera filter advice is a useful reminder that exposure control affects the whole capture chain.
If you need a cleaner output for marketplace handoff, this HD photo guide is a useful reference for keeping the file side of the workflow tidy.
Settings card
| Setup | Aperture | Shutter | ISO | White Balance | Alignment Check |
|---|---|---|---|---|---|
| Small product batch | f/5.6 to f/8 | 1/125 or faster | 100-400 | Manual | Bubble level or app |
| Full depth catalogue frame | f/11 to f/16 | 1/125 to 1/250 | 100-400 | Manual | Bubble level or app |
| Phone on tripod mount | Use camera app controls | Stable support | Lowest workable | Locked | Perpendicular check |

Composition and Styling for Catalogue-Wide Consistency
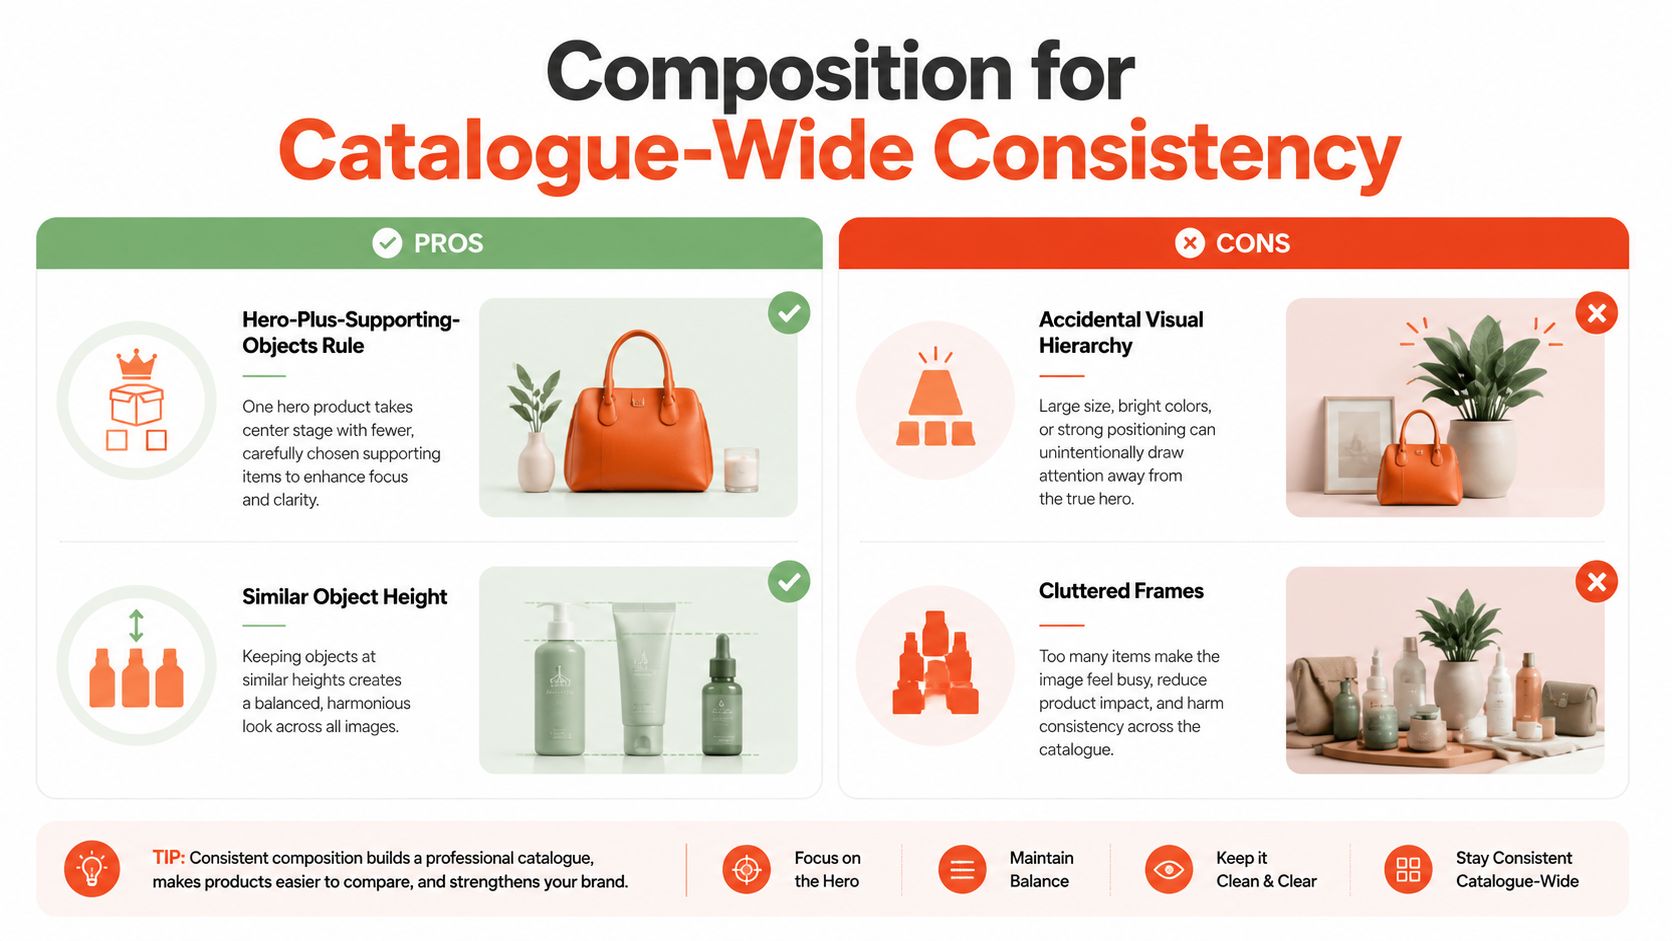
A good flat lay is controlled, not crowded. The hero product should own the frame, while supporting objects reinforce the story without stealing attention. If every item is visually loud, the catalogue stops reading like a collection and starts looking like a pile of unrelated test shots.
Build the hierarchy once
The safest structure is hero plus supporting objects. Keep the supporting items at a similar height so they do not cast awkward shadows or create accidental visual steps, and do not cram too many similar objects together. That sounds simple until you are styling thirty variations of the same product line and every prop is competing for attention.
Doing this for a whole catalog?
MerchLoom runs background removal, upscaling and AI editing across every product photo you have — one prompt, whole batch.
Try MerchLoomA cohesive colour palette matters more than novelty. Repeating a small set of tones across a batch gives the entire line visual memory, even if the products themselves vary. The point is not to make every frame identical. The point is to make the catalogue feel organised enough that the shopper recognises the brand language immediately.
Watch the edges, not just the centre
With a 50mm lens, peripheral objects need to sit about 3% to 5% closer to centre than intuition suggests, because edge parallax stretches corner props and breaks the illusion of consistency. That adjustment saves a lot of silent drift when the same layout is repeated across multiple SKUs.
Gather every prop before the first frame. If you keep stopping to find a coaster, a tag, or a sprig of greenery, the composition loses its rhythm and the spacing starts changing by accident. The cleaner workflow is to build a prop tray, test the arrangement, then leave the set alone except for small measured corrections.
For stylists who want a more automated look across repeated compositions, style transfer techniques for visual consistency can be a useful reference point for how consistent visual language gets approached in adjacent workflows.
Composition rule I trust: if the crop feels tight in the test frame, it will feel worse after batch exports. Leave breathing room and let the layout survive the channel-specific trim later.
If you are matching centre-weighted crops across platforms, this centring resource is worth a look before you lock the layout.
Batch Shooting the Session Without Losing Your Mind
A lay flat session gets easier when it is run like production, not inspiration. The shot list should carry one row per SKU, with the hero position, prop set, and target output format written down before the first frame. That keeps you from guessing what has already been shot, what is repeated, and which items need a separate crop.
Build a session rhythm
Start with a test frame and check alignment before the run begins. After that, keep a steady cadence, set the layout, capture, check every tenth frame, reset. The pattern is plain, and that is the point. Dull repetition is how you get a hundred usable images without drift creeping in unnoticed.
Shoot more frames than you expect to use, and keep the resolution high. Once the final image is sharpened and blended across frames, the flat lay often stays crisp from edge to edge, which matters when the catalogue has to survive resizing and compression. If you are capturing hundreds of frames, the discipline is not speed at the start. It is restraint in the last third of the day, where rushed hands usually ruin the set.
Name files so humans and tools can read them
Use a date-and-SKU structure that still makes sense when you are reviewing contact sheets months later. The file name should show which product it belongs to, which session produced it, and which frame is the keeper. If the naming scheme only works on shoot day, it is not a system, it is temporary stress.
Drifting props, heat build-up from continuous lights, and tripod creep are the failure points that show up once the batch is underway. Check the surface, the camera head, and the edge of the frame often enough to catch drift before it forces a reshoot. If you use a booth setup for small items, this guide to buying a photography booth is useful for thinking in terms of repeatable capture instead of isolated frames.
| Setup | Aperture | Shutter | ISO | White Balance | Alignment Check |
|---|---|---|---|---|---|
| Overhead DSLR batch | f/11 to f/16 | 1/125 to 1/250 | 100-400 | Manual | Bubble level |
| Overhead phone batch | Camera app control | Stable support | Lowest workable | Locked | Digital levelling app |
| Mixed product session | f/5.6 to f/8 | 1/125 or faster | 100-400 | Manual | Test frame before batch |
For teams that want a cleaner operational setup, MerchLoom can handle collections through chained steps instead of treating each file like a separate project.
Post-Processing and Multi-Channel Export Workflows
Per-image editing stops scaling the moment a folder hits 300 files and three marketplaces are waiting on the same afternoon. The practical approach is a chained pipeline, background cleanup first, then reframing for each destination, then export in the right shape for each channel. The same base image set can then produce Amazon, Shopify, Etsy, and Instagram versions without rebuilding each file from scratch.
Cut the expensive work down first
If the workflow includes background removal, do that before upscaling. It keeps the file smaller before the most expensive step, which matters when you are processing a catalogue rather than a single product. In batch work, the order of operations affects both cost and turnaround time.
MerchLoom can handle that kind of chained processing across collections, which fits the way repeatable output needs to work. It takes imported product sets, cleans them up, reframes them, and pushes them toward marketplace-ready variants without forcing you to babysit every file.
Match the export to the channel
Amazon usually needs a white-background treatment, Shopify works cleanly with square framing, Etsy listings often need 2000 pixels on the long side, and Instagram wants portrait-friendly crops when you are using the feed format. Those channel differences are why the batch has to be planned from the beginning, because a composition that only looks good in one crop is not finished.
Keep the colour space in sRGB so the files behave predictably across platforms. Use filenames that still make sense after upload, because when three marketplaces reject, compress, or rename files in the same afternoon, your own naming system needs to stay readable.
If you are also planning social output, best Instagram content dimensions is a useful companion when you are choosing which crop gets priority.
When Lay Flat Photography Is the Wrong Choice
A flat lay breaks down when the product sells through depth, drape, fit, or texture realism. Soft apparel, bulky knitwear, and items that need to be seen worn, hung, or filled usually need another format to make the sale. A top-down frame can still support the listing, but it should not carry the entire job.
The trade-off gets sharper on mobile. Buyers scroll quickly, and if the image does not answer the core question, whether the item feels wearable, usable, or substantial, the cleanest arrangement will not fix it. For channels that lean on fast swipes, the choice of crop matters, but the bigger decision is picking the right view before you start styling and cropping.
The rule I use is straightforward. If the product sells on how it looks when worn, hung, used, or filled, a flat lay is support material, not the hero image. If you are building a catalogue system, use lay flat photography where it earns its place, then add on-model, angled, or in-context shots wherever the buyer still needs proof.
The same logic applies when a garment has movement or structure that disappears from overhead. A silk blouse can look tidy in a flat lay and still fail to show how it falls. A tote bag can look balanced on a background and still hide its depth, lining, and scale. In those cases, shooting only from above gives you a neat file that does not do much selling.
There are also practical limits on the production side. Some products are harder to style consistently in a top-down set, especially when the collection includes irregular shapes, reflective surfaces, or items that collapse as soon as you stop holding them in place. That creates more retouching, more resets, and more inconsistency across the catalogue. A mixed capture plan is usually faster than forcing every SKU into the same overhead treatment.
For a batch workflow, the decision is less about taste and more about repeatability. Use lay flat photography for items that benefit from graphic consistency, clear grouping, and quick comparison. Use another format where the buyer needs realism that a flat frame cannot provide. That is how you keep the catalogue coherent without pretending one view fits every product.
If you are planning social output alongside marketplace assets, the best Instagram content dimensions still matter, but only after you have chosen the view that matches the product.
MerchLoom turns batch image work into a repeatable pipeline for sellers who need more than one polished shot. If you are standardising lay flat photography across a catalogue, use MerchLoom to process whole image collections into marketplace-ready outputs without rebuilding every file by hand.
Stop editing product photos one at a time
Upload your catalog or connect your store. Describe the result once. MerchLoom does the rest.
Try MerchLoom