
Photography Booth for Sale: A Buyer's Guide 2026
Find the perfect photography booth for sale in 2026. Our guide helps e-commerce sellers choose the right booth and build a scalable image workflow.
Most product teams eventually encounter a shared problem, one that often leads to seeking a photography booth for sale. Your catalogue photos come from too many places. Some were shot on a phone near a window, some on a warehouse table, some by a freelancer with their own lighting setup. The result is a store that looks patched together.
A booth fixes the capture side of that problem. It gives you repeatable lighting, a defined shooting area, and a workflow your team can hand off without retraining from scratch every week. That matters when you're listing ten products. It matters even more when you're refreshing hundreds of SKUs across Amazon, Shopify, Etsy, and your own site.
But the booth isn't the whole system. It's the front end of the system.
The bottleneck usually starts after the shoot. You capture 300 clean images, then someone still has to remove backgrounds, straighten framing, resize for different marketplaces, rename files, and export multiple versions. That's where a lot of in-house setups fail. The hardware is organised. The post-production isn't.
Beyond the Snapshot Your First Step to Scalable Product Images
The reason more sellers are looking at in-house capture is simple. The technology is no longer niche. The global photo booth market was valued at $639.1 million in 2026 and is projected to reach $1.5551 billion by 2036 according to Future Market Insights' photo booth market forecast. For online sellers, that signals a mature category with practical hardware choices rather than experimental gear.
A booth helps you standardise what the camera sees. It doesn't automatically standardise what your marketplaces require.
Capture consistency solves only half the problem
On the operations side, consistency is worth more than peak image quality on a single hero shot. A slightly less flexible setup that produces the same result every time is often more useful than a more advanced setup that depends on one skilled operator. That's why dedicated booths appeal to busy teams. They reduce variation in shadows, reflections, framing, and colour drift.
Still, once the photos leave the booth, the manual queue starts:
- Background handling: Amazon often needs a pure white result, while your brand site may need softer branded treatments.
- Aspect ratio changes: Shopify squares, marketplace standards, social crops, and ad variants all pull from the same original image.
- Batch corrections: Exposure, edge cleanup, and consistent centring become repetitive fast.
- File throughput: Hundreds of images in one collection need the same rules applied the same way.
That post-capture layer is where a lot of sellers underestimate labour. If you're mapping the broader operational side of growth, Snappycrate's ecommerce business scaling roadmap is a useful read because it treats systems, not just sales channels, as the thing that scales.
A photography booth is a production tool, not a complete production workflow.
Buy the booth with the next step in mind
Before you compare enclosures, lights, or camera mounts, decide what happens to the images the moment a shoot ends. If your answer is "someone edits them one by one", you're not buying enough system for the workload you have.
A better approach is to pair the booth decision with a repeatable post-processing path. That usually means planning for naming rules, folder structure, output presets, and image automation from day one. If you need a practical primer on that side, this guide to e-commerce image automation covers the operational logic well.
Understanding Your Photography Booth Options
Not every photography booth for sale solves the same problem. Some are built for compact products on a desk. Some are meant to sit semi-permanently in a warehouse corner. Others are designed to move, fold, and travel between locations. If you buy the wrong category, the friction shows up immediately in setup time and image inconsistency.
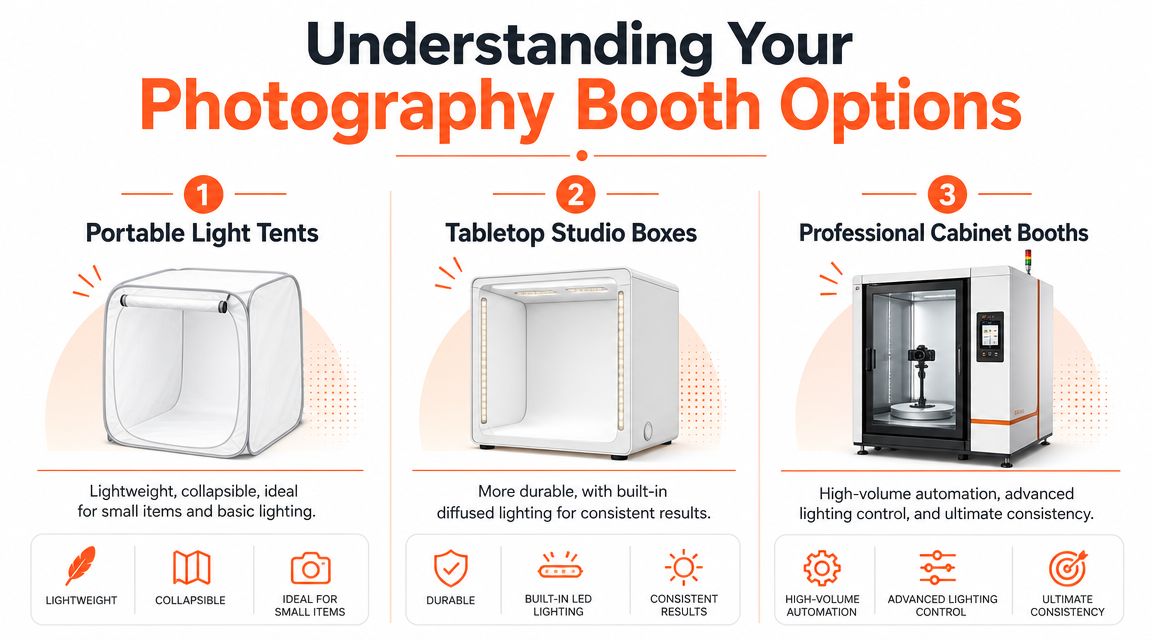
Portable light tents
Think of these as the microwave of the category. Fast, small, and useful when your products fit the format.
They work well for jewellery, cosmetics, small electronics, accessories, and other objects that don't need much staging room. Their main advantage is speed. You can fold them away, put them on a table, and start shooting without dedicating floor space all day.
The downside is creative and physical constraint. Once a product needs a wider angle, more distance from the background, or styled props, these setups get tight. They also tend to expose operator inconsistency if the lighting isn't integrated well.
Tabletop studio boxes
This is the countertop oven option. More structured than a fabric tent, still compact enough for smaller workspaces, and usually better at repeatability.
A solid tabletop booth often gives you more dependable diffusion and cleaner edge separation. For catalogue work, that's useful because background removal becomes less messy and shadow control is easier to repeat across batches. If you're shooting a steady stream of similar products, this category often hits the best balance between footprint and output.
For sellers still testing whether a permanent photo area makes sense, renting space for a day can help clarify your needs before purchase. Encore Film And Music Studio's guide is helpful for thinking through layout, access, and practical studio constraints.
Professional cabinet booths
This is the full range. Bigger, less mobile, and much better suited to teams who shoot constantly.
A cabinet-style or enclosed studio booth makes sense when image consistency is more valuable than portability. These setups reduce environmental variation because the booth defines more of the shot. That's useful for apparel accessories, packaged goods, home products, and any catalogue that needs the same clean look every week.
Some portable systems have become surprisingly dense in terms of onboard hardware. One listed model weighs 30 lb and measures 17 in × 22 in × 60.5 in while including a Canon DSLR camera, a 12-inch touchscreen, and a professional printer, as shown in Photo Booth International's booth listings. That tells you something important: portability no longer always means stripped-down capability.
Selection rule: Buy for the products you shoot most often, not the outlier product you photograph twice a quarter.
If you're also planning the visual environment around the booth, a strong studio photo backdrop guide is worth reviewing because backdrop choice affects cleanup time more than many buyers expect.
Key Specs to Evaluate for Catalogue Consistency
A booth should make your catalogue more uniform. If it doesn't, it's just another piece of equipment taking up floor space.
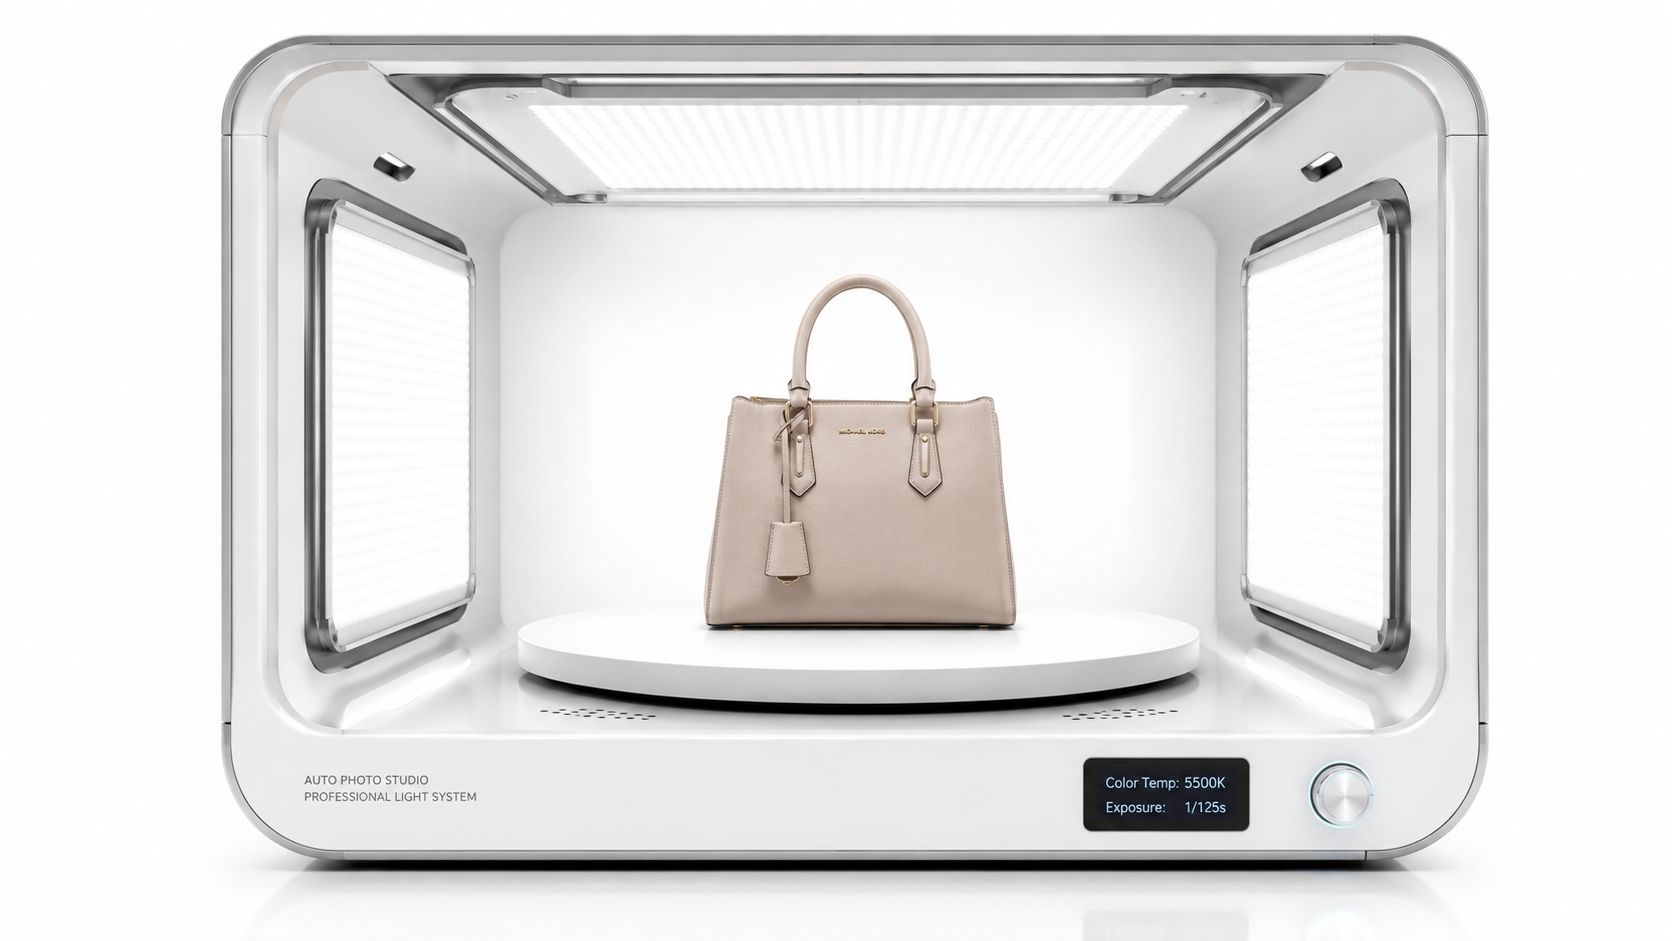
Footprint and clearance
The booth's advertised size is only part of the space question. You also need room for the operator, product staging, laptop access, and safe movement around the setup. For a small in-house studio, plan for a minimum footprint of 6 ft × 9 ft, based on FotoATM's booth setup guidance. In practice, more room makes the workflow smoother.
If your team is working in a stock room or warehouse corner, bad spacing creates real friction:
- Crowded access: Operators bump lights, stands, or product tables.
- Weak staging flow: Finished items and unshot items end up mixing together.
- Inconsistent camera distance: Tight spaces encourage small position changes that show up across the catalogue.
- Safety issues: Power cables and packed gear don't mix well with fast-moving fulfilment areas.
Lighting quality and control
Most poor product photography isn't caused by the camera. It's caused by unstable light.
For e-commerce, the booth should create the same light every time, with enough diffusion to control harsh reflections and enough directional control to preserve shape. Shiny packaging, glass, metal hardware, and glossy cosmetics all punish weak lighting setups. If the booth can't tame reflections reliably, your editing time rises because every image needs individual correction.
Look for practical control, not just brightness. Ask whether the light spreads evenly, whether shadows are predictable, and whether products can be separated cleanly from the background. A booth that reduces cleanup work is worth more than one that looks bright in a demo.
Build quality and daily use
A booth used once a month can be delicate. A booth used every day can't.
Panels, hinges, mounts, and diffusion surfaces take a lot of abuse in real operations. Teams drag products in and out, wipe down surfaces, adjust angles, and move the unit when layouts change. Flimsy material doesn't just wear out. It introduces small variations that become visible in the final set.
If your workflow depends on re-levelling the booth or repositioning parts every week, the setup isn't stable enough for catalogue work.
Background handling and output cleanliness
Background material changes how much time you spend in editing. Smooth, clean surfaces are easier to mask and easier to keep visually consistent across product families. Textured or wrinkled materials create edge problems, especially with white or reflective products.
That matters even more when you need multiple exports from one image set. One original may feed a clean white marketplace image, a square storefront crop, and a social asset. Resolution planning belongs here too. If your booth setup produces files that need heavy cropping later, you're effectively losing usable detail. This explanation of what 300 DPI means is helpful if you're sorting out how capture resolution translates into listing-ready output.
Doing this for a whole catalog?
MerchLoom runs background removal, upscaling and AI editing across every product photo you have — one prompt, whole batch.
Try MerchLoomMatching a Booth to Your E-commerce Niche
The right booth depends less on the booth itself and more on what you sell. A jewellery seller needs tight control and close-up precision. A footwear brand needs enough room to style pairs consistently. A home goods seller often needs flexibility more than enclosure.
The mismatch problem
A lot of disappointing purchases come from buying the most impressive-looking unit instead of the one that matches the catalogue. Bigger isn't always better. For some categories, a compact booth produces cleaner and faster results because it limits variables.
For other categories, a smaller booth becomes a daily annoyance. You start compromising on angles, folding products unnaturally, or shooting part of the catalogue outside the booth. Once that happens, consistency disappears.
Photography booth type vs. e-commerce use case
| Product Category | Recommended Booth Type | Key Consideration |
|---|---|---|
| Jewellery and watches | Tabletop studio box or compact light tent | Controlled reflections and tight framing matter more than floor space |
| Cosmetics and skincare | Tabletop studio box | Packaging needs repeatable lighting and clean label readability |
| Small electronics | Tabletop studio box | Straight edges and glossy surfaces benefit from stable diffusion |
| Shoes and handbags | Larger pop-up tent or open-front booth | You need room for angles, pairs, and light styling adjustments |
| Folded apparel | Open-front booth with flexible shooting area | Flat lays need overhead access and spacing around the product |
| Apparel on mannequins | Larger enclosed or semi-enclosed booth | Height, camera distance, and repeatable body positioning matter |
| Home décor and small home goods | Pop-up tent or larger booth depending on item size | Mixed product dimensions require flexibility without rebuilding the set |
| Packaged consumer goods | Enclosed studio booth | Batch shooting benefits from fixed placement and repeatable framing |
What works and what doesn't
For tiny reflective products, a small, controlled environment often wins. You're not trying to create drama. You're trying to produce reliable product edges, realistic colour, and repeatable highlights.
For soft goods, access matters more. Clothing, tote bags, and textiles usually need room to style, pin, steam, and adjust. A booth that's too enclosed slows the team down because each shot becomes a miniature wrestling match.
A practical buying rule is to judge the booth by your hardest common product, not your easiest one. If most of your catalogue is mid-sized and awkward to position, don't choose a tiny setup just because it looked neat in a product listing.
Budgeting for Your Booth and Total Ownership Costs
The purchase price matters. It just isn't the whole budget.
Most listings for a photography booth for sale focus on the enclosure, the lights, and sometimes the camera mount. That's understandable because hardware is easy to show. What they usually don't show is the cost of running the workflow after the booth arrives.
The sticker price is only the starting line
The ownership cost includes software, file handling, image cleanup, transport inside your own workspace, replacement parts, and labour spent converting raw captures into usable listing images. That's especially relevant because booth listings often skip the wider workflow problem. SpinPix360 highlights this gap by noting how little buyers are told about software, transport, and workflow automation.
If one team member spends hours every week manually processing images, that labour belongs in the purchase decision. A cheaper booth that creates messy files can cost more over time than a pricier setup that produces cleaner inputs.
Think in terms of payback and resale
Even if you're buying for in-house product photography rather than event work, the broader booth market still gives you a useful value benchmark. In Los Angeles, photo booth rentals start around $475 for an event, according to Captured Celebrations' industry roundup. That doesn't translate directly into product studio economics, but it does tell you there is underlying equipment demand, which helps support resale when you upgrade.
Use that as a mindset shift. A booth isn't just a spend. It's an operating asset with a secondary market.
A more realistic buying checklist
Before you commit, budget for these line items too:
- Editing workflow: If your post-production process is manual, include that labour accurately.
- Workspace changes: Tables, shelving, cable management, and background storage add up quickly.
- Operator time: A fast booth still costs time if the setup is awkward or the capture sequence is inconsistent.
- Batch tools: If you process large catalogues, software for high-volume editing isn't optional.
For teams comparing the software side of the equation, a bulk product photo editor guide can help frame the cost beyond hardware alone.
From Raw Photo to Marketplace-Ready in Minutes
Most buyers spend too much time comparing booth hardware and not enough time planning what happens after the shutter clicks.
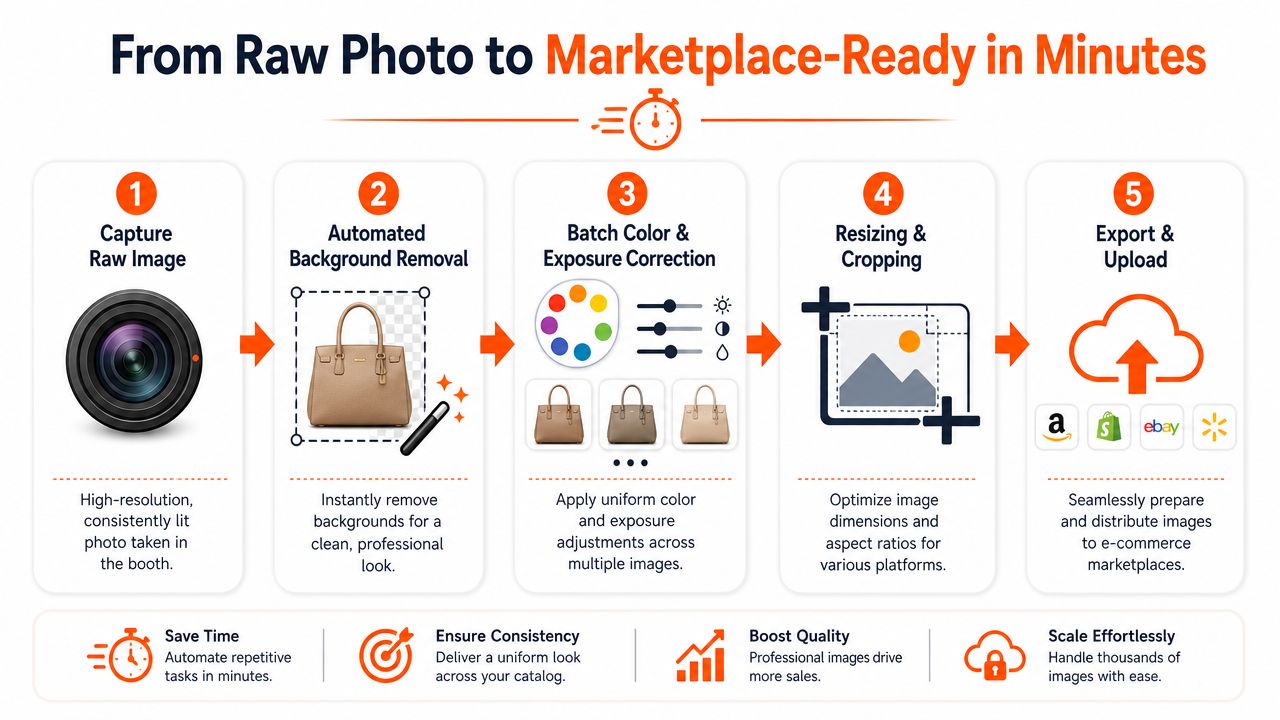
A strong booth gives you consistent source files. That's valuable because automation works better when inputs are consistent. If every image has a different shadow direction, crop, and white balance, batch processing becomes less reliable. If the booth produces stable captures, the software layer can do much more of the heavy lifting.
The manual workflow most teams fall into
It usually looks like this:
- Open one image.
- Remove the background.
- Adjust exposure and white balance.
- Crop for one platform.
- Save.
- Reopen or duplicate for another platform.
- Repeat for the next image.
That sequence is manageable for ten photos. It breaks down when a new collection lands and you need hundreds processed quickly.
Here is a useful walkthrough before building your own system:
What an automated pipeline should handle
A practical e-commerce image pipeline should run the same sequence across a whole folder or collection:
- Background removal: Clean cut-outs for marketplace compliance and flexible reuse.
- Colour and exposure correction: Applied consistently so neighbouring products don't look like they came from different shoots.
- Reframing: Square for Shopify, white-background listing output for Amazon, larger marketplace-friendly versions for Etsy.
- Export logic: Naming, dimensions, and file variants prepared in one pass.
Operational shortcut: The more consistent your booth output is, the simpler your automation rules can be.
One reason this matters is that product listings for booths rarely address the software side at all. That gap is real. The ownership challenge isn't just capture. It's handling the hundreds of images that come out of the booth after a shoot.
For catalogue-scale work, tools built for batches make more sense than one-image editors. MerchLoom is one example. It runs chained AI workflows across collections, so a folder of raw booth images can move through background removal, reframing, cleanup, and export preparation without editing each file by hand. If you want to see the workflow logic in more detail, this guide to batch product photo editing is a solid starting point.
Frequently Asked Questions for New Booth Owners
Can I use a smartphone with a booth?
Yes, often you can. For many catalogue tasks, the lighting and repeatable positioning matter more than the camera body. A good booth can make a phone workflow much more usable, especially for smaller products and straightforward listing images.
What's the best way to handle shiny or reflective items?
Start with diffusion and positioning, not editing. Move the product, camera angle, and light source before you assume the file needs heavy retouching. Reflections are easier to prevent than to clean up repeatedly across a large batch.
Should I buy used?
Sometimes, yes. Used can make sense if the frame, lights, and core structure are still stable. What matters most is whether it produces repeatable output without constant adjustment. If a used booth saves money but creates extra labour, the savings disappear quickly.
What should I prioritise if the budget is tight?
Prioritise lighting consistency and workflow fit. A smaller booth with dependable output is usually a better investment than a larger, less controlled setup. For catalogue work, repeatability beats novelty.
If your booth gives you cleaner source images but your team still spends too long editing one file at a time, MerchLoom is worth a look. It's built for batch image workflows, so you can take a full collection of raw product photos and process them into marketplace-ready outputs for different channels without rebuilding the same edits manually each time.
Stop editing product photos one at a time
Upload your catalog or connect your store. Describe the result once. MerchLoom does the rest.
Try MerchLoom