
Bulk Product Photo Editor: A Seller's Workflow Guide 2026
Stop editing photos one by one. Learn to build a scalable workflow with a bulk product photo editor to create consistent, marketplace-ready images faster.
If you're still editing product photos one by one, the actual cost isn't just time. It's the constant context switching, the missed listing deadlines, the inconsistent crop on variant images, and the quiet pile-up of rework when one marketplace needs white backgrounds, another needs square images, and your ad team wants lifestyle versions by the end of the day.
Most sellers don't need another shiny editor. They need a bulk product photo editor that behaves like operations infrastructure. That means pulling images from wherever they already live, routing each file into the right treatment, producing consistent outputs for every channel, and giving the team a clean review loop before anything goes live.
Why Manual Photo Editing Fails at Scale
Manual editing breaks long before a catalogue gets large. It starts with a few harmless shortcuts. One image is centred differently. Another keeps a slightly grey background. A third gets exported at the wrong dimensions because someone reused the last template. On a single PDP, that feels minor. Across a collection, it looks sloppy.
For sellers managing listings on Amazon, Shopify, Etsy, social ads, and email, one-by-one editing creates three operational problems at once.
The work doesn't stay creative
The first problem is repetition. Most of the work isn't art direction. It's cropping, background cleanup, resizing, renaming, centring, and exporting variants. That isn't where your margin comes from.
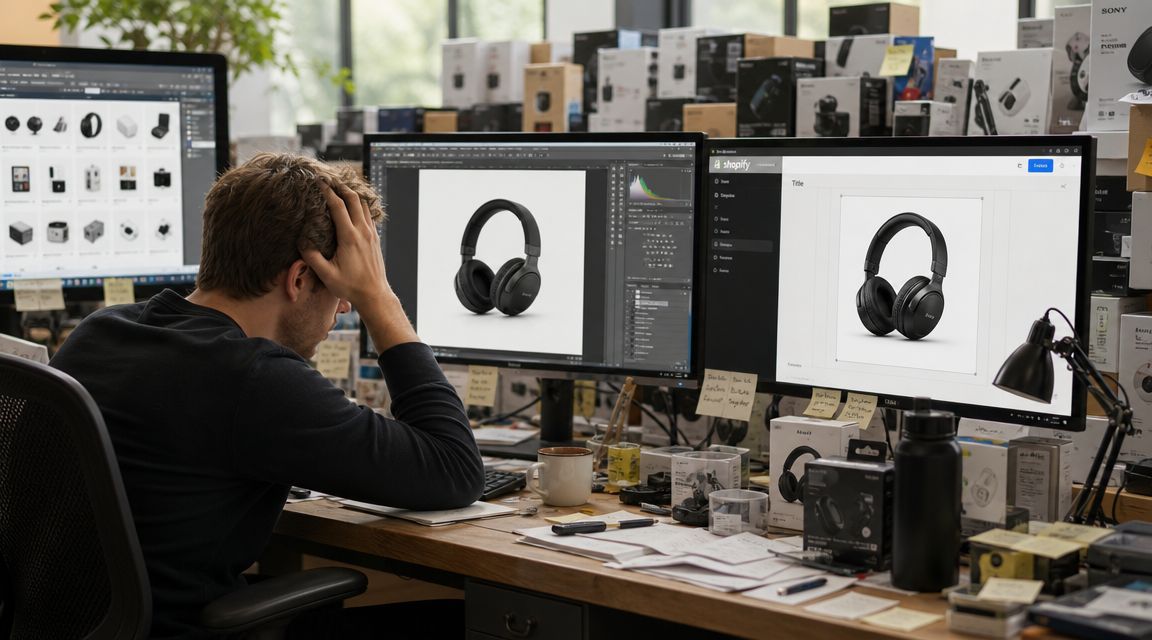
The second problem is economics. An independent review of AI product photo tools reports that traditional product photography can cost $20 to $150+ per image, while AI tools can range from $0.03 to $2.99 per image, with many ecommerce teams seeing 80 to 95% cost reduction according to WearView's review of AI product photography tools. Even if you don't replace every shoot, that gap changes how often you can refresh listings, test new hero images, or build seasonal assets.
Inconsistency spreads faster than people expect
A catalogue rarely fails because one image is bad. It fails because the set doesn't look organised.
When images are edited manually, teams usually get drift in these areas:
- Framing drift. Similar products sit at different scales in the frame, so collection pages look uneven.
- Colour drift. Whites shift warmer or cooler depending on who edited the image and what monitor they used.
- Background drift. Some files are pure white, some are off-white, and some still have edge contamination.
- Platform drift. The Shopify image is acceptable, but the Amazon version or social crop gets rebuilt later and no longer matches.
Practical rule: if a task needs to be repeated across a collection, it shouldn't depend on memory.
That is why a bulk product photo editor matters more than a single-image editor. The value isn't only speed. It's repeatability.
The opportunity cost is bigger than the editing cost
Every hour spent manually preparing image variants is an hour not spent on pricing, merchandising, sourcing, ad testing, or fixing weak listings. Teams that still treat image editing as a series of isolated design tasks usually end up with a hidden production bottleneck.
If your source images are decent but inconsistent, a workflow that standardises them in bulk will usually move the business further than endless manual touch-ups. For low-resolution source files, a separate HD photo conversion workflow can help before those files are pushed into the wider catalogue process.
Designing Your Automated Image Pipeline
A scalable image workflow starts with a simple shift in thinking. Stop asking, "How do I edit this photo?" Start asking, "What should happen to every photo of this type from input to export?"
That question leads to a pipeline.
Start with inputs, not effects
The first job isn't background removal. It's source control.
Your images already exist somewhere. Usually that's a photographer's Dropbox folder, a Google Drive organised by season, a Shopify library full of legacy assets, or a mixed folder with packshots, model shots, reference images, and supplier photos all dumped together. A good pipeline begins by connecting to those existing sources and keeping them intact.
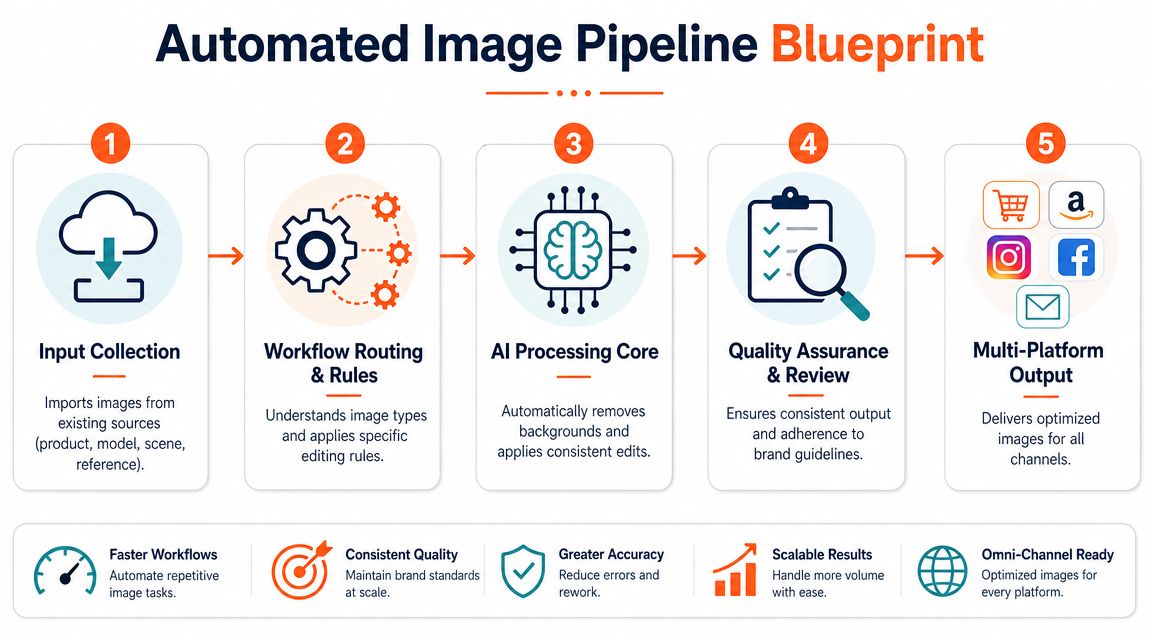
The reason this matters is simple. If the source layer is messy, every downstream step becomes manual again. Teams end up re-uploading files, renaming images by hand, and guessing which version is current.
Modern AI photo editing platforms can process 5,000+ images in a single batch with consistent specifications, according to Autophoto's overview of AI photo editing statistics. That kind of volume only helps if the flow into the system is structured.
Build recipes for image types
Not every image deserves the same treatment. A clean packshot doesn't need the same workflow as a model image, and a lifestyle source shouldn't be pushed through the same white-background rule set as a marketplace main image.
I usually separate workflows by image role:
| Image type | Typical processing logic | Common output |
|---|---|---|
| Packshot | Background removal, centring, crop normalisation, colour correction | Marketplace main image |
| Detail shot | Tight crop preservation, sharpness check, ratio-specific export | PDP gallery image |
| Model image | Subject preservation, background cleanup, composition balancing | Brand store, ads, social |
| Reference image | Style matching or scene guidance only | Internal creative input |
Tools vary in their capabilities. Some editors batch-process files but still expect you to manually decide what each folder contains. Others can route images based on type and apply chained rules.
One example is AI batch image editing workflows, where a system can import images from existing sources, distinguish between product, model, scene, and reference files, then push each set into the appropriate sequence. MerchLoom fits that operational model. It isn't just a bulk background remover. It handles entire collections through chained AI pipelines and produces consistent output across a batch.
A short walkthrough helps make that mental model concrete:
Lock the target spec before processing
Most failed batch jobs happen because teams automate the tool, not the standard.
Before you run anything at scale, define the essential requirements:
- Background standard. Pure white, transparent, or scene-based.
- Crop logic. Product fills most of the frame, centred consistently, with protected margins for awkward shapes.
- Aspect ratio set. Square for storefronts, portrait for ads, custom for selected channels.
- Colour handling. Preserve product colour first. Don't over-enhance.
- File naming and export destination. This decides whether downstream publishing is smooth or chaotic.
If your team can't describe the ideal output in one paragraph, the pipeline isn't ready yet.
The strongest pipelines don't try to be clever on every image. They apply simple rules consistently, then let QA catch edge cases.
Optimizing Workflows for Cost and Quality
The cheapest workflow isn't always the one with the lowest per-image editing price. Ultimately, savings come from step order.
A lot of sellers run expensive operations too early. They upscale first, generate backgrounds before cleaning the subject, or push full-resolution files through multiple versions of the same task. That burns compute and usually degrades quality.
Sequence matters more than most teams think
The overlooked question isn't just which tool to use. It's when each step should happen. As noted in this discussion of batch automation economics, the total cost of processing is often missed, and image size reduction before expensive steps such as upscaling or scene generation can change the unit economics of the whole pipeline.
A practical order for most catalogue work looks like this:
- Ingest and classify the source image.
- Remove obvious junk first, such as unusable backgrounds or empty margins.
- Crop and reframe to the intended composition.
- Run enhancement or upscale only if needed.
- Generate alternate scenes or channel variants last.
That order keeps heavy operations focused on a cleaner, smaller, more controlled file.
Good quality control starts before generation
Generative steps are where teams often lose product fidelity. Logos soften. Labels become unreliable. Reflective surfaces pick up strange geometry. Transparent packaging gets messy.
That's why I treat generation as a late-stage option, not the foundation of the workflow. The base image needs to be correct first.
A few rules consistently work better than feature-hunting:
- Protect readable details. If packaging text matters, don't let a creative background step rewrite the important area.
- Use one prompt family per collection. Mixed prompt styles create a catalogue that feels assembled from different brands.
- Reserve upscaling for images that require it. Don't pay for enlargement on files already suitable for listing use.
For apparel or try-on style content, the same principle applies. A pipeline should standardise the base product image before any virtual product try-on workflow enters the process. Otherwise the system is amplifying inconsistency, not solving it.
Clean inputs save money twice. They lower processing cost and reduce review time.
Managing Quality Assurance and Team Review
Bulk editing only works if the review process scales too. If your team automates processing but still checks every file manually, you've moved the bottleneck, not removed it.
Use review by exception
The most practical QA model is review by exception. Instead of opening every image at full size, define failure conditions and look for those.
Common exception categories include:
Doing this for a whole catalog?
MerchLoom runs background removal, upscaling and AI editing across every product photo you have — one prompt, whole batch. Try 2 batches free, no signup.
Try it free- Edge failures. Hairline cut-out problems, missing product corners, clipped straps, or shadow artefacts.
- Detail failures. Distorted logos, blurred labels, warped patterns, or texture loss.
- Composition failures. Product too small in frame, off-centre placement, or inconsistent vertical alignment.
- Export failures. Wrong background, wrong format, duplicate variants, or misplaced destination folder.
That gives the team a triage system. Clean batches move through quickly. The questionable files get human attention.
Build a mid-batch feedback loop
One of the most useful habits in high-volume workflows is not waiting for the whole run to finish before checking results.
Run a subset, inspect the first outputs, tighten the crop rule or prompt if needed, then continue. This matters most on difficult categories such as reflective packaging, soft goods with texture, or products with lots of printed detail.
A workable team review model usually looks like this:
| Stage | What to review | Who should review |
|---|---|---|
| Early sample | Cropping, colour, edge quality | Operator or catalogue manager |
| Mid-batch check | Consistency across SKUs and variants | Team lead or merchandiser |
| Pre-publish sweep | Channel compliance and naming | Marketplace or content owner |
Treat privacy as part of image operations
For California sellers especially, this isn't just a creative workflow. It's also a compliance workflow. According to Smart Photo Editors on AI-driven editing and ecommerce operations, the CPRA can apply to product images containing identifiable people or data, and a reliable pipeline should ingest, auto-detect and redact personal data before edits are run.
That matters more than many catalogue teams realise. Returns photography, user-submitted images, shipping labels, order slips, and background faces can all enter the system if intake is loose.
Separate privacy-risk images from clean packshots before any enhancement or generation step. Fixing that problem later is slower and riskier.
If your team still receives mixed image sets from multiple sources, tighten the intake checklist before worrying about advanced edits. For broader presentation consistency after QA, a practical reference point is this guide on how to make product photos look professional.
Generating Outputs for Every Marketplace Channel
The same product image almost never works everywhere without modification. A main marketplace image, a Shopify collection tile, an Etsy listing image, and an Instagram creative each ask for different framing logic, file dimensions, and visual intent.
That doesn't mean you should edit four times. It means you should maintain one mastered source and export variants automatically.
Work from a single mastered image
The best workflow creates one approved base image per shot, then generates channel-specific outputs from that file.
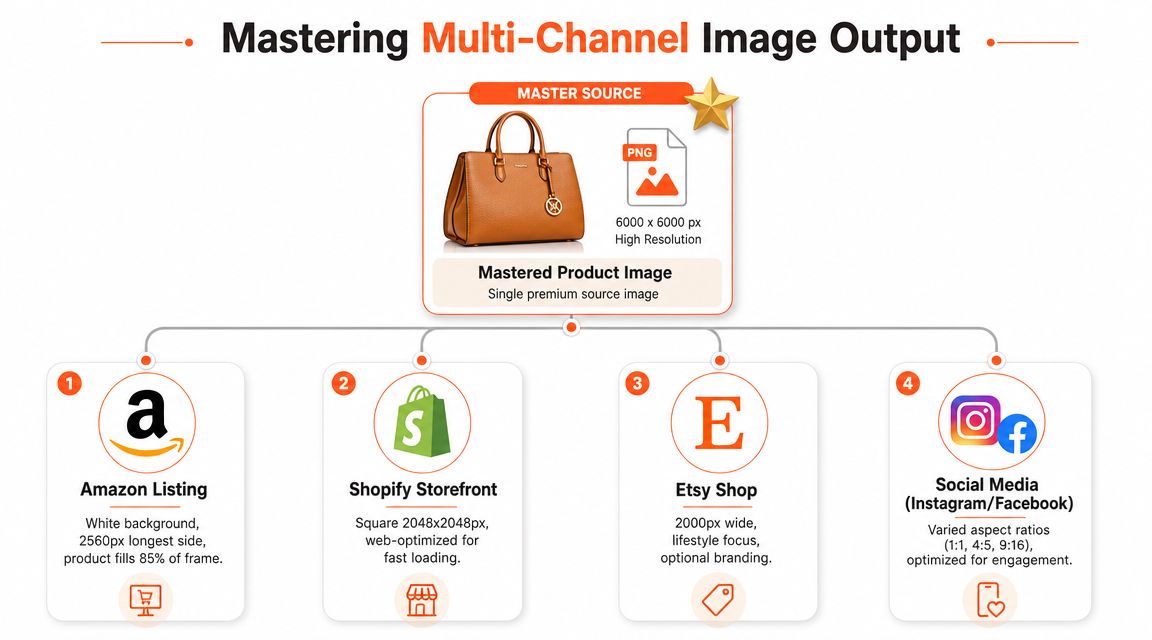
That avoids a common mistake. Teams often open the Amazon image to make the Instagram version, then open the Instagram version later to make the Etsy one. After a few rounds, the image has been re-cropped, re-exported, and softened multiple times.
A healthier process is:
- Approve the master. This is your clean, high-quality, brand-aligned source.
- Apply channel presets. Each destination gets its own crop, ratio, background rule, and compression setting.
- Export to named folders or destinations. That keeps publishing clean and avoids version confusion.
Keep channel rules explicit
Readers handling Amazon should be especially careful because the main image has stricter expectations than most storefront channels. For a useful operational overview beyond just image prep, this guide for optimizing Amazon listings is worth reviewing alongside your media workflow.
A practical checklist for common channels looks like this:
| Channel | What usually matters most | Operational note |
|---|---|---|
| Amazon | White background, clean framing, compliant main image | Keep non-product elements out of the primary image |
| Shopify | Square consistency across collections | Optimise for grid uniformity and fast loading |
| Etsy | Larger, attractive listing visuals with more flexibility | Lifestyle variants can support click-through |
| Instagram and Facebook | Ratio-specific creative outputs | Build portrait and square variants from the same master |
For marketplace-specific prep, this guide to Amazon product image size requirements is useful when setting export presets inside a bulk workflow.
Don't rebuild the same image for ads and social
Catalogue images and ad creatives shouldn't be treated as separate universes. They should share the same visual base, then diverge only where the channel requires it.
That usually means the product cut-out, colour treatment, and centring logic stay consistent, while the surrounding canvas changes. Once that rule is in place, launching campaign variations gets much easier because the team isn't hunting for whichever version was last edited by hand.
Measuring ROI and Justifying the Switch
The business case for a bulk product photo editor is usually clearer than teams expect. You don't need a complicated model. You need a disciplined way to compare manual effort against a repeatable pipeline.
Measure three things first
Start with these inputs:
- Images processed per month
- Average handling time per image in your current workflow
- Current cost per usable image, whether that cost comes from internal labour, agency work, photographer retouching, or tool sprawl
Canadian ecommerce reached about CA$3.7 billion in December 2024, with online sales representing 6.6% of total retail trade, according to DesignKit's discussion of multi-angle product photo production. In that environment, catalogue consistency is an operational issue. Sellers aren't managing one-off images. They're maintaining assortments across multiple channels.
Use simple ROI formulas
A straightforward internal model works well:
- Time saved = current total handling time minus automated workflow handling time
- Labour value saved = time saved multiplied by your internal hourly cost
- Production savings = old image production cost minus new image production cost
- Operational gain = fewer delays, fewer re-exports, faster launches, cleaner multi-channel consistency
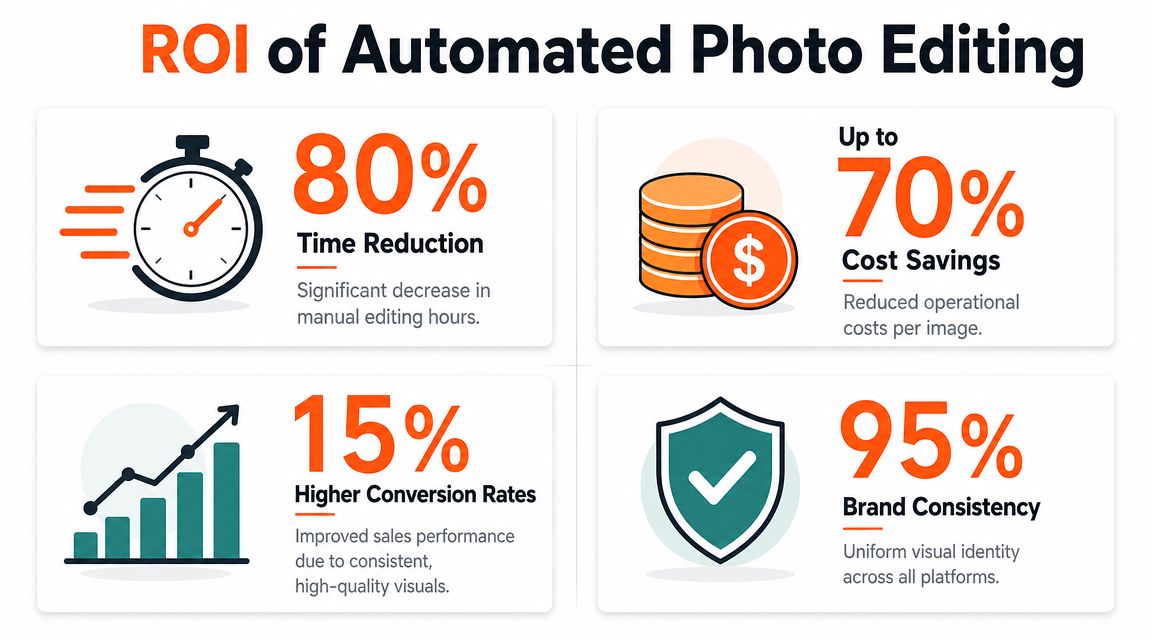
You don't need to invent a conversion uplift to justify the switch. Typically, the savings show up first in labour hours, reduced rework, and faster catalogue publication.
The strongest ROI case isn't "AI is cheaper." It's "the team can ship more catalogue work with fewer manual touches."
Look beyond direct editing costs
The switch often pays off because it removes friction between teams. Merchandising gets images sooner. Marketplace managers stop chasing missing sizes. Paid social can pull approved product assets without asking design to rebuild crops.
If you're also improving Amazon-specific assets, this roundup of expert Amazon image strategies from Headline Marketing is a useful companion to the operational side of the workflow.
A good ROI review after implementation should ask four questions:
- Did publishing speed improve?
- Did rework drop?
- Are outputs more consistent across channels?
- Can the team handle catalogue growth without adding the same amount of editing labour?
If the answer is yes to even two of those, the switch is already doing real work.
Frequently Asked Questions
Can a bulk product photo editor handle difficult products like glass, jewellery, or reflective packaging
Yes, but those categories need stricter QA. Reflective surfaces, transparent materials, and tiny printed details tend to expose weak masking and over-aggressive enhancement. For those products, keep the base workflow conservative, review a sample early, and avoid sending them straight into heavy scene generation without checking edge quality first.
What's the difference between a bulk product photo editor and a general design tool
A general design tool helps you edit images. A bulk product photo editor helps you run repeatable catalogue operations. That includes intake from existing sources, batch rules, routing by image type, export presets, and review logic. If your problem is "I need one nice image", a design tool is enough. If your problem is "I need consistent assets for hundreds of listings", workflow matters more than canvas features.
Should small sellers care about bulk workflows if they only edit a few photos at a time
Yes, because the habit matters before the volume does. Even a small seller usually needs multiple versions of the same image for marketplaces, storefronts, and social. If you set up a clean process early, you won't have to rebuild your catalogue operation later. The same logic that helps a large retailer also helps a smaller shop stay organised, especially when older listings need refreshes.
Is bulk editing only useful for white-background catalogue photos
No. White-background main images are just one use case. A proper workflow can also create collection images, lifestyle variations, social crops, seasonal updates, and ad-ready assets from the same approved source set. The key is separating the master image from the output variants so you aren't re-editing from scratch every time.
How often should the team review and update the workflow
Review the workflow any time one of these changes: marketplace requirements, category mix, source quality, or brand style rules. Outside of that, a simple recurring audit is enough. The goal isn't to constantly tweak the pipeline. It's to keep the rules stable and only adjust when a repeated failure shows up.
If you're trying to stop the one-by-one editing grind, MerchLoom is built for that operational use case. It connects to existing image sources, routes product, model, scene, and reference files into the right workflow, then runs chained AI processing across full collections instead of isolated uploads. For sellers managing catalogue-scale image production, that's the difference between using AI as a novelty and using it as part of the actual business process.
Stop editing product photos one at a time
Upload your catalog or connect your store. Describe the result once. MerchLoom does the rest.
Try it free — no signup