
Instagram Product Photos That Convert at Catalog Scale
Plan, shoot, edit, and batch-process Instagram product photos that convert. Exact sizes, lighting, and AI workflows for sellers managing hundreds of SKUs.
Your problem is probably not the photos. It's the pile. You've got raw product shots sitting in Drive, Dropbox, Shopify, or a camera roll, and every time you touch them one by one, the week disappears. That's the instagram product photos job at catalog scale, turning a mess of files into publishable assets without re-editing the same SKU 200 times.
Start with one decision. Build the workflow for the whole catalog first, then shoot and edit to that standard every time. If your source files can't survive batch processing, Instagram won't save them for you. A clean library structure matters here, and this guide on product image library management is a good reference point for keeping the catalog from turning into chaos.
The Catalog Problem You Are Actually Solving
The mistake is thinking each product photo is a tiny creative job. It isn't. It's a production line problem, and the line breaks when every shirt, mug, candle, or bag gets a different crop, a different white balance, and a different file name.
You need one repeatable standard for the whole store. That means one way to shoot, one way to export, one way to tag, and one way to approve. If you don't impose that discipline early, you'll keep fixing the same issues later, only at triple the cost.
Practical rule: if a decision has to be made more than once, it belongs in a preset, a template, or a batch step.
That's why this isn't a single-image tutorial. It's a catalog workflow. Every step below should answer one question, can I repeat this across the full assortment without making a new judgment call each time?
Instagram Product Photo Sizes and Specs
Before you shoot anything else, lock the output sizes. Instagram feed posts are commonly published as 1080 × 1080 px for square, 1080 × 1350 px for portrait 4:5, and 1080 × 566 px for 1.91:1 horizontal, with 4:5 being the best feed crop for vertical space. Stories and Reels use 9:16, typically 1080 × 1920 px, so if you want one source file that can feed multiple placements, master it in portrait or square first. A quick reference for image dimensions for social platforms helps when you're laying out exports for more than one channel.
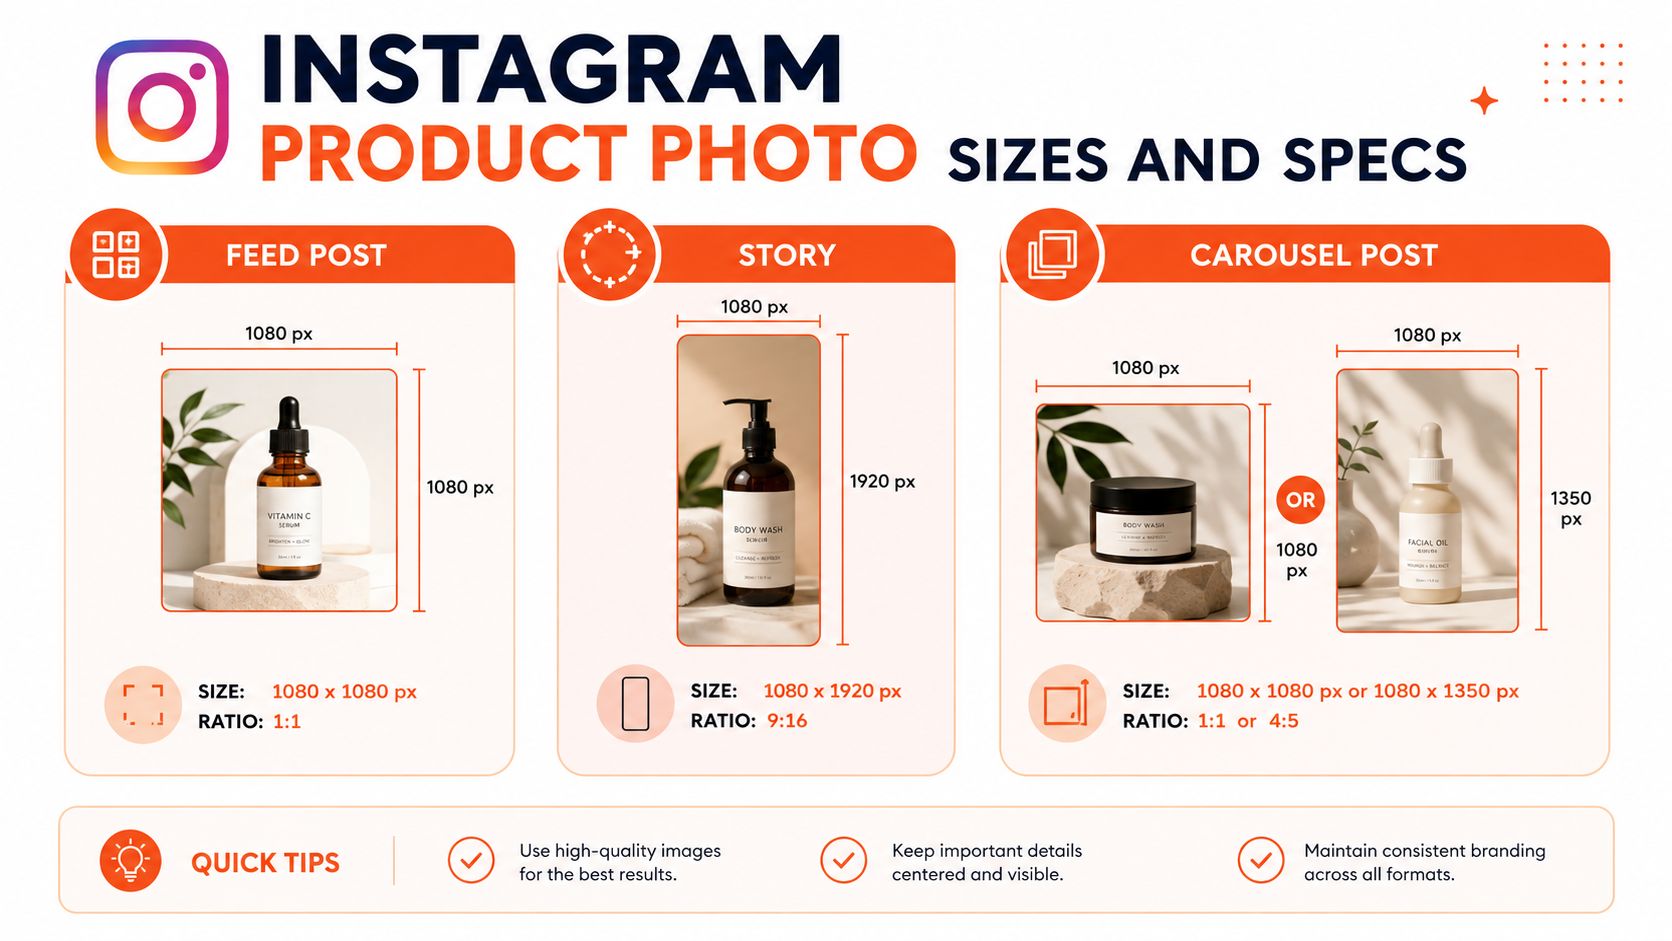
For shopping, Meta's catalog specs require JPEG or PNG, up to 8 MB, with images at least 500 × 500 px and a recommended 1024 × 1024 px or larger. Shops on Facebook and Instagram display product images as square 1:1 crops, so your master needs to be square-safe even if the original shoot isn't. The simplest way to avoid edge losses is to build every SKU from a square or portrait master, then derive the feed, shop, and carousel versions from that one file.
Don't upload oversized files and hope Instagram will fix them. One 2026 guide warns against images wider than 1440 px because Instagram downscales them and the compression can look worse, especially on detailed product textures. Keep your exports at or just above the platform's native feed dimensions, not far above them. That's the cleaner path for sharp edges, labels, and packaging text, and it saves you from having to rework the same asset for every placement.
For multi-channel sellers, the source file should also be flexible enough to serve Amazon, Etsy, and Shopify. Amazon main images need pure white RGB 255,255,255 with the longest side 1600 px or more, Etsy wants 2000 px on the shortest side, and Shopify supports square files up to 4472 × 4472. Pick one master standard per store, not per image, and build everything from there.
Planning the Shoot for Consistency Across the Catalog
Shoot for repeatability, not drama. A diffuse window with a sheer curtain handles most product lines, and if your daylight shifts too much, a softbox kit in the $60 to 150 range gives you a steady baseline. Keep the product roughly 2 to 3 feet from the window, lock the camera distance, and stop changing the setup for each SKU. If you want a tighter setup guide, this product studio lighting guide covers the practical choices that keep a batch shoot under control.
The hidden cost is inconsistency. One shirt looks warm, another looks cool. One candle shadow falls left, another falls right. Spread that across a catalog, and batch editing turns into cleanup instead of production.
Lock the variables before you shoot
Use one white balance preset. Use one sharpening preset. Use one prop style, or none at all. If you like a brand palette, keep at least 60% to 70% of posts aligned with it, because that is how you keep the feed from looking assembled one item at a time.
A simple setup beats cleverness here.
- Fixed distance: keep the lens and product at the same spacing across the set.
- Stable light: window light softened by sheer fabric, or the same softbox arrangement every time.
- Single palette: one background family, one prop language, one surface treatment.
- Consistent exposure: do not chase each SKU with different brightness fixes.
The angle should come from the product's selling point, not habit. Top detail means overhead. Side detail means eye level or 45-degree. Shape-driven items often need three-quarter or low-angle views to show volume. That rule gives you a decision tree, which matters when you are photographing dozens of items in one sitting.
If you are also shooting assets for other workstreams, keep the framing flexible. For a portrait-oriented crop standard that works well with Instagram placements, this portrait size reference is useful as a planning anchor. If you need to batch the output into grid-ready sets, use automate Instagram grid posting as the post-shoot delivery step.
Editing Passes That Survive a Batch Run
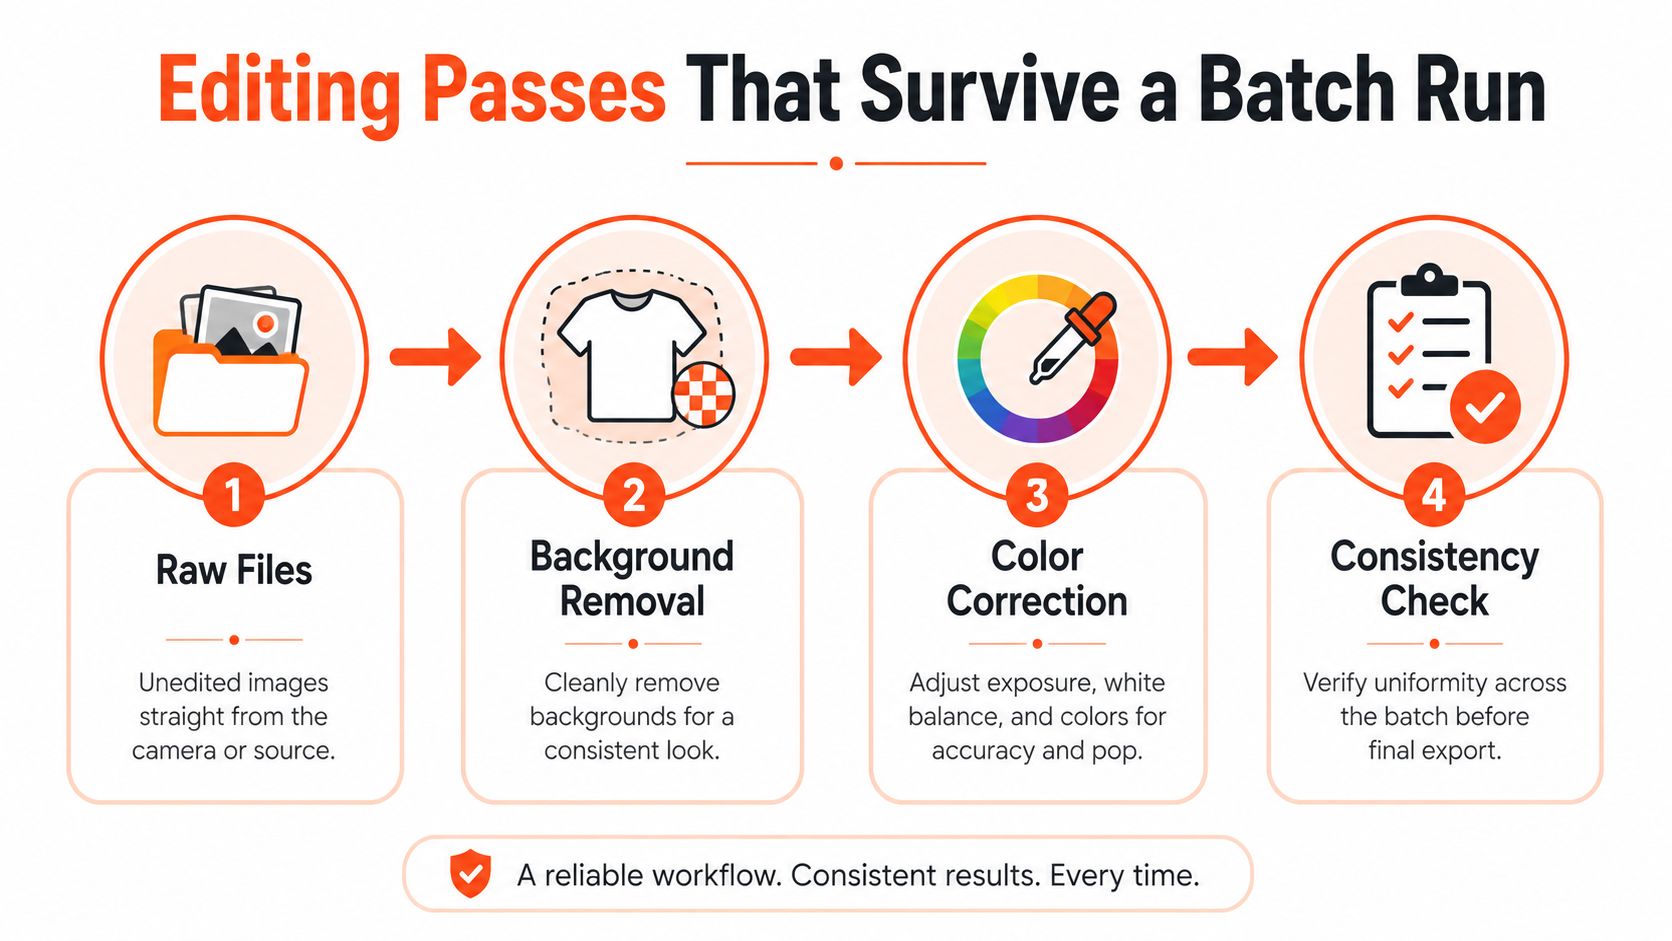
Start with the edits that can carry through the whole catalog without breaking consistency. Background cleanup comes first, then color correction, then sharpening, then export. That order keeps later steps from fighting with bad source files.
What should be preset and what should stay manual
Background removal belongs in the batch. So does color correction when you are using one white balance and one preset across the catalog. Sharpening should be standardized too. If every SKU gets a different edge treatment, the feed starts to look patched together fast.
Manual work still has a place, but only where the product needs it. A zipper, logo, handle, label, or texture edge may need a closer check. Everything else should run through repeatable settings, not one-off fixes.
Clean masters beat oversized masters. If you upload huge files and let the platform compress them later, you give away control over the final look. For a practical batch workflow, use batch product photo editing as the model and keep the source files tidy before export.
Doing this for a whole catalog?
MerchLoom runs background removal, upscaling and AI editing across every product photo you have — one prompt, whole batch. Try 2 batches free, no signup.
Try it freeKeeping files at 1080-class resolution is the smart move. Export near native feed dimensions, then use the same crop-safe square or portrait frame across the catalog. If you are preparing grid layouts or split-posts for Instagram, this guide on how to automate Instagram grid posting helps you shape the final output without redoing the entire set.
Do not waste time on oversized masters just because they look safer. Large files create heavier cleanup, slower exports, and more room for tiny inconsistencies that show up once the catalog goes live. Clean once, batch once, publish once.
From One Image at a Time to a Repeatable Pipeline
A real pipeline has inputs, operations, and outputs. The inputs are your raw files from a consistent shoot. The operations are the steps you apply in the same order every time. The outputs are the files you publish, named for feed, shop, carousel, and Stories.
That sounds obvious until you are staring at hundreds of SKUs. Then every per-image choice becomes a delay, and every delay gets multiplied by the size of the catalog.
Build the sequence once, then reuse it
Import from wherever your images already live, Google Drive, Dropbox, Shopify, Amazon S3, Cloudinary, or the rest. Define the workflow in plain English, then let the system run across the batch. The point is not to babysit every file. The point is to keep the same logic moving through the full collection.
A practical order looks like this:
- Clean the source: remove backgrounds or isolate the product first.
- Correct the image: apply the same color and exposure treatment.
- Reframe for placement: square, portrait, story, or carousel crop.
- Export the variants: name them clearly so you know which is which.
Do the cheap steps before the expensive ones. Background cleanup should happen before upscaling, because there is no reason to spend processing on a file that still needs isolation. That is the kind of order you want in a batch system, and it is the reason a workflow guide like AI image workflow automation matters before you touch a large catalog. MerchLoom fits that setup because it runs chained AI workflows across a full collection instead of forcing you to treat each file as a separate job. The first images can be tried without an account, and it is pay-per-image with credits that never expire.
Use mid-batch review, not end-of-day surprise. Check the first outputs for drift, then tighten the process and keep it moving. Reuse processed images as inputs when needed so you are not uploading the same files twice. That is how you stop re-editing the same product photo 200 times and start producing a catalog that stays consistent from the first SKU to the last.
Running the Pipeline Across a Full Catalog
Processing day should feel like production, not craft. Bring in the batch, launch the workflow, and watch the output stream in real time. The hard rule is simple, you review enough to catch drift, not so much that you turn automation back into manual editing.
The catalog use cases are varied, but the logic stays the same. Clean white-background listings need exact product visibility. Lifestyle scenes need enough realism to hold attention. Virtual try-on previews, ad creatives, and branded catalog visuals all need the same underlying consistency, even if the background changes.
What to check while the batch runs
- Product integrity: the item still looks like the item you're selling.
- Crop safety: labels, handles, straps, and edges aren't getting cut off.
- Color consistency: the same SKU family doesn't drift across variants.
- Surface fit: the object belongs in the scene, not pasted into it.
Don't re-upload processed files just to make one change. If the batch workflow is set up properly, you can reuse outputs as inputs and keep moving. That's how you handle hundreds of SKUs without turning every update into a fresh editing session.
The point of tools in this category is not to replace review. It's to move the repetitive work out of your hands so you can check the parts that matter. For a seller with a large assortment, that's the difference between finishing a launch and stalling in file prep.
Captions, Hashtags, and Product Tagging
The image is only half the sale. Once the photo is ready, the caption, tags, and product links do the commercial work. Skip them, and you have a polished asset that does nothing for the listing.
Write captions that say what the product is, what it solves, and who it is for. Use a small template for each category, not a fresh sentence every time. A skincare product, a tote bag, and a desk lamp do not need the same voice, but they do need the same structure.
Keep the posting system simple
Use a reusable checklist before publishing:
- Name the product clearly: do not hide the item behind a vague brand line.
- Mention the use case: show why someone would want it.
- Tag the product: if it is shoppable, make sure the tag is attached to the right SKU.
- Write alt text: describe the item plainly for accessibility and search.
- Verify the carousel order: hero first, lifestyle second, details third and fourth, then a final slide for CTA or pricing.
Instagram carousels can hold up to 10 images/videos, so do not waste that space. A clean sequence works better than random variety. The pattern that holds up across catalogs is simple, hero shot first, lifestyle context second, detail close-ups third and fourth, then a closing slide if you need a CTA or price callout.
If you use an integration layer to keep publishing and catalog data in sync, the workflow gets cleaner fast. If you want to connect Instagram to Exerta, this Instagram integration guide from Exerta shows the setup path for linking product assets to posting tools and cutting down handoffs between your catalog and your feed.
Your caption does not need to be clever. It needs to be accurate, specific, and attached to the right product.
That same discipline should carry into your weekly workflow. MerchLoom fits there as a batch image pipeline for the full collection, so you can publish with captions, tags, and alt text already aligned to the SKU. The first images can be tried without an account, and it is pay-per-image with credits that never expire. MerchLoom
If you want instagram product photos that hold up at catalog scale, stop editing one file at a time. Build the shoot once, lock the specs, batch the edits, and run the same pipeline across every SKU you own. Start with MerchLoom and test the first few images without an account, then use the same workflow to keep the whole catalog consistent from feed to shop.
Stop editing product photos one at a time
Upload your catalog or connect your store. Describe the result once. MerchLoom does the rest.
Try it free — no signup