
Image Editing for Ecommerce at Catalogue Scale
Master image editing for ecommerce at scale. Learn batch workflows, exact marketplace dimensions, and cost-saving automation for large product catalogs.
You have a folder full of product photos, and the problem isn't editing one of them. It's getting two hundred or two thousand images to use the same background, crop, color, shadow, file structure, and marketplace dimensions without checking every file by hand.
Start by separating your catalogue into repeatable groups. Keep apparel, beauty, electronics, furniture, reflective products, and transparent products in different batches. Each group needs its own crop rules and quality checks. A single workflow that works for a white ceramic mug can damage a clear bottle or erase the edge of a black jacket.
What Catalogue Scale Editing Demands
Editing one product photo is a design task. Editing hundreds or thousands is an operations problem. The workflow becomes manageable when the team defines the output once, applies it consistently, and reserves human review for decisions automation cannot make reliably.
The cost of inconsistency appears long after the retouching step. A product can look fine in isolation yet fail beside the rest of the catalogue because its scale, color, shadow, or file mapping differs. Product imagery also shapes whether a listing feels trustworthy at the first point of shopper evaluation. Industry analysis has reported that high-resolution product photos convert about 94% better than low-resolution images, while professional product photography has been reported to lift conversion by roughly 33% compared with low-quality imagery. These historical industry figures are not guarantees for every shop, but they show why image editing for ecommerce belongs in merchandising operations. (Ecommerce product photography statistics)
The same reporting links broader visual coverage with purchase completion. Listings with 7 or more images have been reported to convert at 2.4 times the rate of single-image listings. A richer gallery gives shoppers more ways to inspect shape, texture, scale, and construction when they cannot handle the product physically.
Where Catalogue Work Slows Down
Background removal is rarely the only bottleneck. Review, correction, and file handling consume the time that scaling teams underestimate.
- Inconsistent framing: Products sit at different heights or occupy different proportions of the canvas.
- Color drift: One batch makes neutral products warmer, while another leaves them cool or gray.
- Edge failures: Hair, transparent packaging, reflective metal, and curved surfaces create halos or clipped details.
- Naming errors: Finished files fail to map cleanly to SKUs, variants, or marketplace listings.
- Rework: A late crop or export requirement can send an entire batch through processing again.
The asset process also needs ownership, folder structure, version control, and reuse rules. The ECORN digital asset playbook provides a useful reference for organizing those responsibilities across a growing collection.
A repeatable pipeline separates standard operations from exceptions. Batch processing for ecommerce images can apply defined edits across a collection, while human review handles transparent edges, reflective surfaces, unusual proportions, and failed background cuts. The practical goal is to remove repetitive decisions from the queue, not to remove people from quality control.
Operational rule: Optimize for the quality of the whole catalogue, not the perfection of one hero image.
Exact Marketplace Dimensions and Source Prep
Your source images should be larger and safer than the final marketplace crop. Leave enough space around the product for square reframing, mobile display, and alternate channel exports. If the original frame cuts off a handle, sole, label, or garment edge, no batch workflow can recover the missing information accurately.
Amazon's main image has strict presentation requirements. The background must be pure white, RGB 255,255,255, and the image must show the actual product without logos, watermarks, props, or confusing accessories. Amazon states that images should be at least 500 pixels on the longest side, with 1,000 pixels or larger enabling zoom, and lists 10,000 pixels as the maximum on the longest side. For a practical catalogue workflow, export the main image with the longest side at 1,600 pixels or more when you need a consistent zoom-ready standard across your own process. Check the current Amazon product image requirements before publishing because marketplace rules can change.
Etsy uses a different baseline. Listing photos should be at least 2,000 pixels on the shortest side so shoppers can inspect sharp images and use zoom across marketplace surfaces. Shopify commonly recommends square product images at 2,048 × 2,048 pixels for optimal zoom. Shopify community guidance states that themes can accept images up to 4,472 × 4,472 pixels and up to 20 MB, although your theme, page speed goals, and storage setup should determine the export you use. (Etsy image size guidance, Shopify product image guidance)
| Platform | Minimum Dimension | Max Dimension | Background Rule |
|---|---|---|---|
| Amazon | 500px longest side, use 1,600px+ for a practical zoom-ready catalogue standard | 10,000px longest side | Main image pure white RGB 255,255,255 |
| Etsy | 2,000px shortest side | Not specified in the provided guidance | Follow listing and category requirements |
| Shopify | 2,048 × 2,048px commonly recommended | Up to 4,472 × 4,472px and 20 MB in Shopify community guidance | Theme and merchandising choice |
Prepare the source before editing
Use a consistent naming pattern before the first automated operation. A structure such as SKU_variant_angle_original is easier to audit than names like IMG_4837_final2. Preserve the original file separately, and write finished assets to a new output folder.
Keep the product inside a safe zone. The product should be fully visible with enough margin for a square crop, but it shouldn't become a tiny object surrounded by empty space. For a catalogue, consistency matters more than making every item fill the frame identically. A small product and a large product may need category-specific framing rules.
Finally, decide whether your master file will be PNG or JPEG. Transparent cutouts and images with sharp graphic edges often need PNG during processing. Marketplace-ready product photos commonly use JPEG when file size and broad compatibility matter. Don't compress the only master. Export a web version from a preserved high-quality source.
Sequencing Batch Operations for Cost Efficiency
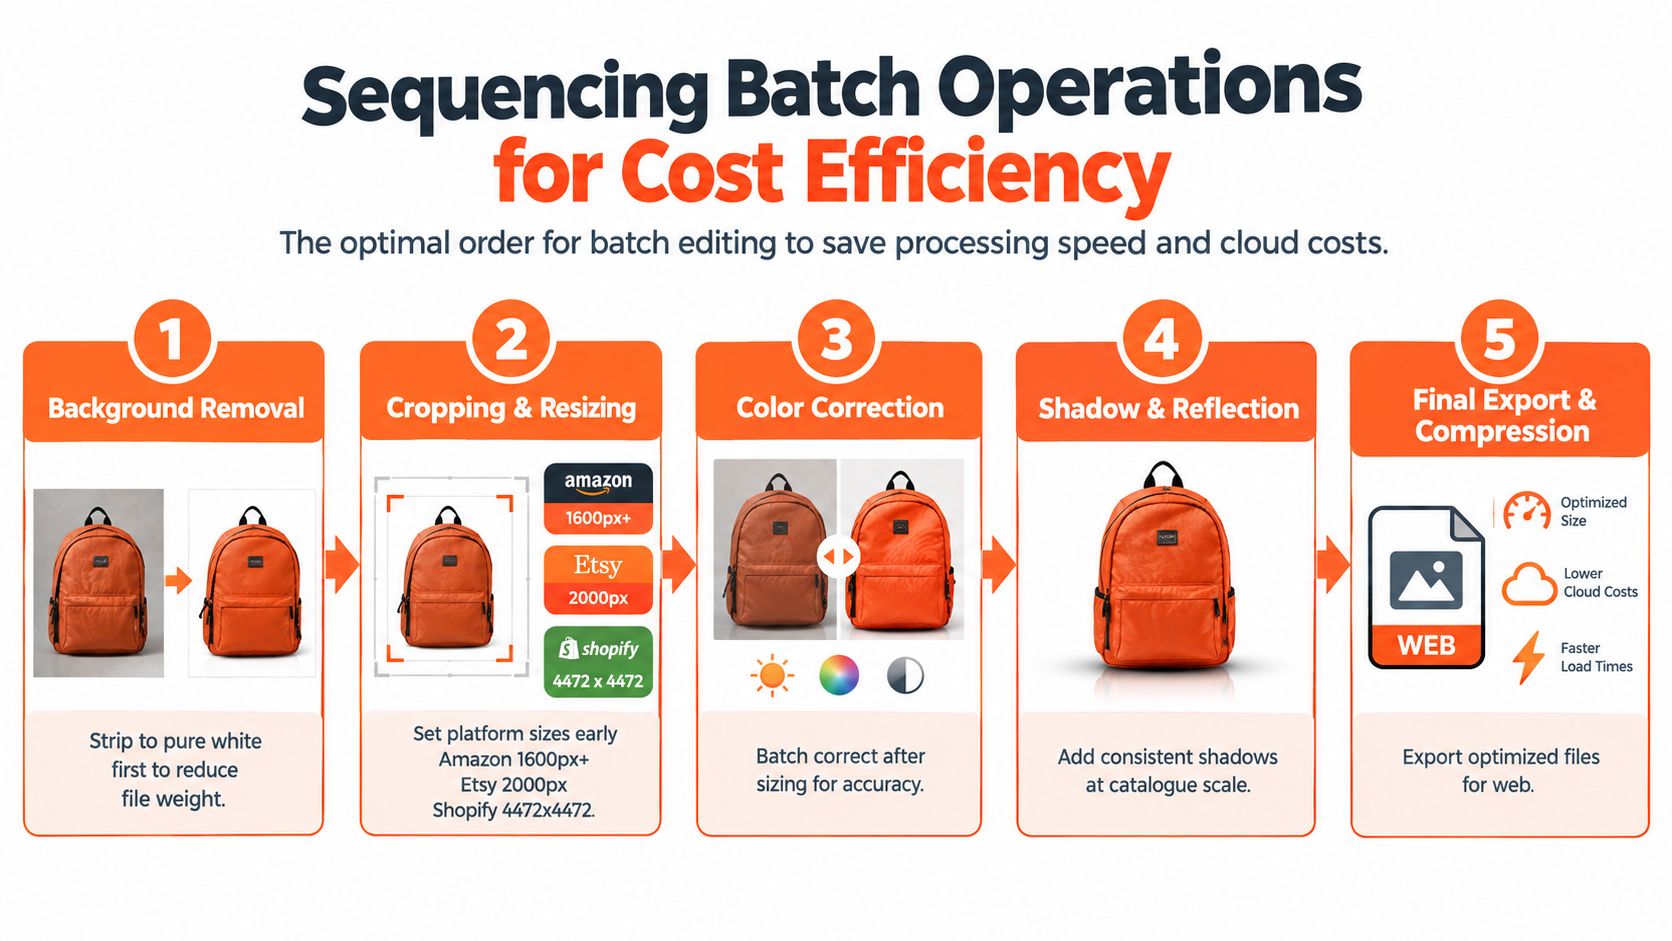
The order of operations controls both processing time and rework. A practical sequence is:
- Remove the background.
- Crop and resize for the target platform.
- Correct color and exposure.
- Add shadows or reflections.
- Export and compress.
Background removal comes first because it removes pixels you don't need to carry into later operations. Upscaling a cluttered original means paying to enlarge the background, floor, props, and irrelevant edges before deleting them. Upscaling the cleaned product instead concentrates the expensive operation on the pixels that remain in the final asset.
Build the workflow around dependencies
Cropping and resizing should happen before final color correction because pixel dimensions affect how edges, fine texture, and small labels render. If you correct a huge source and then resize aggressively, the final result may look different from the version you approved.
Color correction follows sizing for the same reason. Review the product at the output dimensions buyers will see. Check white balance, black levels, label readability, and whether the product's real color still matches the listing description.
Shadows are a separate catalogue decision. A soft grounding shadow can stop a cutout from appearing to float, but generated shadows vary when each image receives a different treatment. Use a fixed direction, opacity range, and softness rule for each product category. Reflective products need extra caution because an invented highlight can change how the surface appears.
Cost-saving rule: Never enlarge pixels that your workflow will delete later.
Use conditional branches for difficult products
A batch shouldn't mean identical treatment for every SKU. Set a standard path for ordinary opaque products, then route exceptions to review:
- Transparent items: Check glass edges, liquid levels, and internal visibility.
- Reflective items: Check highlights and reflections for shapes that weren't in the original product.
- Textured products: Inspect fabric, grain, stitching, and embossed details at close range.
- Curved products: Check that the silhouette hasn't been flattened or pulled outward.
The batch product photo editing workflow should record which branch each file used. That record makes failures traceable. If every transparent bottle fails after one particular background instruction, you can change that branch without rerunning unrelated products.
Finish by exporting platform-specific files from the approved master. Don't resize repeatedly from a compressed marketplace export. Keep the clean approved version as the source for Amazon, Etsy, Shopify, eBay, WooCommerce, Poshmark, and Depop variations.
Automating Pipelines with Cloud Integrations
Doing this for a whole catalog?
MerchLoom runs background removal, upscaling and AI editing across every product photo you have — one prompt, whole batch. Try 2 batches free, no signup.
Try it freeLocal folders become a bottleneck when you're moving files between storage, editing software, exports, and listing tools. A scalable workflow starts where the originals already live, whether that's Google Drive, Dropbox, Amazon S3, Shopify, WooCommerce, a CDN, or another object-storage service.
The useful pattern is simple: select a source collection, define the operations in order, send the outputs to a destination, and review results while the batch runs. You shouldn't have to download hundreds of files, edit them, rename them, and upload them again just to make a background white.

Connect storage to a repeatable process
Start with a small collection from one category. Import the originals, describe the desired result in plain English, and specify the rules. For example: remove the existing background, preserve the product's color and label, center the item, create a white-background marketplace version, and export a second square version for Shopify.
MerchLoom is designed to run chained AI pipelines across a whole collection instead of editing one image at a time. It can process imported product photos, apply background removal, reframe outputs, correct colors, upscale images, and create lifestyle variations. The first images can be tried with no account. Its model is pay-per-image, using credits that never expire, so you can process according to catalogue demand rather than committing to a recurring editing plan.
That model still requires review. A connected pipeline saves transfer and setup time, but it doesn't know whether a particular handbag's leather texture looks authentic or whether a tiny electronics label changed. Keep a human approval stage between processing and publication.
The AI image processing workflow for Amazon S3 is especially relevant when your source files already sit in object storage. The same principle applies to a Shopify or WooCommerce catalogue. Use the existing source of truth, then write approved outputs to a clearly separated destination.
A related visual workflow can help when you're testing how products appear in staged scenes. The LunaBloom app can be considered alongside other image-generation approaches, but the same rules apply: start from an accurate product image and reject outputs that alter the item.
Here's where the pipeline earns its keep. You can inspect early outputs, adjust the instruction, and reuse the approved result as an input for a later operation rather than rebuilding the entire process from scratch.
Don't automate the wrong handoff
A pipeline can make a bad process faster. Before connecting every folder, define:
- Input rules: Which file types, naming patterns, and product categories are accepted?
- Output rules: Which dimensions, formats, and background colors apply to each channel?
- Review rules: Which defects stop publication?
- Routing rules: Which products need manual retouching or a different workflow?
- Storage rules: Where do originals, working files, approved outputs, and rejected files live?
The operational gain comes from eliminating repeated handling, not from pretending every SKU is identical. A small, well-defined pilot reveals where the workflow needs branches before you process the full collection.
Quality Assurance and Consistency Checks
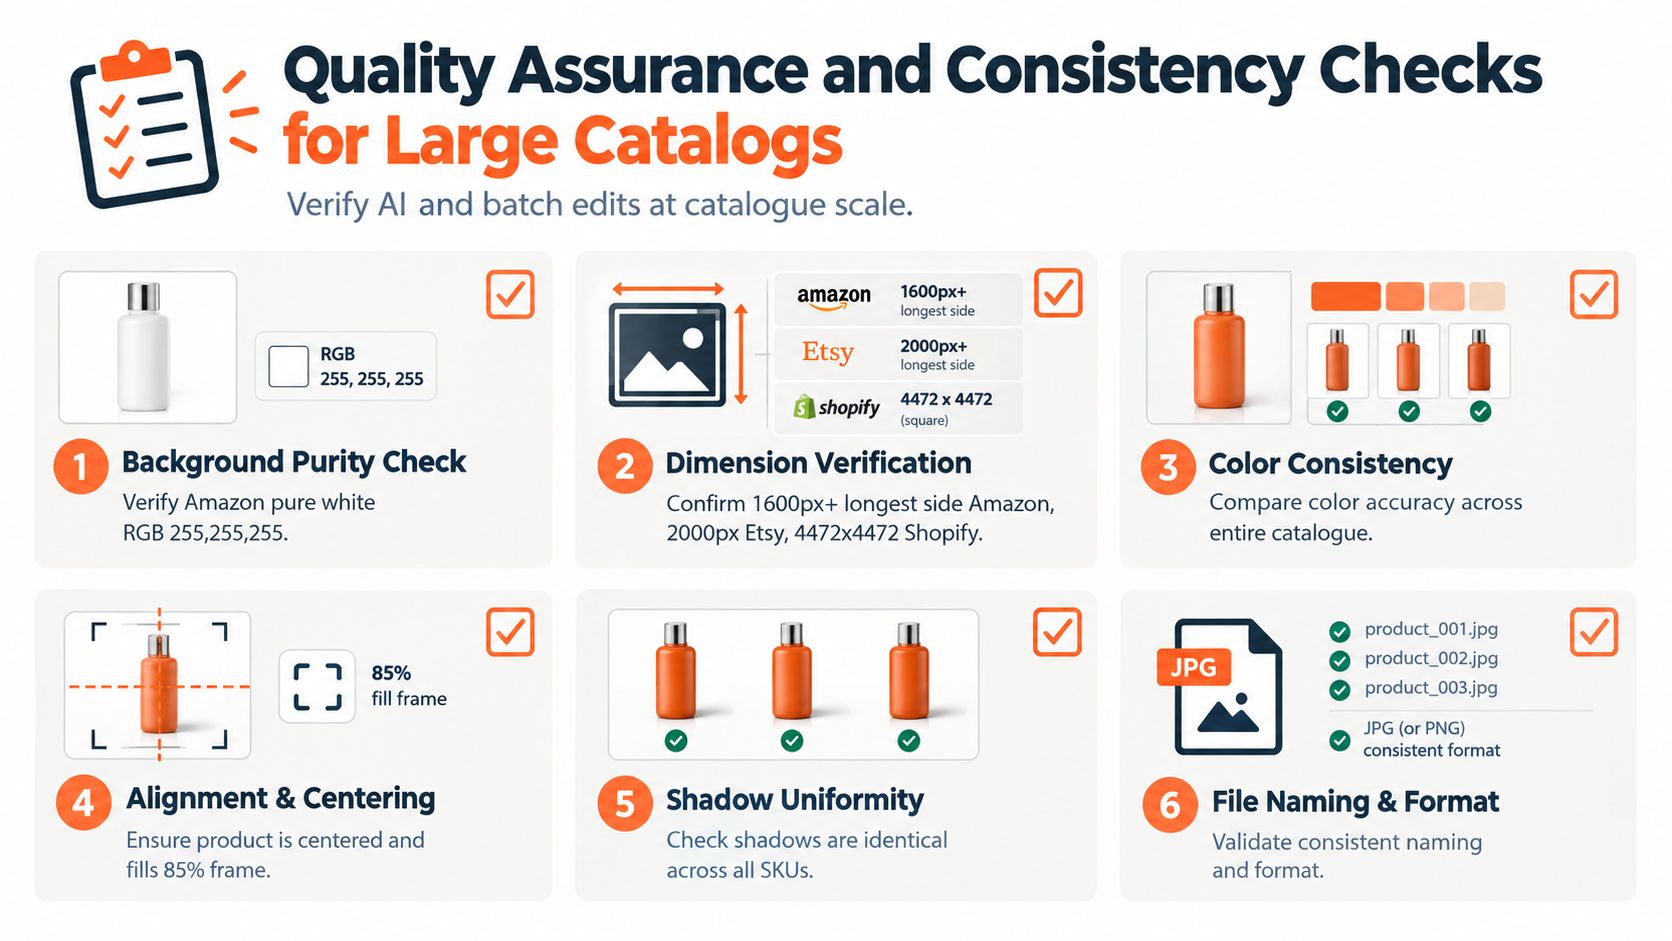
Fast output isn't the same as publishable output. AI and batch scripts can remove a logo, soften a texture, shift a color, or create a shadow that makes the product look physically different. Those failures are expensive because they can lead to customer confusion, returns, listing corrections, and another full export cycle.
Use a zero-tolerance rule for critical SKU changes. Wrong color, altered logo, changed label, incorrect geometry, and invented material details are rejection reasons, not minor imperfections.
Test the workflow before releasing the catalogue
Build a benchmark set of 20 to 50 real product photos. Include reflective, transparent, textured, and curved items rather than selecting only easy packshots. Run each candidate workflow five times on the same source image and settings, then score approved outputs instead of counting every generation. (Ecommerce image-editing benchmark methodology)
Score the things that affect publication:
- Identity preservation: Is it still the same product?
- Brand fit: Does the lighting, crop, and background match the rest of the catalogue?
- Instruction adherence: Did the workflow follow the requested output?
- Marketplace readiness: Does the file meet the relevant platform requirements?
- Visible defects: Are there halos, warped edges, plastic textures, or false reflections?
- Completion time: How long does the batch take?
- Manual-review minutes: How much human checking remains?
- Total spend: What does the complete workflow cost?
Set a minimum publish-ready rate before running the full catalogue. A lucky output or a narrow test set can make a workflow appear successful when it fails on the products that matter most.
Review at two scales
First review the catalogue as a grid. Look for inconsistent product size, background tone, camera angle, shadow direction, and empty space. Grid review catches visual drift that's hard to notice when you inspect files one at a time.
Then zoom into high-risk areas. Check labels, stitching, hair, glass edges, metal highlights, and small hardware. AI-generated imagery can look acceptable at thumbnail size while becoming obviously over-smoothed or plasticky at listing scale. Guidance on optimising product photos for Google rankings is useful for the broader image-quality and web-publishing context, but marketplace compliance and product accuracy still come first.
Record every rejection reason. If the same issue appears repeatedly, change the workflow rather than manually fixing each file. If a product category continues to fail, route it to a specialist process or manual edit.
Expanding into Lifestyle Contexts and Next Steps
Once the primary product images are clean and consistent, use the same approved source to create context images. A lifestyle image can show a lamp in a room, a jacket on a person, or a skincare product beside a sink. It answers questions that a white-background image can't, such as scale, use, and placement.
The gallery should support the buying decision rather than replace the accurate product view. Industry reporting has found that products with 5 or more images can experience about 50% higher conversion rates than single-image alternatives, while other compiled reporting describes 25% to 40% lifts from 5 to 8 images, with gains flattening after roughly 8 to 9 images. These historical findings point to a practical direction, but they don't justify adding weak or repetitive images. (Ecommerce product image statistics)
Lifestyle imagery has also been cited as lifting conversions by 15% to 30% in industry summaries. (AI, AR, and UGC product photography trends) Treat that as a reason to test useful context, not as a promise. A staged image still fails if the shadow points the wrong way, the product floats, the scale is implausible, or the generated scene adds accessories that aren't included.
Use a separate workflow for AI product lifestyle image generation. Keep the approved packshot unchanged, generate variations from it, and compare every result against the original SKU. MerchLoom can run those variations across a collection through chained AI pipelines, using pay-per-image credits that never expire, but a person should approve the final images before they reach a product page or ad.
The next step isn't more editing for its own sake. It's a catalogue system with clear source files, platform-specific outputs, repeatable transformations, exception routing, and documented QA.
MerchLoom lets you connect existing product sources, describe an image workflow in plain English, and run chained edits across a full collection instead of one file at a time. Try the first images without an account, then use its pay-per-image credits, which never expire, to process only the catalogue work you need. Visit MerchLoom and test the workflow on a difficult product batch before committing to a full catalogue run.
Stop editing product photos one at a time
Upload your catalog or connect your store. Describe the result once. MerchLoom does the rest.
Try it free — no signup