
How to Photograph Products at Home for Online Sales
Learn how to photograph products at home for your online store with practical lighting, camera, and editing steps that scale across your catalog.
You've got a stack of products on the table, a deadline tomorrow, and no time to turn every SKU into a separate creative project. That's the job of how to photograph products at home, making a catalog look consistent enough to convert when the whole shoot happens in a spare room, kitchen corner, or garage. The trick is to stop thinking in single images and start thinking in repeatable standards.
If you're shooting 200 items this weekend, the first win is not the camera. It's deciding what every image must look like before anything comes off the shelf, so you don't waste time solving the same problem 200 times.
Set the Catalog Standard Before You Shoot a Single Frame
A catalog shoot starts with one rule set, not a pile of products. If you're working through 240 SKUs, every extra decision costs time, and every inconsistent choice costs sales later because the grid looks stitched together instead of planned.
Write the platform rules down once
Put a one-page brief on the wall and make it boring on purpose. For Amazon main images, the standard is pure white RGB 255, 255, 255 and the longest side at 1600px or more. For Etsy, keep the shortest side at 2000px. For Shopify, work in a square format up to 4472x4472. Those specs keep you from making the wrong crop after you've already shot the whole lot.
Practical rule: if the platform expects a white main image, shoot for that standard in-camera and in edit, not as an afterthought.
File size matters too. Keep standard product images under 100KB where possible, and treat under 200KB as the hard ceiling for storefront performance. That's not about vanity. It's about loading fast enough that a shopper doesn't bounce before the image finishes.
A written standard saves you. If the frame, background, dimensions, and file size are decided before the first shutter press, you stop re-litigating them for each item. That's the difference between a one-off shoot and a catalog workflow.
A practical way to keep that standard visible is to tape the brief beside the table and open each session with the same check. MerchLoom's guide to making product photos look professional fits neatly into that kind of catalog-first workflow, because the core issue is always the same, consistency before volume.
Decide what every image must obey
The brief should have just a few essentials. Background color, file dimensions, and the final file size go on that sheet first. Then list the product families you'll shoot today, because a bag, a bottle, and a folded shirt won't need the same styling, but they still need the same output standard.
Keep the sheet simple enough that a helper could follow it without asking what you meant. If the answer lives in your head, it isn't a system yet.
Build the Home Setup With Cheap, Interchangeable Parts
A home setup doesn't need to look fancy. It needs to hold the product still, keep light predictable, and let you repeat the same shot shape across an entire day without guessing.
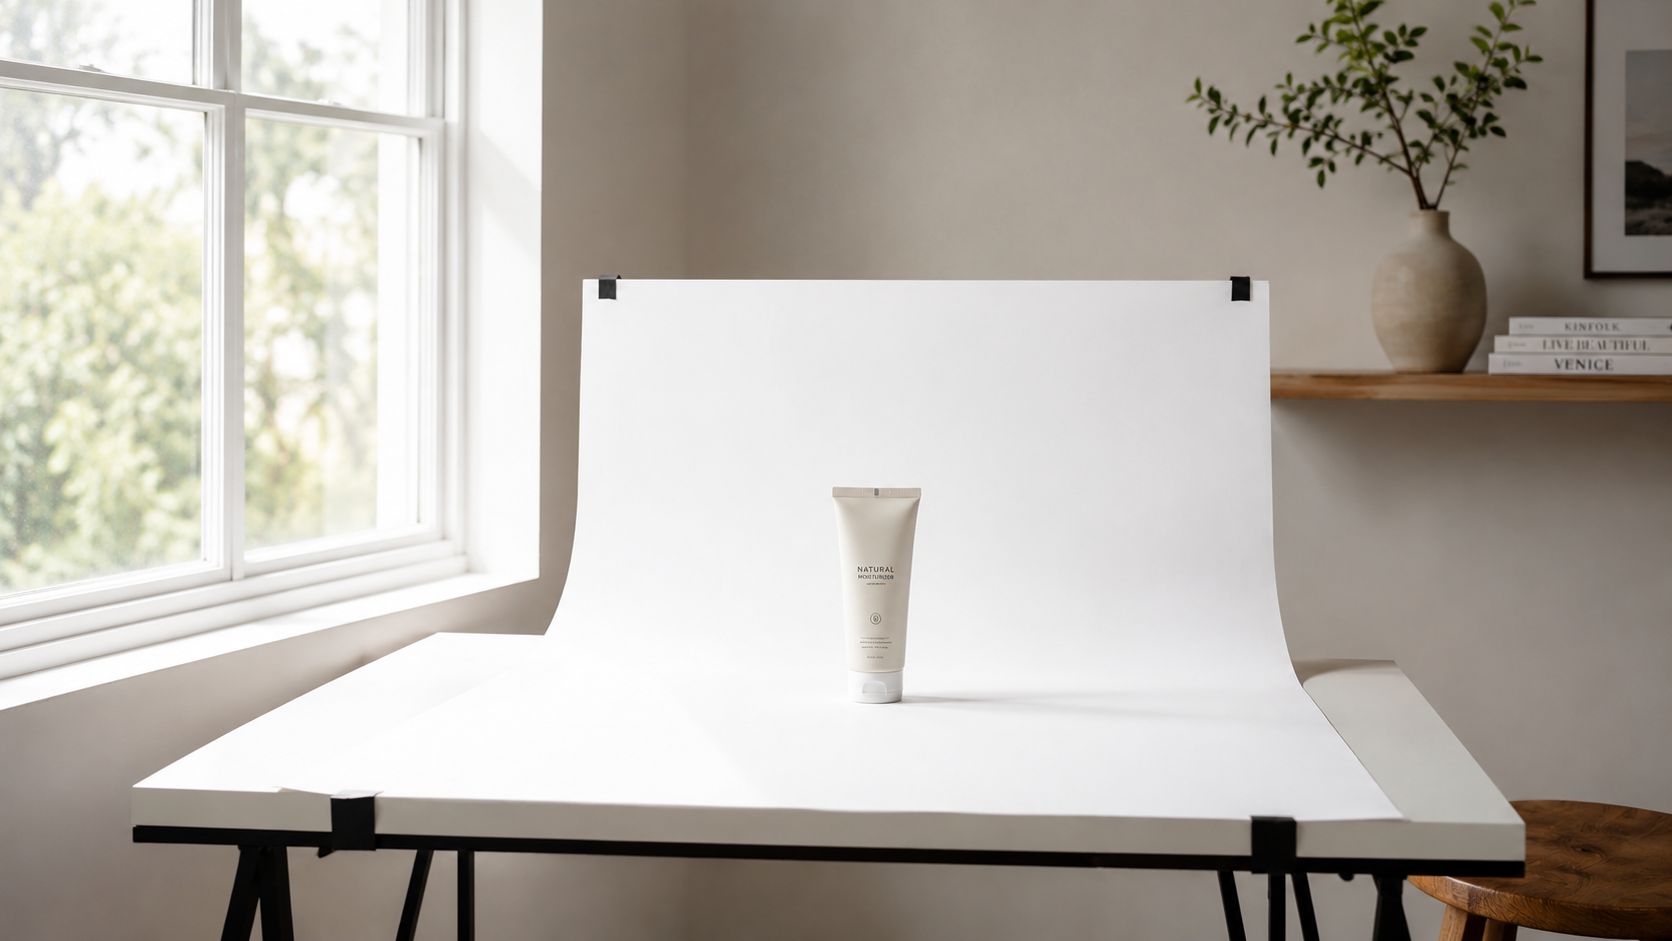
Build one workstation and leave it alone
Set a 24x36 inch table perpendicular to a north- or east-facing window. Tape a white foam-core sweep to the table so it curves up the wall without a hard edge. Put a second foam-core card on the shadow side as a reflector, then add a tripod or phone mount and a small clamp light with a white bulb for fill.
That's enough for most catalog work. A $60 minimum kit can be plain foam-core, tape, a basic clamp lamp, and a phone mount. A $180 setup that lasts five years adds a sturdier tripod, better clamps, and a cleaner sweep board you won't need to replace every month. The cheap version still works if the pieces stay interchangeable.
For the camera side, the baseline is simple. A phone with at least 12 megapixels is enough for this kind of work, and an iPhone 13 or newer is a reasonable target. That fits the current reality of home product photography, where the phone is often good enough as long as the setup is disciplined.
A lamp, a sheet of foam-core, and a tripod solve more catalog problems than a drawer full of gadget upgrades.
The one piece worth spending on first is the tripod. Locked framing is what makes batch editing possible later. If the camera moves between shots, every crop becomes a manual correction.
A good reference for building this kind of practical setup is the guide to sustainable revenue as a creator, especially if you're trying to keep the studio side lean while the catalog keeps growing. If you want to compare kit styles before buying parts, MerchLoom also has a straightforward photography booth for sale resource that helps frame the trade-off between a fixed booth and a table-based setup.
Keep the kit swappable
Every part should have a cheap substitute. A $30 light can become a $5 lamp if it gives the same direction and color. A foam-core board can be replaced with plain white poster board. The system works because the geometry stays the same, not because the gear is expensive.
Lock the Lighting Recipe So It Survives the Whole Day
Lighting drift is what ruins an otherwise clean catalog. Morning window light, midday glare, and a room lamp turned on by mistake can make one shelf of products look like another seller owns it.
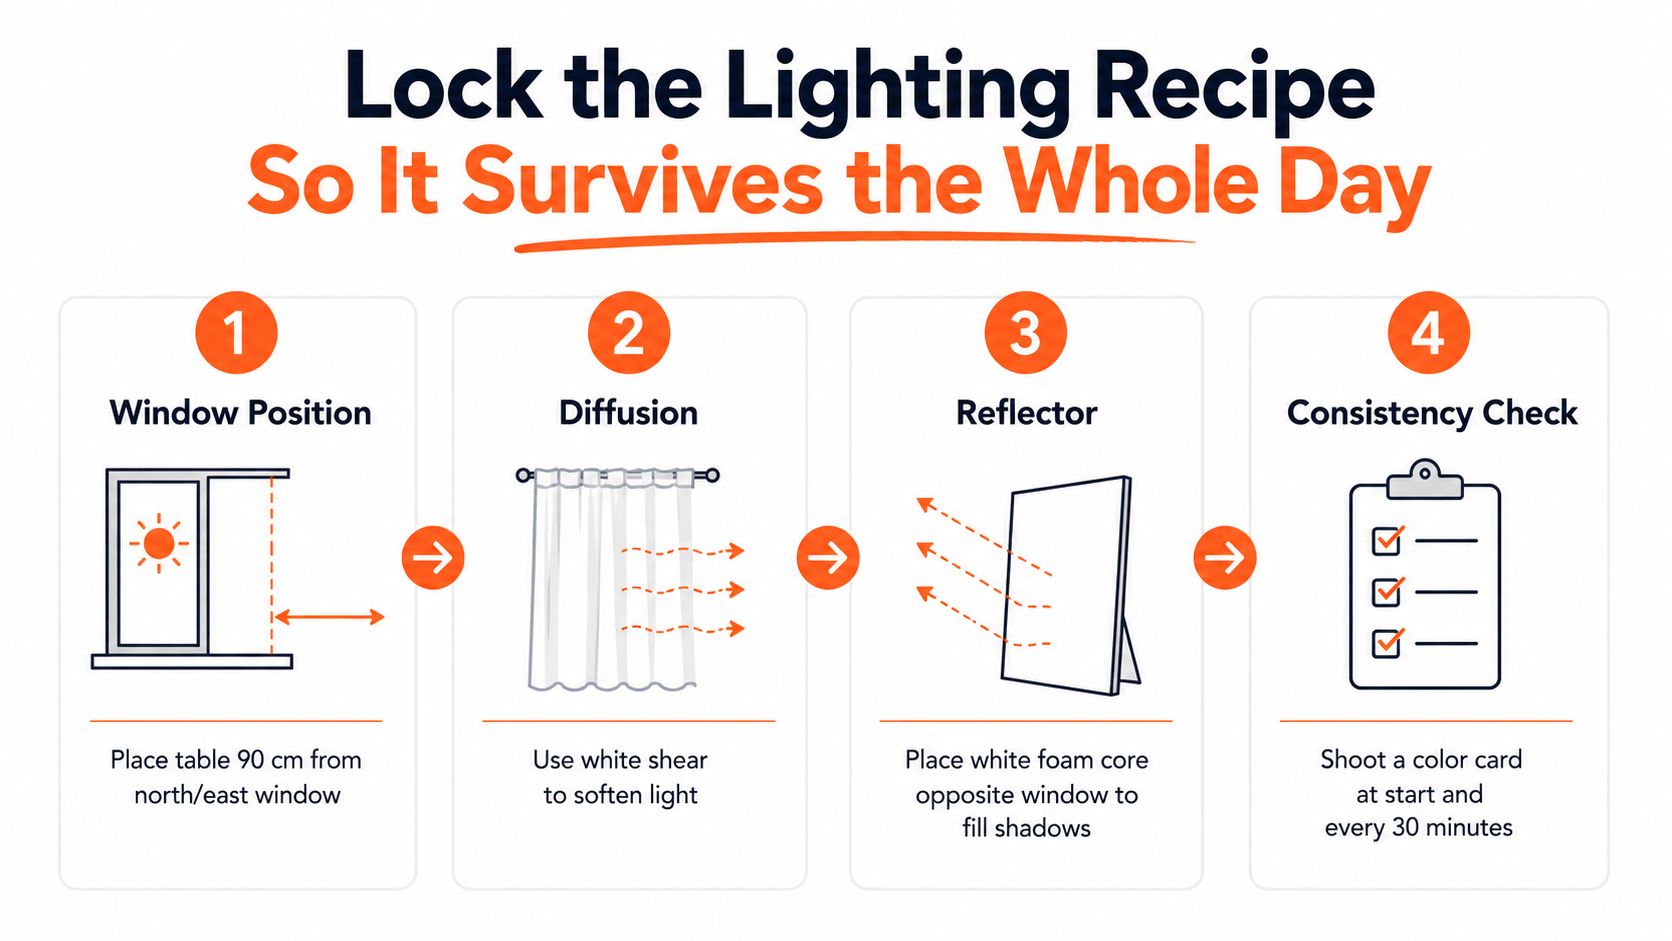
Fix the window recipe first
Place the table about 90 degrees to the window so the light comes from the side. Bounce fill from the opposite side with the foam-core card, and turn off every other light in the room. That one choice cuts the weird color mix that shows up when overhead bulbs fight daylight.
Start with a test shot on the sweep using ISO 100, f/8, and a shutter speed around 1/125s. The goal is a frame that sits a hair under pure white, so you preserve highlight detail and don't clip the product edge. If the sun gets harsher, pull the curtain across the window. A sheer white curtain softens the light without changing the whole room.
For glossy packaging, a translucent panel about two feet in front of the product helps kill hotspots. That matters more than the average beginner guide admits, because reflective surfaces don't fail politely. They throw bright patches, false color, and strange edge reflections that take longer to clean up than a plain matte item.
The same lighting rule applies if you're reading broader advice on lighting for video recording from Flexwork Podcast Studios. The principle is the same, control the source, control the room, and don't let mixed light invent problems you'll have to fix in edit. If you're building out a dedicated corner, MerchLoom's product studio lighting guide also fits this kind of repeatable setup.
Lock white balance and keep it there
Set a custom white balance from the foam-core once at the start of the session. Then shoot a single gray card frame every 20 products so later corrections stay aligned. If the light shifts and you don't reset, the whole row of listings starts to drift.
If the lighting changes, the catalog changes. Decide the lighting first, then shoot to that standard all day.
That's the mindset that keeps one session looking like one session, even when you're moving from skincare to cookware to apparel.
Camera and Phone Settings That Lock the Look
The camera settings are where catalog work either gets easy or turns into cleanup work. Once the values are fixed, the whole day gets faster because you're not hunting exposure on every item.
Use the same capture settings across the run
On a mirrorless camera or DSLR, shoot RAW, set ISO 100, use f/8 to f/11, and keep shutter speed around 1/125s. Set manual white balance, choose single-point autofocus on the product, and use a 2-second timer or shutter release to kill vibration. That range is safe because product edges stay sharp, the whole object sits in the depth of field, and color is easier to correct without guessing.
The temptation is to open the aperture wider for brightness or use digital zoom when a product feels small in frame. Don't. Wide-open apertures make some parts of the product fall soft, and digital zoom cuts away detail you can't get back. For catalog work, those are the wrong trade-offs.
On a phone, turn off 2x or 3x optical zoom if it causes instability, lock exposure with a long press, lock focus on the product, turn grid lines on, and use the highest-quality capture mode available. The point is not to make the phone behave like a DSLR. The point is to stop it from changing the look from shot to shot.
Lock the camera, rotate the product
Doing this for a whole catalog?
MerchLoom runs background removal, upscaling and AI editing across every product photo you have — one prompt, whole batch. Try 2 batches free, no signup.
Try it freePut the camera on a tripod and leave it there. Rotate the product on a small turntable instead of moving the camera around the table. Shoot front, three-quarter, side, back, top, and detail from the same position.
That single decision removes a ton of framing variability. It means you can batch-rename, batch-crop, and batch-export later without checking every frame like it's a separate assignment. If you've ever had 200 images where the logo shifts left and right by a few millimeters, you already know how much time this saves.
MerchLoom's white balance for product photography piece pairs well with this part of the process, because white balance only stays useful when the camera and product stay locked to the same setup.
Match the device to the job
A phone can absolutely work for home product photography, but the capture discipline has to be tighter. A camera gives you more control over RAW and white balance, while a phone gives you speed and convenience. For a catalog seller, the right choice is the one you can repeat without drift.
Backgrounds, Styling, and the Five-Check Rule per Product Type
The background is where catalogs usually break apart. One product looks clean on white, another throws reflections, and a third needs a different stand just to sit upright.
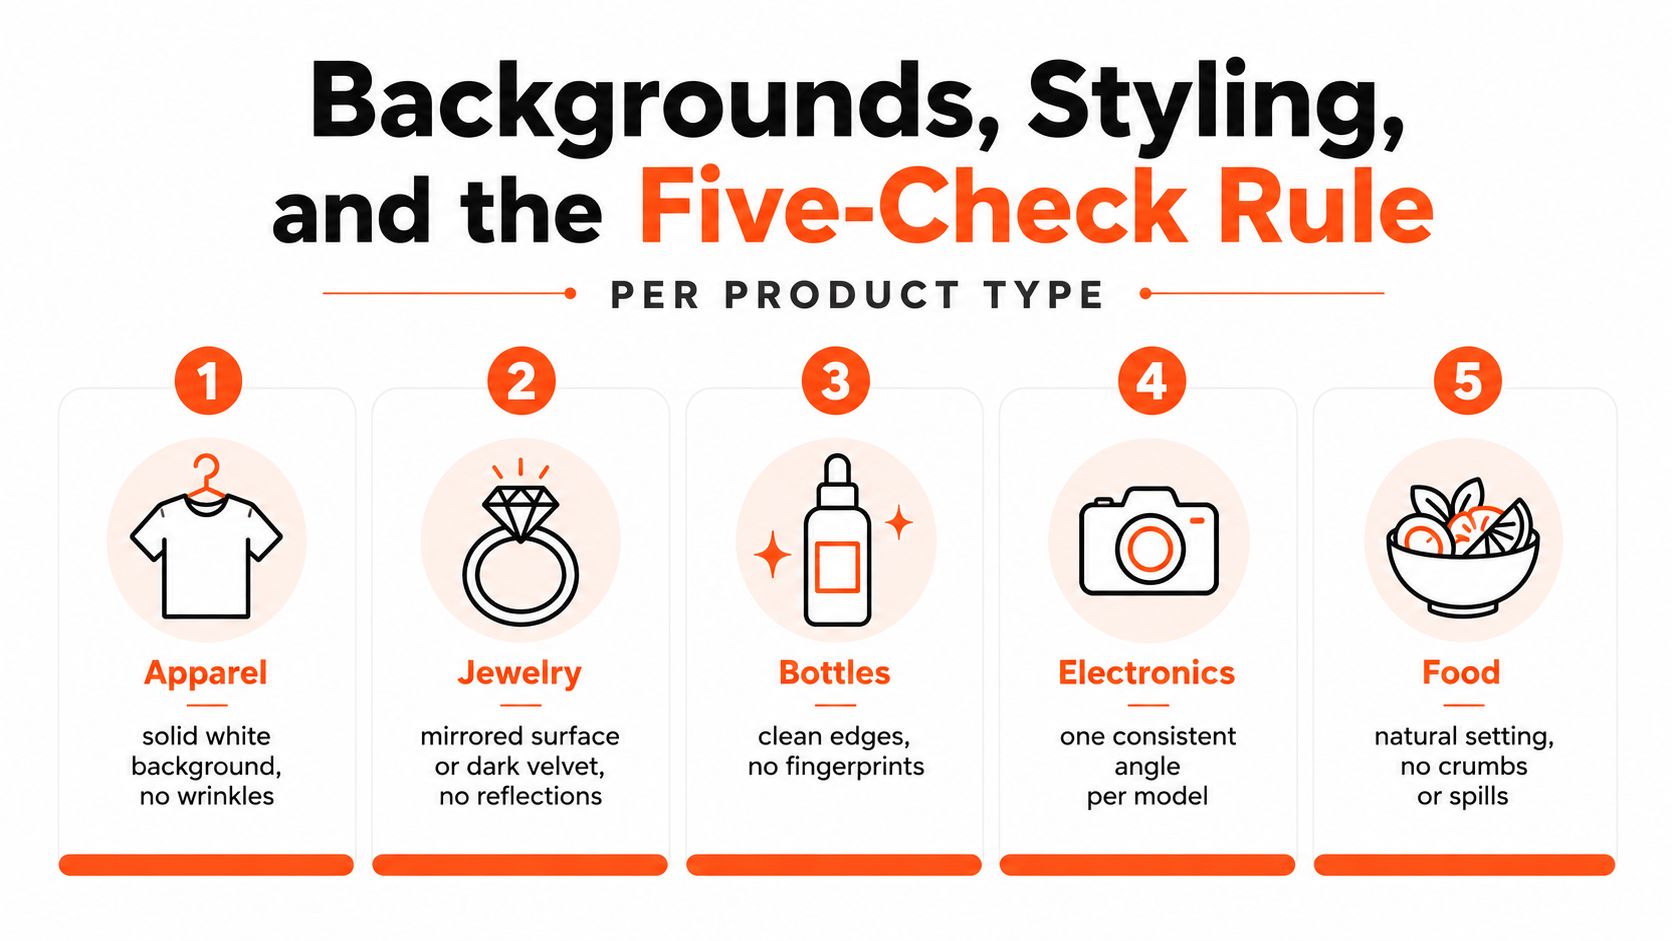
Use the same five checks for every SKU
Run the same checklist every time, whatever the product. Sweep clean, no visible seams, no dust, no fingerprints, and product fills 80% of frame. That last point keeps the product from looking lost in the frame, and it also makes batch cropping easier later.
For a backpack, the sweep and seam matter more than prop styling. For a pair of shoes, use the same sweep with a small acrylic stand if the pair needs a little lift. For a flat-folded apparel piece, shoot it as a flat lay from directly above so the catalog keeps one visual logic even when the products vary. The table setup doesn't change, only the camera angle does.
Treat problem materials differently
Glossy, metallic, transparent, and dark products need more control. A polarizing filter or a second diffusion panel becomes useful when reflections get ugly, and a black flag on the shadow side can shape the edge better than a reflector. Pull exposure down one stop if highlights are blowing out.
That matters for jewelry, glassware, cosmetics, and polished packaging, because these items can look clean in person and still photograph badly if you treat them like matte cardboard. Dark products can disappear into the background if the contrast isn't controlled. Transparent products often need you to photograph the edges more carefully than the object body.
Glossy items don't need more decoration. They need fewer reflections and a cleaner control of the light.
For packaged food, use a natural-looking setup and keep crumbs, spills, and wrinkled labels out of frame. For bottles, the main problem is usually fingerprints and uneven edge reflections, not the label itself. Once again, the five checks keep the edit from becoming a rescue mission.
Make the editor's job binary
Every product should pass the same five checks before it leaves the table. That keeps styling decisions from leaking downstream into edit, where they turn into extra time and inconsistent results. If the item doesn't pass on set, fix it on set.
Editing, File Standards, and Marketplace Export
Capture only gets you halfway. The editing pass is where the catalog becomes usable across marketplaces, because one raw folder and one polished listing library are not the same thing.
Edit in the same order every time
Start by culling unusable frames. Then straighten the keepers using the on-product reference lines, correct white balance from the gray-card frame, crop to the marketplace template, and strip the background to pure white. Save as a 16-bit file until the final export so you preserve the flexibility during cleanup.
After that, export to the platform target. Amazon main image wants JPEG, sRGB, 1600px or more on the longest side, and pure white RGB 255,255,255. Etsy works best at 2000px on the shortest side. Shopify can take square files up to 4472x4472. Poshmark and Depop both benefit from a white background and a 1:1 ratio.
The structure matters as much as the pixels. Use a single folder per SKU, name files like SKU_front_01.jpg, and keep one index spreadsheet that maps each image to its listing. That way, a virtual assistant or contractor can pick up the folder and know what each file is without asking three questions first.
For a practical reference on sizing and export logic, the Shopify product image size guide is useful because it reinforces the same basic truth, platform output only stays clean when the source files are organized before export.
Keep the file size lean
Standard product images should stay under 100KB where possible and under 200KB as a hard ceiling. That's the storefront-performance piece most sellers ignore until the page slows down and the catalog starts feeling heavy. The smaller file isn't just easier to upload, it's easier to move through the whole process without clogging your storage.
| Marketplace | Min dimensions | Color profile | Notes |
|---|---|---|---|
| Amazon | Longest side 1600px or more | sRGB | Main image should be pure white RGB 255,255,255 |
| Etsy | Shortest side 2000px | sRGB | Keep product clean and centered |
| Shopify | Square up to 4472x4472 | sRGB | Square works well for catalog consistency |
| Poshmark | Square ratio | sRGB | White background keeps the grid tidy |
| Depop | Square ratio | sRGB | Keep the image legible on mobile |
Run the Same Workflow Across the Whole Catalog With Batch AI
A single clean hero shot does not solve a catalog. Once the setup is working, the job is running the same light, crop, and edit rules across every SKU without turning the process into hand work. Batch processing matters because catalog-scale photography lives or dies on repeatability, not one lucky frame.

Chain the same edits across every product
MerchLoom runs the kind of pipeline this workflow needs. You can connect a source like Google Drive or Shopify, describe the edit in plain English, and process products in batches instead of opening every file one by one. The value is not flashy output. It is repeatable background removal, reframing, color correction, and upscale steps applied under the same catalog rules.
The order still matters. If you remove the background before upscaling, the file goes into the expensive step at a smaller size, which can bring the upscaling cost down by roughly 87%. That matters for sellers handling large photo runs, where the wrong sequence burns time and budget on every listing.
For a practical look at batch cleanup workflow, see MerchLoom's guide to AI batch image editing. The first images can be tried with no account. Pricing is pay-per-image, credits never expire, and you can review output as it streams in. Human review still matters on every batch, because no AI pass should go live blind, especially when product color and label edges are on the line.
MerchLoom is not a Photoshop replacement, and it should not be used like one. It is a way to chain repeatable image steps across a catalog so the same setup that produces one acceptable image can produce hundreds more at the same standard.
Fix the five problems that slow a shoot
Catalog shoots usually go off track for the same five reasons.
- Yellow color cast: household bulbs are still on. Turn off the overhead light and let the window be the main source.
- Harsh shadows: direct sun is hitting the setup. Move the table three feet from the window or add diffusion.
- Visible sweep seam: the sweep isn't taped cleanly. Re-tape the curve so the background reads as one plane.
- Fingerprints on glossy packaging: bare hands touched the surface. Wear cotton gloves and re-shoot the product.
- Different exposures across products: the light drifted during the run. Re-shoot the gray card every 20 frames and reset the exposure.
That checklist keeps a long shoot from drifting halfway through.
Print the routine and follow it every time
The wall version stays short, brief, setup, lighting, capture, edit, export, index. That order keeps the next shoot day from becoming a memory test. It also gives you a process a helper can follow without learning the whole business first.
Stop editing product photos one at a time
Upload your catalog or connect your store. Describe the result once. MerchLoom does the rest.
Try it free — no signup