
Fashion Product Photography How to Shoot for Marketplaces
Master fashion product photography for marketplaces with gear, lighting, styling and a batch editing workflow to create listings that convert.
You've got a rail full of garments, a phone full of half-finished shots, and product pages waiting on Amazon, Etsy, Shopify, eBay, or all of them at once. The problem usually isn't getting one shirt to look good. It's getting 200 images to match, upload cleanly, and answer the shopper's questions before they bounce.
Start with a fixed shot system before you touch the camera. Pick your background, your crop, your first three required angles, and your export sizes for each channel. If you decide those after shooting, the backlog gets expensive fast.
Why Fashion Product Photography Decides Conversion at Scale
Friday night, the rack is full, the marketplace deadlines are close, and the expensive mistake is already baked in if the photo plan is loose. At catalog scale, photography is not about getting one strong image. It is about producing a full set that answers the buying questions fast, matches across every SKU, and survives Amazon, Shopify, Etsy, and eBay crop rules without a manual fix on every file.
Poor image systems fail in boring ways. Sleeve length is unclear. Black fabric shifts blue on one SKU and charcoal on the next. One blouse gets six angles, another gets two. The listing goes live anyway, then the return reason shows up later as "not as expected" or "looked different online." Those are production problems, not creative problems.
Shoppers make the image judgment early. In one e-commerce photography statistics summary, researchers compiled findings showing that image quality heavily influences online buying, many shoppers look at photos before product copy, high-resolution images can outperform low-resolution ones, and leading fashion brands commonly use multiple photo styles across a listing rather than relying on a single frame.
That last point matters more in apparel than in a lot of other categories. Fabric, fit, drape, texture, and construction details do not fit inside one front shot. A dress needs different proof than a hoodie. A blazer usually needs closed, open, back, cuff, lapel, and texture coverage before a shopper has enough information to commit. If that image set changes item by item, conversion gets harder to improve because the catalog stops teaching the customer what to expect.
I learned this the hard way shooting weekend batches. The first 20 SKUs usually look fine. The next 200 expose every weak decision in the system. If the team has to decide angle count, detail priority, or crop height garment by garment, output slows down and post-production costs rise with no sales upside.
The fix is simple to describe and harder to enforce. Build a required shot list by garment type, then hold it. Tops get one set. Dresses get another. Outerwear gets another. That structure does two jobs at once. It helps shoppers compare products faster, and it makes editing, naming, QC, and reorders cheaper across the whole catalog.
Photos still cannot solve every sizing question. If you sell apparel at volume, pair the image set with a sizing tool such as the Robosize sizing platform, so the customer can connect what they see on screen with a more confident size choice.
Gear and Lighting Setups That Stay Consistent Across Hundreds of Shots
A repeatable studio beats an impressive gear list. For catalog work, the goal is simple. Same light, same color, same distance, same crop. If you change those every hour, your edit time doubles.

The lean kit that actually holds up
You don't need a huge studio. You need a setup you can rebuild exactly next weekend.
- Camera: A mirrorless or DSLR body with manual exposure control. A recent phone can work for some catalogs, but dedicated cameras make matching files easier over long batches.
- Lens: A normal focal length works well for apparel because it keeps shape natural. Avoid very wide lenses. They distort hems and sleeves.
- Tripod: Non-negotiable for consistency. Lock height and distance.
- Lights: Two soft lights are enough for most product-only setups.
- Backdrop: White sweep for marketplace images. Neutral wall or paper for secondary lifestyle-style catalog shots.
- Steamer, clips, pins, lint roller: These save more time than another lens.
If you need a more detailed breakdown of bounce, diffusion, and light placement, this guide on product photography lighting for e-commerce covers the practical setup decisions.
Two setups that work for apparel
The first is the catalog setup. Put two diffused lights at equal distance from the garment, slightly above product height, angled inward. This gives even coverage for flat-lay, mannequin, and hanging shots.
The second is the shape setup. Keep one main soft light and use a lighter fill on the opposite side. That adds a little depth to textured garments, knits, and structured pieces without turning the image into moody editorial work.
If the light looks flattering on one SKU but forces you to re-edit every black garment and every white garment differently, it's the wrong light for catalog work.
Lock the settings before the batch starts
Three habits prevent most catalog inconsistency:
- Manual exposure: Don't let the camera brighten black garments and darken white ones shot to shot.
- Fixed white balance: Set it once for your lights. Auto white balance drifts.
- Tape marks on the floor or table: Mark tripod legs, mannequin position, and garment placement.
That's how 200 items end up looking like one brand instead of six different shoot days.
Styling and Shooting Techniques for Apparel That Sells
By the time you hit SKU 80, styling mistakes stop looking small. One twisted side seam turns into 40 crooked product pages. One inconsistent sleeve fold means the editor has to crop every colorway differently. At catalog scale, styling is not set dressing. It is production control.
The format has to match what the customer needs to judge. SellHound notes that ASOS saw a 65% higher purchase completion rate after adding more high-quality product views, and the same analysis says on-model photos can convert 20 to 30% higher than flat-lay for structured garments, with time on page increasing 40 to 60% when on-model shots are used, according to this conversion-focused product photo analysis.
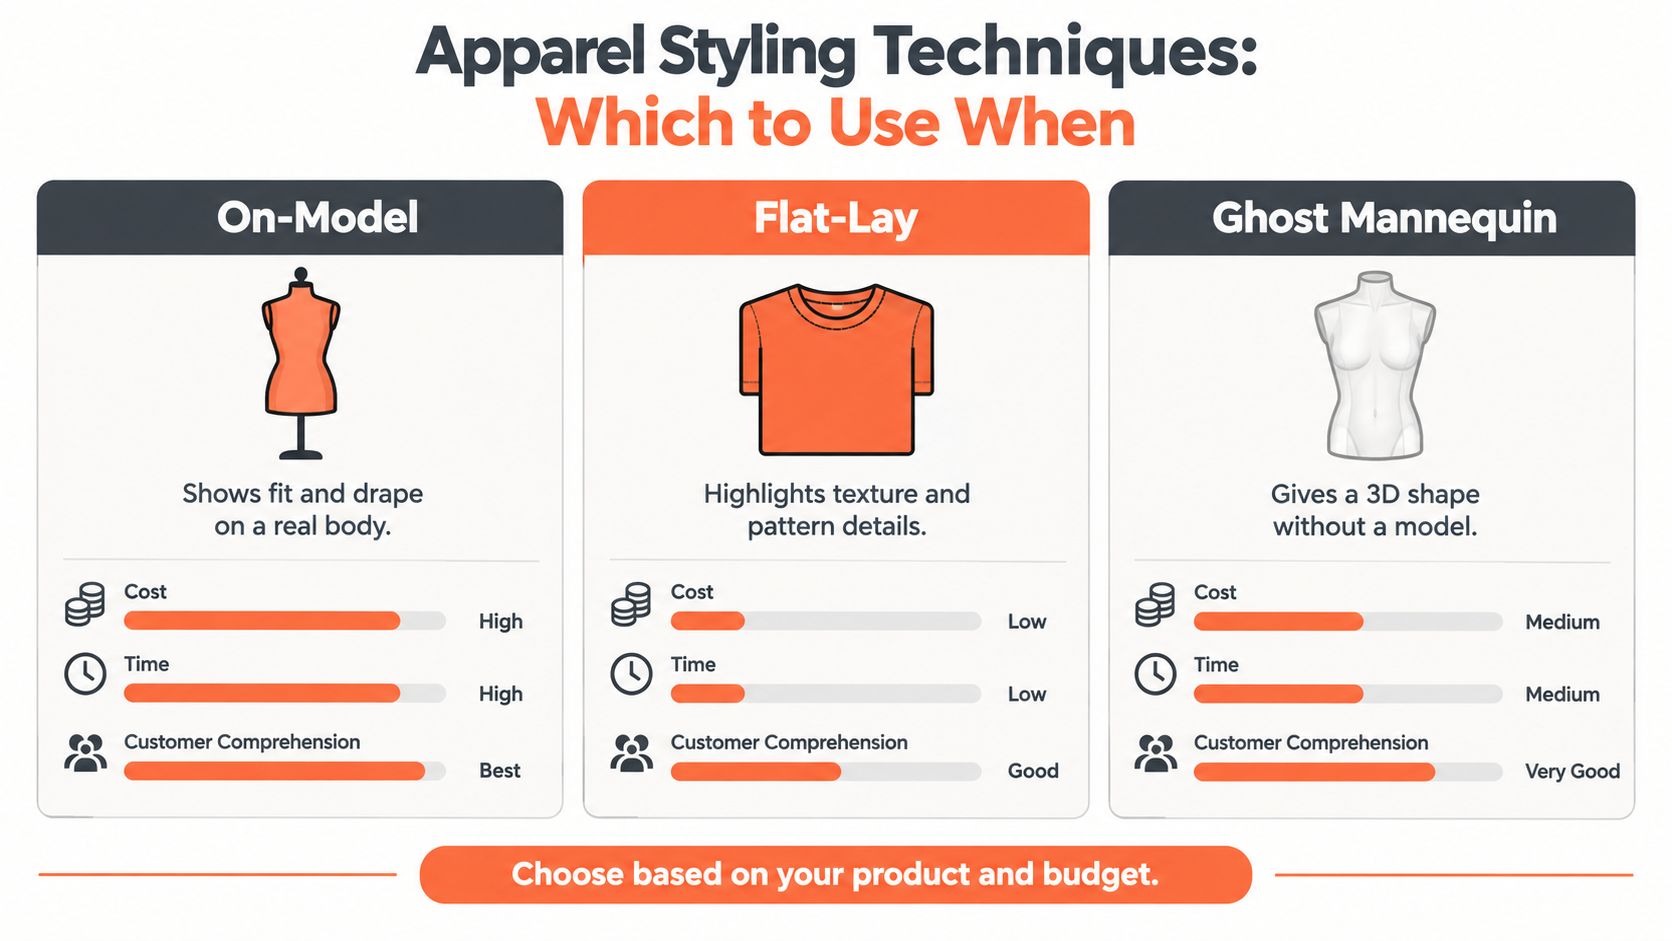
Pick the format by garment type
Use on-model when fit answers the sale. Dresses, trousers, blazers, denim, and tailoring usually need a body to show rise, drape, and proportion.
Use flat-lay when the buyer is reading surface first. Tees, scarves, kidswear, graphics, and simple knit styles often work better this way because the shape is obvious and the shoot moves faster.
Use ghost mannequin when you need structure without model booking, model releases, fitting delays, or a second styling pass. It works well for shirts, outerwear, and tops with interior shape.
Cost decides more than aesthetics here. On-model usually gives the best fit communication, but it adds prep, steaming, changing, retakes, and approval time. If you want broader coverage without putting every SKU on a live model, this guide on choosing a model for clothing imagery lays out the options clearly.
Build one shot list per category
A repeatable shot list saves more time than any camera upgrade. If every top gets one sequence and every dress gets another, assistants can style ahead, shooters can work faster, and post stays predictable.
For most apparel, this set is enough:
- Front full view: Straight, centered, level.
- Back full view: Match the front crop.
- Side or three-quarter view: Show volume and shape.
- Close-up detail: Fabric, stitching, hardware, print, or trim.
- Texture shot: Useful for knits, lace, rib, linen, denim, and anything with visible handfeel.
- Fit shot or styled view: Add this when silhouette or length affects the sale.
Six clean frames beat twelve inconsistent ones.
Working shortcut: Steam in batches, style in batches, then shoot in batches. Switching tasks item by item burns time and creates inconsistency.
A quick visual walkthrough helps if you're training someone else or standardizing your own process:
Style for the crop, not the rack
Garments need to be built for the frame. Pin excess fabric behind the piece so the front silhouette stays honest. Keep sleeves matched. Straighten plackets, cuffs, waistbands, and hems before every click, not every fifth item.
Small fixes matter more on marketplaces than they do on a brand homepage because thumbnails are doing part of the selling. If one black tee has a tight fold and the next one spreads wider, the grid looks sloppy even if each image is technically sharp. I learned this the hard way on large apparel batches. The reshoot cost was never the camera time. It was the relisting, renaming, and recropping.
For sets and colorways, copy the same placement every time. Same angle. Same spacing. Same button state. Same sleeve position. That consistency is what makes batch cropping and template-based editing work.
One rule closes the loop. Stop shooting once the required frames are done. If a basic top needs six images for your site and marketplaces, get six usable images and move on. Catalog efficiency comes from fewer decisions per SKU, not more coverage per garment.
Doing this for a whole catalog?
MerchLoom runs background removal, upscaling and AI editing across every product photo you have — one prompt, whole batch. Try 2 batches free, no signup.
Try it freeCamera Settings File Formats and Naming for Catalog Scale
Bad file handling ruins good photography. The shoot can go perfectly, then the batch falls apart because front views are mixed with detail shots, colorways are mislabeled, or edits get exported to the wrong size.
Settings that stay stable
For apparel, sharpness and color matter more than dramatic depth of field. Keep enough depth so hems, seams, and collars all read clearly. Use a tripod so you can prioritize consistency over handheld speed.
If you're deciding what to keep from camera through editing, this breakdown of raw vs jpeg editing explained is helpful. In practice, RAW gives more correction room, while JPEG is faster if your lighting and white balance are already locked.
For sellers handling big batches, a common split is simple:
- RAW for master capture: Better when color correction matters and you reuse assets later.
- JPEG for quick proofing: Useful for fast review and sorting.
- Exported JPEG or PNG for marketplace upload: Chosen after cropping and background decisions are done.
If you need cleaner enlarged outputs after capture, this guide on making a photo in HD for e-commerce use is worth keeping handy.
Naming that prevents rework
A file name should answer four questions fast: what item, what color, what angle, what version.
Use a pattern like this:
| File part | Example |
|---|---|
| SKU | DRS-1042 |
| Color | black |
| View | front |
| Sequence | 01 |
That becomes DRS-1042_black_front_01.
Keep folder structure equally plain:
- Season or drop
- Product category
- SKU folder
- Raw, selects, exports
When you're tired on Sunday night, simple naming beats clever naming every time.
Marketplace Specs and Batch Post Processing With MerchLoom
Most sellers lose time. They shoot the images once, then manually rebuild them for every channel. That's backwards. Shoot one strong source file, then run a fixed post-processing path based on where the image is going.
Amazon is the strictest place to start. Amazon says the main image background must be pure white, RGB 255,255,255, images below 500 pixels on the longest side can't be uploaded, and 1,000+ pixels on the longest side enables zoom in its guidance. Those rules are in Amazon Seller Central image requirements. Seller-facing guidance in the same verified data set notes 1600+ pixels on the longest side as the practical target for sharper zoom on high-resolution screens, so that's the safer working export for most catalogs.
Etsy has a different constraint. Recent guides consistently recommend at least 2000 pixels on the shortest side, which helps when Etsy crops the same image across shop and listing placements, as explained in this Etsy listing image size guide.
Shopify is more flexible. One 2026 guide says Shopify supports images up to 4472×4472 pixels and recommends 2048×2048 for product pages, which gives enough room for square presentation, zoom, and recropping. That guidance is covered in this Shopify product image sizing reference.

Marketplace Image Specs at a Glance
| Marketplace | Main Image Requirement | Recommended Export |
|---|---|---|
| Amazon | Pure white background, RGB 255,255,255. Longest side 1600px or more for practical zoom-ready export | Longest side 1600px or more, centered product, clean margins |
| Etsy | Consistent master image that holds up when cropped across placements | At least 2000px on the shortest side |
| Shopify | Square product image workflow | 2048×2048 square master, with room to scale up to 4472×4472 if needed |
The batch order matters
Post-processing costs stack when you do steps in the wrong order. The efficient sequence is usually:
- Cull first: Remove duplicates, blurred frames, and wrong angles.
- Background cleanup: Especially for Amazon-ready mains.
- Crop and reframe: Build one framing rule per channel.
- Color correction: Match the physical garment, not your mood.
- Upscale only when needed: Save that step for files that need larger exports.
- Export per destination: Amazon, Etsy, Shopify, plus any square social crops.
That's where a chained workflow helps. Instead of editing image by image, MerchLoom runs batch image pipelines for e-commerce catalogs, including background removal, reframing, color correction, and output prep across a whole collection. The first images can be tried with no account, and it's pay-per-image with credits that never expire. It still needs human review, especially for garment edges, texture fidelity, and color truth. If you want the fuller process view, this guide on image editing for ecommerce maps the sequence well.
Don't upscale everything by default. Upscale only after you know the final crop and channel. Otherwise you pay in time and storage for pixels you won't use.
Keep the source master cleaner than the exports
A good source file can feed Amazon, Etsy, Shopify, and marketplaces you haven't added yet. A bad source file forces reshoots. That's why catalog-scale fashion product photography is less about heroic editing and more about preserving a reusable master.
Quality Control Time and Cost Optimization That Keeps Listings Converting
Final QC is where margin gets protected or burned.
The expensive mistakes are usually small. A white background exported slightly gray on 50 Amazon mains. A denim set cropped 4 percent tighter than the rest of the category. A color profile slip that makes one burgundy dress look brown beside its siblings. None of that looks dramatic during editing. It becomes expensive after upload, when listings are live and the whole batch has to be reopened.
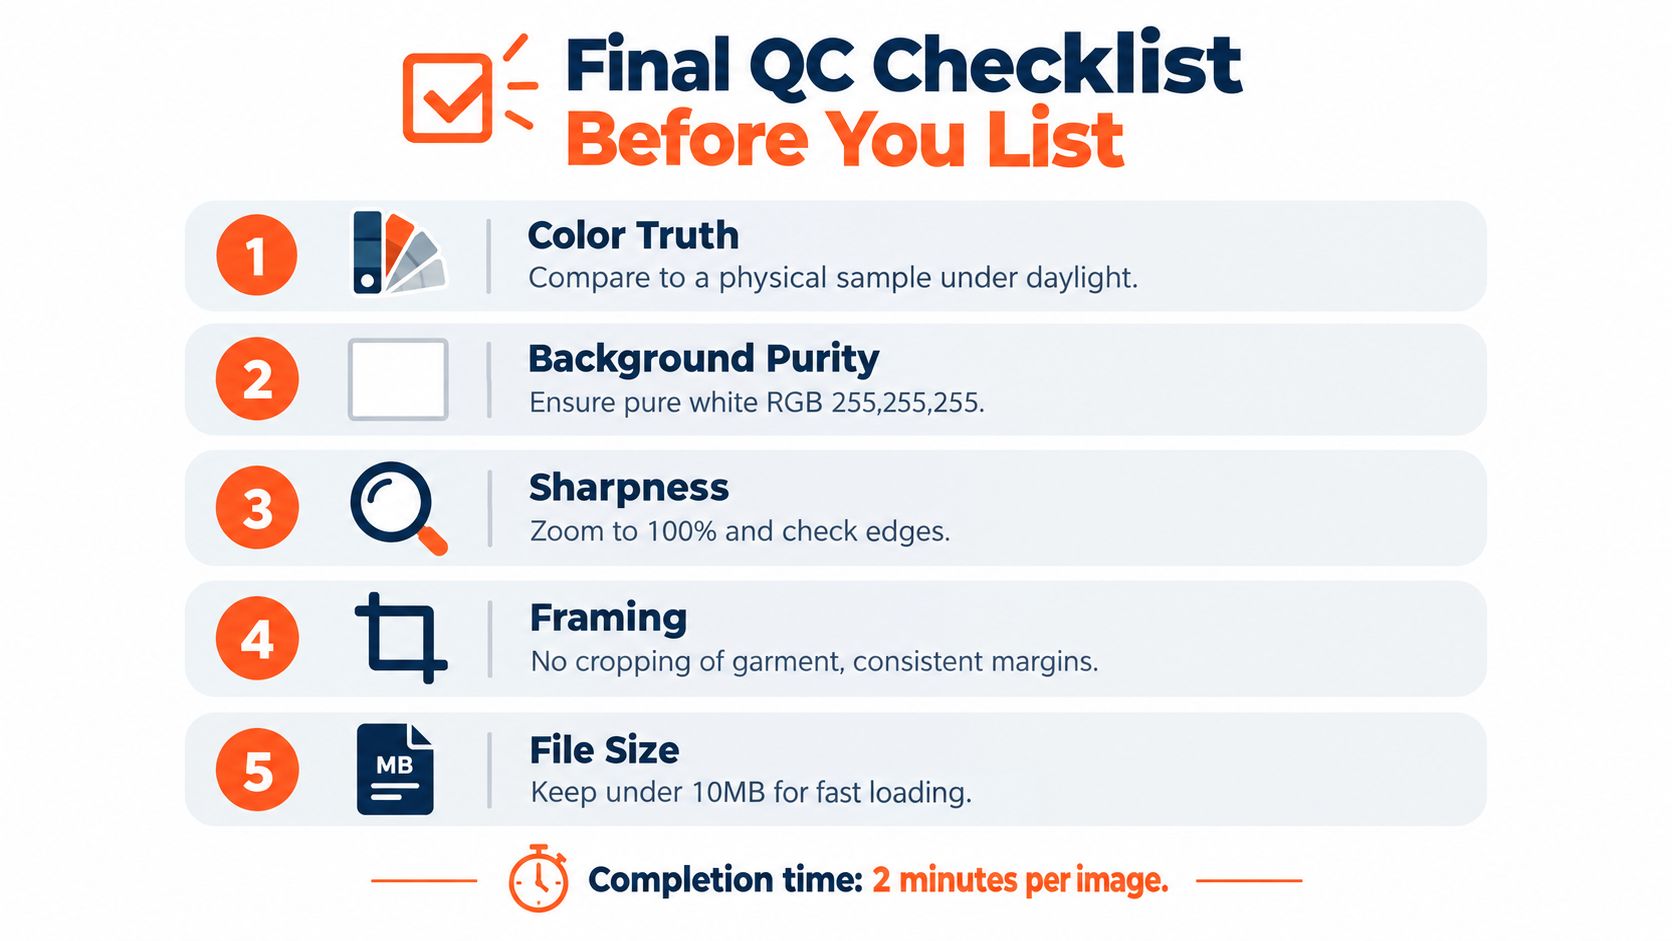
The fast QC pass
Use a timed grouped-view check before anything goes live. Two minutes per product family is usually enough if the files were organized properly.
Start with similar items side by side, not one file at a time. Review all black dresses together. Then all denim. Then all front-facing mains. Batch errors show up fast in grouped view because your eye catches the outlier immediately.
Check these points in order:
- Color truth: Compare the export to the garment under neutral light.
- Background purity: For Amazon mains, verify pure white RGB 255,255,255.
- Sharpness: Zoom in on seams, edges, prints, hardware, and texture.
- Framing: Confirm the same product scale and margin rule across the set.
- Destination folder: Make sure the Amazon set did not get mixed into Etsy or Shopify exports.
I also spot-check the same SKU at thumbnail size and full size. Thumbnail view catches weak framing. Full size catches edge cleanup problems, fringing, and texture loss.
Time and cost discipline
Re-editing one image is annoying. Re-editing 50 because one export preset or background setting was wrong will eat half a day and push listing dates. If the files have already been uploaded to multiple channels, someone also has to replace assets, recheck crops, and confirm the right image order. That admin time is usually worse than the edit itself.
The fix is procedural. Keep one QC checklist, one owner for final sign-off, and one pass before upload. Do not let raw edits go straight from export folder to marketplace.
Human review still matters even in a batch workflow. Tools can clean backgrounds, standardize framing, and prep channel-specific outputs, but they will not know that a sleeve hem looks twisted compared with the physical sample or that one red knit shifted too far orange. A structured batch product photo editing workflow helps reduce repeat work, but the final approval should stay with the person who knows the catalog standards.
Good QC protects conversion because shoppers compare products side by side too. If one listing in a range looks off, the image reads as lower trust before anyone checks fabric, sizing, or price.
Stop editing product photos one at a time
Upload your catalog or connect your store. Describe the result once. MerchLoom does the rest.
Try it free — no signup