
Bulk Background Remover for Product Photos: A 2026 Guide
Learn to use a bulk background remover for product photos not just for speed, but for smarter e-commerce workflows. A complete guide for sellers.
You've finished a product shoot. The files are sitting in Drive or Dropbox. Some need Amazon-ready white backgrounds, some need clean transparent PNGs for your site, and some should become social creatives instead of just catalogue shots. That's when most sellers realise the main bottleneck isn't the camera. It's the editing queue.
If you're searching for a bulk background remover for product photos, you probably don't need help removing one background. You need a repeatable way to process batches, keep the cutouts consistent, and push the same source image into multiple sales channels without rebuilding everything by hand.
From Photo Shoot to Sales Channel Bottleneck
A lot of sellers still think the image job ends when the photographer delivers finals. In practice, that's where operational work starts. One folder of product shots turns into separate listing needs for Amazon, Shopify, Etsy, email campaigns, paid social, and collection pages. The same SKU may need a pure white hero image, a square crop, a transparent cutout, and a lifestyle version.
That's why manual editing stops making sense fast. Internal teams at fashion brands like Nordstrom report spending 8–15 minutes per SKU on background cleanup alone, and a mid-sized retailer processing 5,000 new products quarterly can spend about 833 labour hours per quarter just on background processing before revisions and QA even begin, according to Rewarx on bulk background removal for e-commerce.
Where sellers actually get stuck
The usual failure point isn't deciding whether to remove a background. It's handling volume while staying consistent.
- Catalogue drift: One batch has soft shadows, another has harsh edges, and your listings stop looking like one brand.
- Platform mismatch: Amazon wants a clean white main image, Shopify often benefits from square consistency, and Etsy sellers commonly work with larger listing images such as 2000px exports.
- Team bottlenecks: A designer can fix almost anything. A designer cannot fix everything across hundreds of SKUs by tomorrow afternoon.
Sellers who scale this well stop thinking in single-image edits and start thinking in production lines. The strongest teams standardise naming, batch by product type, and route images through the same steps every time.
Practical rule: If you're touching each image individually before you know its final destination, the workflow is already too expensive.
Clean inputs matter too. If your team is still trying to improve raw shots after the fact, tighten your shooting process first. NanoPIM's guide to eCommerce product images is a useful refresher on capture discipline because better source photos make every downstream automation step easier.
For a broader view of how teams shift from one-off edits to repeatable batch systems, this breakdown of e-commerce image automation is worth reading.
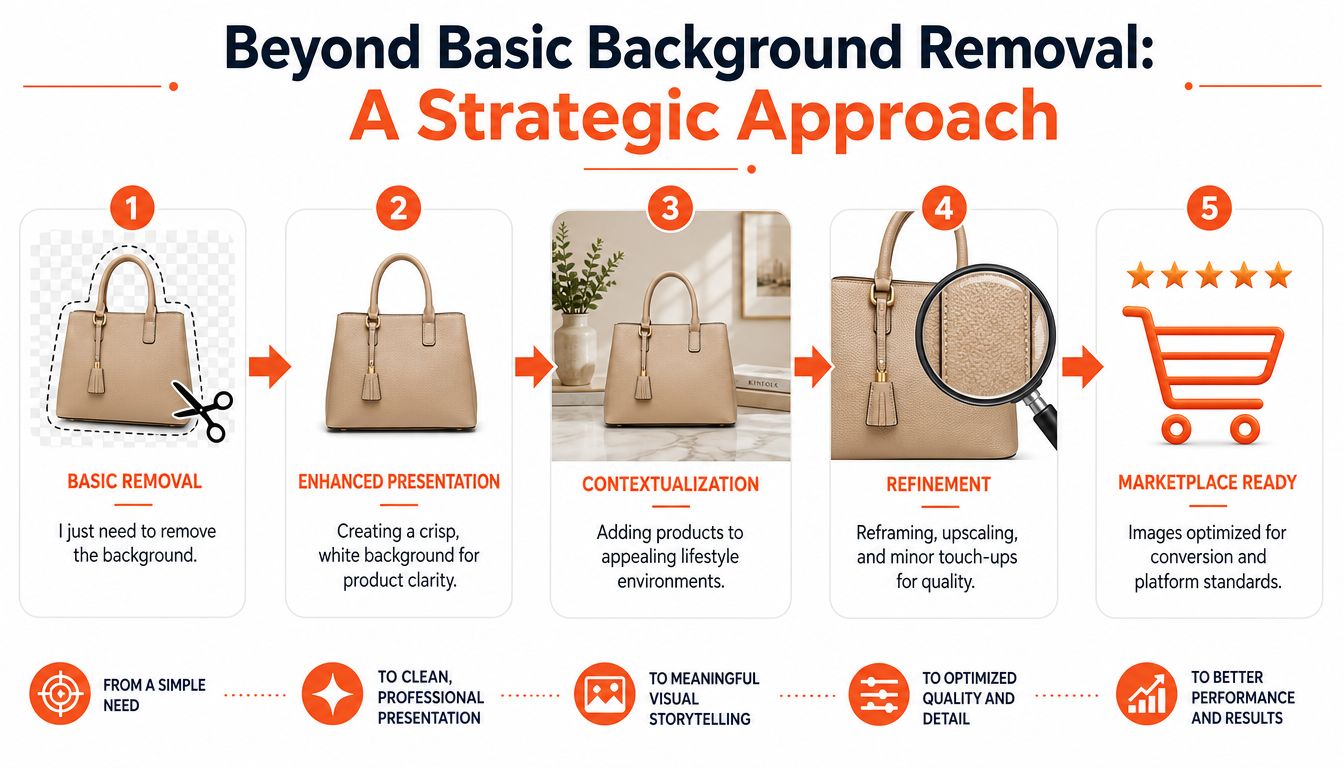
Why Background Removal Is Just the Starting Point
Background removal solves one problem. Selling across channels creates several more.
Most sellers begin with the obvious need: isolate the product, clean up the frame, and meet marketplace rules. That matters. A cluttered background makes listings look inconsistent, and some channels are strict about presentation. But once the background is gone, you still need the image to fit its job.
For e-commerce brands, background removal is almost always step one in the pipeline, and 87% of successful catalogue optimisation workflows begin with background removal before expensive upscaling steps to shrink file sizes and reduce compute costs by up to 87%, according to Claid's guide to background removal apps.
When removal alone is enough
Sometimes the cutout is the final asset.
That's usually true when you need:
- Transparent PNGs for your site: Useful for collection grids, layered merchandising, and design flexibility.
- Basic white-background catalogue images: Often enough for straightforward product listings.
- Quick one-off edits: If you're a casual seller fixing a single image, there's no reason to build a bigger pipeline.
If the product is simple, well lit, and already framed correctly, a bulk background remover for product photos may get you all the way there.
When the real work starts after the cutout
More often, removal is just the first operation.
A practical workflow usually branches into several outputs:
| Need | What happens after removal |
|---|---|
| Amazon main image | Add a pure white background and export to listing dimensions |
| Shopify collection image | Reframe into a square crop and keep spacing consistent |
| Etsy listing image | Export a larger, clean version with enough detail for zoom and cropping |
| Paid social creative | Place the product into a branded or lifestyle scene |
| Product detail page | Upscale or sharpen after the cutout is already clean |
Sellers waste time if they treat each image as a fresh project. The smart move is to define outputs once, then run them in batches. Background removal becomes the entry point to reframing, white-background creation, background replacement, and final export.
One operational mistake I see often is using a transparent PNG as the finish line when the sales channel needs something else. The product looks isolated, but the listing still fails because the framing is wrong, the canvas ratio is off, or the image doesn't match the rest of the collection.
Remove the background first. Decide the destination second. Build the output around the destination, not the edit.
That shift matters more than the remover itself.
Prepping Your Images for Flawless AI Processing
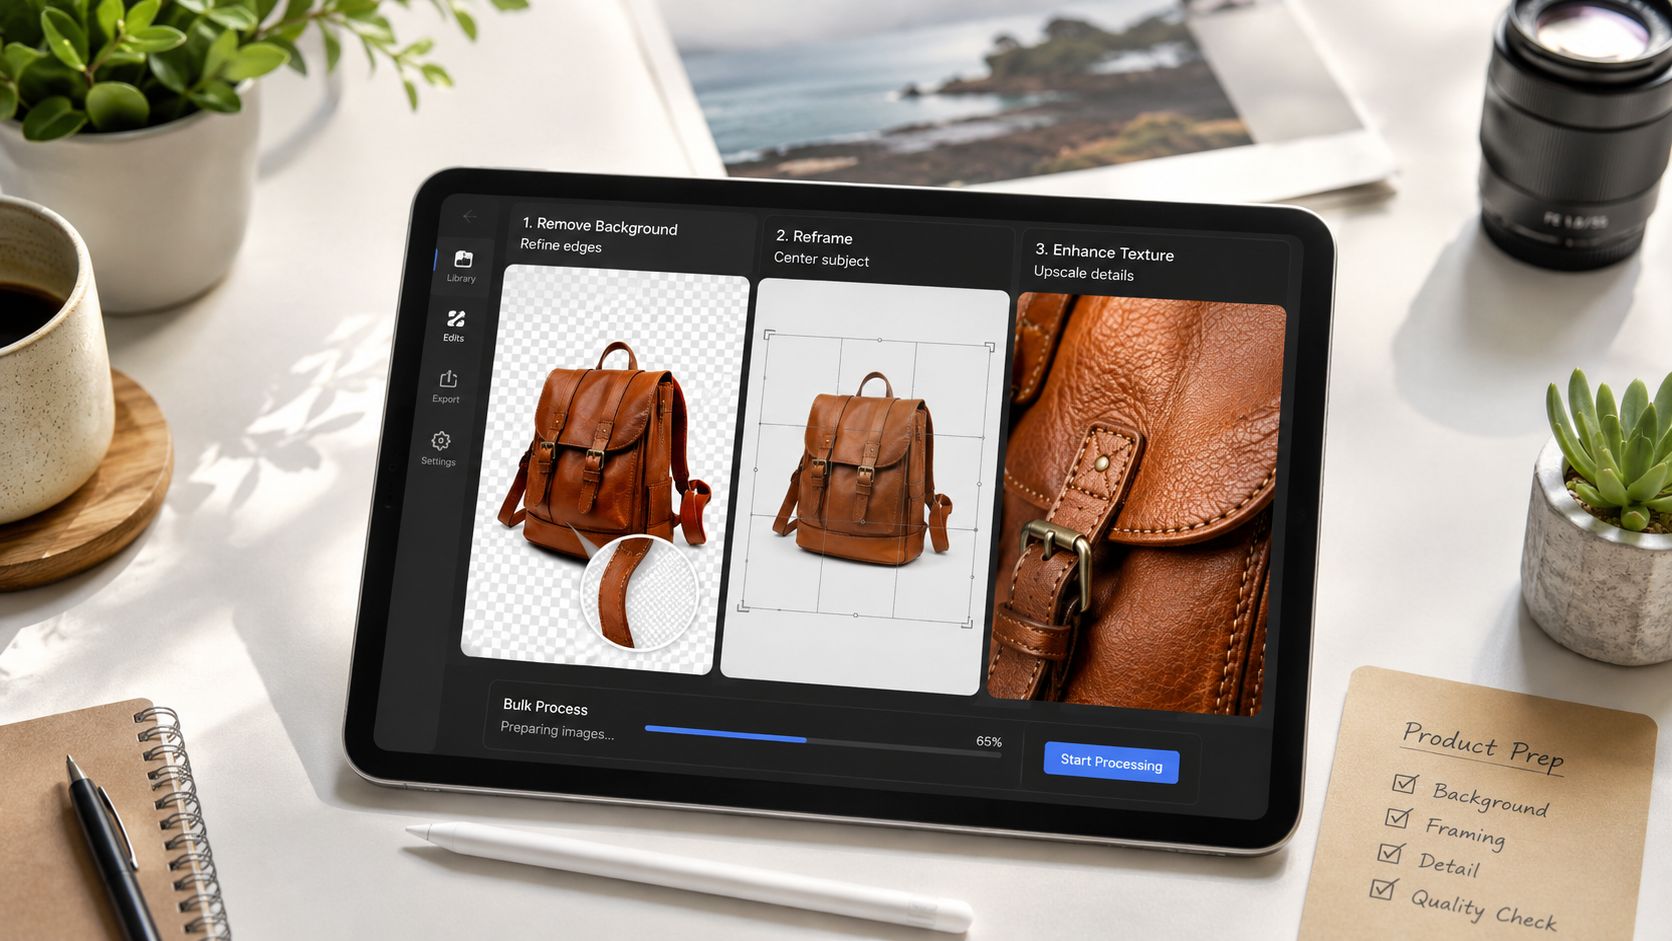
The quality of your batch output is mostly decided before you upload anything. If the source images are inconsistent, badly lit, or grouped carelessly, no bulk tool will rescue the full set cleanly.
AI bulk background removers achieve 96–98% accuracy on simple products but can drop to 85–90% on complex items like glassware. A common pitfall is using white backgrounds that blend with product elements. Shooting on gray and adding a 15% opacity shadow in post is a proven fix, according to Rewarx's test of background removal tools on product photos.
Shoot for the cutout, not just for the camera
A photo that looks acceptable to the eye can still confuse edge detection.
The strongest setup for batch removal is boring on purpose:
- Use a plain light gray background: It gives the model better edge separation than white.
- Keep lighting consistent: Mixed shadows across a batch create uneven outputs.
- Leave breathing room around the product: Tight crops make edge detection and later reframing harder.
- Capture high-resolution originals: You want enough detail for edges, texture, and later exports.
If you shoot small products, jewellery, or compact accessories, this guide to how to photograph small items is a practical reference because tiny edge details are where automated cutouts often break first.
Sort before you batch
Most cleanup pain comes from batching unlike images together.
Don't throw everything into one job. Separate by difficulty and by lighting condition. A clean leather wallet, a glass bottle, and a silver necklace shouldn't be processed under the same assumptions.
A useful sorting structure looks like this:
Simple solids
Boxes, shoes, folded apparel, packaged goods.Reflective or transparent items
Glassware, metallic cosmetics, polished hardware.Fine-detail products
Hair accessories, lace, fringe, textured fabrics, jewellery.Shadow-sensitive shots
Images where realism depends on keeping a natural grounding shadow.
When sellers skip this step, QA gets much heavier later. You'll end up correcting the same failure pattern over and over.
Field note: Ten minutes spent separating “easy” from “tricky” batches can save far more time than trying to rescue a mixed export set.
Fix the common causes of bad edges
If your outputs keep looking rough, the source is usually the problem.
- White on white: Transparent or pale product edges disappear into the backdrop.
- Harsh reflections: Metallic surfaces can fool edge detection. Two light sources at 45-degree angles are a practical fix noted in the underlying workflow guidance from the same Rewarx testing.
- Low-contrast fabrics: Knitwear, fuzzy materials, and soft edges need cleaner lighting and better separation.
Good batch processing starts long before the upload button.
Building Your Automated Image Workflow
The goal isn't to remove backgrounds faster. It's to create assets for each sales channel without repeating the same manual work.
The best workflows use platform-specific templates. Amazon requires pure white backgrounds, Instagram uses square formats with branded backgrounds, and websites prefer transparent PNGs. A key optimisation is removing backgrounds before upscaling, saving up to 87% in processing costs, according to remove.bg's bulk background remover guide.
Start with one source of truth for images. That could be Google Drive, Dropbox, Shopify exports, or object storage. The important part is avoiding download-edit-upload loops that break version control.

Build output recipes, not one-off edits
A practical catalogue workflow usually has separate recipes for each destination.
For example:
Doing this for a whole catalog?
MerchLoom runs background removal, upscaling and AI editing across every product photo you have — one prompt, whole batch. Try 2 batches free, no signup.
Try it free| Workflow | Core steps | Typical use |
|---|---|---|
| Amazon | Remove background, place on pure white, resize to listing canvas, export JPG | Main marketplace image |
| Shopify | Remove background, square crop, keep consistent margins, export web-ready image | Collection and product pages |
| Etsy | Remove background or use a soft branded backdrop, export larger image | Handmade and craft listings |
| Social | Remove background, place in scene, crop for channel format | Paid and organic creative |
People often overcomplicate things. You don't need a custom editing philosophy for every SKU. You need a repeatable sequence that makes the same decisions every time.
If you're evaluating different systems for that, Landra's roundup to compare AI product photo tools is a decent way to see how different products approach batch editing, scene generation, and listing prep.
Put the expensive step later
One of the biggest workflow mistakes is upscaling too early. If the image still includes unnecessary background area, you're paying to enlarge pixels you plan to delete.
Remove the background first. Standardise the composition second. Upscale only when the image is already close to final form.
That order isn't just tidier. It's cheaper and easier to manage at scale.
For teams formalising this into repeatable logic, this overview of AI image workflow automation is useful because it frames image processing as an operational system rather than a design task.
Keep channel outputs separate
Don't overwrite your master cutout with the final marketplace file. Keep layered outputs distinct.
I'd structure folders like this:
- Raw originals
- Transparent cutouts
- Amazon white background exports
- Shopify square exports
- Etsy listing exports
- Lifestyle and ad variants
That makes reprocessing much easier when marketplace rules change or you decide to refresh creative without reshooting.
A short demo helps if you're mapping this out visually:
Think in collections
The most efficient sellers don't ask, “How do I edit this image?” They ask, “How should this collection move through the system?”
That mindset changes everything. You stop solving isolated problems and start designing reusable flows for apparel drops, furniture launches, beauty collections, or seasonal campaigns. Once that's in place, a bulk background remover for product photos becomes one component inside a much larger machine.
Quality Assurance for Marketplace-Ready Images
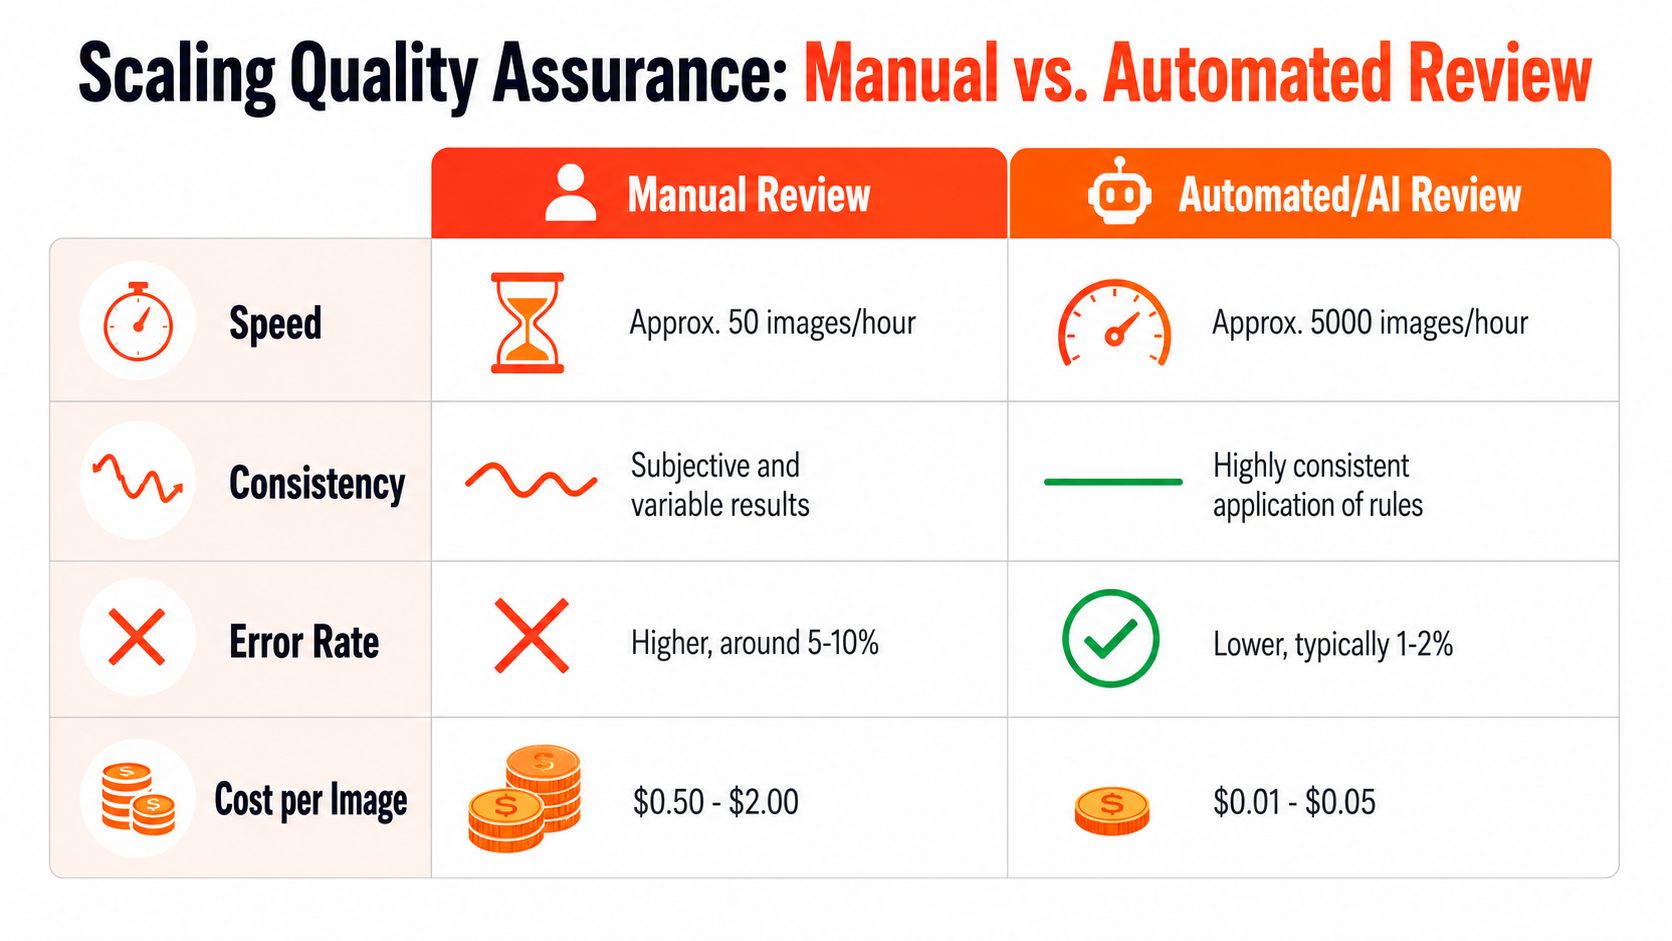
Automation gets you speed. QA keeps that speed from becoming expensive.
Many sellers cut corners by assuming that if the background is gone, the image is done. It isn't. AI can still leave clipped fibres, broken transparency, uneven shadows, or awkward framing that only becomes obvious once the listing is live.
That caution is justified. 68% of Canadian e-commerce sellers report that current AI tools fail to preserve fine details such as hair strands and fabric texture in batch mode, leading to manual rework for 41% of their product lists. That's exactly why QA needs to be designed into the workflow, not treated as cleanup at the end.
What to check first
You do not need to inspect every pixel of every image manually. You do need a ruthless spot-checking routine.
Use a QA pass that focuses on failure patterns:
- Edges: Check fabric hems, jewellery prongs, straps, fringe, and hair-like fibres.
- Shadows: Make sure grounding shadows are consistent across the set.
- Colour spill: Watch for leftover backdrop tint around light products.
- Canvas consistency: Products should sit at similar visual scale across a category.
- File output: Confirm the correct format for the final channel, especially JPG versus PNG.
If one image in a batch fails on a reflective edge, assume similar shots from the same setup may fail too.
Marketplace requirements at a glance
The exact rules vary, but sellers need a working standard for each channel.
| Platform | Background Requirement | Recommended Dimensions (pixels) | Primary Format |
|---|---|---|---|
| Amazon | Pure white for main listing image | 2000 x 2000 | JPG |
| Etsy | Clean, listing-friendly background suitable for product visibility | 2000px class export for flexibility | JPG |
| Shopify | Often square for catalogue consistency, transparent PNGs also useful on site | Square dimensions that fit the theme cleanly | JPG or PNG |
For Amazon-specific checks, Online Brand Growth's Amazon image guide is a useful reference point, and this walkthrough of Amazon product image requirements is handy if your team needs a tighter operational checklist.
Build QA around risk, not around volume
Not every category needs the same review intensity.
A plain carton of supplements can go through a light QA pass. A fashion image with textured fabric, semi-sheer material, or stray fibres needs stricter review. The same goes for glass, chrome, and anything translucent.
A simple triage model works well:
- Low-risk batches: Basic spot check and export verification.
- Medium-risk batches: Zoomed edge check on samples from each lighting setup.
- High-risk batches: Review every image or every close variant before publish.
Non-negotiable check: Always inspect at least a sample set at zoom level before approving a full export batch.
The main point is consistency. Sellers don't lose trust in their catalogue because one image is imperfect. They lose trust when imperfections repeat across a collection.
Troubleshooting and Advanced Batch Workflows
Most problems with background removal show up in the same places. Jagged edges on jewellery. Missing details on textured fabric. Shadows that make the product look like it's floating. These aren't random. They usually come from predictable workflow decisions.
If your shadows look fake, the issue is often that the original grounding shadow was removed but never replaced with something believable. If your metallic item has torn edges, the reflections probably confused detection. If your transparent product looks chipped, the source image likely didn't provide enough separation from the backdrop.
Fix the common batch failures
When a batch goes wrong, don't start editing files one by one. Diagnose the pattern first.
- Jagged cutouts on complex products: Re-batch those items separately from simple objects.
- White halo around light products: Stop shooting on white and use a light gray setup instead.
- Inconsistent catalogue look: Standardise framing and export rules, not just background removal.
- Unnatural shadows: Add a controlled post-processing shadow rather than relying on whatever the tool guessed.
That last point matters. A technically clean cutout can still look commercially weak if the product doesn't feel anchored on the canvas.
Use the cutout as a reusable asset
The economics of image processing change. Once you have reliable transparent cutouts, you can use them far beyond the listing they were made for.
Those PNGs can feed:
- Lifestyle scene generation
- Seasonal campaign variants
- Marketplace-specific canvases
- Ad creative testing
- Branded collection pages
- Virtual product previews
The image edit stops being a sunk cost and becomes a reusable asset library. That's the part many sellers miss when they focus only on “remove background” as a standalone task.
Why batch thinking wins
The operational upside is hard to ignore. Bulk background removal workflows can process 10,000 product images in as little as 2 hours, a 99.8% reduction in time compared with manual editing, with average processing costs dropping below ₹5 per image when using AI batch tools, according to remove.bg's India bulk background workflow guide.
That doesn't mean every output is perfect. It means the economics are now on the side of process design. Sellers can afford to automate the bulk of the work, reserve human attention for difficult cases, and move much faster without scaling headcount at the same pace.
If you're moving from ad hoc edits to repeatable production, this guide to AI batch image editing is a solid next read because the true advantage comes from chaining operations, not from doing one operation faster.
A bulk background remover for product photos is worth using when it becomes the front door to a complete workflow. On its own, it saves time. Inside a batch system, it changes how a catalogue gets published.
MerchLoom is built for sellers who need that kind of catalogue-scale workflow, not just a one-off cutout. You can run batch image pipelines across existing product libraries, turn raw photos into marketplace-ready outputs for different channels, and chain steps like background removal, reframing, white-background creation, scene generation, and upscaling in one flow. If your team is tired of editing listings one image at a time, MerchLoom is worth a look.
Stop editing product photos one at a time
Upload your catalog or connect your store. Describe the result once. MerchLoom does the rest.
Try it free — no signup