
Black Background Images: A Guide for E-Commerce
Learn how to create black background images for product listings at scale. Covers shooting, batch replacement, marketplace specs, and workflow tips.
You've finished editing a product photo, removed the background, and made the item look sharp against deep black. Then you remember the other 200 images waiting in the folder, each with a different crop, edge halo, black level, and marketplace requirement. A result that looks perfect on one SKU can become a catalog problem very quickly.
Start by separating creative images from required listing images. Keep black background images for secondary marketplace photos, collection pages, campaigns, and products that benefit from strong contrast. Build a separate export path for hero images where Amazon or another platform requires a specific background, size, or aspect ratio.
Why Black Background Images Matter for Product Listings
Black backgrounds work because they reduce visual competition around the product. A pale bottle, metallic watch, piece of jewelry, or bright label can appear more defined when the surrounding field stays dark. That effect isn't limited to luxury products. It can help any item with a clear silhouette, reflective surface, or light-colored detail.
The visual idea has a long history. Black pigment appears in some of Europe's earliest surviving cave paintings, including the Lascaux caves in France, which date back over 17,000 years. Modern artists later treated black as an intentional compositional field, and Russian Suprematism made the black square a foundational abstraction in the 1910s. This history of black backgrounds also shows why black should be treated as a range of dark values, not one flat color.

Decide where black belongs
Don't replace every white product image just because black looks more dramatic. A seller usually needs at least two visual roles:
- Hero image: Follow the marketplace's required background and framing rules.
- Secondary image: Use black when it clarifies shape, material, texture, or premium positioning.
- Collection image: Apply one consistent black treatment across related products.
- Campaign image: Use controlled shadows and darker styling when the image supports the brand.
Black and white also produce different reading conditions. White text on black reaches a 21:1 contrast ratio, while WCAG guidance requires at least 4.5:1 for normal text and 3:1 for large text. These color contrast guidelines matter when you add prices, product labels, badges, or buttons over the image.
Dark surfaces can still tire some users, especially when text contrast is weak or the page shifts abruptly between dark and light areas. Keep text away from busy edges, use strong luminance contrast, and avoid decorative patterns that compete with the product.
Before processing a catalog, choose three representative SKUs: one light product, one dark product, and one reflective product. If the black treatment preserves edges and details across all three, it has a chance of working across the wider collection. If it only improves the light product, keep the style limited to that category. For broader product-photo principles, use this e-commerce product photography guide.
Shooting Black Background Images vs Replacing Them Later
There are two workable routes. You can photograph the item against a black surface from the start, or you can remove the existing background from a white-background catalog and place the subject on black afterward. The right choice depends less on taste than on product material, source quality, and the number of files you must repeat.
Shoot native black when the lighting is controlled
A native black setup gives you natural shadow behavior and reflections. It can work well for jewelry, glass, polished metal, dark cosmetics packaging, and products whose edges look artificial after a cutout. Put enough space between the subject and the backdrop so light falling on the product doesn't bounce back into the background.
The reliable sequence is simple:
- Set the camera to manual mode.
- Meter with the flash turned off.
- Lower the ambient exposure until the backdrop records as black.
- Add the key light to expose the product.
- Check the edges, highlights, and shadow before repeating the setup.
Expert guidance commonly uses ISO 100 to 125 and shutter speeds at or below flash-sync limits, often 1/200s to 1/320s. Adobe's black-background photography guidance also recommends matte materials and warns against reflective backdrops. Windows, pale walls, bounce cards, and glossy surfaces can lift the background from black to gray.
Practical rule: If the background receives the same uncontrolled light as the product, you aren't creating a black background. You're trying to rescue a gray one later.
Replace backgrounds when repetition matters most
Background replacement is usually faster for an existing catalog, especially when the source images already have consistent angles, crops, and lighting. It also lets you create one master treatment and apply it to many products without reshooting inventory.
The risk is the mask. Dark products can lose their outer edge against black, while pale products may retain a white fringe from the original background. Reflective items can carry bright pixels into the new background. Review hairline details, transparent packaging, straps, wires, and thin handles before approving a batch.
A useful decision rule is:
- Native shooting: Choose it when reflections, transparency, or natural shadows define the product.
- Replacement: Choose it when you already have clean source images and need a consistent treatment across many SKUs.
- Hybrid workflow: Reshoot difficult hero products, then process the rest from existing files.
For a practical example of the role a clean white source image plays before editing, see BEDHEAD's product shot white background. Once the source files are organized, AI background removal for product images can be part of a repeatable pipeline rather than a one-off fix.
Batch Processing Black Background Images for a Full Catalog
The first mistake in batch editing is starting with the background color. Start with the source contract instead. Decide the accepted input format, crop, subject position, color profile, output dimensions, and file naming pattern before processing anything.
A catalog workflow needs a reference image. Pick one product that represents the most common shape and use it to set the canvas, subject scale, margin, shadow behavior, and black value. Then test that setup on a light product, a dark product, and a reflective product before releasing it across the collection.
Build the batch around fixed checks
Process the files in the same order every time:
- Import: Preserve the original files in a separate folder. Never overwrite the source.
- Remove: Create the mask before placing the new background.
- Normalize: Apply the same black background treatment, crop, and subject position.
- Correct: Check color temperature and product color against the source.
- Resize: Create marketplace-specific outputs from a consistent master.
- Export: Use predictable file names and keep the output format consistent.
A black background should be the same black across the collection. Don't let one tool export a near-black gray while another produces a clipped black with lost shadow detail. Check the output in a color-managed viewer, because a profile mismatch can make a correct file appear washed out or overly dark in another application.
Edge problems also multiply. A faint white halo around one bottle is annoying. The same halo across a product family makes the store look unfinished. Review the first files from each product type, then inspect a sample from the middle and end of the batch. New lighting conditions, camera angles, and packaging materials often appear later in a folder.
Protect resolution during the pipeline
Don't resize aggressively before the mask is complete. Small source images make thin edges harder to isolate and can soften text on packaging. Keep a larger working master, then create platform exports after the background, color, and crop have passed review.
For broader process ideas outside product catalogs, VideoTour.ai's real estate photo AI tool guide is useful because property imagery has the same operational problem: many files need a consistent visual treatment, not just one attractive result.
Doing this for a whole catalog?
MerchLoom runs background removal, upscaling and AI editing across every product photo you have — one prompt, whole batch. Try 2 batches free, no signup.
Try it freeUse a staging folder with three states: source, approved master, and platform export. That structure makes it possible to correct a bad mask once, regenerate the exports, and avoid manually hunting through every marketplace folder. A batch image editing workflow can help formalize those repeated operations.
Marketplace Size and Color Rules for Product Images
A polished black-background image can still fail a marketplace review. The problem appears when one attractive treatment has to serve a full catalog while each channel applies different size, color, and placement rules. Set the compliant hero version first, then create black-background variations for placements that allow more creative control.
Amazon requires a strict hero treatment
Amazon's main product image must use a pure white background, RGB 255,255,255, and the longest side must be at least 1600 px for the commonly cited zoom-ready standard, as explained in Gdefoto's breakdown of Amazon photo requirements. That requirement makes a catalog template more reliable than editing each product by eye.
Keep the Amazon hero on a square master frame where possible, even when the product has a different shape. Consistent framing makes hundreds of SKUs easier to compare and review. Before upload, check the white point, subject scale, and longest-side dimension.
Black-background images can support Amazon listings as secondary images when the listing format permits them. They cannot replace a compliant main image. A strong listing may need both versions: a white hero for platform rules and a dark image that shows material, styling, or use context.
Use NanoPIM's Amazon product image requirements guide when building a marketplace-specific export checklist. The Amazon product image requirements checklist from MerchLoom provides another way to organize those checks before files reach the listing workflow.
Etsy and Shopify need consistent sizing
Etsy product photos are commonly specified at 2000 px on the shortest side, with guidance describing 2000 x 2000 px or larger as the practical recommendation. Etsy's product photo size guidance connects that size with zoom quality and shows why a shop should use a consistent minimum instead of mixing small and large source files.
Shopify is commonly recommended at 2048 x 2048 px for product images. Shopify supports images up to 4472 x 4472 px and 20 megapixels, giving sellers room for detailed product pages. Shopify product image sizing recommendations also points to the practical benefit of a square master for repeated resizing across themes.
Apply the export logic consistently:
- Amazon: Create the pure-white hero export first. Keep black as a secondary treatment where appropriate.
- Etsy: Keep the shortest side at 2000 px or more before cropping and replacing the background.
- Shopify: Maintain a square master and export within the platform's supported dimensions.
- eBay, WooCommerce, Poshmark, and Depop: Check the current listing rules for each account, then use the same approved master instead of making separate manual edits.
Never stretch a small image just to meet a pixel requirement. A larger file cannot restore missing detail. If the source is too small, use a suitable enlargement step, then inspect fine text, seams, and product edges at actual viewing size.
Building a Repeatable Workflow for Black Background Images
A reliable catalog process has a decision point before the creative edit. Every file should first be identified by destination, source quality, product type, and required output. That prevents a black-background campaign image from being mistaken for an Amazon hero image later.
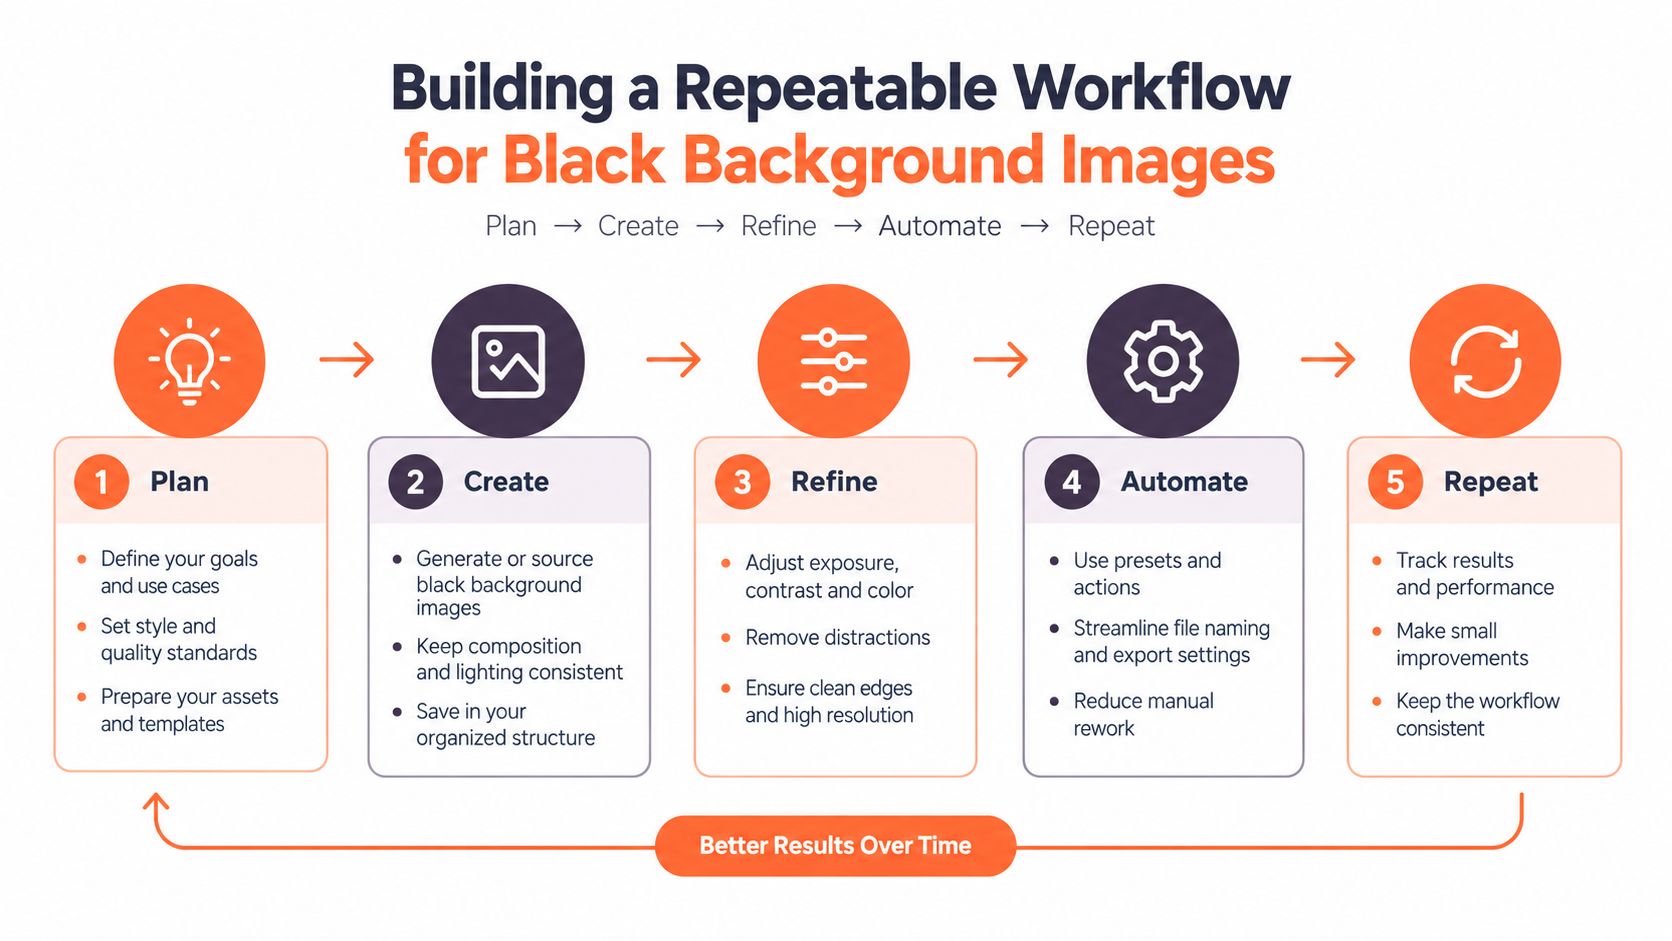
Use five controlled stages
1. Sort the inputs. Group files by product family and source condition. Keep reflective, transparent, and very dark products in review groups because they need closer edge inspection.
2. Create the cutout or capture the native setup. Use the existing white-background source when it is clean and consistent. Use a native black shoot for products where reflections and natural shadows cannot be reproduced convincingly after replacement.
3. Apply the visual treatment. Set one black value, one crop rule, one subject scale, and one shadow approach. Don't adjust those values from SKU to SKU unless the product physically requires it.
4. Check color and detail. Compare the edited file with the source. Look at logos, labels, metallic highlights, transparent areas, and dark surfaces. A black background must not hide the product's actual color or shape.
5. Export by destination. Generate the Amazon white hero, Etsy-ready output, Shopify square output, and creative black-background versions as separate files. Store them in clearly named folders.
Review before the batch finishes
Don't wait until every image has processed. Review the first group, then pause again after a representative middle group. If an edge setting is wrong, stopping early prevents the same defect from reaching the entire collection.
A useful review panel contains one light item, one dark item, one glossy item, and one item with fine detail. Check them at thumbnail size, normal page size, and zoom. Thumbnail review catches weak silhouettes. Zoom review catches halos, clipped highlights, jagged masks, and softened packaging text.
For sellers who don't want to edit each file separately, MerchLoom can run chained AI pipelines across an imported collection. You can combine background removal, black-background normalization, reframing, color correction, and upscaling, then review results mid-batch. The first images can be tried with no account, and the service is pay-per-image with credits that never expire. It still needs human review, and it isn't a full Photoshop replacement.
Keep a written recipe for every approved collection. Record the intended canvas, background treatment, crop, output destinations, and review failures. When new inventory arrives, you can apply the same workflow instead of rebuilding the look from memory. These workflow efficiency practices matter more as the catalog grows because consistency becomes an operating rule, not an editing preference.
When Black Background Images Work and When They Hurt Sales
A jewelry seller may find that black gives a small reflective product a clear outline and makes metal highlights easier to read. A kitchenware seller may get the opposite result if a dark pan disappears into the background or if the handle loses its shape. The same treatment can clarify one category and conceal another.
Research on perceived surface properties found that identical objects were rated significantly glossier against black than white. The reported mean glossiness increase was 2.4 for a glossy sphere and 1.8 for a matte-dot sphere, with statistically significant results reported as t(10)=3.239, p=0.004 and t(10)=2.192, p=0.026. The peer-reviewed vision research supports a practical warning: black can make products feel more premium, but it can also exaggerate highlights and surface defects.

Use black when the product has light edges, controlled reflections, or a material story that benefits from shadow. Avoid it when the product is already dark, when buyers need to judge exact color, or when the platform's hero-image rules require white. A stylized image that hides a seam, clasp, texture, or silhouette can reduce trust even if it looks polished.
Before applying the treatment to the full catalog, compare the same product on white and black. Check the thumbnail, product page, and zoom view. Inspect specular clipping, edge contamination, lost shape cues, and color accuracy. Approve the style only when it improves product understanding, not merely when it makes the image more dramatic.
MerchLoom lets you import product photos, chain background removal and black-background processing, and run the same workflow across a full collection instead of editing one image at a time. Try the first images without an account, review the output, and visit MerchLoom when you're ready to prepare consistent marketplace and campaign exports.
Stop editing product photos one at a time
Upload your catalog or connect your store. Describe the result once. MerchLoom does the rest.
Try it free — no signup