
How to Improve Workflow Efficiency for Product Images
Learn how to improve workflow efficiency across hundreds of product images with batch automation, integrations, and cost-saving step ordering
You've got a folder full of product photos, a Shopify collection waiting for updates, and marketplace listings that still need clean crops, consistent backgrounds, and usable file sizes. Editing one image at a time feels manageable until the same decision has to be repeated across hundreds of SKUs.
Start with the output preset, not the editing tool. Decide where each image will go, what dimensions it needs, which background it requires, and what a human must approve. That single step prevents the most expensive form of rework, touching every file again because the first export was built around the wrong target.
The Catalog-Scale Problem Every Seller Hits
The catalog-scale pain is simple: a workflow that works for one product often breaks when the same product treatment must run across hundreds or thousands of images.
Each marketplace adds constraints. Amazon requires the main image to show the actual product on a pure white background, RGB 255,255,255, with the product filling at least 85% of the frame. Amazon says images should have at least 500 pixels on the longest side and no more than 10,000 pixels in total longest-side size guidance. Etsy recommends listing images at least 2000 pixels wide and high, and warns that images under 2000 pixels wide can trigger an error. Shopify allows product and collection images up to 5000 by 5000 pixels, or 25 megapixels, while its guidance says square product photos commonly display best at 2048 by 2048 pixels. Common Shopify themes may also impose a 4472 by 4472 pixel maximum and a 20 MB file-size limit, so check the theme before setting a master export.
| Platform | Minimum or target resolution | Aspect ratio | Format | DPI |
|---|---|---|---|---|
| Amazon | At least 500 pixels on the longest side. Use a consistent square preset for batch work | Square is practical for catalog consistency | Choose the export format that preserves the required background and quality | Not specified in the marketplace rule |
| Etsy | At least 2000 pixels wide and high recommended | Square is practical for repeatable listings | Use a format that preserves the intended image treatment | Not specified in the marketplace rule |
| Shopify | 2048 by 2048 commonly displays well. Platform limit can reach 5000 by 5000 | Square works well for product catalogs | Use a format supported by your theme and delivery setup | Not specified in the marketplace rule |
A seller with a small collection may manually fix a crop or rename an export. At catalog scale, that same correction becomes repeated labor, misplaced files, and listings that no longer look like they belong to the same store. The guide to image editing for e-commerce is useful background, but the operational rule is more direct: build the marketplace requirements into the preset before processing begins.
If you export first and check requirements later, you'll re-resize, re-crop, and re-upload the same images. The workflow should make the correct output the default.
Set the Order of Operations Before You Touch a Single Image
The practical sequence is source, centralize, define the preset, then run. Don't begin by opening the first product photo and testing random edits. That creates a result, not a system.
Start with one source of truth
Pull raw files from the location where your original images live. That might be a Google Drive folder, Dropbox handoff, camera workflow, or object-storage bucket. Keep the originals untouched and separate from processed outputs.
This prevents a common catalog mistake: processing a stale copy, saving over it, then processing the newer file later because nobody knows which version is final. A clean source folder also makes reruns safer when one stage fails.
Centralize names and SKU mapping
Every source file needs a reliable connection to a product record. Use the SKU, parent SKU, or another identifier in the filename, then keep variants grouped in a predictable way.
For example, a file named SKU123_black_front.jpg tells you more than IMG_4821.jpg. It also gives the export process a destination it can calculate instead of leaving you to sort hundreds of files manually.
Practical rule: If an output can't be traced back to a SKU without opening the image, the naming system is too weak for a large catalog.
Define the preset from the destination backward
The preset should contain the decisions you don't want to make repeatedly:
- Resolution: Set the target for Amazon, Etsy, Shopify, or your own storefront.
- Framing: Decide whether the product is square, portrait, or horizontal.
- Background: Specify pure white, transparent, or a controlled lifestyle scene.
- Color treatment: Lock the color space and correction approach.
- File naming: Preserve SKU and variant information through export.
- Review status: Mark files as pending, approved, or requiring rework.
A preset is not a guess. It's the marketplace specification converted into defaults. A repeatable process is easier to audit because every image receives the same starting treatment.
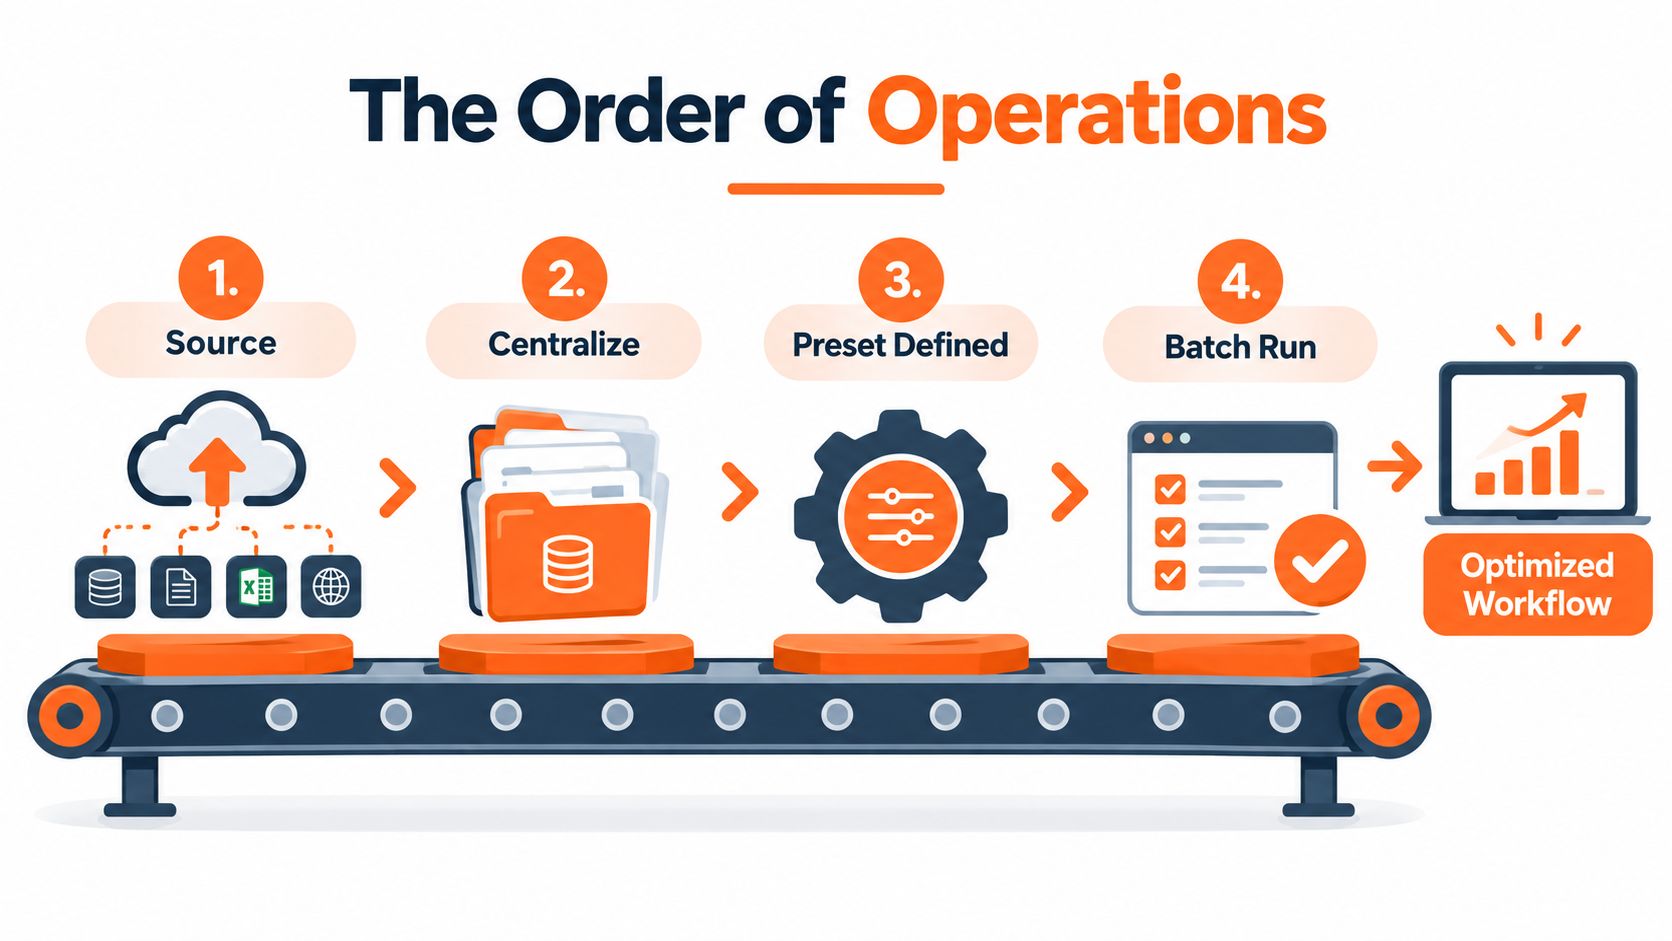
Run the batch only after the source set and preset are fixed. Reversing the order creates duplicate work. Running before centralizing means you may process the same file twice. Centralizing before defining the preset means every file gets touched again when the dimensions or background changes. The sequence is the workflow, as the process optimization examples make clear.
Batch Techniques That Actually Repeat Across a Collection
Four image operations repeat well across a product catalog: background removal, reframing, upscaling, and background replacement. The key is to save each operation as a controlled stage instead of manually improvising it for every SKU.
1. Remove the background at the source size
Run background removal before resizing. The cutout needs as much original edge information as possible, especially around hair, thin straps, transparent packaging, reflective surfaces, and small hardware.
Keep a transparent version for uses that need compositing. For Amazon, create a separate flattened version with RGB 255,255,255 as the background. Don't overwrite the cutout. The same product may later need a transparent asset for a store banner, a white-background main image for Amazon, and a lifestyle composition for another sales channel.
2. Reframe against the marketplace target
After the cutout is clean, set the composition. A square canvas is usually easier to reuse across Shopify, Amazon, and Etsy, but the product must remain fully visible and consistently sized from SKU to SKU.
For Amazon, a 1600 by 1600 working preset can give a seller a consistent catalog canvas, while the marketplace rule itself requires at least 500 pixels on the longest side. Keep the product inside the frame and preserve the required 85% minimum frame fill for the main image.
For Etsy, use a canvas at least 2000 pixels wide and high. For Shopify, a 2048 by 2048 square master is a practical starting point when the theme supports it.
3. Upscale only the files that need it
Upscaling every file wastes processing time and can soften images that were already large enough. First identify files below the destination requirement. Then upscale only those files, using a fixed scale such as 2x or 4x, capped at the target dimension.
The cap matters. A file that needs a 2000-pixel output shouldn't become an unnecessarily large master and then be reduced again. That adds processing without improving the listing.
4. Replace backgrounds after the cutout and crop
Background replacement should be the final compositing stage. Use pure white for an Amazon main image, a controlled scene where Etsy merchandising benefits from context, or a restrained studio treatment for Shopify.
Keep lighting direction, horizon position, and shadow behavior consistent. For broader guidance on reducing file weight while retaining usable quality, consult this resource on image optimization for web performance.
| Technique | Amazon settings | Etsy settings | Shopify settings |
|---|---|---|---|
| Background removal | Preserve the cutout, then flatten the main image to RGB 255,255,255 | Preserve transparency when needed for reuse | Preserve transparency when needed for reuse |
| Reframing | Use a consistent square working canvas and maintain at least 85% product fill | Use at least 2000 by 2000 for the listing canvas | Use a square master, commonly 2048 by 2048 |
| Upscaling | Apply only below the chosen listing target | Bring the image to at least 2000 pixels wide and high | Stop at the theme and platform target |
| Background replacement | Pure white for the main image | Use a consistent approved scene or clean background | Use a controlled studio or storefront background |
Save the sequence as a reusable chain. The batch product photo editing workflow should be something you can apply to the next collection without rebuilding each instruction.
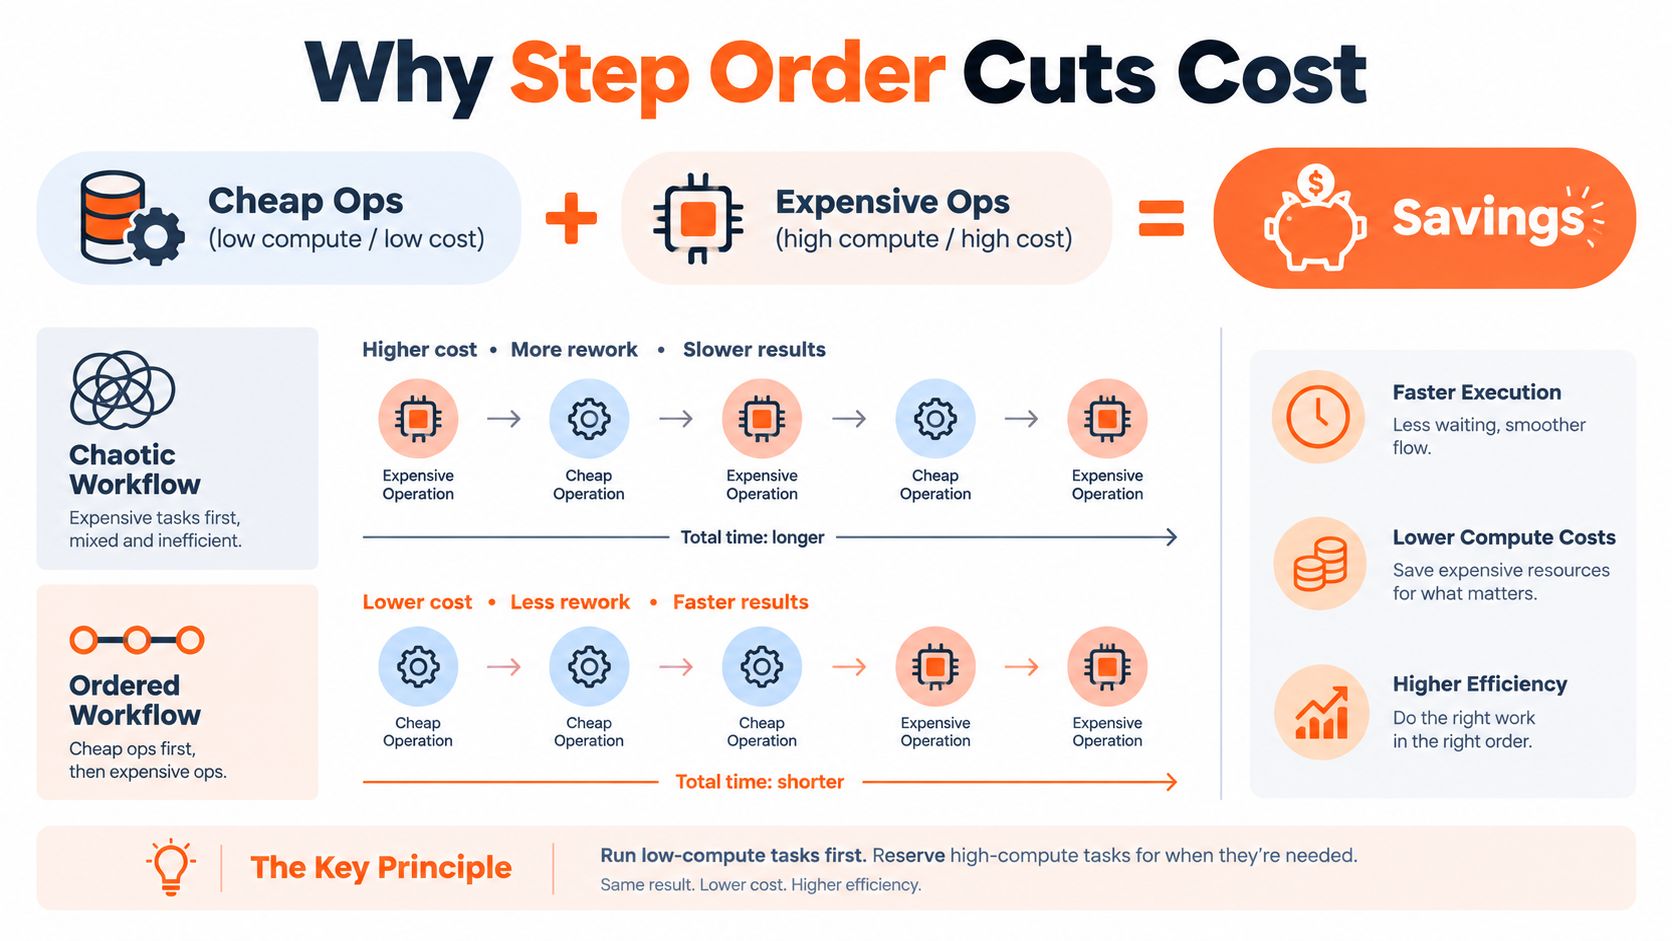
Why Step Order Cuts Cost and Time on Every Run
The cheapest operation should usually happen before the expensive one. That sounds obvious, but many image pipelines upscale first, generate a detailed scene next, and remove unwanted pixels only at the end.
Doing this for a whole catalog?
MerchLoom runs background removal, upscaling and AI editing across every product photo you have — one prompt, whole batch. Try 2 batches free, no signup.
Try it freeConsider a source image that measures 4500 by 5400 pixels. If the final Etsy target is 2000 by 2000, there's no reason to run an expensive enhancement process across pixels that will later be cropped away. Remove the background, establish the crop, and reduce the working image to the required canvas before applying expensive enhancement only where it's needed.
The same principle applies to color correction and shadows. Normalize white balance across the batch before upscaling so the enhancement stage receives more consistent inputs. Add generated shadows after the crop and composition are locked. Otherwise, a later crop can cut through the shadow or force you to generate it again.
This is also why you should measure a batch from intake to approved export, not just the time spent inside an editor. A public-institution batch-processing study found that advanced planning reduced average execution time by 69 minutes, and its authors concluded that the planning effect was statistically significant. The batch-processing study also points to fragmented control and poor planning as sources of execution variability.
A high-load image benchmark reached a related conclusion. Under 4,096 concurrent requests, a newer AMD EPYC processor processed up to 41% more images per second than the prior-generation processor across seven image-processing operations. The computer-vision preprocessing benchmark shows why single-image tests can mislead. Test with representative batch sizes, mixed resolutions, and the same preprocessing chain you use in production.
Integrations That Turn Batches Into a Continuous Pipeline
A batch becomes a continuous pipeline when each completed stage triggers the next one without manual file juggling. The useful question isn't only where files start. It's which processed asset can be reused later.
| Source | What it feeds | Reuse output |
|---|---|---|
| Amazon S3 or Google Cloud Storage | Raw product-image intake | A preserved source linked to SKU and variant |
| Dropbox or Google Drive | Vendor and photographer handoffs | A centralized batch ready for preset processing |
| Shopify, Etsy, or Amazon | Marketplace-ready exports | Platform-specific crops and approved listing assets |
| Cloudflare R2 | Object storage and delivery | Reusable product variants for storefronts and campaigns |
| Direct CDN URLs | Storefront or application delivery | A stable image reference without repeated uploads |
A new file in an S3 or Google Cloud Storage bucket can trigger intake. A file added to a Dropbox or Drive folder can enter the same queue after a vendor handoff. Once the SKU is recognized, the pipeline can create the needed marketplace variants from one source rather than asking you to upload the same product repeatedly.
Reuse is where the catalog saving appears. If a clean cutout already exists, a new colorway or listing should not run background removal again. If an approved square master exists, create a different marketplace crop from that master rather than returning to the original folder.
The minimum self-running setup needs three connections:
- An intake source, such as S3, Google Cloud Storage, Dropbox, or Drive.
- A processing and review queue, with SKU mapping and saved presets.
- A destination, such as Shopify, Etsy, Amazon, Cloudflare R2, or a direct CDN URL.
A fourth connection to your listing platform helps, but it shouldn't replace the source of truth. The guide to AI workflow automation for brands offers useful context on connecting triggers, transformations, and destinations. For Shopify-specific workflows, see AI image editing from Shopify.
MerchLoom can connect existing storage and commerce sources, then run chained AI image workflows across a collection. It's pay-per-image with credits that never expire, and you can try the first images without an account. It still needs a human review step, and it isn't a full Photoshop replacement.
Keep Human Review in the Loop Without Killing Throughput
Automation should remove repetitive decisions, not remove judgment from the process. AI can create a clean first pass, but a seller still needs to verify whether the product looks true, whether the edges are intact, and whether the final image meets the marketplace rule.
A practical review gate checks the first 10 images, then every 100th image, plus any file the pipeline flags as low confidence. A recent industry summary describes these flagged images as usually under 5% of a run, but treat that as a planning reference rather than a guarantee. Your catalog, source quality, and product types will change the rate.
Give the reviewer a fixed checklist
The reviewer should not stare at every file without a decision framework. Check:
- Color truth: Compare the output with the physical product or a trusted reference.
- Edge accuracy: Look for missing handles, clipped corners, halos, and holes filled incorrectly.
- Product framing: Confirm that no edge is accidentally cropped.
- Shadow direction: Make sure shadows match across the collection and don't overpower the item.
- Marketplace compliance: For Amazon, confirm the main image uses pure white RGB 255,255,255 and contains no unwanted props, logos, watermarks, or inset images.
- Variant identity: Confirm that the image matches the SKU, color, size, and angle in the filename.
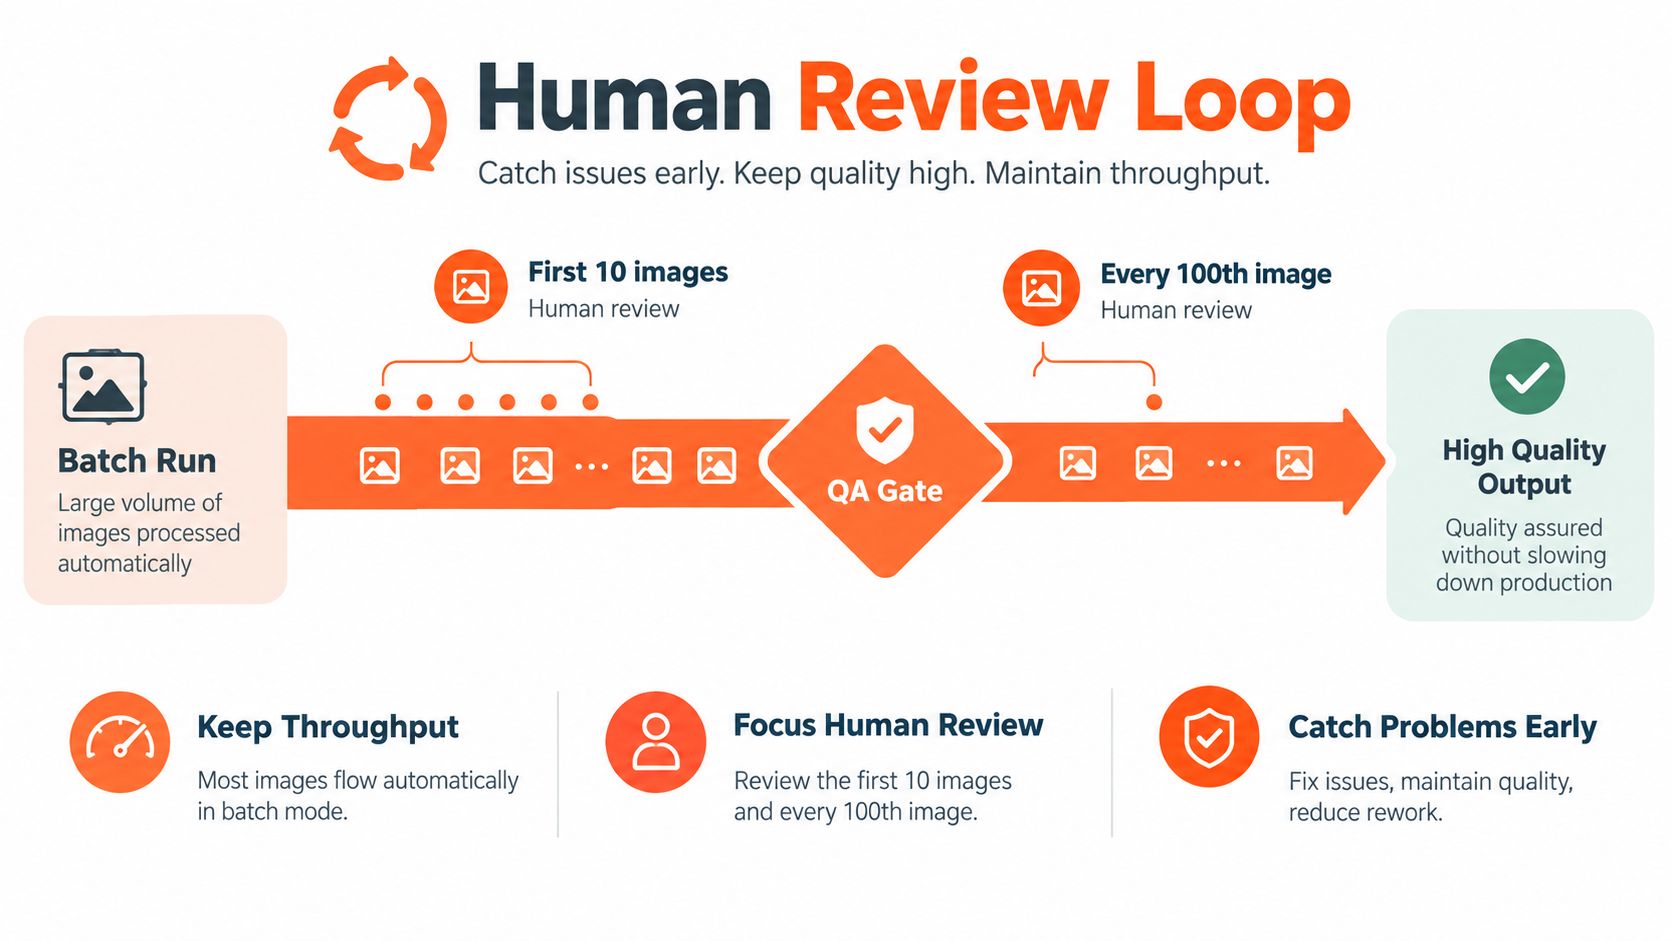
Assign one person as the approver for each run. That person should either approve the batch, reject a defined subset, or pause the pipeline when a shared error appears. Don't make the reviewer fix every image manually. Send failed files back to the specific stage that caused the issue.
For example, an incorrect shadow belongs in the shadow stage, not in a complete rerun. A bad crop belongs in reframing. A wrong background belongs in compositing. This keeps QA measured in minutes per batch instead of turning it into a second editing workflow.
Human review is a quality gate, not a return to one-image-at-a-time editing.
Run the Whole Pipeline Across Your Catalog
Workflow efficiency improves when the catalog moves through one connected system:
- Pull the source files from cloud storage.
- Identify each file by SKU and variant.
- Remove the background.
- Normalize color and prepare the cutout.
- Reframe to the marketplace canvas.
- Resize before expensive enhancement.
- Upscale only the files below target.
- Replace or flatten the background.
- Export to marketplace-ready folders.
- Send the batch to human review.
- Publish only approved assets.
That order protects both processing time and catalog consistency. Run background removal before color correction when the background affects the correction. Rename files to the ASIN or SKU before export, not after the files have already landed in a marketplace folder. Resize the working image before upscaling when the crop will discard part of the original.
For Etsy, target at least 2000 pixels wide and high. For Shopify, retain a 2048 by 2048 square master when it fits the theme and catalog design. For Amazon, keep the main image on pure white RGB 255,255,255, make the product fill at least 85% of the frame, and stay within the marketplace's stated image dimensions.
Make the run auditable
A useful run log records the source folder, preset name, SKU, output destination, review status, and failed stage. That information lets a new operator repeat the process without asking which version was used last time.
It also makes seasonal catalog work easier. Swap the source folder and export destination, keep the approved preset chain, and review the first sample before allowing the full collection to continue. The process should change only when the product type or marketplace requirement changes.
MerchLoom is one way to run this structure across a whole collection through chained AI pipelines instead of one image at a time. It can pull product images from connected sources, apply background removal, reframing, upscaling, color correction, and background replacement, then route the outputs for review. There's no monthly subscription requirement, and credits are pay-per-image with no expiration.
The broader lesson is that adding another editing tool rarely fixes a broken process. Independent coverage citing McKinsey reports that 80% of respondents felt AI improved personal productivity, while only 37% saw positive EBIT impact. The same coverage says only about 6% were high performers, and nearly three-quarters of those organizations were redesigning workflows rather than merely adding tools. Read the workflow redesign analysis for the wider business context.
The seller-level version is straightforward. Centralize the files, define the output once, run cheap operations before expensive ones, reuse clean intermediate assets, and keep a human at the approval gate. That's how to improve workflow efficiency without sacrificing the visual consistency that makes a catalog look trustworthy.
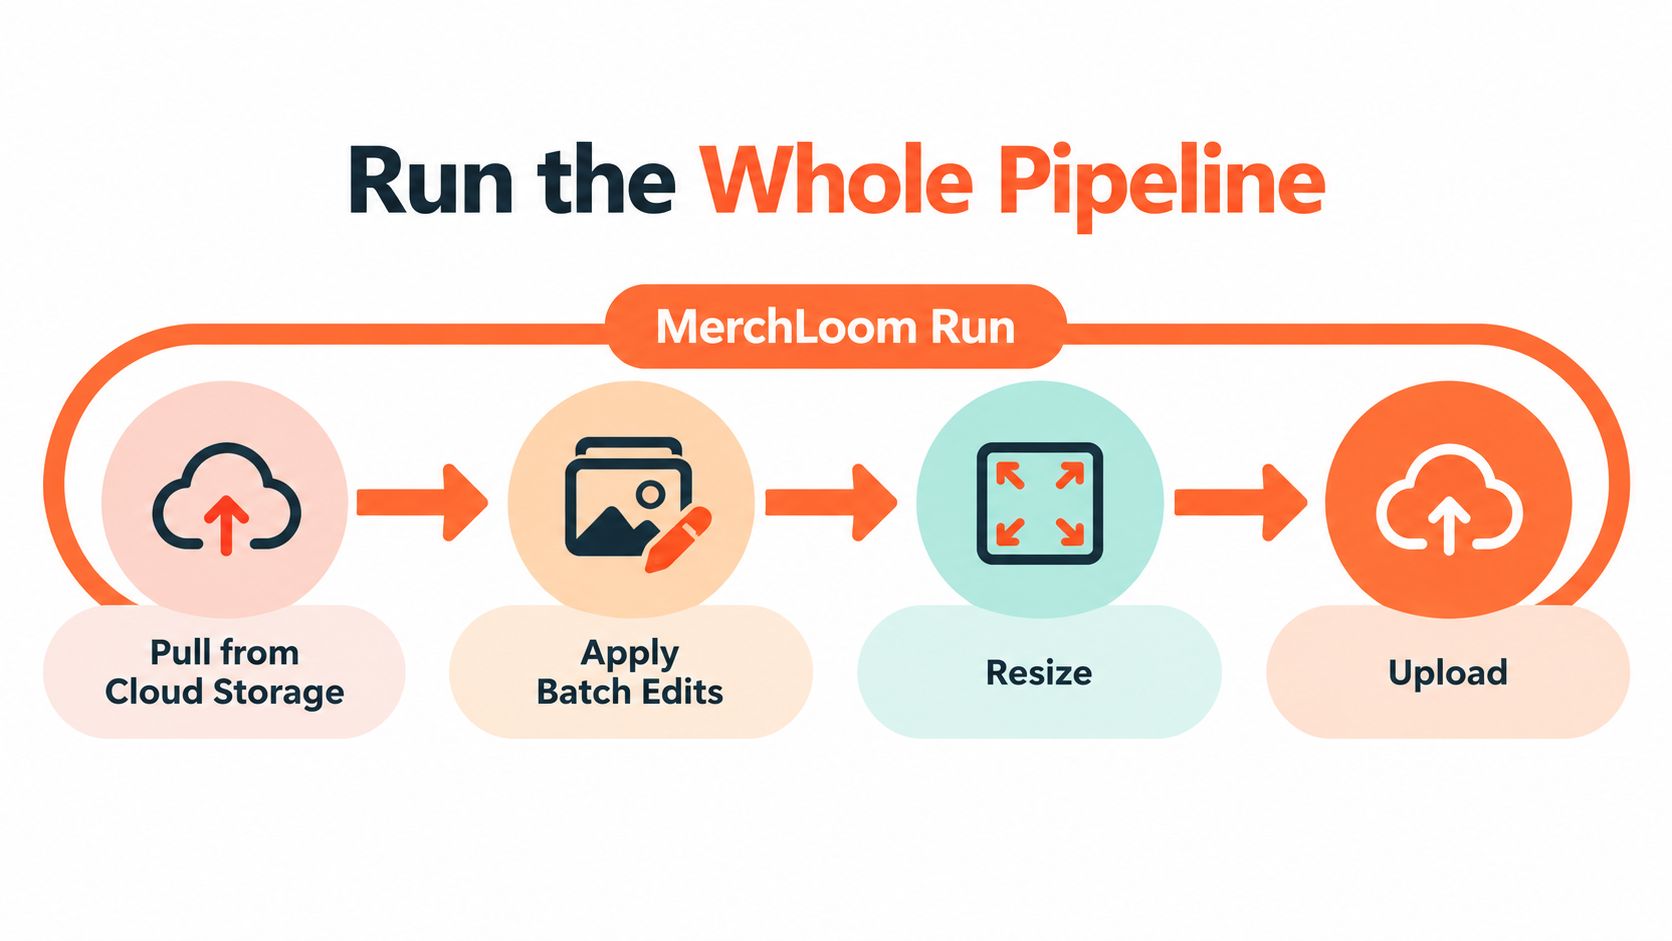
A visual walkthrough of the end-to-end flow is available below.
For more detail on connecting the stages, see this AI image workflow automation overview.
Start with a small product folder, define the marketplace preset, and send the first images through MerchLoom without an account. Visit MerchLoom to run chained image workflows across your catalog, review the output, and pay only for the images you process.
Stop editing product photos one at a time
Upload your catalog or connect your store. Describe the result once. MerchLoom does the rest.
Try it free — no signup