
Black Background for Photography: Setup to Batch Workflow
Black background for photography made repeatable. Setup, lighting, settings, fixes, and batch processing for product and portrait catalogs at scale.
You've got 200 SKUs waiting, and the listings need to look consistent across Amazon, Etsy, Shopify, eBay, WooCommerce, Poshmark, and Depop. There's no time to reshoot because one product shifted, one backdrop lifted gray, or one batch picked up a different color cast.
For black background for photography, start with the camera, not the editing software. Set the camera to manual, use ISO 100, choose a shutter speed near your camera's sync speed, around 1/200 to 1/250s, and stop down from f/5.6 toward f/8 to f/11 until an empty frame reads black. This baseline follows the repeatable workflow described by ORBITVU's black-background product photography guide. Then add flash. The same sequence should work on image one and image 200.
Why a Black Background Has to Be Built, Not Edited In
A black background isn't created by dragging the exposure slider down after the shoot. That approach often darkens the product edges with the background, removes useful shadow detail, and leaves you repairing every file separately. At catalogue scale, the cheapest image is the one that starts close to finished.
Adobe describes black-background product photography as a classic, timeless fine-art approach. Its commercial value is more practical than decorative. A white background can dull the edges of a white chair and obscure its curves, while black can preserve more dimensional contrast and reveal more of the product's shape. Adobe's comparison of black and white backgrounds also recommends low-ISO shooting in the 100–125 range and a low f-stop to separate the subject from the background.
Build the darkness in the room
The order matters:
- Kill ambient light. Turn off nearby lamps, close blinds, and remove daylight from the set.
- Set manual exposure for an empty black frame. Don't place the product in the scene yet.
- Add flash after the frame is black. Adjust flash power and modifier position, not the aperture you already tested.
- Check the histogram. Keep most tonal data pushed left, but protect the product's highlights and edges.
If the empty frame looks gray, the problem usually isn't the editing. Ambient light, background spill, or a backdrop that reflects too much light is reaching the sensor. Fix the room and light geometry before touching the product.
Practical rule: A black background should be a controlled exposure target, not a rescue operation in post.
This distinction becomes more important with a large catalogue. If every file needs individual masking, edge repair, black-level correction, and shadow recovery, a visually simple style becomes a slow production system. A repeatable set, fixed camera position, locked white balance, and consistent product placement let you apply the same decisions across the batch.
Black backgrounds also make product differences obvious. A silver watch, black cosmetic tube, leather bag, and glossy package won't respond to the same light in the same way. The workflow must stay fixed, but the flash position may need small, documented adjustments for reflective or unusually dark products. That's still faster than improvising every image from scratch.
Two Setups That Cover Most of Your Catalog
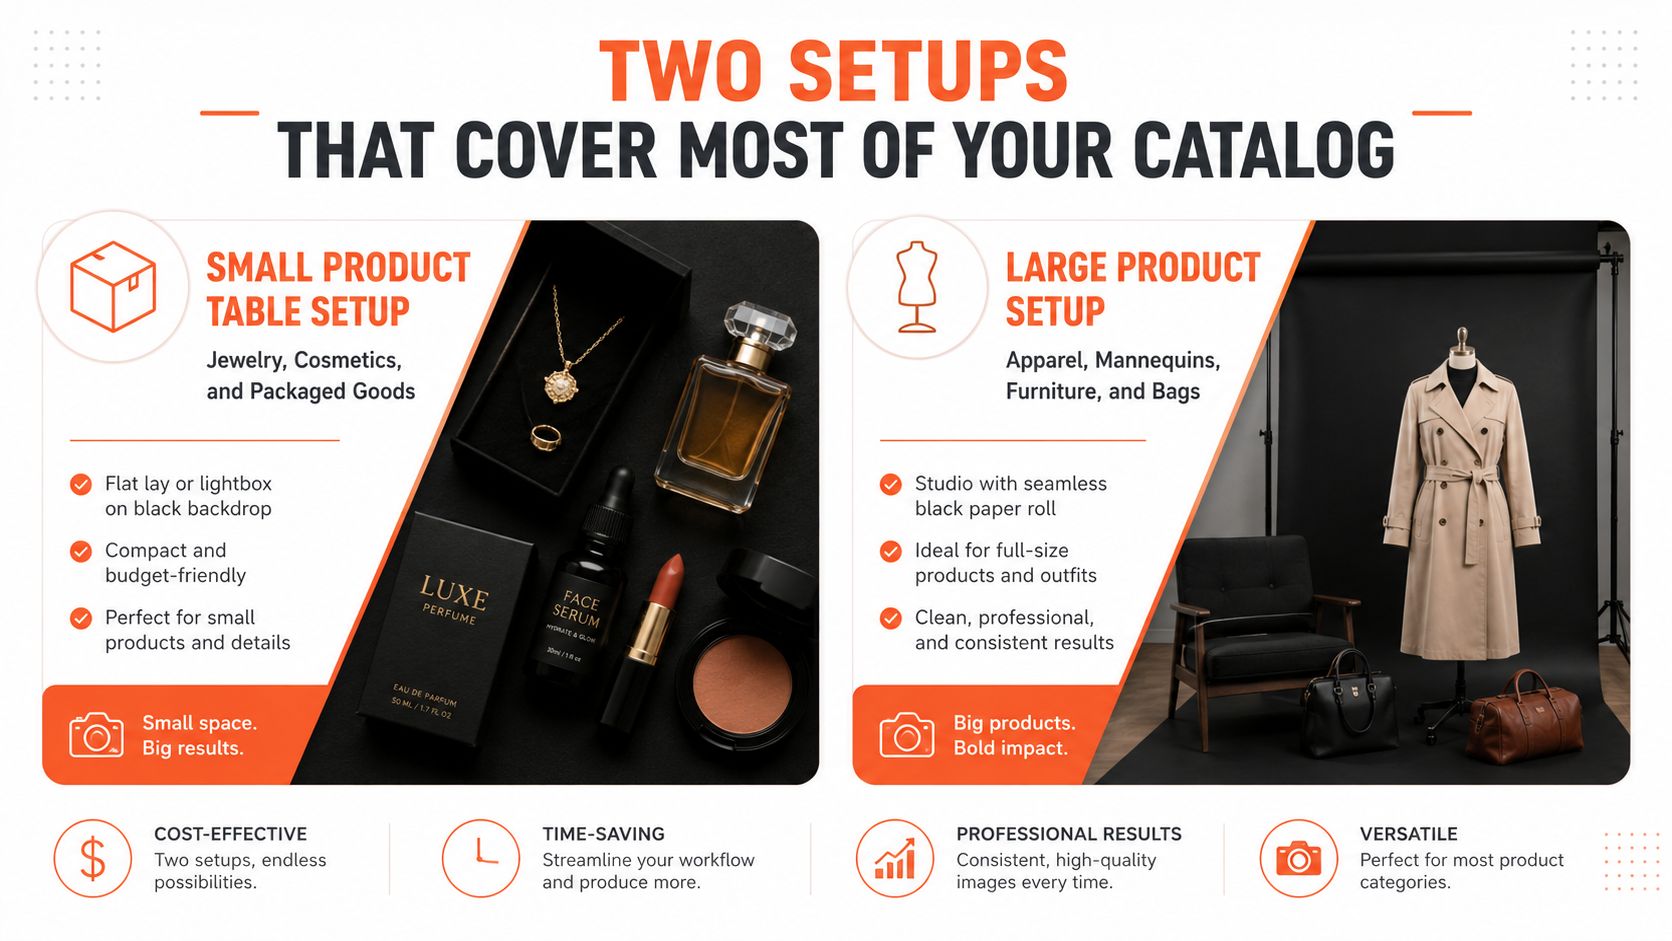
Most e-commerce catalogues can be divided into two physical setups. Small products need controlled tabletop lighting. Large products need more distance so the background stays unlit.
Small product table setup
Use this for jewelry, cosmetics, accessories, watches, and packaged goods. Place the table or lightbox at least 3–4 ft from the black backdrop. That distance gives light a chance to fall off before it reaches the background and leaves room for a black flag or black foam-core panel on the camera-side edge of the table.
Use a snoot or gridded strip box as the starting modifier. Both narrow the beam and reduce spill compared with a broad, uncovered source. Keep the camera roughly level with the product's mid-line unless the catalogue requires a consistent flat-lay view. Whatever angle you choose, mark the tripod legs and table position so every SKU sits in the same visual frame.
Build a loose U-shape of black velvet or another non-reflective material around the set. The side panels absorb bounce from walls, tables, and nearby equipment. This matters with glossy packaging because the product can reflect the room even when the backdrop itself is perfectly black.
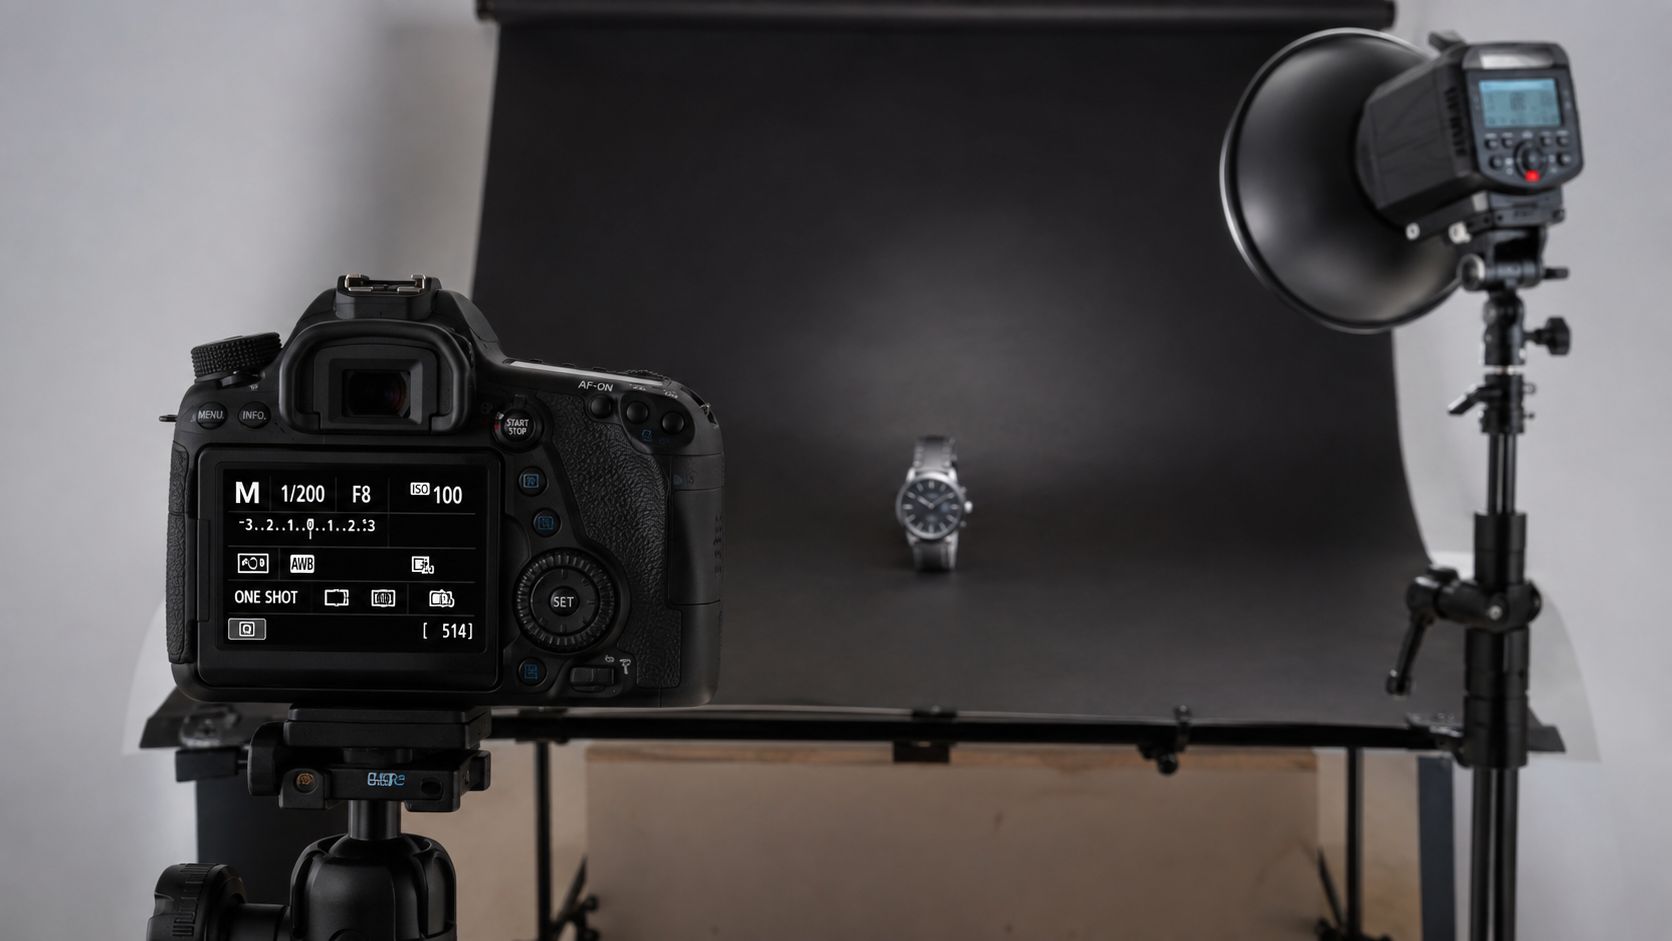
Before placing the first product, shoot an empty frame. Check the LCD and histogram. If the empty frame doesn't read black, stop and fix the distance, flags, or ambient light.
Large product setup
Use this for apparel on mannequins, furniture, bags, home goods, and larger packaging. Give the product at least 6–10 ft between it and the backdrop where the room allows. A longer gap reduces the chance that the key light will raise the background and makes edge separation easier to control.
For large items, start with a feathered key at roughly 45 degrees. Aim the brightest part of the source across the product rather than directly at the backdrop. Add black flags on the opposite side to absorb bounce, then extend the black material into a U-shape around the product when the room has pale walls or reflective floors.
Keep the camera height close to the product's mid-line. For furniture, that may mean lowering the camera. For a mannequin, it may mean raising the tripod. Consistency matters more than a universal camera height, because a catalogue looks untidy when the same product category changes perspective from listing to listing.
The test is unchanged. Shoot the empty set and confirm a black histogram before the product enters the frame. A studio backdrop guide from MerchLoom can help you plan the physical background before you standardize the set.
Camera and Flash Settings That Repeat Across the Batch
For a batch of 200 SKUs, consistency comes from changing one variable at a time. Use manual exposure, shoot RAW, and keep the camera on a tripod. Set the camera to the baseline established in the earlier setup, then leave ISO, shutter speed, and aperture fixed while you tune the light. This prevents small exposure changes from spreading across the catalogue.
Before the first product, shoot an empty frame with the lights off or blocked. The frame should read as black. If ambient light remains, stop it down until the background disappears. A shutter-speed change alone will not correct spill once flash is firing.
Add flash without reopening the exposure
Turn on the flash only after the empty frame passes. Adjust flash power, modifier distance, or modifier angle while the camera settings stay unchanged. If the product is dark, raise flash power or bring the source closer. If the background becomes gray, check spill first. Move the product farther from the background, narrow the beam, or add a flag.
A gray-card frame should be the first reference frame in the batch. Photograph the card under the final lighting, create a custom white balance from it, and apply that balance to the full group. PhotoFocus explains the gray-card batch method for keeping catalogue color consistent without correcting every file separately.
Check the LCD histogram for tones concentrated toward the left, while preserving important highlights on the product. A gray background with a correctly exposed subject indicates a spill problem, not an exposure problem. Fix the light path before changing subject brightness.
For apparel collections, ai fashion photography can help assess whether a physical shoot or generated presentation fits the workflow. Either way, review product accuracy, fabric detail, and framing consistency. A black background is a poor choice when those details merge into the field or when the selling platform requires a light background.
Use a product studio lighting workflow from MerchLoom to document repeatable positions for each product group. Record the modifier, stand position, camera height, and product distance. Those notes make a returning seasonal collection faster to set up and easier to match.
Choosing the Right Background Material
The backdrop controls more than color. It affects reflected light, wrinkles, lint, edge separation, and how often you need to clean the frame. For a catalogue shoot, choose material based on the product's surface first.
| Material | Reflectivity | Wrinkle resistance | Best for |
|---|---|---|---|
| Black velvet | Very low | Good when supported or stretched | Jewelry, reflective packaging, black-on-black products |
| Matte black paper | Low | Poor if creased | Clothing on a hanger and clean, disposable sets |
| Black fabric | Low to medium | Poor unless stretched | Portable setups and larger products |
| Painted foam board | Medium, depending on paint | Excellent | Rigid tabletop work with controlled light |
| Black acrylic | High | Excellent | Deliberate reflection effects, not most catalogue shots |
Doing this for a whole catalog?
MerchLoom runs background removal, upscaling and AI editing across every product photo you have — one prompt, whole batch. Try 2 batches free, no signup.
Try it freeCrushed black velvet is usually the safest choice for jewelry and reflective products. Its low reflectivity reduces specular bounce, so dark objects are less likely to show a gray or uneven background. The Replica Surfaces guide to black-background food photography describes using black velvet in a U-shape and controlling spill with a feathered key and a black flag.
Match the material to the product
Matte black paper gives clothing and hanging products a clean, uninterrupted field. It's easy to replace and doesn't carry the texture of velvet, but every crease shows under side light. Roll it out carefully, tape the floor edge, and replace the damaged section rather than trying to erase a deep fold from hundreds of files.
Black fabric travels well, but loose cloth creates inconsistent folds and catches lint. Stretch it tightly across a frame, steam it before the shoot, and keep a lint roller beside the set. For a long catalogue day, those small maintenance steps protect the same background tone from the first SKU to the last.
Painted foam board is inexpensive and rigid. It's useful for small products when you need a flat surface, but hard light can create glare on the paint. Move the board off-axis, use a matte finish, or switch to velvet when reflective products begin showing bright patches.
Black acrylic is the deliberate exception. It can create a clean reflection, but most sellers don't want every listing to show a visible floor reflection. It also turns lighting placement into a reflection-management problem.
The rule is simple: if the product reflects, choose the lowest-reflectivity material available. If the product is matte, choose the most wrinkle-resistant material. For a broader comparison of backdrop choices, see MerchLoom's guide to backgrounds for product photography.
When Black Is the Wrong Background
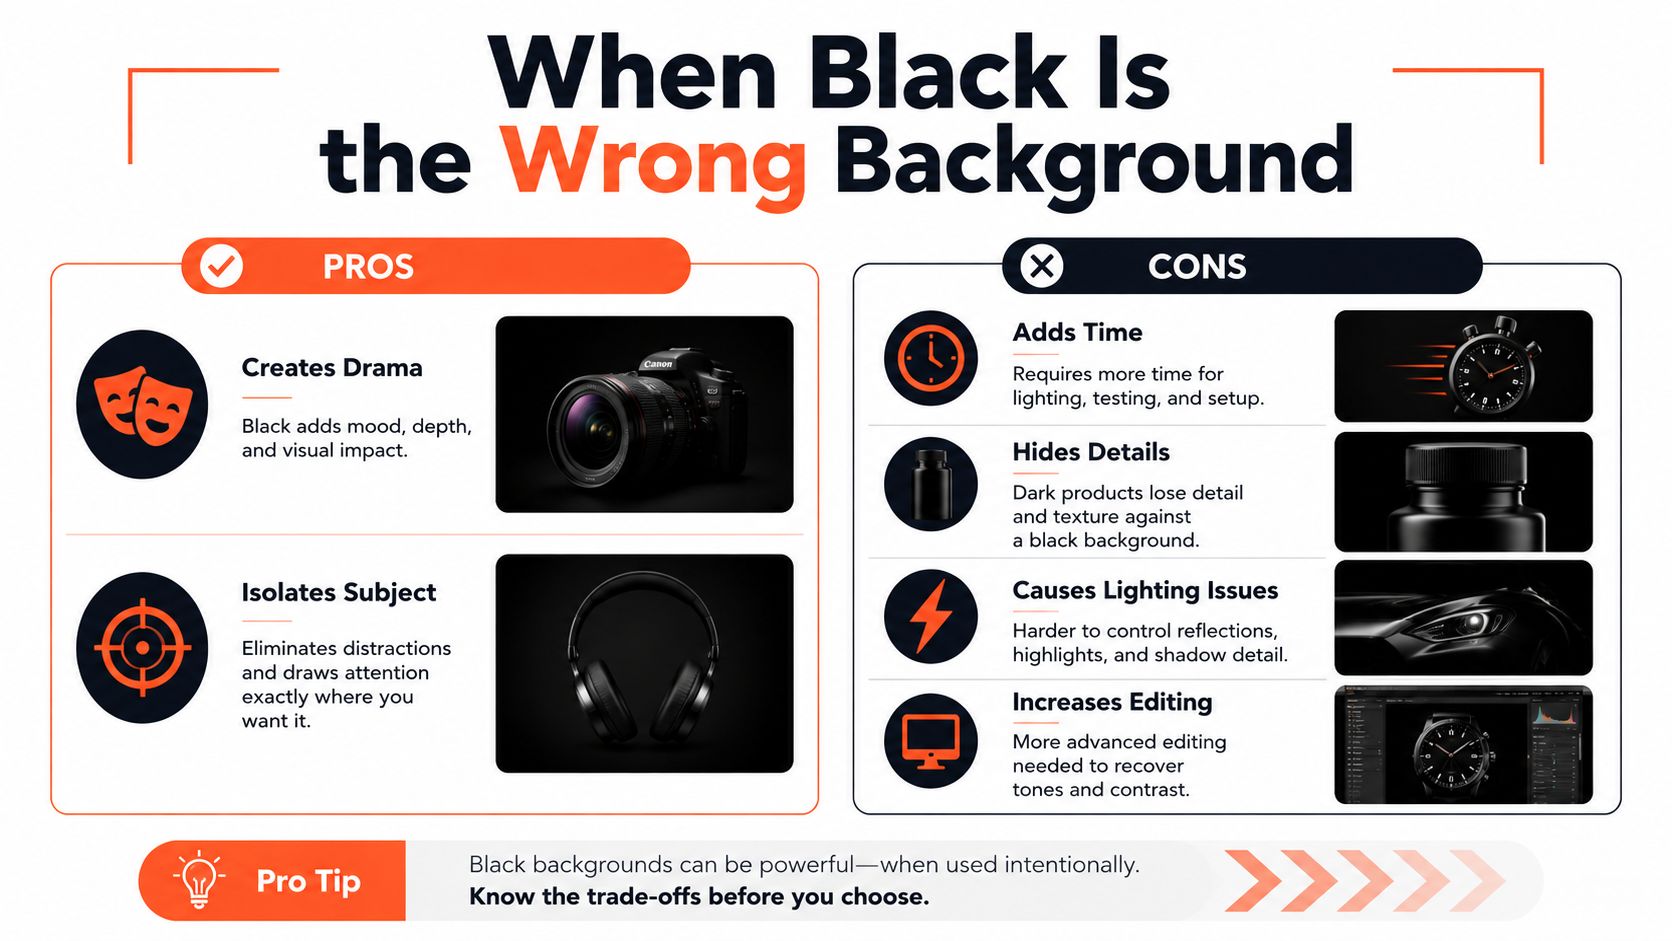
Black is not a universal default. It works when the product has enough edge contrast and the set can stay controlled. It becomes inefficient when the product behaves like a mirror.
Chrome hardware can reflect the entire studio, including the camera, stands, flags, and ceiling. Black-on-black cosmetics may lose their silhouette because the packaging and background merge. Glossy black boxes often record each modifier as a bright hot spot, while glassware refracts the set into lines and patches that are difficult to clean consistently.
You can solve some of these problems with rim lights, side lights, grids, snoots, multiple flags, greater subject-to-background distance, and a velvet enclosure around the set. Those methods work, but they add setup decisions. When you repeat them across a large SKU count, the black style can take longer than a neutral capture followed by background replacement.
Use a neutral capture when separation is the real problem
A gray background gives reflective products something controlled to reflect. It also preserves a clearer edge around dark packaging, especially when the product includes black text, black labels, or dark molded surfaces. You can then isolate the product and apply an approved background in post without forcing every highlight to describe a black studio.
The PictureCorrect guidance on black backgrounds for product photography highlights this trade-off. Dark products, reflective packaging, and glossy surfaces demand separation, not just a darker backdrop. The extra lighting architecture may be justified for a small premium campaign, but it often makes less sense for a broad marketplace catalogue.
Decision rule: If the product reflects more than 30% of the light hitting it, shoot gray and replace the background in post. You'll finish the catalogue sooner.
That threshold is a practical production rule, not a reason to measure every object with laboratory equipment. Look at the surface. If you can see the room, modifier, or camera in the product, black may be the wrong starting point.
Post-Processing That Keeps the Whole Catalog Consistent
Post-processing should refine a controlled capture, not rebuild the lighting. Work from the gray-card reference frame, apply the same white balance across the batch, and keep the adjustments repeatable. A preset, action, or batch pipeline is more valuable than a clever edit on one hero image.
Use four passes:
- Set true black: Bring the darkest background areas to RGB 0,0,0 while checking that product edges don't disappear.
- Recover product detail: Lift only the subject shadows that lost texture during the low-key exposure.
- Standardize color: Apply the gray-card white balance from the reference frame to the full batch.
- Export by destination: Create separate outputs for Amazon, Etsy, Shopify, and any marketplace with different framing or background rules.
The histogram should guide the black point. Don't crush the shadows by eye because a laptop display can make a nearly black background look finished while hiding a gray lift around the product. Zoom into pale edges, hair, transparent packaging, and reflective corners before approving the preset for all files.
Batch first, inspect exceptions second
Process the first group manually. Check a light product, a dark product, a reflective product, and the most irregular shape in the collection. If the same preset protects all four, apply it to the rest. If one category fails, split the catalogue by product behavior rather than weakening the correction for every SKU.
One-click background tools can be useful for simple cutouts. They're less dependable when a product has fine transparent edges, black-on-black detail, reflections, or shadows that carry product information. Keep human review in the workflow, especially for marketplace hero images where an edge error can make the listing look careless.
For a repeatable editing sequence across large folders, MerchLoom's batch product photo editing workflow is one option for chaining background, color, framing, and resolution steps. It doesn't remove the need to approve representative outputs. It gives you a way to apply the same instructions across a collection instead of opening every file individually.
Keep the original RAW files and a clean master export. Don't overwrite the source with a marketplace-specific crop. A black-background image may suit a brand collection page, while Amazon's main image requires a different background and framing treatment.
Platform Specs and Running the Whole Batch Through One Pipeline
Decide the master dimensions before the shoot. A square working frame gives you room to create consistent marketplace exports, but the final files still need platform-specific checks.
- Amazon main image: Use a pure white background at RGB 255,255,255. The product should fill about 85% of the frame, and the longest side must be at least 1000 px, with 1600 px or larger recommended so zoom works reliably, according to Amazon product image requirements summarized by Pinnacle Edits.
- Etsy: Listing photos should be at least 2000 pixels on the shortest side, as outlined in Pixpipe's Etsy image-size guide.
- Shopify: A practical square target is up to 4472 × 4472 pixels, which supports consistent crops across collection pages, product galleries, and theme layouts, according to SellHound's product-photo requirements guide.
These decisions belong in the export pipeline, not at the end of a 200-SKU shoot. Keep one high-quality master, then generate the required background, crop, and size for each destination. That prevents one listing from using a tight crop while another leaves excessive empty space.
Chain the work instead of repeating it
The workflow can run in a fixed order:
- Import the original product images.
- Remove or isolate the background where needed.
- Normalize the black background for brand or editorial images.
- Reframe each product for the target marketplace.
- Upscale or export to the required dimensions.
- Review a sample from each product category.
- Publish only after edge, color, and background checks pass.
MerchLoom runs this work across an entire catalogue through chained AI pipelines instead of one image at a time. The first images can be tried with no account, and it's pay-per-image with credits that never expire, as described in this workflow overview. Treat the output as a batch starting point, not an automatic approval. Review product identity, fine edges, reflections, and platform compliance before upload.
If you also manage large media outputs, the RenderIO guide to scale video with batch processing offers useful context for thinking in jobs, queues, and repeatable processing rather than individual files. The same operational idea applies to product photography.
For Amazon-specific preparation, MerchLoom's Amazon product image requirements guide can sit beside your export checklist. Run the first ten images by hand, including the gray-card reference and empty-frame test. Confirm the background, crop, color, and edge treatment. Then apply the approved pipeline to the remaining collection and inspect exceptions instead of rebuilding every image.
MerchLoom lets you import product photos, chain background removal, black-background normalization, reframing, color correction, and upscaling across a full catalogue. Try the first images with no account, pay per image with credits that never expire, and visit MerchLoom to prepare a repeatable workflow for your next product batch.
Stop editing product photos one at a time
Upload your catalog or connect your store. Describe the result once. MerchLoom does the rest.
Try it free — no signup