
Amazon Product Image Size: The 2026 Reference Guide
Master every Amazon product image size requirement for 2026. This complete guide covers main images, A+ content, ads, and batch processing for perfect listings.
Your Amazon product images need to be at least 1,000 pixels on the longest side to enable zoom, and 2,000 x 2,000 pixels is the professional standard for a strong main listing image. Get that wrong and you risk either a weak, low-trust listing or a suppressed one that never has a fair chance to sell.
That's the situation a lot of sellers are in right now. You have a folder full of product shots, some from a photographer, some from suppliers, some pulled from an older catalogue, and you need them ready for Amazon without checking every file by hand. The hard part isn't learning the rules. It's applying them consistently across hundreds of images while keeping framing, background, colour, and sharpness under control.
Amazon's image rules aren't arbitrary. They exist because buyers use product photos as a substitute for touching the item. If the image is too small, badly framed, or soft when zoomed, the listing feels unreliable. If the main image breaks a technical rule, the listing can get held back before the customer even sees your offer.
For sellers who also publish to Shopify, Etsy, or other marketplaces, this gets messier fast. Amazon wants a pure white main image. Shopify often favours square consistency across collections. Etsy sellers often work around 2000px exports for flexible listing use. The only way this stays manageable is with a batch workflow that treats image prep as catalogue infrastructure, not a one-off design task.
Amazon Image Size Quick Reference Table 2026
A catalogue manager usually needs one thing first. A table the team can apply without debating every SKU.
That matters more than the specs themselves. On Amazon, the expensive mistake is not usually misunderstanding one rule. It is letting five different photographers, suppliers, and freelancers send files in five different sizes, then expecting Seller Central to sort it out for you.
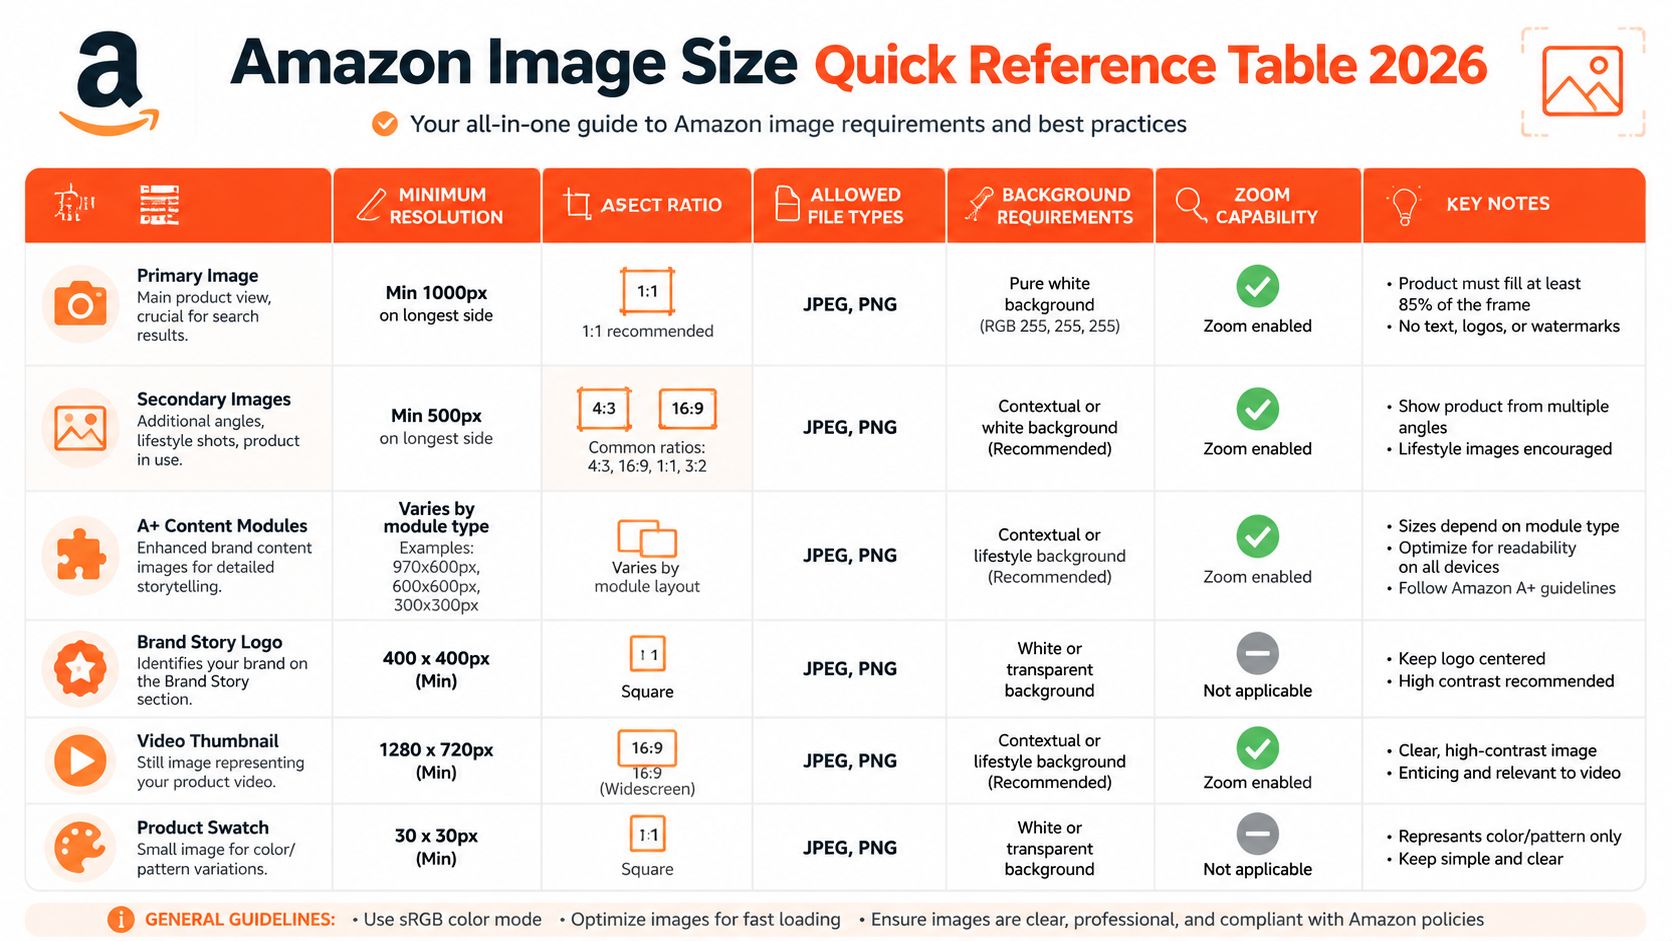
The numbers that matter
| Image element | What to use | Why it works in production |
|---|---|---|
| Main product image minimum | 1,000px on the longest side | Keeps the file eligible for zoom and avoids weak-looking listings |
| Main product image working standard | 2,000 x 2,000px, square | Gives editors enough detail for a sharp hero image without creating unnecessary file bloat |
| Strong batch export range | 2,000 to 3,000px on the longest side | Holds detail well across large catalogues and stays practical for storage, QC, and re-use |
| Maximum file size | Under Amazon's upload limit | Prevents avoidable upload failures and keeps handoff rules simple |
| Maximum dimensions | Stay within Amazon's accepted dimension cap | Oversized source files add processing time and can create upload issues with no sales upside |
| Main image background | Pure white, RGB 255, 255, 255 | Keeps the hero image compliant and consistent across search results |
| Product fill | At least 85% of the frame | Stops the product from looking distant in mobile thumbnails |
How to use this as a workflow reference
For one listing, these rules are easy to check by eye. For 300 listings, that approach breaks fast.
Set one house standard for exports, naming, and QA. I usually recommend square masters at a fixed output size, a white-background check for every main image, and an exception queue for anything that fails framing or sharpness review. That keeps the team focused on decisions that affect conversion instead of spending hours resizing files one by one.
If you need a quick manual fix, use this guide to resize images in GIMP for Amazon listings. For ongoing catalogue work, manual edits should be the exception, not the workflow.
One more practical point. Static image prep should line up with your broader listing assets, including video. Teams building richer PDPs often plan image crops and motion assets together, especially if they are also refining a product video strategy for creators.
Practical rule: standardise the catalogue first, then fix the outliers. That is faster, easier to audit, and far more reliable than inheriting whatever dimensions came from the original shoot.
Why Image Quality and Zoom Matter for Sales
A lot of image guides stop at compliance. That misses the commercial point.
Amazon requires a minimum of 1,000 pixels on the longest side for zoom, but the zoom experience is only guaranteed to activate optimally at 1,600 x 1,600 pixels or larger, according to Soona's Amazon image size guide. That gap matters in real listings because “technically valid” and “visually persuasive” are not the same thing.
Buyers use zoom to resolve doubt
When someone can't pick up the product, they look for texture, seams, edges, hardware, finish quality, and surface detail. On a soft image, they can't answer basic buying questions themselves. On a sharp one, they can.
That changes behaviour. A shopper comparing two similar listings will often trust the one that feels easier to inspect. The better image doesn't just look nicer. It reduces friction.
If the customer has to guess what the fabric, finish, or build quality looks like, the listing is doing less selling than it should.
This is even more obvious in categories like apparel, home goods, packaging-heavy products, and anything with small material details. One blurry close view can create more hesitation than a decent title can fix.
Minimum compliance isn't the same as catalogue quality
For batch uploads, the smartest move is to avoid mixed resolutions. If half the catalogue barely clears the threshold and the other half is comfortably above it, the customer experience becomes uneven. That usually happens when sellers combine supplier images, old photography, and newer studio work in the same account.
Use a standard output size, then work backwards. If the source image is weak, sharpen or upscale it before it becomes part of the listing set. If it's still soft after processing, replace it rather than letting one bad image drag down the SKU.
If you're dealing with inherited assets, this guide on how to fix blurry photos is a practical place to start. Video also helps answer product questions that static shots can't, especially for assembly, movement, or scale. For that side of the media stack, this resource on product video strategy for creators is worth keeping handy.
Core Requirements for Your Main Product Image
The main image usually fails long before a customer opens the listing. It fails in the grid, on mobile, and in batch review, where weak crops and dirty backgrounds waste time across hundreds of SKUs. That is why the first image needs a tighter standard than the rest of the gallery.
For practical catalogue work, treat the hero image as a production template, not a one-off creative asset. Use a square canvas, keep the product large in frame, and export at a size that supports zoom without forcing your team to inspect every file manually. As noted earlier, the goal is to meet Amazon's baseline rules and keep output consistent enough that large uploads do not turn into exception handling.
The required checklist
Use this before anything reaches Seller Central:
- Hit the zoom threshold: If the longest side is too small, the image loses one of the few built-in detail tools Amazon gives you.
- Work from a square master: A 1:1 crop keeps the catalogue uniform and makes batch resizing simpler.
- Keep the background pure white: Near-white backgrounds, grey casts, and heavy shadows create avoidable rejects and extra cleanup work.
- Fill the frame properly: The product should dominate the image, not sit in the middle with excess padding.
- Keep the main image clean: No text, icons, badges, props, or added graphics.
These rules exist for a reason. Search results compress everything into a small visual decision, so the main image has one job: make the product instantly readable. If the item looks small, dim, or poorly cut out at thumbnail size, click-through drops before the customer ever gets to your bullets or A+ content.
The operational side matters just as much. Inherited supplier files are often the problem. One factory sends a tall crop, another sends a loose crop, and a third sends a JPEG with a warm grey background that looks white until you compare it against the rest of the catalogue. At ten SKUs, that is annoying. At five hundred, it becomes rework.
A standard output spec fixes that. I usually want one approved square master per SKU, with the crop, scale, and background handled the same way every time. That makes QC faster, makes batch exports predictable, and prevents the common issue where one ASIN looks sharp in search while the next looks like it came from a different seller.
If background cleanup is a recurring problem, build a repeatable process for creating compliant images with a pure white background. The time savings are not in removing one background. They come from removing the same issue from the workflow.
What works and what usually fails
What works is simple: a centered product, clean edges, balanced crop, accurate color, and enough native detail that the file holds up under zoom.
What usually fails is less obvious at first glance. Supplier images with uneven whites, oversized canvas padding, low-resolution exports, clipped edges, and compressed JPEG artifacts often look acceptable in a folder preview. They break once they hit bulk upload, appear next to cleaner listings, or get reviewed across an entire category set.
That is the actual standard for the main image. It has to pass compliance, earn the click, and survive scaled production without creating cleanup work later.
Specifications for Additional and Lifestyle Images
The additional image slots are where you stop proving compliance and start answering buying questions. Amazon gives sellers more room here, and good operators use that space strategically instead of filling it with repetitive angles.
A strong gallery usually does three things. It shows the product from views the main image can't cover, it explains features visually, and it helps the buyer imagine ownership. That can mean detail shots, scale references, packaging, instructions, texture close-ups, or real-use scenes.
What these images should do
Secondary images are where text overlays, callouts, and contextual scenes can earn their place. If the buyer needs to understand dimensions, compatibility, included components, or how the item behaves in use, this is the right part of the listing to show it.
That freedom matters because the main image can't carry the whole conversion job alone.
- Use one image for context: Show the product in a realistic setting so the buyer can judge scale and fit.
- Use one for details: Surface finish, stitching, closures, ports, materials, or included accessories.
- Use one for explanation: A graphic that clarifies features, sizing, or setup can reduce confusion quickly.
- Use one for reassurance: Packaging, bundle contents, or what's included can prevent mistaken expectations.
How to keep the set coherent
The biggest mistake in gallery images isn't creativity. It's inconsistency. Sellers often mix studio shots, supplier graphics, lifestyle scenes, and old exports with no shared crop logic, lighting style, or colour treatment. The listing starts to feel pieced together.
For catalogue teams, batch styling rules are highly relevant. Keep image proportions consistent where possible, align margins, and avoid switching from very cool colour to very warm colour from one image to the next. The goal is variety of information, not visual chaos.
If you need to generate or standardise contextual scenes across multiple products, an AI product lifestyle image workflow can help create that consistency faster than designing every listing set from scratch.
Secondary images should answer a customer's next question, not repeat the first image six times.
Doing this for a whole catalog?
MerchLoom runs background removal, upscaling and AI editing across every product photo you have — one prompt, whole batch. Try 2 batches free, no signup.
Try it freeA+ Content and Brand Story Image Specs
A+ Content is a separate design system, not an extension of the listing gallery. Sellers get into trouble when they try to force product photos into these modules without considering layout.
The issue isn't just image quality. It's fit. Banner-style assets, small comparison images, logo treatments, and modular blocks all need different crops and design intent. A file that works as a listing image can look awkward inside a narrow A+ panel.
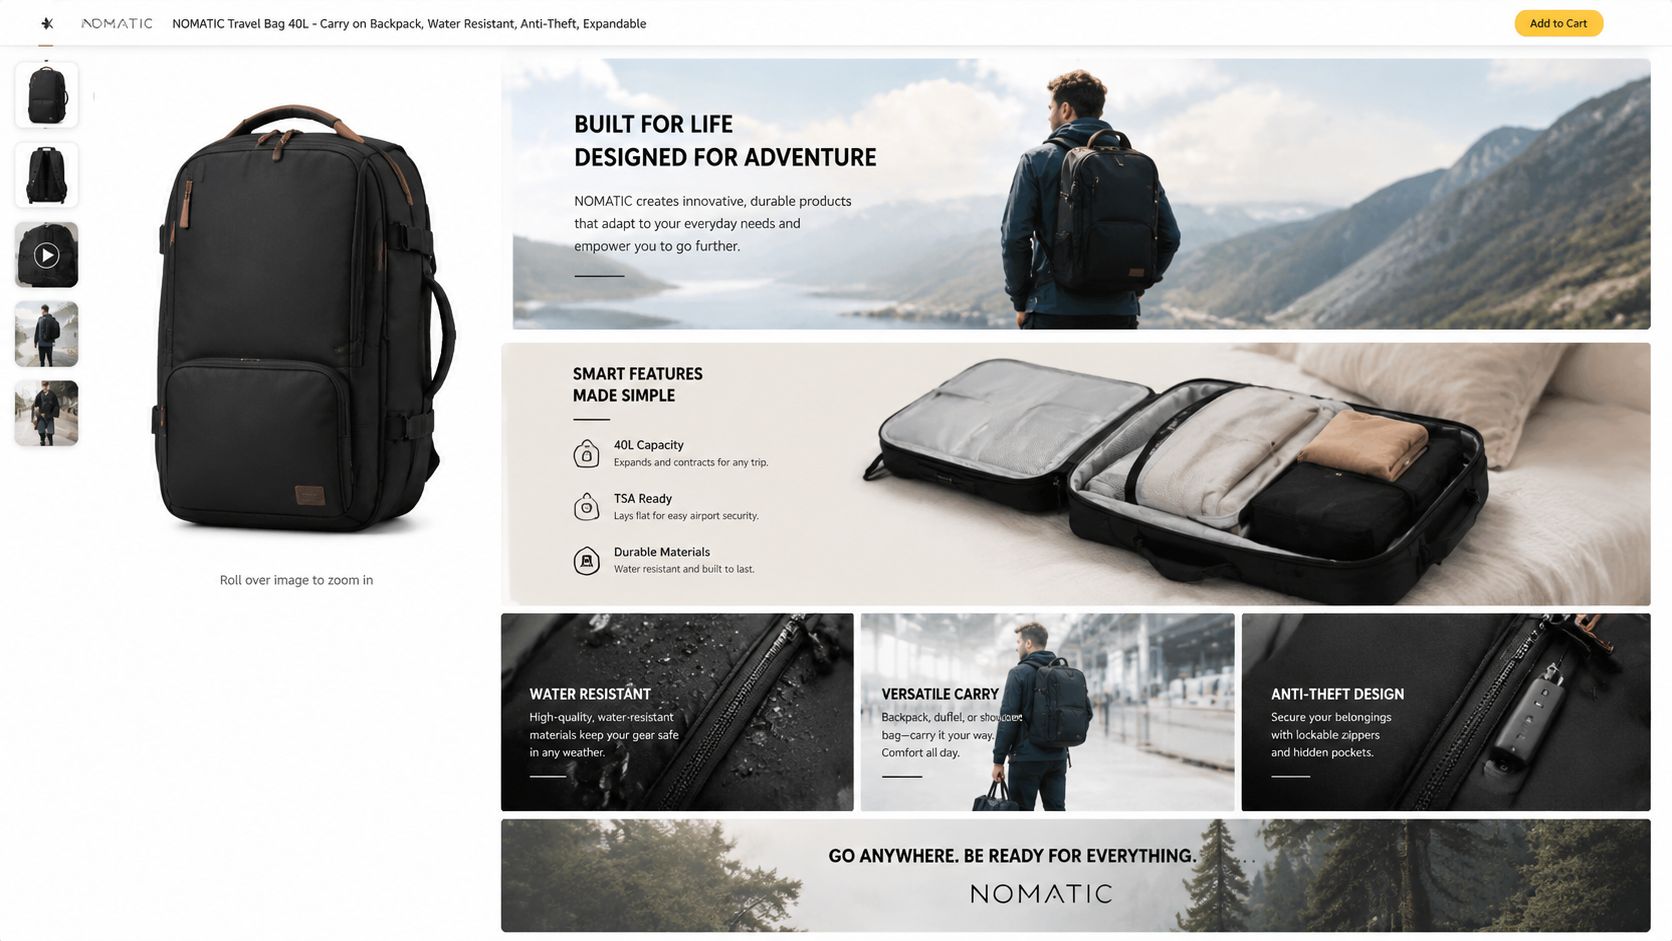
Treat A+ as a different production workflow
The most common A+ assets sellers work with include wide banners, square or near-square support images, brand marks, and comparison visuals. The exact layout depends on the module, so the practical approach is to build a module-based asset library instead of trying to crop one master image into everything after the fact.
The infographic in the quick reference section includes commonly used A+ and brand asset dimensions such as 970 x 600px for a common module style, 300 x 300px for smaller support graphics, 400 x 400px for a brand story logo, 1280 x 720px for a video thumbnail, and 30 x 30px for a product swatch. Use those as working production targets when you're organising creative files for different Amazon surfaces.
What experienced catalogue teams do differently
They don't send A+ work through the same approval path as the main image set. They create a separate output group for brand modules and build source art with safe margins, text legibility, and mobile cropping in mind.
That matters because A+ content often carries denser communication. Materials, use cases, design process, comparison points, and brand story all have to survive across desktop and mobile layouts. A standard product photo with no text hierarchy usually isn't enough.
A practical workflow looks like this:
- Separate source folders: Keep listing images and A+ assets in different collections.
- Design for module shape: Wide banners need composition built for width, not cropped from a square by force.
- Keep typography restrained: Dense copy inside image files gets hard to read fast.
- Use product photos selectively: Not every module needs a straight packshot. Some need context or close-up detail.
For sellers running large catalogues, the primary challenge is asset governance. Once multiple SKUs share a brand story structure, it pays to template repeated module types and only swap the product-specific layers.
Technical File Requirements and Common Pitfalls
Seller Central rejects plenty of images that look fine in Finder or Google Drive. The problem is usually not composition. It is file structure, export settings, or inconsistent handling across a batch.
For teams managing large catalogues, this matters because technical mistakes rarely happen one image at a time. They spread through an entire supplier drop or studio export preset. One wrong colour profile, one oversized canvas, or one aggressive compression setting can create cleanup work across hundreds of SKUs.
The technical checks worth automating
Amazon accepts common listing image formats such as JPEG, PNG, TIFF, and GIF. In practice, JPEG should be the default for most catalogue work because it keeps file sizes manageable and plays well with Amazon's rendering. Exports also need to stay within Amazon's file and pixel limits, and sRGB is the safest colour space for consistent display.
Those rules are simple. Applying them at scale is where teams lose time.
The checks I automate first are:
- File size check: Catch bloated exports before they hit upload queues.
- Pixel dimension check: Oversized files add processing time and create avoidable failures.
- Format check: Keep one standard unless a specific asset type needs something else.
- Colour profile check: Convert everything to sRGB before final export, not after upload errors start.
- Compression check: A file can pass the limit and still look damaged on a white background.
- Filename check: Clean, SKU-linked naming makes bulk replacement and troubleshooting faster.
A good batch workflow treats these as pass or fail rules, not judgment calls by whoever exported the file last.
Where image quality usually breaks down
Overcompression is the problem I see most often. Teams try to get smaller files fast, then end up with ringing around edges, blocky shadows, or texture detail that looks smeared once Amazon compresses the image again. White-background main images make those flaws obvious.
Colour shifts are the second issue. Files exported in Adobe RGB or Display P3 can look acceptable in a design app and still change once they are uploaded or viewed across devices. For apparel, beauty, home decor, or any product where shade affects conversion and returns, that is an operational problem, not a cosmetic one.
If you are diagnosing dirty edges, mushy detail, or visible blocking, this guide to JPEG compression artefacts covers what to look for.
Common mistakes that create batch-level rework
Supplier assets are often the root cause. One factory sends PNGs with embedded transparency, another sends oversized TIFFs, and a freelance retoucher exports everything at maximum quality with no shared preset. The files are usable, but the catalogue becomes inconsistent.
That inconsistency creates extra decisions at every step. Which images need conversion. Which ones need resizing. Which ones can keep detail after compression. Which ones are safe to reuse for other channels. Teams selling on multiple platforms run into this faster, especially when the same source files also need to satisfy TikTok ad requirements for Shop sellers.
The fix is boring and effective. Standardise the output settings, document them, and run every batch through the same checks before upload. In real catalogue operations, disciplined exports beat last-minute manual fixes every time.
Creating Compliant Images at Scale
Single-image advice breaks down the moment you're managing a real catalogue. One SKU might be easy. A seasonal launch with inherited supplier assets, marketplace variants, and multiple platforms is not.
The scalable approach is to treat Amazon image prep as a repeatable pipeline. Start with source intake, then apply the same sequence every time: check dimensions, reframe to the target canvas, clean or replace the background where needed, correct colour, upscale weak files if the source can support it, and export to a controlled preset for upload.

The workflow that scales
For large catalogues, I'd organise the work into production stages instead of by SKU owner or ad hoc task list.
Ingest by collection
Group files by product family, launch batch, or source type. Supplier images usually need different handling from fresh studio shots.Normalise the canvas
Reframe outputs to a standard square size that suits Amazon and still gives you reuse options for Shopify collections and Etsy listing needs.Fix the background before final export
White-background cleanup should happen before final compression. Otherwise, edge issues get baked into the file.Use upscaling carefully
Upscaling is useful for older assets that are directionally right but too small or slightly soft. It won't rescue a fundamentally bad image, but it can lift usable catalogue assets into a listing-ready state.Export by destination
Amazon hero image, Amazon gallery image, Shopify square, Etsy-ready square. Different destination folders prevent accidental uploads of the wrong version.
Why chained processing beats one-step editing
This is the part most image guides skip. The order of operations matters. If you crop first, then remove the background, then sharpen, you'll get a different result from running those steps in a different sequence. At catalogue scale, that difference compounds.
A chained workflow also helps with consistency. Instead of an editor making judgement calls on every file, the team defines the target look once and applies it across the batch. That's how you keep hundreds of images aligned without turning image prep into a full-time manual job.
For sellers building creative assets beyond Amazon, it helps to keep nearby specs handy for other channels too. If you're also publishing social commerce creative, these TikTok ad requirements for Shop sellers are useful for planning alternate exports from the same source set.
Where MerchLoom fits in a professional workflow
For batch-heavy teams, MerchLoom is useful because it processes full image collections through chained AI steps instead of forcing one-photo-at-a-time editing. That matters when you need to resize and reframe product photos, clean or remove backgrounds, upscale older files with Clarity, and keep output consistent across a large catalogue.
The value isn't novelty. It's operational control. You can run the same logic across Amazon white-background images, Shopify square images, and Etsy-friendly exports without rebuilding the process for each SKU.
Troubleshooting Common Amazon Image Errors
The usual Amazon image errors are predictable. That's good news, because they're also fixable if you diagnose the actual cause instead of just re-uploading the same file.
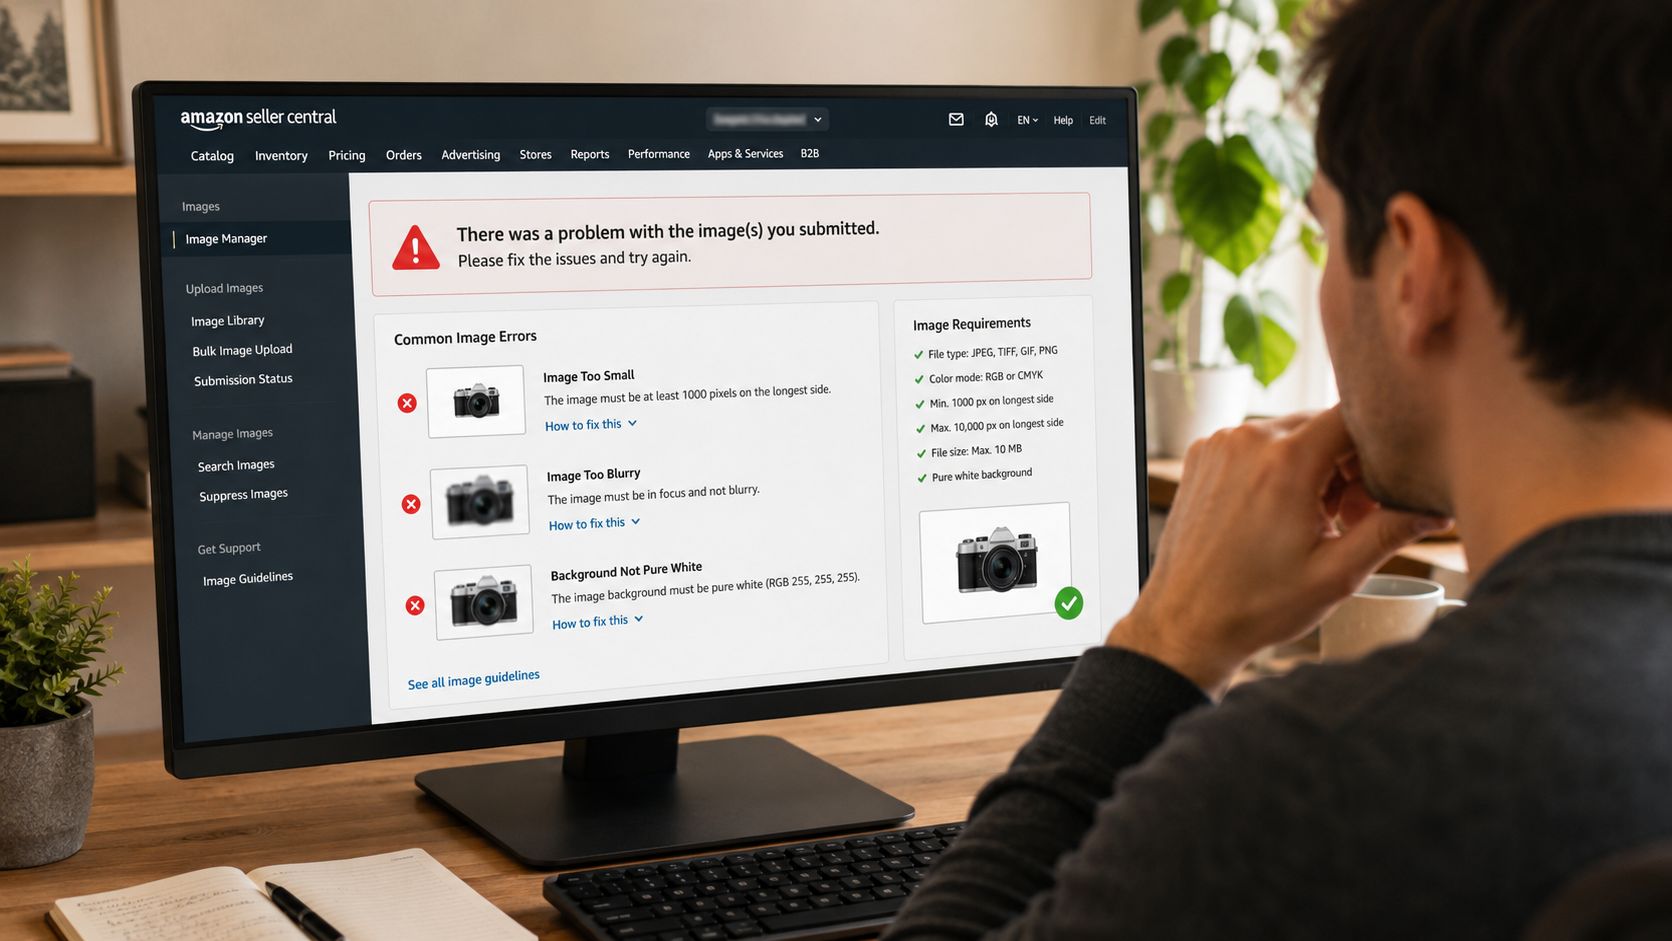
Fast fixes for common problems
Main image background error
The background usually isn't pure white, or shadows and edge contamination are pushing it off-spec. Reprocess the cut-out, then inspect the background rather than trusting a visual preview.Zoom not enabled
The file is often too small on the longest side, or the image was exported from a low-resolution source. Replace it with a larger source file or upscale a usable original before export.Product appears too small
The crop is too loose. Reframe so the item occupies more of the square canvas and reads clearly in thumbnail view.File rejected on upload
Check size, dimensions, format, and colour space before changing anything visual. Many upload failures are technical, not creative.
When batch workflows need adjustment
If a whole batch fails in a similar way, don't fix each image manually. Change the workflow rule. Tighten the reframing setting, update the white-background threshold, or alter the export preset so the correction applies to the whole collection.
That's especially important when you're maintaining a live catalogue. One clean pipeline beats fifty one-off repairs every time.
If you're managing Amazon listings at catalogue scale, MerchLoom gives you a practical way to standardise the work. You can import product photos from the systems you already use, run chained AI workflows across full batches, and produce marketplace-ready outputs for Amazon, Shopify, Etsy, and more without editing every image by hand.
Stop editing product photos one at a time
Upload your catalog or connect your store. Describe the result once. MerchLoom does the rest.
Try it free — no signup