
Amazon Product Background Removal That Actually Scales
Practical amazon product background removal workflow for large catalogues: settings, batch processing, quality checks, and cost-saving automation.
You've got a 200-SKU launch ready to publish, then five main images fail Amazon's white-background check. The products are correct, the photos look fine in a browser, and the result is three days of revisions, renaming, re-exporting, and re-uploading.
Start with the output recipe before you open an editing tool. For Amazon, create a main image with a pure white RGB 255,255,255 background, the complete product visible, one unit unless the listing is a set or multipack, and the product occupying approximately 85% of the frame. Amazon recommends images larger than 1,000 pixels on each side for zoom, and a catalogue workflow can standardize Amazon exports at 1,600 pixels or more on the longest side. The difference between a clean catalogue and a recurring compliance problem is usually the pipeline, not the cutout button.
What Amazon Actually Demands From Your Product Photos
Amazon calls the first image shown on a product-detail page and in search results the main image. Every product needs at least one compliant main image, and that image must show the actual product clearly, include the complete item, and use a pure white background with RGB values of 255,255,255. Light gray, cream, and photographed white that measures below the required value aren't equivalent.
Amazon also expects the product to fill approximately 85% of the image area without being clipped. The image should contain only one product unless the listing represents a set or multipack. Text, logos, badges, watermarks, unrelated props, and decorative scenery don't belong in the main image. Amazon accepts JPEG, TIFF, PNG, and non-animated GIF, with JPEG preferred. Its official product image requirements are the reference point to check before you automate a catalogue.
For production, use sRGB and a fixed canvas. Amazon's guidance accepts files from 500 to 10,000 pixels on the longest side and recommends images larger than 1,000 pixels on each side for zoom. A practical export recipe for many sellers is JPEG or PNG, sRGB, pure white, and 1,600 pixels or more on the longest side. The exact choice matters less than applying it to every SKU instead of allowing each operator or supplier to make a different decision.
| Requirement | Specification | Catalogue impact |
|---|---|---|
| Main background | Pure white, RGB 255,255,255 | Run a pixel check on every output |
| Product framing | Approximately 85% of the image area | Normalize scale and margins across variants |
| Product contents | Complete product, one unit unless sold as a set or multipack | Flag missing, clipped, or duplicated objects |
| Image size | Amazon accepts 500 to 10,000 pixels on the longest side and recommends more than 1,000 pixels on each side for zoom | Lock one export profile before batch processing |
| File format | JPEG preferred, TIFF, PNG, and non-animated GIF accepted | Avoid mixed formats unless another channel requires them |
| Main-image design | No text, logos, badges, watermarks, or unrelated props | Keep merchandising elements for secondary images |
Secondary images support a different job. They can show lifestyle use, product scale, features, details, infographics, and contextual scenes. Amazon recommends at least six images for a product in addition to the main image, and broader guidance recommends additional images and one video so shoppers can evaluate the item more effectively. Read these product photography tips for Amazon sellers alongside Amazon's own rules, then record the decisions in a shared export specification. You can also keep the requirements in one place with this guide to Amazon product image requirements.
A 200-SKU catalogue isn't 200 simple edits. It is 200 compliance checks, followed by masking, reframing, color validation, and export. Treating the work that way prevents a failed submission from becoming the first quality-control stage.
Prepping One Image the Right Way Before You Scale
Before processing a batch, choose one representative source image. Use a photo with the same kind of lighting, product material, and camera angle found across the collection. The source should be at least 2,000 pixels on the longest side, evenly lit, and framed so the product already occupies most of the composition. A background-removal system can correct a background, but it can't reliably reconstruct a product that is soft, clipped, or hidden by a hard shadow.

Correct the image in a fixed order:
- Set white balance first. A warm or green cast changes the product and the background at the same time.
- Adjust exposure next. Lift the image enough to reveal edges without washing out white details.
- Apply a small contrast adjustment. Hard goods can benefit from a modest increase, while fabric and soft materials may lose texture if pushed too far.
- Use clarity selectively. It can help metal, ceramics, and packaging, but it can make cutout edges look brittle.
- Create the mask and inspect the boundary. Separate hard edges from hair, fur, fibers, thin straps, translucent plastic, and glass.
Decide whether the working file needs transparency or a white composite. A transparent cutout is useful when the same product will later sit in a lifestyle scene, but Amazon's main image needs the final product placed on RGB 255,255,255. For a deeper explanation of preserving editable masks, this guide to non-destructive masking for architects covers the same general discipline of keeping the mask separate from the underlying image. The white background workflow for product photography should be treated as an output profile, not as a last-minute color choice.
Three one-image decisions become catalogue problems:
- A transparent bottle may need a white card or controlled fill behind it so the edge and internal contents remain believable.
- A mirror-finish product reflects the studio, so removing the background alone won't remove the reflected environment from the product surface.
- A soft toy needs edge-aware refinement around fibers, while a ceramic mug usually needs a cleaner, harder boundary.
Lock the file naming pattern, working canvas, output dimensions, sRGB profile, and white reference before the batch starts. Those settings should not change halfway through because one image looks slightly better with a different crop.
Tool Categories and the Settings That Matter at Scale
Four tool categories cover most catalogue workflows. The right choice depends on how much edge control you need, how many files you process, and whether the output must feed another system automatically.
Desktop editors with smart selection provide the strongest manual control over difficult edges, color correction, reflections, and compositing. Photoshop-class software can handle a mirror-finish product or a translucent package more carefully than an automatic cutout. The trade-off is operator time. A manual process that feels reasonable on one product becomes difficult to parallelize across hundreds unless you build actions, templates, and review queues.
Browser-based removers work well for a small number of quick jobs. They reduce setup and don't require a local editing workstation. At catalogue scale, separate uploads, downloads, naming decisions, and browser sessions create operational friction. The weakness isn't always the mask. It's the repeated handling around the mask.
API-based AI services are practical for large runs because a script or workflow can send an image, receive a mask or flattened PNG, and continue to the next stage. They charge per image and vary in performance on hair, fur, glass, thin straps, and reflective surfaces. Keep the original mask when the service returns one. A flattened PNG limits later correction.
Chained workflow tools sit above those services. They add intake folders, batch handling, naming, resizing, output routing, and QA. MerchLoom is one example of this category. It can run chained AI pipelines across a collection rather than asking you to edit one image at a time. The first images can be tried with no account, and its pricing is pay-per-image through credits that never expire. It isn't a full Photoshop replacement, and AI output still needs human review where the edge or product representation is uncertain.
| Tool category | Best for | Limitation at scale | Indicative cost per image |
|---|---|---|---|
| Desktop editor | Difficult edges, reflections, color control | Manual time and limited parallel processing | Varies by software and labor |
| Browser remover | Small, isolated jobs | Repeated upload, download, and naming work | Usually usage-based |
| AI API | Automated catalogue processing | Edge quality varies by material and source image | Per-image service pricing |
| Chained workflow tool | Batch routing, naming, resizing, and QA | Still needs review for low-confidence results | Pay-per-image or workflow pricing |
Set these parameters before comparing tools: output resolution, edge feathering, matte color, color space, and mask versus flattened PNG output. There isn't one tool that wins on price, edge quality, and speed for every SKU. A mixed workflow is usually more honest. Use automation for consistent products, then route difficult assets to a desktop editor or human review. A practical overview of e-commerce photo editing apps can help you map those categories to your own catalogue.
Building a Batch Pipeline That Stays Consistent
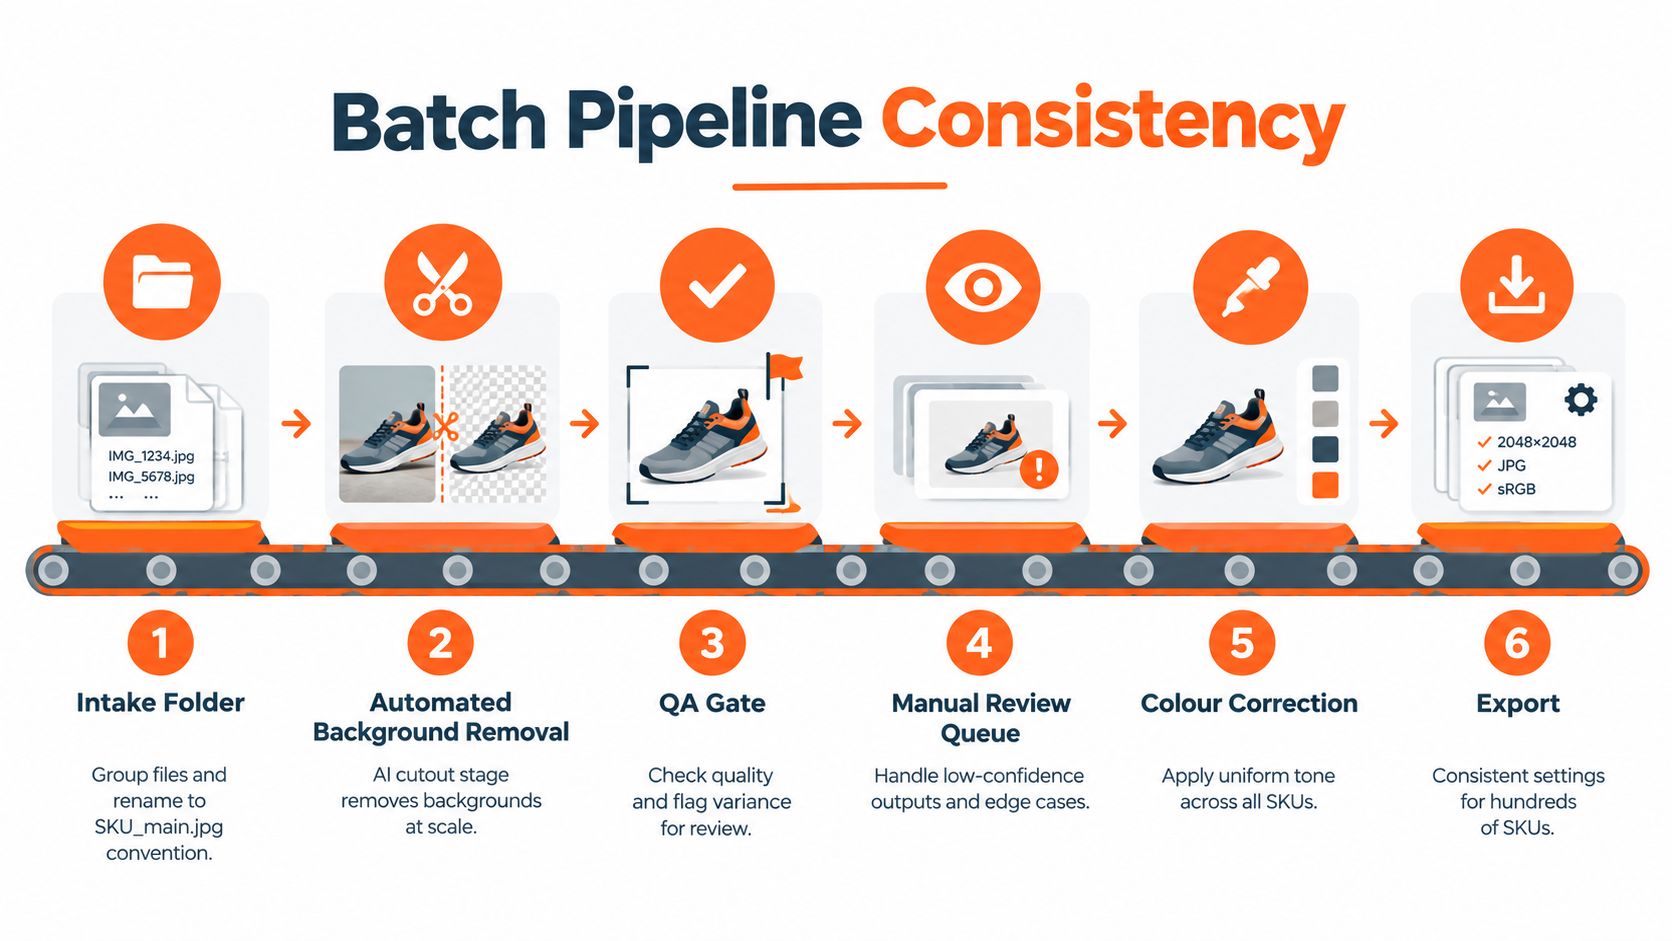
A catalogue pipeline should behave like an assembly line. Every file passes through the same ordered stages, and each stage leaves enough information for the next one to work without manual file juggling.
Start with intake. Rename files to a predictable pattern such as SKU_main.jpg or SKU_01.jpg, then separate incoming and outgoing folders. Tag files that need another channel, a lifestyle composite, or a different product treatment before processing. If the naming convention changes after the cutout, QA becomes a search exercise instead of a quality check.
Use a fixed processing order
- Create a working canvas. Auto-crop or place each source on a square working canvas, such as 2,000 × 2,000 pixels, so the model sees comparable framing.
- Remove the background. Use one fixed model setting for the batch. Don't change settings halfway through because a single product looks unusual.
- Reframe the product. Center the complete object and scale it to the target occupancy. For Amazon, keep the product at approximately 85% of the image area without clipping.
- Write processing metadata. Record the SKU, source filename, output filename, mask confidence, bounding-box coordinates, canvas color, and resize operation in a CSV.
- Route by result. Move high-confidence files to final output and uncertain files to
human_review.
The order protects both quality and cost. If you pad the image before removing the background, the model spends more of its attention on empty space and may produce a softer mask. If you skip naming at intake, a reviewer can't reliably match a failed output to the source product.
Keep the original source and alpha mask. Never overwrite the only copy with a flattened white-background export. That gives you one reusable product cutout for Amazon, Etsy, Shopify, eBay, and future lifestyle compositions.
Doing this for a whole catalog?
MerchLoom runs background removal, upscaling and AI editing across every product photo you have — one prompt, whole batch. Try 2 batches free, no signup.
Try it freeOperational rule: Lock naming, canvas size, white reference, and export format before the first batch enters production.
Run the same pipeline on a schedule, but don't confuse repetition with quality. Review the output grid for scale drift, different margins, unexpected shadows, and inconsistent brightness. The goal is a stable cost per image and predictable rework, not a claim that every product can use one identical mask treatment. You can structure the stages with a batch image editing workflow that keeps source, review, and final folders distinct.
Quality Checks That Catch Bad Cuts Before Upload
A background remover can produce an image that looks acceptable at thumbnail size and fails when enlarged. QA should run before the file enters the final folder. The checks below can be automated against the output raster, alpha channel, and processing CSV, with a human queue for anything uncertain.
Make the gate measurable
Corner and border pixels are the first test. Sample the four corners and the outer edges. If a non-white pixel appears within 5 pixels of the border, flag the image because the crop, shadow, or background replacement is wrong. This catches stray scenery and products that have been scaled too aggressively.
Edge contamination needs a separate test. Inspect the alpha contour with a Sobel or Canny pass and look for fringing softer than 2 pixels. A soft fringe often means the model retained background-colored pixels, especially around hair, fur, glass, white plastic, and thin straps. The fix may be decontamination, a revised mask, or manual edge work.
Occupancy and clipping should be calculated from the product bounding box. The product should occupy approximately 85% of the frame for the Amazon main image, but the complete item must remain visible. A product that fills the canvas while losing a handle or corner has failed even if its occupancy score looks correct.
Confidence routing prevents silent failures. If the model returns a confidence score below 0.92, send the asset to human_review rather than final output. The threshold is a routing rule, not proof that every higher-scoring image is correct.
| Check | Pass criteria | Action on fail |
|---|---|---|
| Border pixels | Corners and edges are pure white, with no stray pixels within 5 pixels of the border | Re-crop or inspect the mask |
| Alpha fringe | No suspicious edge softness below 2 pixels | Refine, decontaminate, or review manually |
| Occupancy | Product reaches the target framing without clipping | Reframe and rerun validation |
| Confidence | Score is at least 0.92 | Move to human_review |
| Sample review | A random sample confirms sRGB, accurate color, and no unwanted shadow | Correct the batch profile if a pattern appears |
Add a human sanity check to a 5% random sample of the batch. Open the files at useful enlargement, confirm the profile is sRGB, inspect fine edges, and check that no shadow or colored halo remains where Amazon expects pure white. A practical Amazon image compliance guide is useful for maintaining a separate suppression-prevention checklist.
QA doesn't replace judgment. It moves judgment to the small group of images that actually need it.
Handling Lifestyle Composites and Non-White Channels
Amazon's main image is the strict asset. The rest of the listing can do more merchandising work. Use the same clean cutout for lifestyle scenes, feature graphics, scale references, and brand-led visuals, but keep the channel rules separate from the main-image export.
For a lifestyle composite, begin with the isolated studio product. Keep the product layer above the scene, place a contact shadow beneath the product, and put the lifestyle background below both. A 30% opacity contact shadow can be a useful starting setting, but inspect it against the scene. A hard shadow under a soft-lit product looks pasted on, while no shadow can make the product float.
Keep a consistent working canvas, such as 2,000 × 2,000 pixels, while you create the composite. This lets the same framing and export checks operate across the collection. Change the background during the compositing stage, not during the cutout stage. The product mask should remain reusable and unchanged.
For infographics, place the cutout on a white or light-gray canvas and keep text in a separate vector layer. Separate text stays sharp when you create another export size. It also lets you revise a feature callout without rerunning the background removal.
Non-white channels need their own output profile:
- Lifestyle scenes: Keep the product angle, scale, and lighting believable against the scene plate.
- Brand-colored backgrounds: Change only the fill or scene layer. Don't alter the product mask to match the brand color.
- Dimension graphics: Use separate vector guides and preserve safe margins around the item.
- Multiple-product pack shots: Remove each object separately, then flatten with the intended z-order.
- Variant imagery: Keep the same crop and product position so color variants look related in a grid.
Etsy allows more flexibility in the first image, and a consistent product collection can use a 2,000-pixel shortest side as its working target. Shopify supports square product images up to 4,472 × 4,472 pixels, so keep a square master and export marketplace versions from it. Don't let a Shopify or Etsy export replace the Amazon main image. A product lifestyle image generator workflow can use the same cutout while keeping the Amazon white-background asset separate.
The discipline stays unchanged: intake, remove, pad, composite when needed, QA, and route. Only the channel-specific background or overlay changes.
Running the Whole Workflow Across Your Catalogue
The full system is a chain, not a collection of disconnected edits. Raw product files enter an intake folder, the background-removal stage creates a mask, the QA gate checks the result, uncertain outputs move to manual review, color correction applies the fixed profile, and final export writes the marketplace files. Each stage should pass the SKU and processing metadata forward automatically.
A useful record contains the source path, output path, SKU, view type, confidence score, bounding-box coordinates, canvas color, color profile, dimensions, and review status. That log gives you a cost-per-SKU view instead of a vague monthly tool bill. It also lets you identify recurring failures, such as transparent packaging, dark fabric, reflective metal, or supplier photos with inconsistent framing.
Connect the stages without manual file juggling
The background-removal engine should return either a reusable alpha mask or a transparent cutout. The next stage can then create separate outputs:
- Amazon main image: Pure white RGB 255,255,255, complete product, one unit where applicable, and approximately 85% frame occupancy.
- Etsy product image: A consistent composition with the working target at 2,000 pixels on the shortest side.
- Shopify product image: A square export, up to 4,472 × 4,472 pixels, using the same catalogue framing.
- Lifestyle image: Product layer, contact shadow, and scene plate with the product still identifiable.
- Infographic: Product cutout plus separate text and measurement layers.
MerchLoom fits into this workflow as a batch image-processing option. You can bring in product photos from storage or commerce systems, describe the desired processing in plain English, and run chained AI pipelines across the collection instead of editing one image at a time. The first images can be tried with no account, and the service uses pay-per-image credits that never expire. That makes it possible to test a small group before committing to a wider run, while still leaving room for human review and manual correction.
Automation doesn't remove the review bucket. Keep a deliberate queue for low-confidence images and difficult products. The right queue size depends on the source quality, product materials, and model behavior on your catalogue. As the system processes more of the same product categories, you can revise routing rules, but you shouldn't delete review just because most solid objects cut cleanly.
Use this pre-upload checklist for every Amazon main image:
- Background: Confirm pure white at RGB 255,255,255. A mask check may use a separate key color such as RGB 255,50,255 during internal testing, but that color must never remain in the delivered image.
- Product: Confirm the complete product is shown accurately, with no unintended props, text, logos, badges, or watermarks.
- Resolution: Confirm the longest side meets Amazon's 1,000-pixel minimum. Use the locked catalogue export target of 1,600 pixels or more when the workflow supports it.
- Framing: Confirm the product occupies approximately 85% of the image area without clipping.
- Profile and format: Confirm sRGB and JPEG or PNG as required by the channel.
- Aspect ratio: Confirm the output matches the intended marketplace template.
- File weight: Confirm the file is under 10 MB before upload.
- Review status: Confirm low-confidence assets have been opened and approved by a person.
The same approach works across hundreds of SKUs because every file follows one route and every exception gets recorded. You can run the work overnight, review the flagged folder during the day, and deliver Amazon, Etsy, Shopify, eBay, WooCommerce, Poshmark, and Depop versions from the same controlled source files. The exact daily capacity depends on image quality, workflow limits, and review demand, so measure completed, approved assets rather than raw files submitted.
MerchLoom can run this catalogue process through chained AI pipelines, including background removal, reframing, color correction, background replacement, and channel-specific exports. Visit MerchLoom to try the first images without an account, then use its pay-per-image credits, which never expire, to process only the assets you need.
Stop editing product photos one at a time
Upload your catalog or connect your store. Describe the result once. MerchLoom does the rest.
Try it free — no signup