
Virtual Try on Ring: A Catalogue-Scale Setup Guide
Build and scale virtual try on ring for your store. Covers 2D vs 3D, asset prep, WebAR integration, batch workflows, QA, and conversion tracking.
You've got hundreds of ring photos in a folder, each one shot at a slightly different angle, on a different background, with inconsistent spacing around the product. A virtual try on ring feature sounds like the answer, until the first batch reveals clipped bands, floating stones, incorrect proportions, and product pages that load slowly.
Start with the catalogue, not the demo. Sort your rings by construction, photography quality, metal, stone setting, and available product data. Then choose whether each group needs a 2D overlay, a 3D AR asset, or a simpler static preview. That decision determines your capture requirements, processing cost, QA workload, and customer experience.
What Virtual Try On Ring Actually Delivers
A virtual try-on tool shows visual fit, not guaranteed physical fit. It places a ring image or model over a hand photo or camera view, helping shoppers judge the style, stone presence, band width, and overall appearance. It doesn't replace a ring sizer, a jeweler's measurement, or confirmation of knuckle clearance.
Photta's ring try-on guidance makes this distinction clearly. The experience is “visual fit, not tape-measure-accurate sizing,” so your product page should pair the try-on button with a separate sizing guide. That guidance should explain how to measure an existing ring, check finger circumference, and account for wider bands that can feel different from narrow bands.
A technical study reported approximately 94.17% positional accuracy for a 3D ring model placed on a finger in a mobile AR workflow (study on AR jewelry try-on accuracy). That's a useful alignment benchmark, but it doesn't mean every photo will produce the same result. Lighting, finger position, image quality, and occlusion still affect the output.
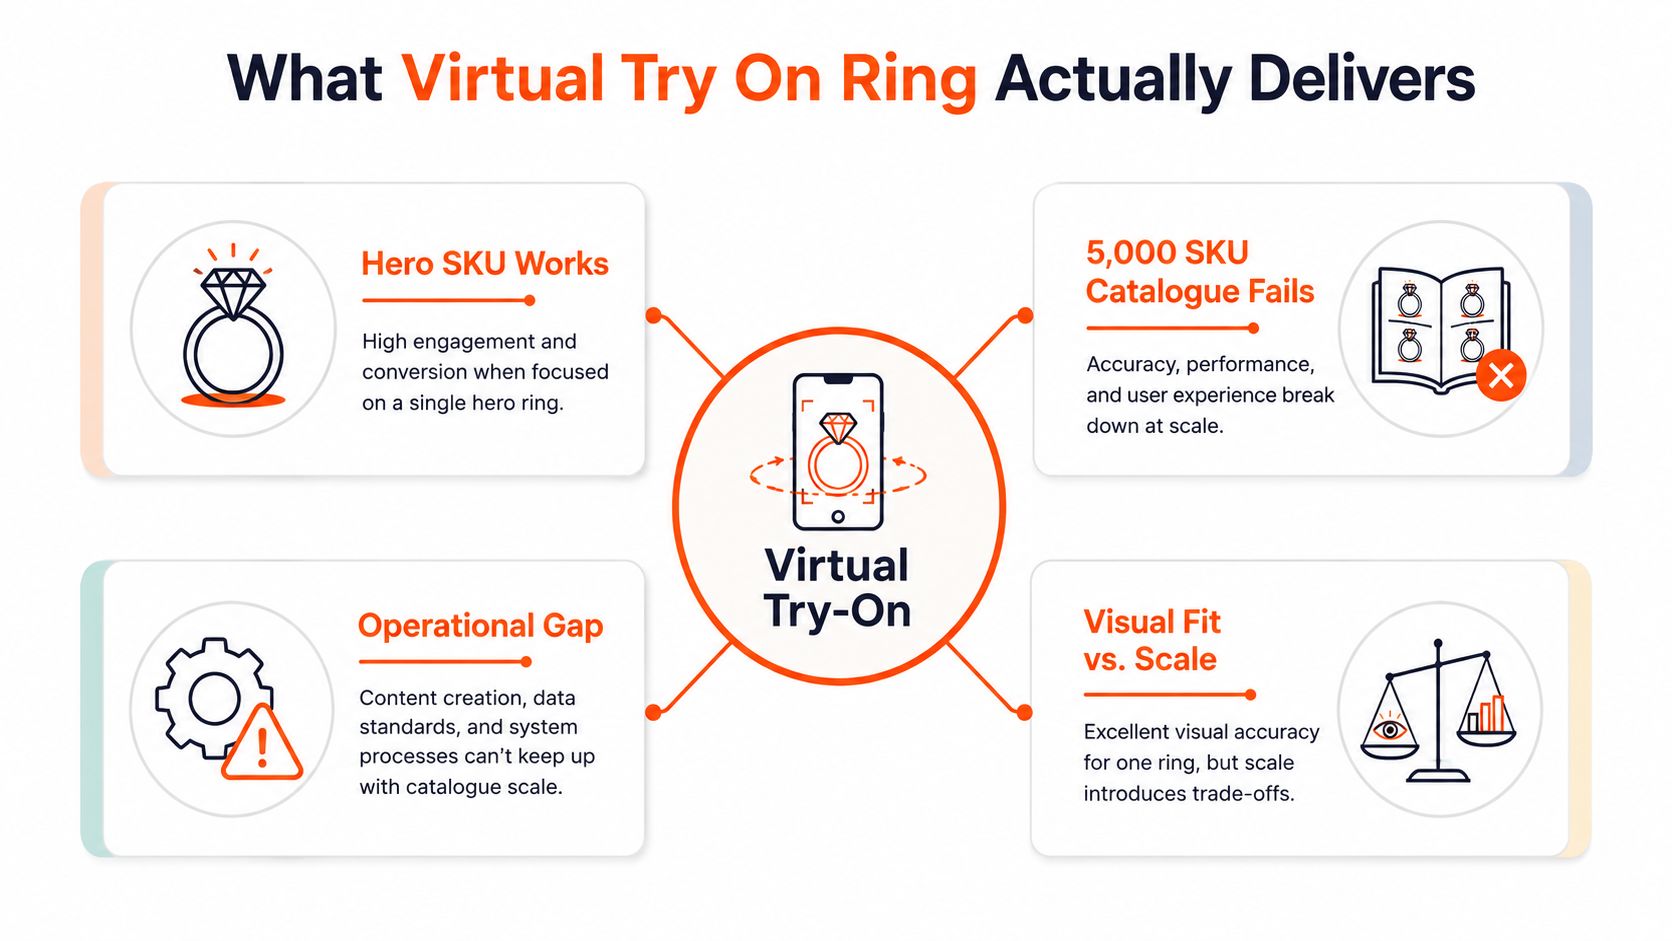
The production gap
A hero SKU can look excellent because someone has manually corrected its crop, orientation, scale, and hand placement. That same process fails when repeated across a large catalogue. Rings vary by band width, setting height, stone shape, shank profile, and camera angle. A system that handles one solitaire may place a thick eternity band incorrectly.
A production-ready setup needs three layers:
- Consistent assets: Every source image follows the same crop, resolution, orientation, and background rules.
- Device-aware delivery: The experience works sensibly on mobile browsers, desktop browsers, and devices that can't support camera-based AR.
- Quality control: Automated checks and human review catch bad alignment before an asset reaches a product page.
A 2026 academic paper measured ring rendering at an average of 50.6 FPS with smoothing and 50.8 FPS without smoothing, showing that near-real-time ring rendering is technically viable for consumer-facing systems (academic paper on real-time virtual jewelry try-on). The same pipeline measured other jewelry categories, which matters if your store also sells earrings, bracelets, or necklaces.
What success looks like
Don't judge the project only by whether the overlay appears. Track whether shoppers use the feature, compare products afterward, add an item to cart, and return less often. Also track the internal metric that operators usually miss, cost per usable SKU asset.
A strong system lets you process a collection without opening every image in a desktop editor. It preserves a master asset, creates channel-specific versions, records the workflow version, and sends uncertain results into review. The virtual try-on workflow for products is useful background when you're mapping accessories into body-placement workflows.
For examples of how AR can sit inside a retail experience rather than functioning as a novelty page, review this AR experience from Studio Liddell. The important lesson for a catalogue owner is placement. The try-on control belongs beside product imagery and purchase information, where shoppers already evaluate a ring.
Choosing Between 2D Overlay and 3D AR
The most practical choice depends on catalogue size, ring value, asset quality, and technical capacity. A 2D overlay uses a prepared ring image and maps it onto a hand photo. 3D AR uses a model that can render from different angles and respond to camera movement.
For a large catalogue with uneven photography, 2D usually gets you live faster. It works in more browser environments, needs fewer specialized assets, and is easier to update when a product image changes. The trade-off is obvious. The result is less flexible when the hand rotates, the finger bends, or the shopper wants to compare angles.
3D AR provides the richer experience, but every SKU needs a suitable model, materials, scale data, and testing. Page performance also matters. A large collection of heavy models can create loading problems, especially if the engine initializes before the shopper has expressed intent.
| Criteria | 2D Overlay | 3D AR |
|---|---|---|
| Asset creation | Prepared ring images with transparent backgrounds | 3D model, materials, scale data, and testing |
| Catalogue rollout | Faster for broad collections | Slower because each model needs preparation |
| Angle flexibility | Limited by source image and placement logic | Supports changing views and camera movement |
| Device support | Broad browser coverage | Depends on browser, camera, and AR capability |
| Maintenance | Replace or reprocess image assets | Maintain models, materials, SDK behavior, and device compatibility |
| Best use | Large fashion or mixed-quality catalogues | High-value rings where interaction justifies added work |
| Main risk | Sticker-like placement or weak perspective | Loading weight, model defects, and integration upkeep |
A practical selection rule
Use 2D first when you have hundreds or thousands of SKUs and your main goal is to help shoppers judge style and visual scale. It's also appropriate when rings change frequently or when your source images aren't consistent enough for reliable modeling.
Use 3D for a smaller group of high-consideration products. Engagement rings, custom pieces, and rings with complex settings can justify more detailed interaction because shoppers need to inspect the setting and silhouette from multiple views.
A hybrid catalogue is often the sensible answer. Put 3D assets on priority products and use 2D overlays for the long tail. This prevents the AR project from becoming a full replatforming exercise.
Operational rule: Don't build 3D models for every SKU before measuring usage. Start with the products where visual uncertainty is most likely to block checkout.
The same asset logic applies to other try-on categories, but rings have a tighter relationship between image placement and finger geometry. A workflow such as AI virtual outfit try-on can inform broader body-placement automation, but ring assets still need finger-specific alignment and proportion checks.
Image Capture and Asset Preparation at Scale
Your rendering engine can't correct inconsistent source photography reliably. If one ring is centered tightly, another has excess canvas, and a third is photographed from above, the try-on output will vary before the AR system does any work.
For a 2D catalogue, capture or normalize ring assets at 2000 by 2000 pixels minimum, with a consistent product orientation and transparent PNG output where the overlay needs to preserve the hand behind it. Keep the ring's visual center aligned across the collection. A band that sits low in its canvas will produce a different placement result from one centered correctly, even if both files have the same dimensions.
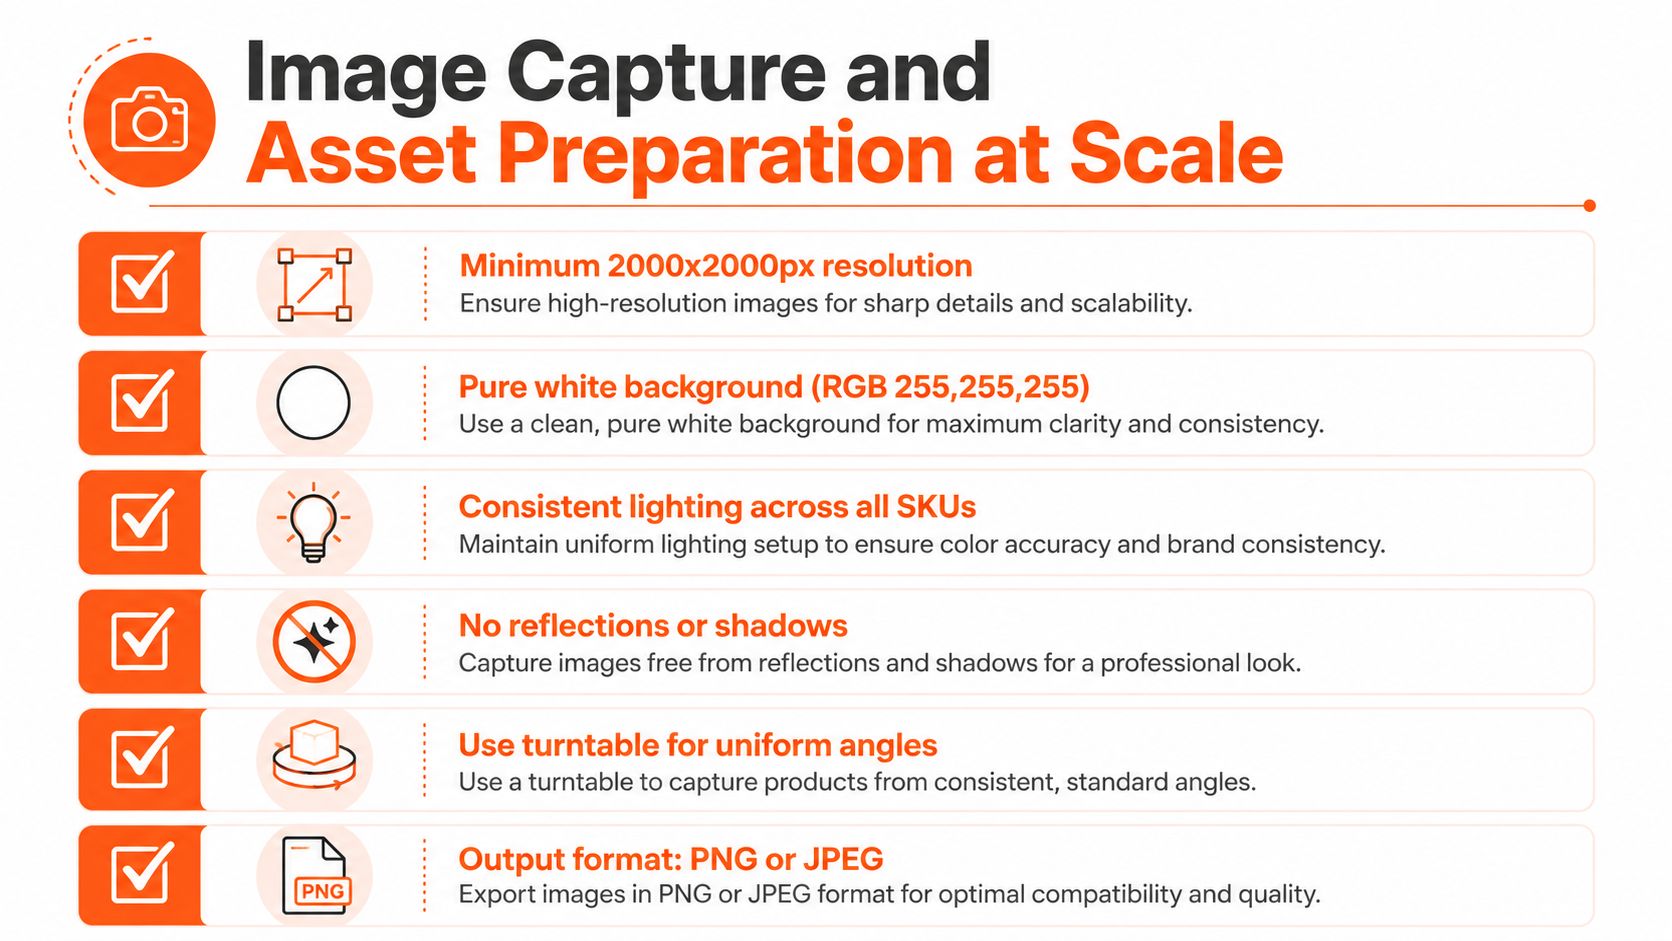
Build one master asset
Create a master file before generating marketplace versions. Keep the product isolated, preserve the original resolution, and store fields for SKU, metal, stone type, band width, setting style, and orientation. Those fields let you route similar rings through the same processing rules.
For marketplace delivery, Amazon's main image rules require a pure white background, RGB 255,255,255, with the product filling about 85% of the frame. Files should be at least 1000 pixels on the longest side, with 1600 pixels or larger recommended for zoom (Amazon product image requirements). Treat those as a separate channel output, not as the only master used for try-on.
Etsy guidance commonly uses 2000 pixels on the shortest side, while Shopify product images are often prepared as square files up to 4472 by 4472 pixels (marketplace image size guidance). Keep one high-quality source, then generate versions for Amazon, Etsy, Shopify, eBay, WooCommerce, Poshmark, and Depop according to each channel's needs.
Use a naming pattern that survives bulk processing:
- SKU-first:
RG-2048_silver_oval-top_v01.png - Variant-aware: Include metal, stone, band width, or angle where the catalogue needs them.
- Versioned: Increment the version when the source image or placement logic changes.
- Machine-readable: Avoid spaces and inconsistent abbreviations.
Choose the right 3D source
CAD-based modeling works well when the manufacturer has accurate geometry. Photogrammetry can help with physical pieces that lack CAD files, but reflective metals and gemstones require careful capture and cleanup. For mobile delivery, keep models optimized and use physically based materials only where they improve the visible result.
Doing this for a whole catalog?
MerchLoom runs background removal, upscaling and AI editing across every product photo you have — one prompt, whole batch. Try 2 batches free, no signup.
Try it freeValidate every SKU before ingestion:
- Confirm the minimum resolution.
- Check the background and alpha channel.
- Confirm the ring is centered and facing the expected direction.
- Confirm metadata for metal, stone, band width, and size.
- Check that no prongs, stones, or band edges are clipped.
- Render a sample overlay on a standard hand image.
- Record the asset version and source filename.
For more detailed guidance on photographing rings and diamonds, focus on repeatable lighting, controlled reflections, and camera positioning rather than one attractive hero shot.
The following video can help you evaluate a repeatable small-product capture setup:
A batch workflow such as how to photograph small items becomes useful when the same capture and normalization rules must run across a full product collection.
Integrating WebAR Into Product Pages
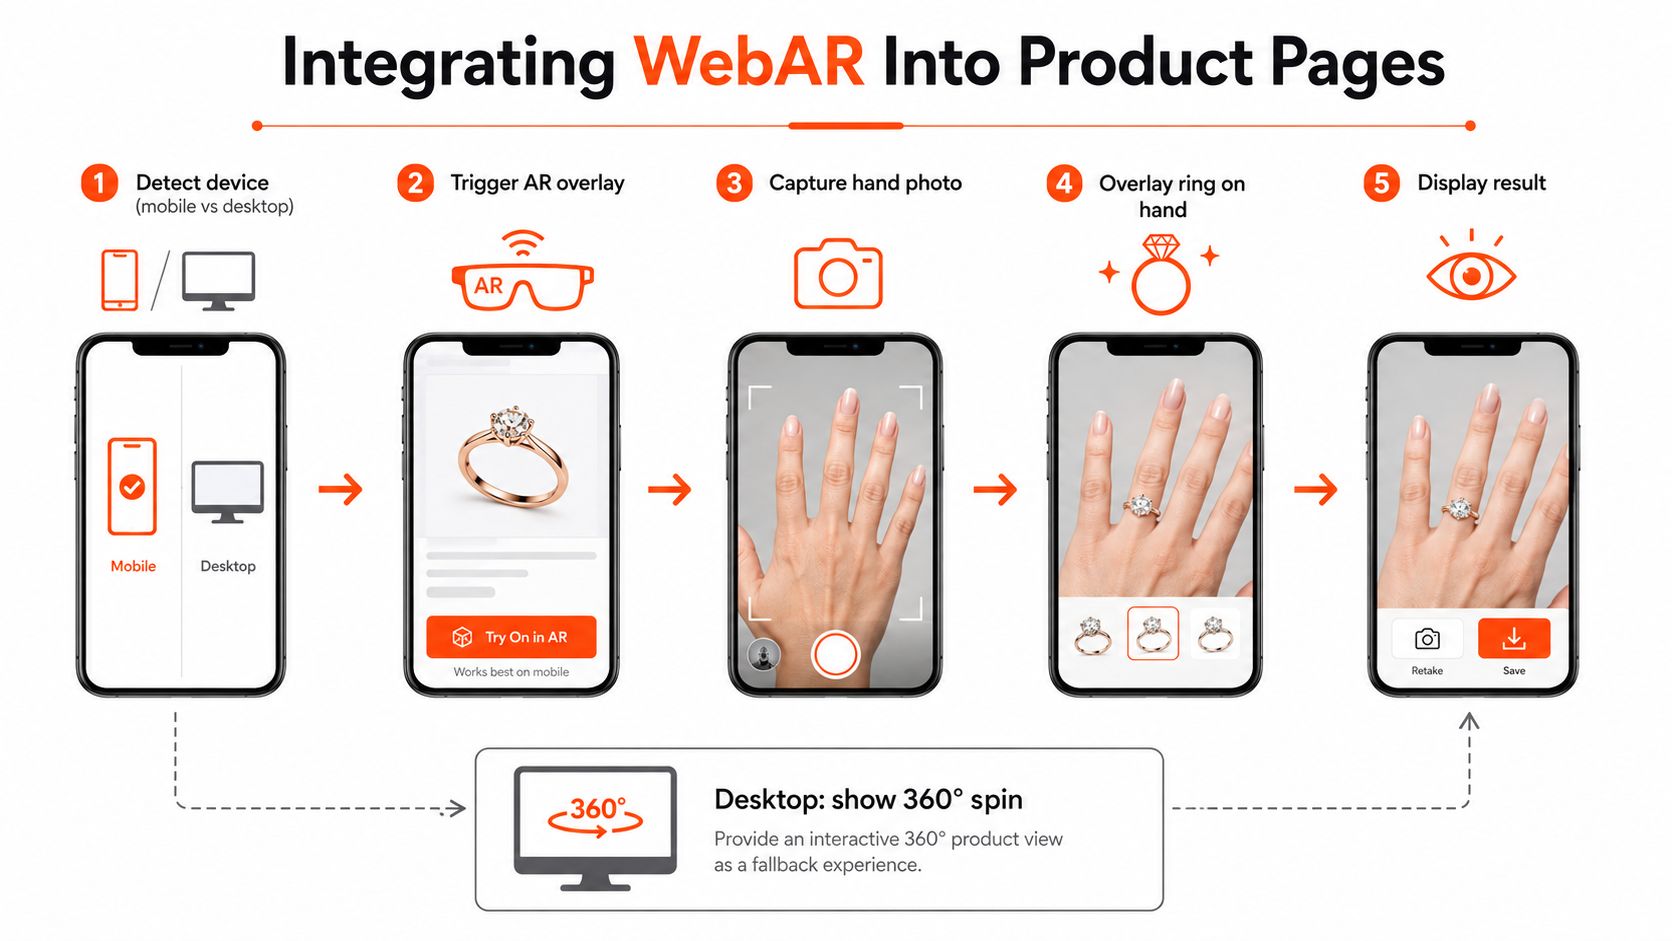
A try-on feature should load when the shopper asks for it, not when the product page first opens. Put a clear Try On control near the image gallery, then load the AR engine after the tap. This keeps the initial page lighter and avoids requesting camera permission before the shopper has shown interest.
The basic sequence is simple:
- Detect whether the visitor is on mobile or desktop.
- Check camera and browser support.
- Load the AR engine lazily.
- Ask for permission after the try-on action.
- Guide the shopper through hand positioning.
- Capture or stream the hand view.
- Place the ring.
- Let the shopper swap products without restarting the session.
Reduce failed captures
The capture screen should tell the shopper what to fix. Use a hand outline, a target finger marker, and short guidance for distance, lighting, and pose. If the hand is too close, too far away, turned sideways, or partly outside the frame, show the problem before sending the image through the rendering pipeline.
This matters at catalogue scale because every failed capture consumes processing time and creates support questions. A clear prompt such as “Place your index finger inside the guide” is more useful than a generic error message.
Desktop users need a different route. A browser may have no camera access, or the shopper may not want to use a webcam. Offer a QR code that opens the try-on flow on a phone, or provide a static model-hand preview and a product gallery fallback. The Michael Hill virtual ring try-on instructions show a practical pattern, desktop users can upload a hand photo or use a model hand, while smartphone users can take a photo in the browser and retake it as needed.
Keep comparison friction low
Store the session state temporarily so shoppers can switch between rings without repeating camera permission and hand capture. Let them compare metal, stone shape, and band profiles while keeping the same hand image or camera session.
When evaluating an SDK or WebAR provider, check the browser support matrix, bundle size, licensing model, fallback behavior, analytics hooks, and update process. Ask how the provider handles OS and browser changes. A feature that works in a controlled demo but breaks after a browser update creates catalogue-wide support work.
The page layout matters too. Clear copy, a visible fallback, and a direct route to product details support the kind of data-backed landing page strategies that reduce confusion around interactive features. For image delivery and transformation, document the handoff between your catalogue, CDN, and try-on engine using an AI image workflow for Cloudinary approach.
Batch Processing and Quality Control
Batch processing only saves time when the pipeline rejects bad inputs early. If you let a low-resolution image, missing alpha channel, or incorrect SKU mapping move into rendering, every downstream step may produce a defective asset.
Start with a manifest containing the SKU, source path, product variant, ring dimensions, and intended output channels. Ingest the raw files, run automated gates, process approved assets, and route exceptions to review. Keep the original file untouched so a failed experiment doesn't overwrite the source.
| Pipeline Stage | Cost per SKU | Time per SKU | Automated QA Gate |
|---|---|---|---|
| Source ingest and metadata mapping | Depends on storage and workflow setup | Depends on file count and transfer | SKU match, file presence, duplicate check |
| Background and alpha preparation | Depends on image complexity and processing method | Depends on image resolution and queue load | Transparent edges, product isolation, missing pixels |
| Ring placement or model preparation | Depends on 2D or 3D method | Depends on asset type and render queue | Orientation, scale, finger anchor |
| Marketplace resizing | Depends on output count and transformation steps | Depends on channel versions | Amazon white background, Etsy shortest side, Shopify square format |
| Render generation | Depends on engine, resolution, and retries | Depends on queue availability | File creation, render completion, visual bounds |
| Human review and correction | Depends on exception volume | Depends on defect complexity | Overlay alignment, clipping, realism, product identity |
Don't insert unsupported cost or time estimates into this table. Your actual figures depend on the model provider, image count, output resolution, storage, and whether you're generating 2D or 3D assets. Record those inputs before you compare suppliers or calculate margin.
Use layered QA
Automated checks should catch objective defects:
- Resolution: Reject files below the required master or channel size.
- Canvas: Detect unexpected aspect ratios, excess empty space, or clipped edges.
- Background: Confirm transparency for overlays and RGB 255,255,255 for Amazon main images.
- Placement: Compare the ring anchor against the target finger zone.
- Scale: Flag rings that fall outside the expected size range for their metadata.
- Identity: Check that the rendered ring matches the source SKU and variant.
Human review handles what scripts can't judge well, including whether the stone looks natural, whether the band appears embedded correctly, and whether reflections make the product look damaged. Review a sample from every batch and inspect every asset that triggers a gate. Don't approve a whole collection because the first few outputs look good.
Practical rule: Fix the earliest failed stage. Re-rendering a bad source image won't solve a bad crop, missing transparency, or incorrect SKU mapping.
Retry logic also matters. Failed renders should return to a queue with a reason, not disappear into a spreadsheet. Version each source and workflow so a new product photograph doesn't invalidate older AR assets. A batch workflow such as batch product photo editing can help organize repeatable transformations, but it still needs product-specific review for reflective jewelry.
MerchLoom fits this type of operation by letting sellers connect existing image sources, describe a workflow, and run chained AI pipelines across a collection rather than one image at a time. The first images can be tried with no account. It uses pay-per-image credits that never expire, and the output still needs human review because AI processing isn't a complete Photoshop replacement.
Measuring Conversion Impact and ROI
Use the available industry figures as directional benchmarks, not promises for your store. A 2026 jewelry retail summary reported that shoppers using AR features were 65% more likely to complete a purchase, spent 4.5 times longer on websites with AR features, and produced an 18% increase in average order value (jewelry retail AR summary). The same summary said virtual try-on solutions cut return rates by 40%, especially for high-value items such as engagement rings.
Track the feature as its own funnel. Record product-page views, try-on starts, successful captures, ring swaps, add-to-cart actions, purchases, and returns. Separate mobile and desktop results, then compare shoppers who used try-on with a control group that saw the same product page without it.
Don't calculate return on investment from conversion alone. Include asset preparation, model or overlay creation, SDK licensing, compute, storage, maintenance, QA time, and the cost of replacing failed outputs. Then compare those costs with incremental order value and avoided return handling.
A ring try-on system is more likely to justify its operational burden when product uncertainty is high. That may include engagement rings, unusual settings, wide bands, and products with strong visual differences between a product-only image and a hand-worn view. For low-priced products, a 2D approach may be more practical than a full 3D build.
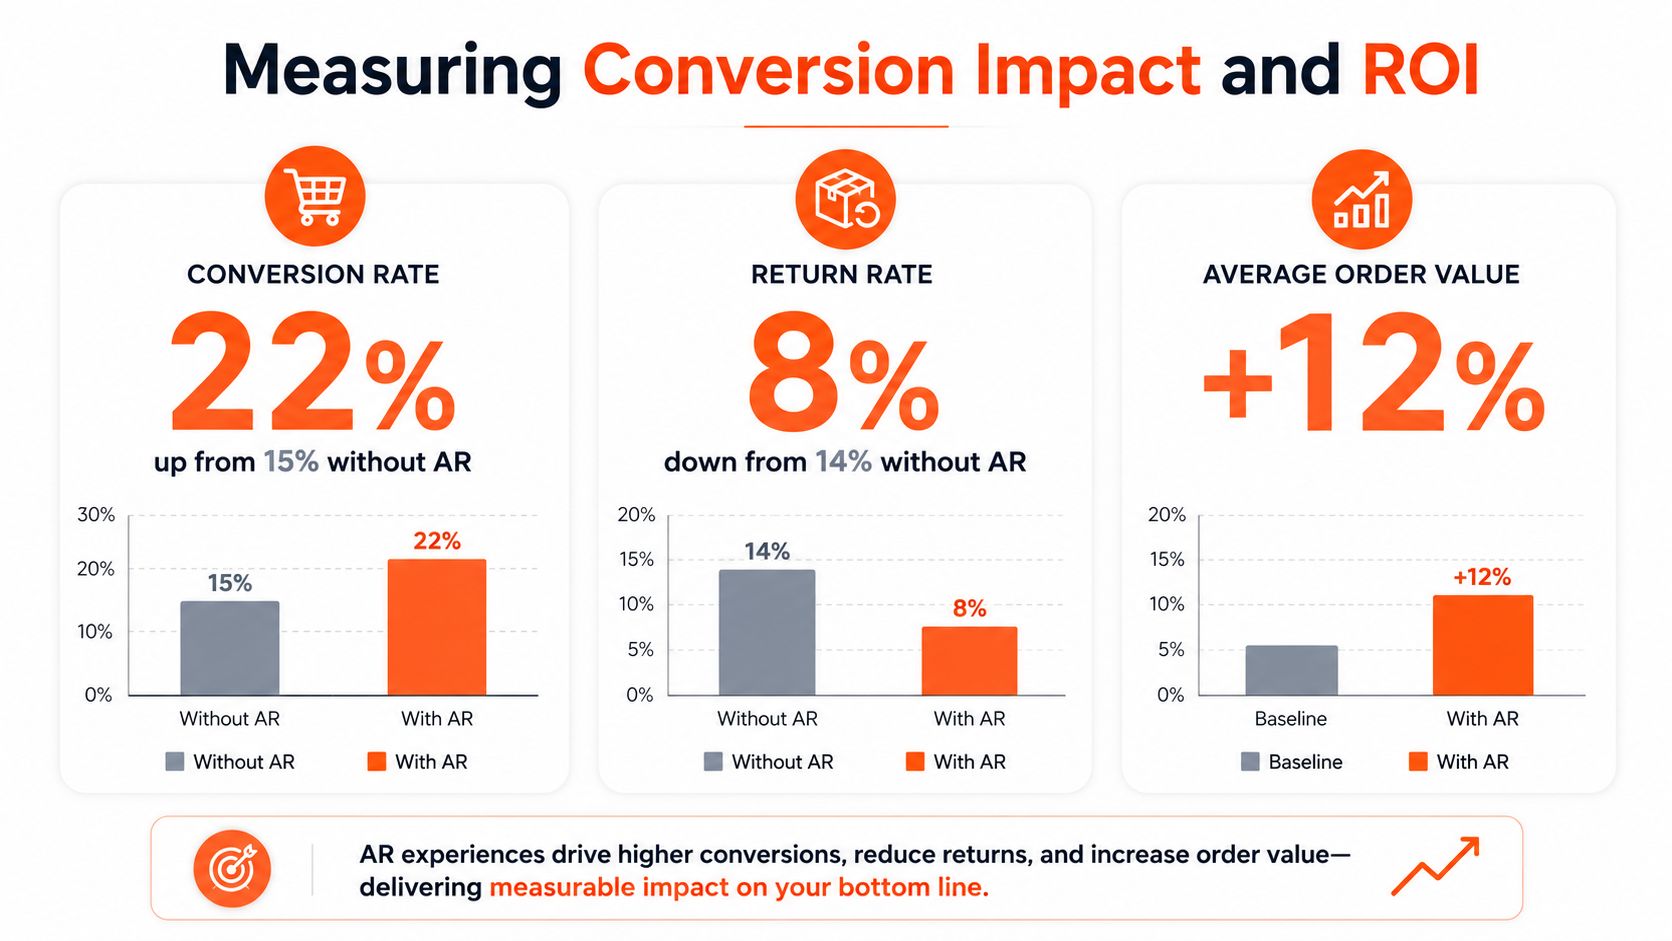
Review results by SKU group, not only at store level. A setting style may benefit from try-on while a simple band shows little change. This lets you expand the workflow where it helps and avoid paying to process every product equally.
If you're building the catalogue pipeline now, MerchLoom can run chained AI image workflows across imported product collections, create virtual try-on previews, and keep processing pay-per-image with credits that never expire. Try the first images without an account, review the results yourself, and visit MerchLoom to prepare a repeatable ring asset workflow for your store.
Stop editing product photos one at a time
Upload your catalog or connect your store. Describe the result once. MerchLoom does the rest.
Try it free — no signup