
Shopify Product Image Size: A Practical Catalog Guide
Get the Shopify product image size right across your catalog. Exact dimensions, formats, retina rules, and a batch workflow that actually scales.
You've got a folder full of supplier photos, phone shots, old marketplace exports, and maybe a few images someone pulled from a past Shopify store. Some are tiny. Some are oversized. Some are portrait. Some are square. None of them match. That's the Shopify product image size problem.
Don't fix that one listing at a time. Set one export standard for the whole catalog first. For most stores, that means square product images at 2048 × 2048 px because Shopify says square product images at 2048 × 2048 pixels usually display best in its product media guidance and theme image documentation (Shopify product media types, Shopify theme images).
Why Your Catalog Needs One Image Standard, Not One-Off Fixes
Monday morning, you upload 40 new SKUs. By Monday afternoon, the collection page looks uneven, product cards jump in height, and half your team is arguing over whether the problem is the theme or the photos. It's the photos. More specifically, it's the lack of a catalog standard.
Mixed image sizes create operational drag long before they create a visible storefront problem. One supplier sends tight square crops. Another sends tall lifestyle shots. Older listings still use padded images with extra whitespace. If you approve files one product at a time, you get a store that looks inconsistent and a workflow that stays slow.
Pick one catalog default and use it everywhere
Your primary product image needs one format across the full catalog: 2048 × 2048 px, square. Shopify's product media guidance says square product images at 2048 × 2048 pixels usually display best (Shopify product media types).
Use that as an export rule, not a suggestion.
Once every primary image shares the same shape and dimensions, routine catalog work gets easier:
- Merchandising stays consistent because product cards fill the same frame
- Batch exports run cleanly because one preset fits the whole collection
- QA gets faster because image problems stand out immediately
- Reorders and new drops fit the existing catalog instead of introducing a new exception
That matters more than getting one photo to look acceptable on one PDP. A catalog standard is an operations decision.
One-off fixes create repeat work
Editing after upload wastes time twice. First, someone has to spot the problem in the storefront. Then someone has to go back to the source file, resize it, replace it, and check every place that image appears.
Set the image rules before anything reaches Shopify. That means dimensions, crop style, background treatment, compression, and file naming are decided once and applied to every export. If your folders are already a mess, clean up the process at the library level with a product image library management system and file structure.
Here's the rule I'd use across a large catalog: if an image cannot fit the standard cleanly, it does not become the primary image. Put it in secondary media or replace it. Stores with a handful of products can tolerate inconsistency. Stores with hundreds pay for it every week.
Shopify Image Specs You Can Copy Into a Preset
You do not want your team making sizing calls product by product. On a 300-SKU catalog, one bad preset becomes 300 replacements, 300 QA checks, and a messy storefront. Set one export standard and use it every time.
Shopify accepts large product images, but the upload ceiling is not the setting you should build around. The practical target for a clean catalog is still 2048 × 2048 px in a 1:1 square. Shopify's own documentation also points sellers toward square product images at that size for reliable display, while keeping files under the platform's upload cap.
Hard limits vs. preset values
Use the platform limits as guardrails. Use your preset as the rule.
| Spec | Value | How to use it |
|---|---|---|
| Max dimensions | 5,000 × 5,000 px | Ceiling, not export target |
| Max file size | 20 MB | Upload cap |
| Recommended working size | 2048 × 2048 px | Default export size |
| Aspect ratio | 1:1 square | Primary catalog standard |
| Color profile | sRGB | Default for web consistency |
The contradiction in Shopify's help docs around megapixel wording is not important for daily operations. What matters is simple. Stay well below the ceiling, keep files under 20 MB, and standardize the entire catalog on one preset that your theme can display cleanly.
Preset to copy
Use this for primary product images:
- Dimensions: 2048 × 2048 px
- Aspect ratio: 1:1
- Color profile: sRGB
- Format: JPEG for standard product photography
- PNG use case: only for graphics or images that need transparency
- Compression target: as much as needed to keep quality clean and file size comfortably below Shopify's limit
- Naming rule: keep filenames tied to SKU or handle so replacements stay organized at scale
That last point matters more than sellers expect. Once you are exporting hundreds of files, clean naming and one fixed image shape save more time than squeezing a little extra detail out of a single oversized photo.
Format rules that hold up across a large catalog
JPEG should be your default. It is lighter, easier to batch, and usually the right choice for apparel, home goods, beauty, and most standard product photography.
PNG is for exceptions. Use it when the image needs transparency or when text and flat graphics hold up better in PNG. Do not switch formats randomly between similar products. Mixed file logic creates avoidable cleanup work later.
If you need a repeatable way to reduce file weight after resizing, use a workflow built around a Shopify image optimizer for batch compression and export cleanup.
The preset standard I would use
If you need one answer your team can follow without debate, use this:
Primary Shopify product image preset: 2048 × 2048 px, square crop, sRGB, JPEG, compressed below 20 MB.
Use that as the default export rule for every primary image in the catalog. Only break it when a product category has a documented reason to use a different ratio across the full set, not because one image came in awkward.
Multi-Channel Image Specs for Shopify, Amazon, and Etsy
You export 300 SKUs for Shopify, then realize Amazon rejects half the main images and Etsy thumbnails look soft. That is what happens when each channel gets handled as a one-off fix instead of a catalog standard.
Set one master spec for the full catalog, then make small channel-level adjustments only where a marketplace has a stricter rule. For most sellers, Amazon is the constraint that forces the cleanest process.
The specs that should drive your master files
Amazon is stricter than Shopify on the main image. It requires a pure white background at RGB 255,255,255, the product to fill most of the frame, and enough resolution for zoom. If Amazon matters in your mix, keep a separate Amazon-ready main image variant and use a square master that gives you enough room to crop cleanly. For the exact framing rules, use this Amazon product image size guide.
Etsy is less rigid about background treatment, but it still punishes weak source files. Earlier sourcing in this article covers Etsy's commonly used larger image recommendations. The practical takeaway is simple. Do not build your catalog around small files.
Shopify stays easiest to manage when your primary product image follows the square preset covered earlier. That keeps your store feed, collection pages, and product galleries more consistent once you apply the same export rule across the catalog.
Side-by-side comparison
| Platform | What matters most | Safe catalog export target | Channel-specific adjustment |
|---|---|---|---|
| Shopify | Consistent shape, clean display in theme grids | 2048 × 2048 px square | Usually none if the master is already square |
| Amazon | White background, tight framing, enough resolution for zoom | Square master at about 2048 px | Export a main image with pure white background and Amazon-safe framing |
| Etsy | Strong first image, enough resolution to stay sharp | Square master at about 2048 px or larger if your workflow supports it | Reorder and crop the first image for thumbnail appeal |
The batch standard I would use
Use one square sRGB master for every primary product image in the catalog. Keep it around 2048 × 2048 px. Store that as the reusable source file for Shopify, Amazon, and Etsy.
Then apply only two channel overrides:
- Amazon: pure white background and marketplace-compliant framing for the main image
- Etsy: choose the strongest first image and check thumbnail crop
- Shopify: keep the square master as-is unless a category has an approved exception
This is the part sellers miss. A single image decision multiplied across hundreds of listings becomes an operations decision. If your team exports one square master per SKU, names it consistently, and only creates exceptions for marketplace rules, you cut rework, reduce listing errors, and make future replacements faster.
How Shopify Themes Crop, Resize, and Display Images
Most Shopify image problems aren't file problems. They're theme behavior problems.
Your source image might be technically fine, but if the theme crops collection cards to square and your product shot is tall portrait, the catalog still looks off. The theme will force consistency one way or another. You're better off deciding that consistency before upload.
Collection grids punish mixed aspect ratios
A mixed catalog creates three visible problems fast:
- subject drift when one product sits high and another sits low
- awkward crops when the theme centers a non-square image badly
- uneven whitespace around products from different shoots
A square 2048 px export avoids most of that. It gives the theme one predictable shape to work with on collection pages and product galleries.
Doing this for a whole catalog?
MerchLoom runs background removal, upscaling and AI editing across every product photo you have — one prompt, whole batch. Try 2 batches free, no signup.
Try it freeProduct pages need a stronger source file
Theme resizing is normal. What hurts you is feeding the theme a weak source image and expecting it to look sharp everywhere.
If your store uses a square crop on collection pages, start square. If you need portrait lifestyle images, keep those as secondary gallery images, not the primary catalog standard.
Working rule: Your main product image should match the shape your collection grid wants, not the shape your camera happened to shoot.
If you're cleaning up an old catalog with mismatched ratios, this walkthrough on how to make images square for marketplace use is the right place to standardize the primary image set.
The Catalog-Scale Optimization Workflow
The order of operations matters. Get it wrong and you'll create more cleanup, heavier files, and more failed exports. Get it right and the whole batch moves faster.
Start with source control
Keep the originals untouched in a locked source folder. Don't keep re-editing already compressed marketplace files. Every time you resave a lossy image, you chip away at quality.
Use a simple folder structure:
- Originals for the untouched source images
- Working for resized and edited files
- Final export for channel-ready outputs
This matters when a supplier sends an updated colorway or you need to rerun the same SKU for another marketplace.
Run the steps in the right sequence
Here's the workflow I'd use across a real catalog:
Pull the largest usable source file
Start from the best available image, not a marketplace download.Resize to your catalog standard
For Shopify-first catalogs, that means 2048 × 2048 px square for the main image.Do background cleanup after resize
Edge cleanup is easier to judge at the size you'll upload.Convert to your export format
JPEG is the default for most product photos. PNG is for true transparency cases.Compress last
Compression should happen on the final composition, not halfway through the workflow.Name files for bulk upload
Use a stable naming structure tied to the product handle or SKU.
Don't scatter the process across random tools
The common mistake is bouncing one batch through a browser resizer, then a background remover, then another compressor, then a manual rename step. That's how sellers lose track of versions.
Use one repeatable flow. If you want to automate chained processing across a whole collection, MerchLoom is one option for that. It lets sellers run batch image workflows across existing catalog folders, try the first images with no account, and pay per image with credits that never expire. It's useful for repetitive catalog prep, but you still need a human QA pass before upload.
For a broader view of how this fits into listing prep, see this guide to image editing for ecommerce.
Keep the standard stricter than the platform
Platform limits are safety rails. Your internal standard should be tighter.
Use one square master for primary product images. Keep backgrounds consistent. Keep naming clean. Keep the edit order fixed. Sellers who skip that discipline always end up doing the same work twice.
Common Image Problems and How to Fix Them
You upload 80 products from two different shoots. By the end of the day, half the collection looks clean, a quarter looks soft on zoom, and the rest sit at slightly different heights in the grid. That is not a one-image mistake. It is a batch standard problem.
Use this section to diagnose the pattern fast, fix the source, and stop repeating the same defect across the rest of the catalog.
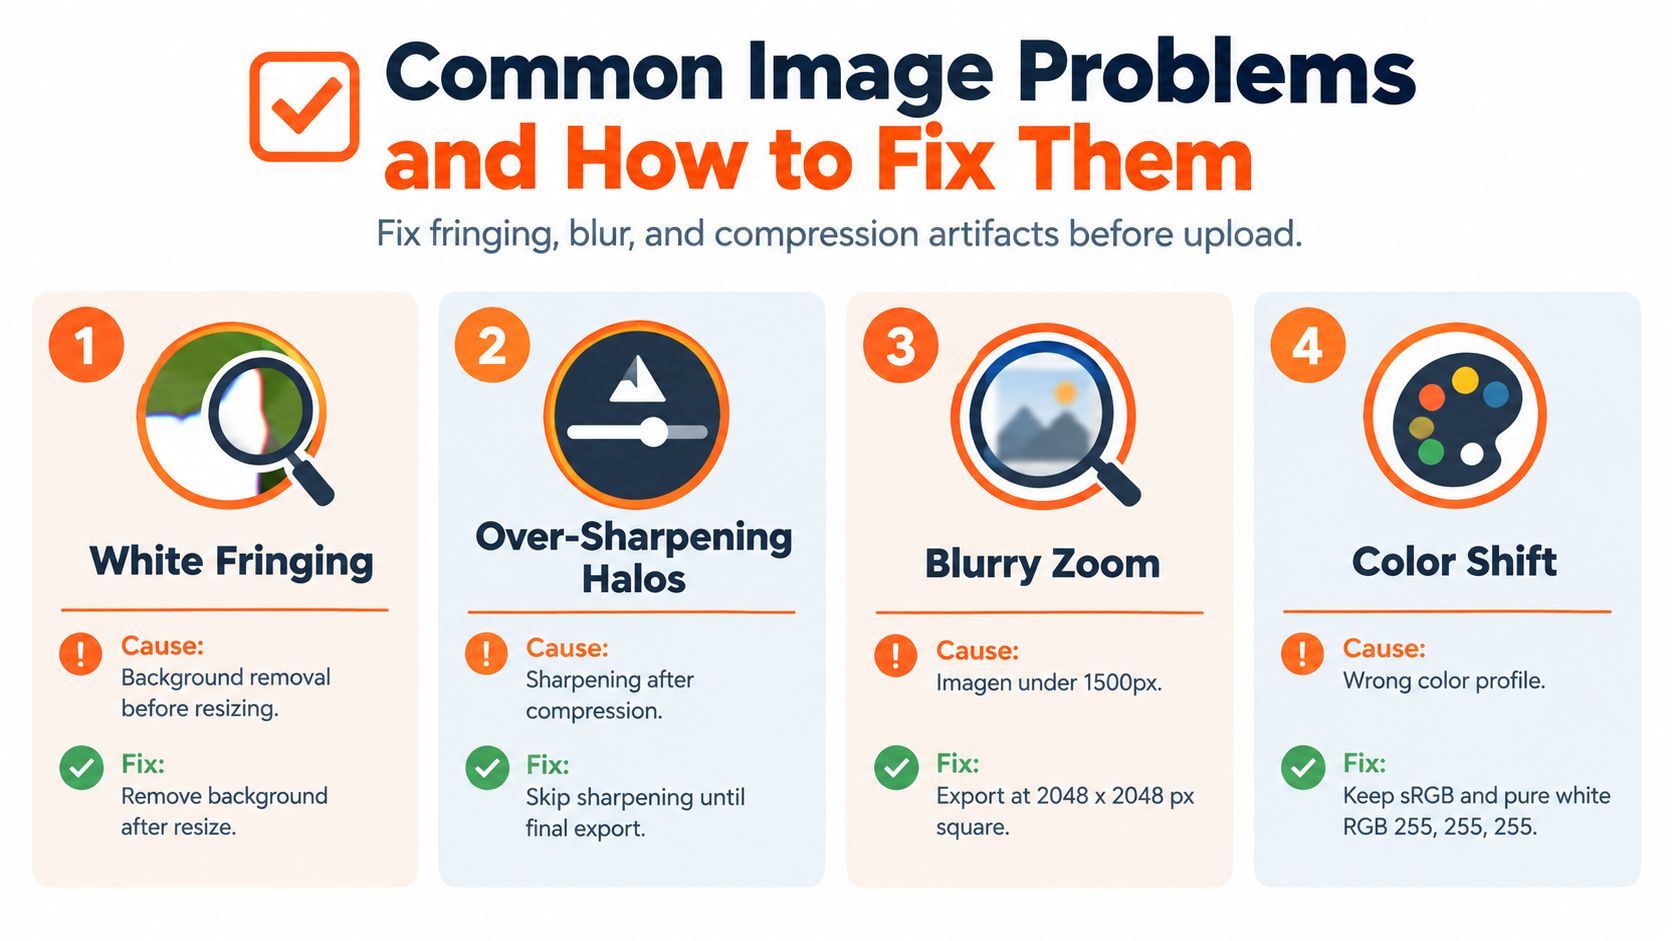
Four problems that keep showing up
White fringing
Cause: edge cleanup happened on the wrong version, or the cutout was rushed.
Fix: inspect the file at final export size, then clean the edge on that version. If one image has halos, check the rest of that batch. The same workflow usually caused the same defect across every SKU.Blurry zoom
Cause: the source file was weak before export, or someone stretched a small image to hit the store standard.
Fix: replace it from the original source. Do not upscale a bad file and keep moving. Across a large catalog, one soft source usually means a whole subset needs to be rerun.Mismatched framing across a collection
Cause: products were cropped by eye instead of against one placement rule.
Fix: reset the set to one framing preset. Keep the subject at a consistent visual size and vertical position in every primary image. Grid pages look messy when each product fills the square differently, even if every file is technically the same pixel size.Color shift
Cause: mixed color profiles, uneven white balance, or background whites that are close to white but not clean.
Fix: keep exports in sRGB. For Amazon main images, set the background to pure white at RGB 255,255,255. If one supplier sends warmer files or a different profile, convert that whole batch before upload instead of correcting images one by one.
A short visual walkthrough helps if you need to explain this to a teammate or VA:
What not to do
Do not sharpen a broken export and call it fixed. Do not turn a compressed marketplace image into your new master. Do not let theme cropping decide the final composition.
Clean catalogs come from repeatable standards and batch QA.
If a file fails at normal viewing size, remove it from the batch and replace it from the source. That is faster than patching the same problem across 20 related listings after they are already live.
Running the Workflow Across a Whole Collection
Once the single-image process works, stop clicking through it manually. Build the workflow around folders, naming, and batch rules.
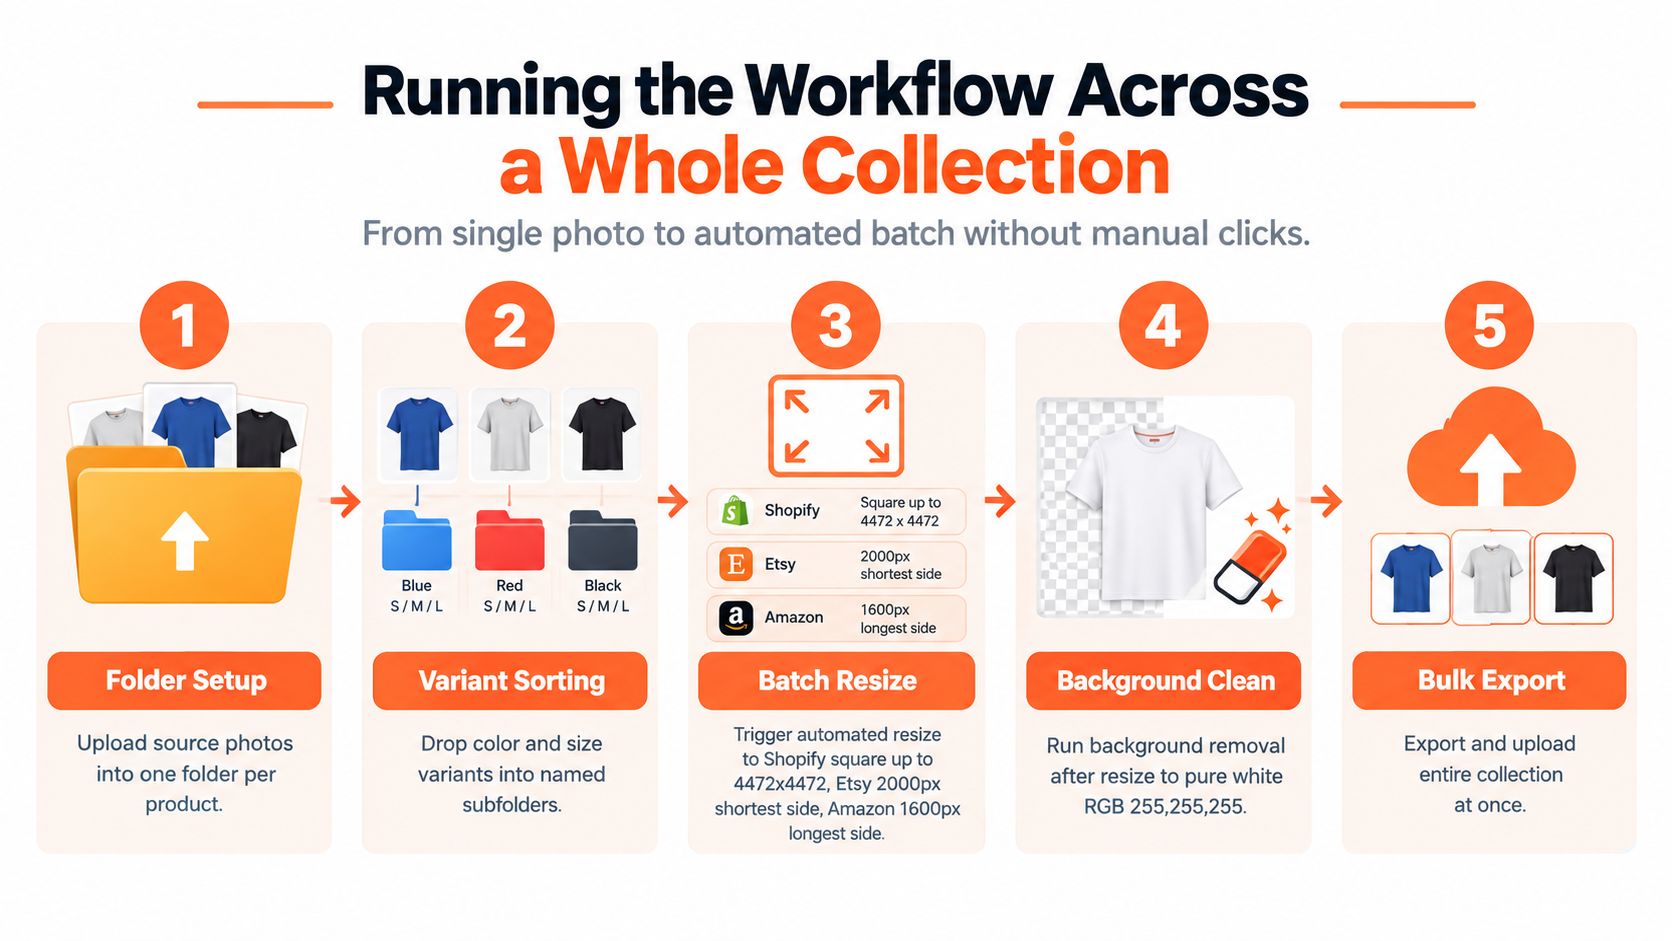
Use a folder structure that survives reorders
A simple structure works best:
- One folder per product
- Named subfolders for variants
- Separate output folders for each channel if needed
That gives you a reliable place to rerun the same workflow when a colorway changes or a marketplace rejects an image.
Automate the sequence, not the judgment
The right batch order is straightforward:
- Resize first to your store standard
- Run background cleanup next so edge handling stays consistent
- Export the final file last in the format you need
Chained AI workflows help. They remove the repetitive clicking, not the need for review. You still need to spot-check edge quality, framing, and compliance before publishing.
For a large collection, that's the difference between controlled batch processing and a week of one-by-one editing. The whole point is consistency. Same crop logic. Same background rule. Same export behavior across every SKU.
Your Catalog Image Checklist Before Upload
You feel the cost of a bad image standard at the end of the job, not the start. The batch looks fine until one marketplace rejects half the files, one theme crops the top of the product, and twenty SKUs go live with mismatched framing. Fixing one image is easy. Fixing a collection is rework.
Use one final catalog check before anything goes into Shopify. The goal is simple: every product image set should pass the same standard, file after file.
The pre-upload list
Dimensions
Set 2048 × 2048 px as your default Shopify master export for square product images. It is the safest storewide preset and keeps your catalog consistent across collection pages, product pages, and zoom views.Channel compliance
Check the same master set against the channels you sell on. For Amazon, main images need a pure white background and enough resolution for zoom. For Etsy, the first image needs larger dimensions than many sellers expect. Those requirements were covered earlier. Do not wait for marketplace errors to catch them.File size
Keep each Shopify image under 20 MB. If a batch is creeping up in size, fix export settings before upload instead of compressing random files after the fact.Format and color
Use JPEG for standard product photos. Keep everything in sRGB so colors stay predictable across devices and channels.Naming and QA
Name files by product handle or SKU, then check the whole batch at full size. Look for crop misses, background cleanup errors, soft exports, and inconsistent product scale between listings.
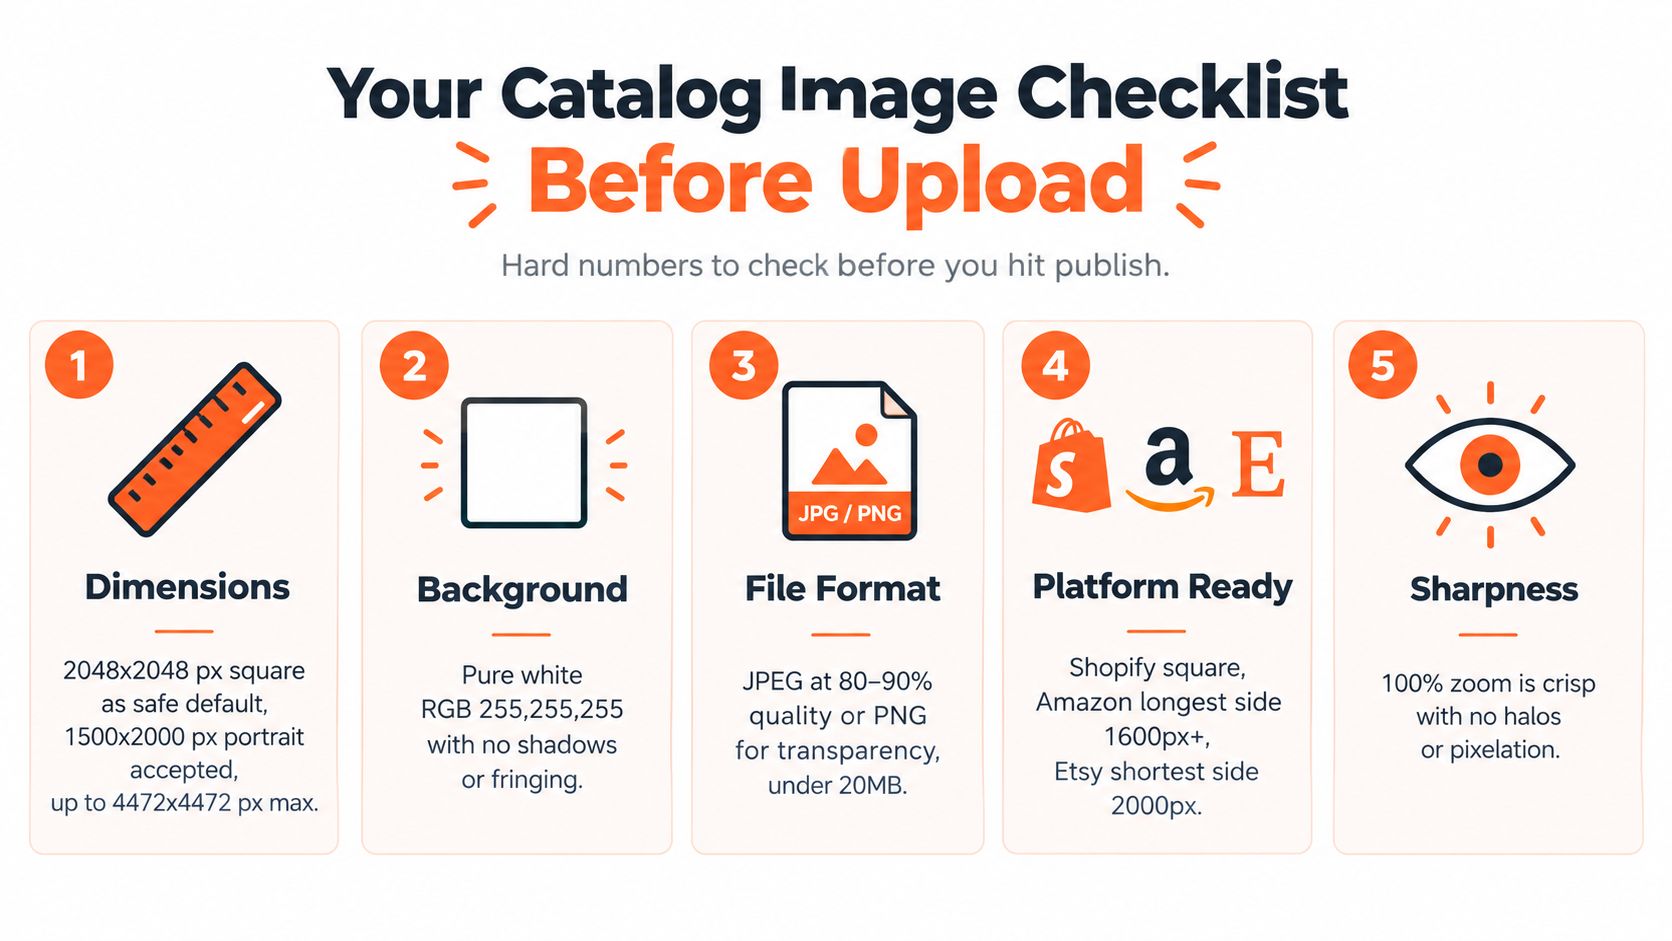
This step catches the expensive mistakes. A framing problem on one image is a nuisance. The same framing problem across eighty listings turns into a week of cleanup.
If you want to run this process across a real catalog instead of editing one image at a time, MerchLoom is built for batch product image workflows like resizing, cleanup, reframing, and export across marketplace-ready collections. You can try the first images with no account, and it's pay-per-image with credits that never expire, which fits better than another subscription when you're cleaning up a backlog.
Stop editing product photos one at a time
Upload your catalog or connect your store. Describe the result once. MerchLoom does the rest.
Try it free — no signup