
Product Image Background AI for Large Catalogs
Use product image background AI to process hundreds of catalog photos fast. Workflows, marketplace specs, cost-saving order of operations, and quality control.
Monday morning, the backlog doesn't feel like “editing.” It feels like 200 decisions, and each one can break a listing later. A white background drifts gray, a bottle edge turns fuzzy, a shadow points the wrong way, and suddenly the same product has three different looks across Shopify, Amazon, and Etsy.
Start with the cheapest fix first. Shoot or clean the source image, remove the background, and only then spend time on new scenes, shadows, or upscale steps. That order matters at catalogue scale, because every extra pixel and every re-render gets multiplied across the whole batch.
Two Hundred Photos and a Monday Deadline
A seller with a Shopify store and an Amazon queue usually doesn't have one “bad” photo. They have a folder full of almost-right photos. One bottle is centered differently from the next. One shirt has a soft gray halo. One SKU family uses a warm background while the rest are cool. That's how a batch turns into a manual cleanup job that eats the whole day.
Repetition is a significant challenge. If you fix one listing by hand, you've still got 199 more images waiting, and tiny inconsistencies show up in the grid, on search pages, and inside marketplace review flows. Amazon main images are unforgiving about background color, and every channel has its own framing habit, so a one-off edit rarely holds across the whole catalogue.
Practical rule: treat the batch as one production run, not as 200 separate design tasks.
That mindset changes the order of work. Don't start by making pretty scenes. Start by isolating the product cleanly, then reuse that cutout across the rest of the workflow. It's the same reason a batch pipeline beats an image-by-image habit, which is why a process built for grouped work matters more than a single-editor approach. If you want a practical batch view of the problem, this internal guide on batch product photo editing fits the same operating logic.
The hidden cost is almost always downstream rework. An image that looks acceptable at a glance can still fail because the crop is off-center, the edge is muddy, or the background doesn't match the channel. Fixing those problems late means touching the same file again, and that's where the time disappears.
Source Photos and the First AI Pass
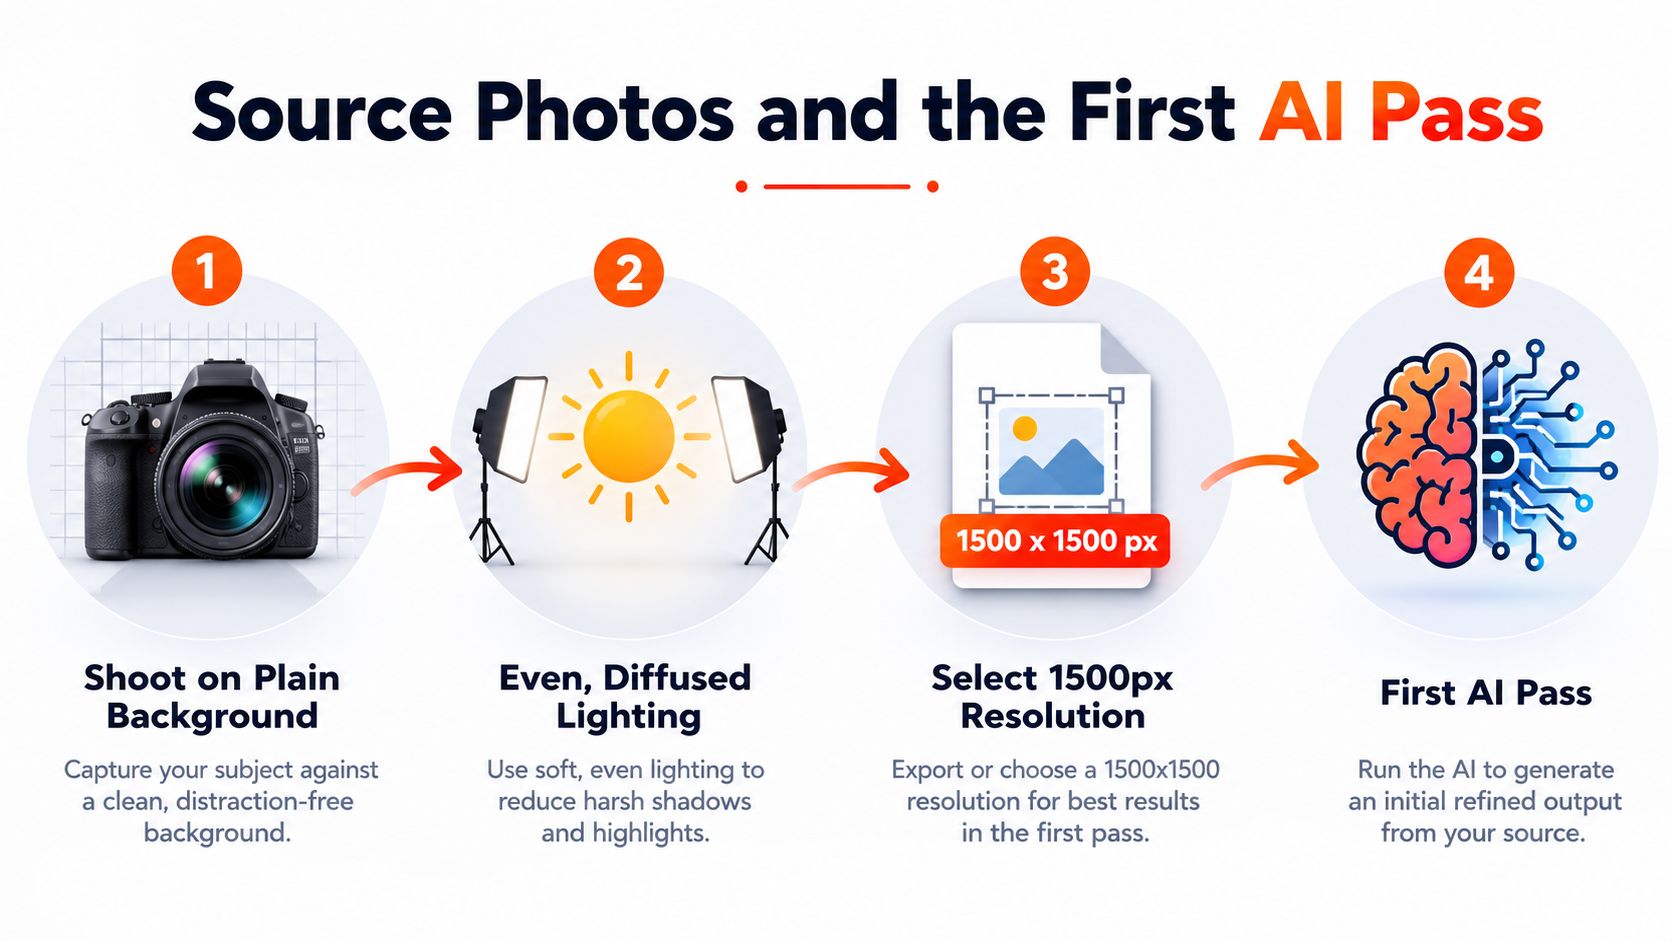
Shoot for the mask, not for the final scene
The cleanest product image background AI work starts before the model ever sees the file. A plain background, even light, and a steady camera angle make the first pass easier because the subject stands apart from the surroundings. Adobe Firefly's product-background guidance points to plain backgrounds, bright light, subject selection, and transparent export as the practical path for cleaner compositing later, and that workflow lines up with the way catalog teams work at scale (Adobe Firefly background workflow).
Keep the source image around 1500×1500 px when you can. That gives downstream tools enough detail to work with without forcing them to hallucinate edges from a tiny file, and it fits the reality of marketplace exports discussed in the workflow guides. Tight, centered framing matters too, because a SKU family shot with inconsistent spacing is harder to standardize after the fact (workflow guidance on source sizing and variants).
A small cleanup pass before upload saves a lot of trouble later.
- Remove dust and stray reflections: Tiny defects become much more obvious after background removal.
- Straighten the product: A crooked label or tilted box creates inconsistent masks across the batch.
- Match framing within a SKU family: Keep the product at the same visual scale so one listing doesn't look fuller or smaller than the next.
Run background removal first
The first AI step should be isolation, not scene generation. Export the result as a transparent PNG so the cutout can be reused in multiple backgrounds, multiple channels, and multiple export sizes. That gives you a stable product mask you can carry forward instead of regenerating the subject every time.
This is also where a lot of sellers waste money. If you upscale or stylize first, you enlarge pixels that you're going to throw away anyway when the background changes. If you remove the background first, the subject becomes smaller in pixel terms before the expensive step, which is why the order matters in a batch pipeline.
For a broader look at the source side, this reference on product studio lighting is useful when you're trying to make the first pass more predictable. If you're following trend-driven background styles, the nano banana AI trend images piece is a good reminder that style can shift fast, but clean source prep still carries the batch.
Clean source photos don't make AI perfect. They make the failures cheaper.
Marketplace Export Specs That Actually Matter
Marketplace rules decide how much of your work survives the upload. A clean, composited image still gets rejected if the export doesn't match the channel's expectations. That's why the final file should be sized for the destination, not just for whatever looks good in your editor.
For Amazon, the main image needs a pure white background, RGB 255,255,255, and the longest side should be 1600 px or more so zoom can work correctly. Etsy listings need 2000 px on the shortest side. Shopify supports square images up to 4472×4472. For a quick reference on Amazon-specific handling, this internal guide on Amazon product image requirements is worth keeping open while you export.
Marketplace image specs at a glance
| Marketplace | Main image background | Longest side minimum | Recommended export | Notes |
|---|---|---|---|---|
| Amazon | Pure white RGB 255,255,255 | 1600 px or more | Square or near-square, high-resolution | Main image should stay clean and compliant |
| Etsy | Channel image rules vary by listing context | Not specified here | 2000 px on the shortest side | Lifestyle backgrounds can fit many listings |
| Shopify | Flexible for product pages | Not specified here | Square, up to 4472×4472 | Good for gallery consistency |
| eBay | Flexible, depending on category and listing style | Not specified here | Export to the highest common size you can manage | Background swaps are common in listing flows |
| Poshmark | Lifestyle-friendly in many listings | Not specified here | Square or near-square works well in practice | Keep the product centered and readable |
| Depop | Lifestyle-friendly in many listings | Not specified here | Square or near-square works well in practice | Consistency matters more than decorative scenes |
Export once, then resize per channel
The safest batch habit is to export at the highest common denominator, then resize per channel. That avoids re-photographing the same product just because one platform wants a different crop. It also keeps the product mask intact while you create channel-specific variants later.
Lifestyle backgrounds are fine where the marketplace allows them, but the same image usually shouldn't do every job. Amazon main images are the strictest example, while Shopify galleries and many resale-style listings are more flexible. If you need ad-style formatting too, this practical overview of Instagram ad specs helps you avoid building the wrong aspect ratio into the batch.
Why Background First Saves Up to 87 Percent
The order of operations is where the money lives. Background removal before upscaling can shrink the work the expensive step has to do, and MerchLoom's workflow notes that this can save up to 87% when you remove the background first and upscale afterward. That isn't a styling trick. It's a processing order decision.
Cheap steps should happen before generative steps
If the product is still sitting inside a busy scene, every later operation has to chew through more pixels. Remove the background first, and the subject becomes a smaller, cleaner input for the next step. That helps with color correction, shadow generation, and scene placement because the model has fewer irrelevant edges to interpret.
The same logic applies to any generative pass. If you ask a system to create a new backdrop before the subject is isolated, you're forcing it to solve two problems at once. If you isolate the product first, you keep the mask sharp and reusable, which matters when the same SKU needs multiple backgrounds or seasonal variants.
If a step multiplies pixel count or triggers a generative model, put it at the end of the pipeline.
Doing this for a whole catalog?
MerchLoom runs background removal, upscaling and AI editing across every product photo you have — one prompt, whole batch. Try 2 batches free, no signup.
Try it freeWhy upscale-last usually wins
Upscaling first feels safe because the file looks bigger. In practice, it can also make background cleanup slower and less precise, because the tool has to process more pixels than necessary. That extra size is wasted if you're going to trim the image, replace the backdrop, or recrop for a marketplace afterward.
For batch work, the rule is simple. Remove, isolate, and normalize first. Then generate scenes, shadows, or alternate compositions. Only after those steps should you export to the final marketplace size. That gives you one pipeline order you can reuse across hundreds of SKUs without rewriting the logic every time a new collection lands.
Wiring Cloud Storage and Storefronts Into the Pipeline
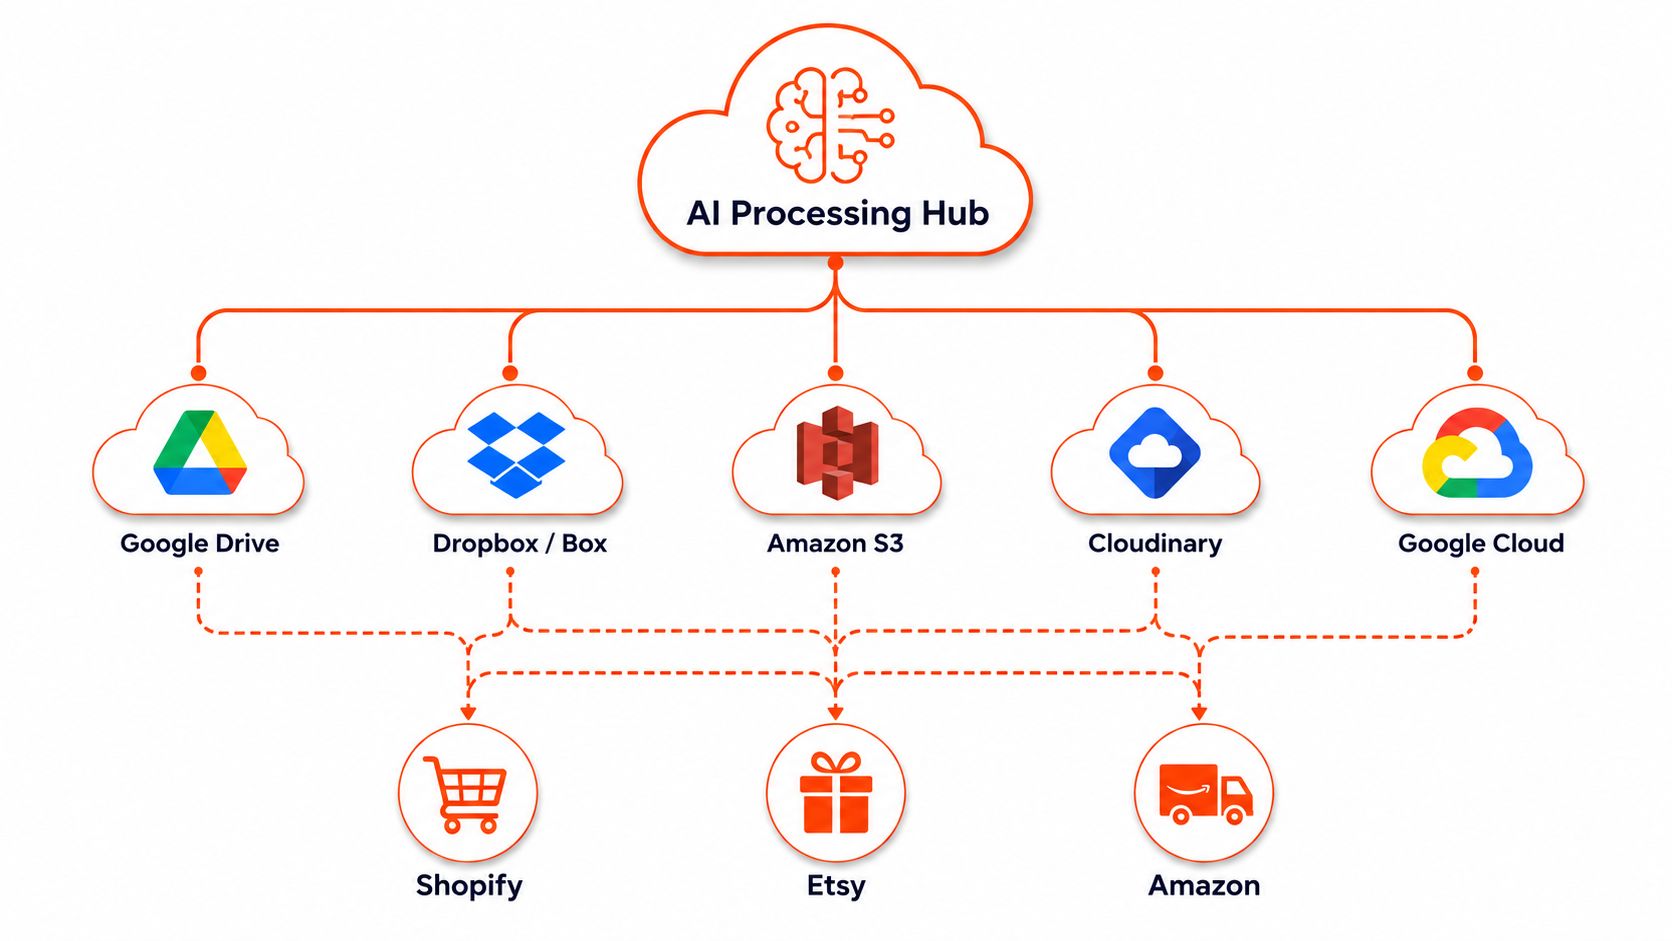
A real catalog workflow doesn't start in a photo app. It starts in whatever bucket, drive, or store already holds the files. MerchLoom supports sources including Google Drive, Dropbox, Box, Shopify, WooCommerce, BigCommerce, Amazon S3, Cloudinary, Google Cloud, DigitalOcean Spaces, Cloudflare R2, and Backblaze B2 for batch image workflows, so the import step can fit the way most sellers already store product assets (MerchLoom source connectors).
Source connectors that matter in practice
| Source type | Why it matters |
|---|---|
| Cloud drive | Easy handoff from a photographer or VA |
| Object storage | Good for larger catalog batches and repeat jobs |
| Storefront import | Useful when the original image already lives in the product record |
The point isn't to move files around for fun. It's to avoid re-uploading the same assets every time the workflow changes. Once the source photos are in the pipeline, the cleaned cutouts can flow back into the storefronts or output folders without starting over.
That's where a chained system makes a difference. MerchLoom runs batch workflows across the whole collection rather than one image at a time, and it's set up so the first images can be tried with no account. Pricing is pay-per-image, credits never expire, and you see the exact cost before processing starts, which keeps the batch budget visible before you commit.
Keep the pipeline connected end to end
When the workflow is wired correctly, the same product can move from source storage to AI processing and then back to Shopify or a marketplace feed without manual shuttling. That matters most when the SKU count climbs and the hidden cost becomes file handling instead of editing. It also keeps the catalog consistent because the same processing logic touches each image in the same order.
For teams using Amazon S3 as a source, this internal guide on AI image processing from Amazon S3 is a useful companion. The broader distinction is simple, though. A chained pipeline handles storage, processing, and export as one workflow. A one-off editor only handles the middle.
Quality Control Across the Whole Batch
A batch only looks finished when the worst image is caught before the marketplace finds it. The fastest review loop is a four-check pass that takes seconds per file and scales cleanly across hundreds of SKUs. It catches the problems that turn into suppressions, rejects, and ugly catalog inconsistencies.
The four checks that save the most rework
- Edge halo: Look closely at reflective surfaces, glass, and thin product edges. If the cutout glows or frays, the mask needs another pass.
- Shadow direction: The shadow should match the implied light source across the whole batch. A left-lit product shouldn't suddenly cast a right-side shadow.
- Framing consistency: Products from the same collection should sit at the same visual scale and position. If one SKU is cropped tighter, the set looks uneven.
- Final resolution: Check the exported size before upload. A nice composition can still fail if the file is too small for the channel.
Review the first few files manually, then sample the rest by pattern. The mistake usually repeats.
Stream, correct, and reuse
Mid-batch review works best when results stream in as they're produced. That lets you spot a bad mask, tighten the prompt, or fix the subject cut before the whole run completes. Once the correction works, feed the corrected output back into the same workflow instead of starting from raw files again.
A practical habit is to inspect roughly 10% of a batch by hand, then spot-check the remaining files on one criterion, usually edge quality. You don't need to inspect every image if the first sample proves the setup is stable. You do need a consistent sampling habit so small errors don't become a batch-wide problem.
That review pattern matters even more when you're shipping across channels. Shopify might tolerate a visual style that Amazon won't, and marketplace acceptance can turn on tiny details like background tone or crop shape. The batch is only as good as the weakest file in the set.
Troubleshooting Bottles, Glass, and Rejected Listings
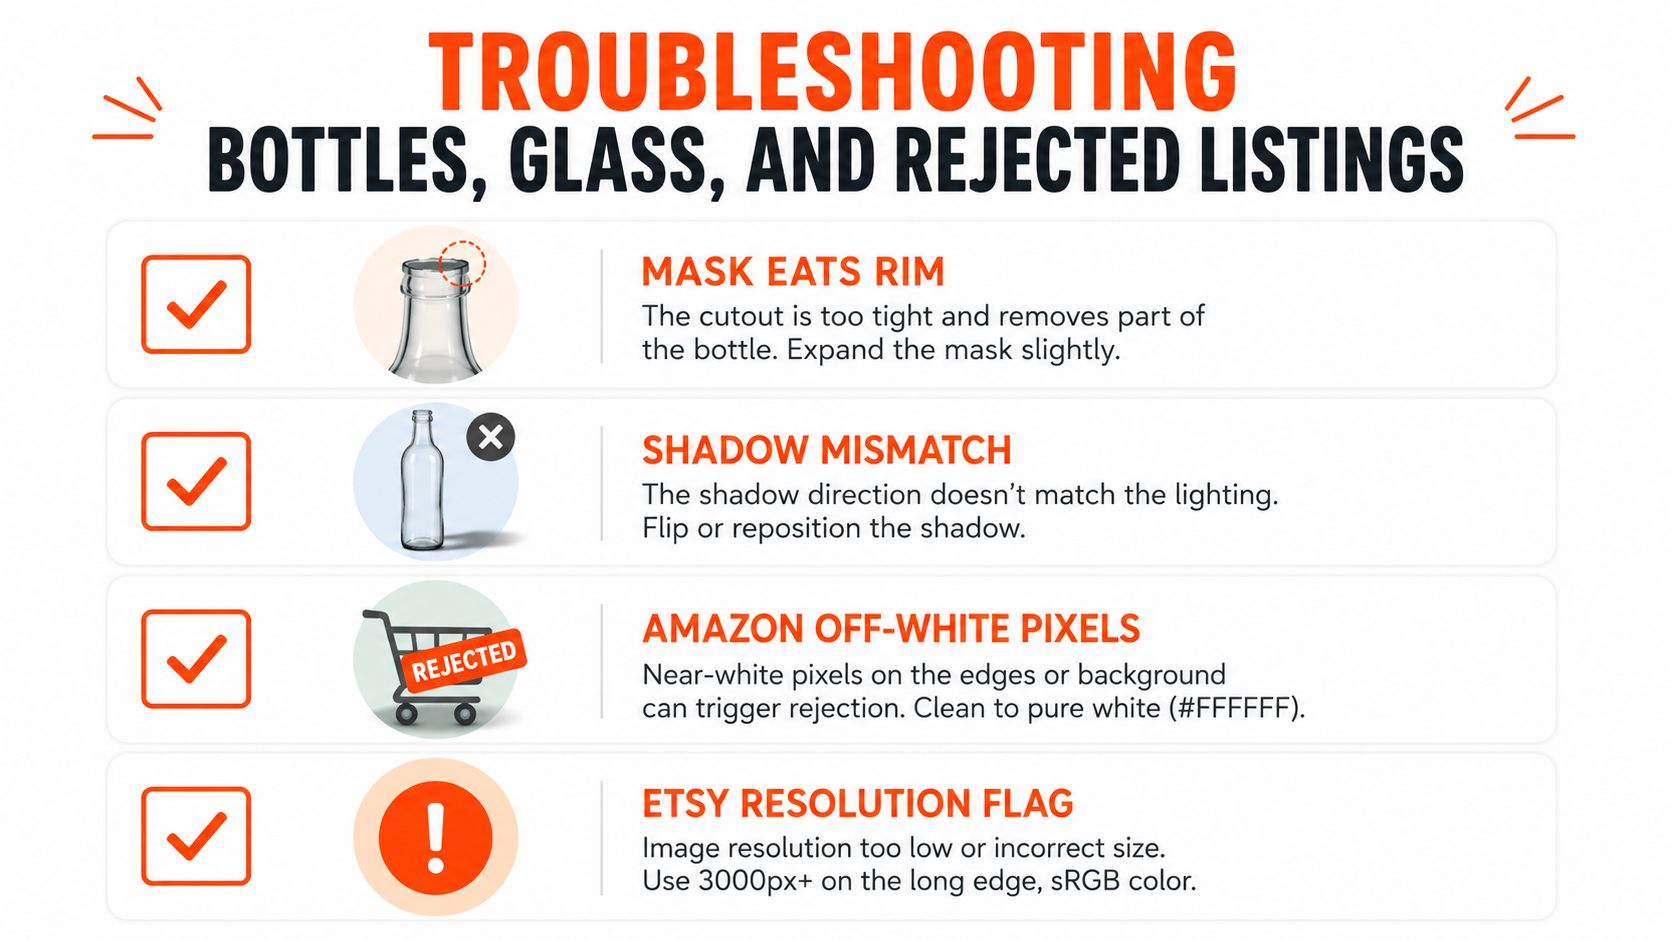
A bottle with a clean label can still fail because the rim disappears. Glass can fool the mask. Amazon can reject an image that looks white enough at a glance but isn't compliant. Etsy can flag a main image that doesn't fit the format the listing expects. The fixes are usually boring, which is good, because boring fixes are cheap.
What to do when the image breaks
If the mask eats the rim of a bottle or clips a transparent edge, the cheapest fix is usually source-side. Re-shoot against a higher-contrast backdrop, increase even lighting, and clean stray reflections before upload. Reflective packaging needs more discipline at capture time because the mask can only separate what it can see.
If the shadow lands on the wrong side, don't keep regenerating random variants. Tighten the prompt, add a manual mask pass, or re-run the compositing step with the light direction spelled out more clearly. When the AI puts the product on the wrong scale in a lifestyle scene, swap that SKU to a transparent background for that run and let the scene be added later by hand or by a separate pass.
If Amazon suppresses a listing for off-white pixels, fix the background precisely rather than “close enough.” If Etsy flags the main image, resize and re-export to the channel-friendly frame before retrying. These are usually file-prep problems, not creative problems.
A short rejection checklist
- Check the background: Is it compliant for the channel?
- Check the edge quality: Are reflective parts and thin rims intact?
- Check the shadow: Does it match the scene lighting?
- Check the crop: Is the product centered and sized consistently?
- Check the export size: Is it ready for the marketplace's minimum expectations?
If a file fails twice, stop treating it like a general workflow problem and isolate it as a SKU-specific exception. That's often the cheapest path, because one difficult product shouldn't slow the whole catalogue.
MerchLoom fits this kind of batch work when you need to run background removal, scene placement, relighting, and export across a collection instead of touching every image separately. If you want to push a catalog through a chained pipeline and see the cost before you start, visit MerchLoom and test the first images without an account.
Stop editing product photos one at a time
Upload your catalog or connect your store. Describe the result once. MerchLoom does the rest.
Try it free — no signup