
How to Reduce Photo Size on iPhone: Boost Your Store
Master how to reduce photo size on iPhone for online stores. Discover quick tricks, Shortcuts batch resizing, & pro workflows for Amazon & Shopify.
You finish a product shoot on your iPhone, open Shopify or Etsy, and immediately hit friction. Uploads drag. A few images look oversized for the slot they’re going into. Others are technically sharp, but they’re heavier than they need to be, so every next step feels slower than it should.
That’s the problem behind how to reduce photo size on iPhone. It isn’t just about making one picture smaller. It’s about keeping a catalogue manageable when you’ve got listing photos, alternate angles, close-ups, and platform-specific crops piling up in your camera roll.
For a casual user, one compressed image might solve it. For a seller, photo size affects storage, upload speed, editing time, marketplace compliance, and how fast a new collection gets live. If you’re also juggling DPI questions for print or marketplace exports, this image DPI converter guide helps clarify where pixel dimensions matter and where they don’t.
Why Your iPhone Photos Are Too Big for E-commerce
Modern iPhones are built to capture strong-looking photos first. That’s great when you’re shooting products on a white sweep near a window. It’s less great when you come back from a session with hundreds of files and need them ready for listings by the end of the day.
A seller usually notices the issue at the worst point in the workflow. The shoot is done. The hard part should be over. Then the files land in Photos at full phone-camera dimensions, and every downstream task becomes heavier: background cleanup, reframing, duplicate exports, marketplace uploads, team review.
Why this happens in real store workflows
The iPhone camera doesn’t know whether a photo is headed to a hero banner, an Amazon main image, an Etsy gallery slot, or a quick supplier approval thread. It captures for quality, not listing efficiency.
That creates a mismatch between capture size and commerce use case.
| What you shot | What you actually need |
|---|---|
| Large original product image | A listing-ready file that uploads quickly |
| Multiple angles in full resolution | Consistent dimensions across the whole set |
| One clean white-background shot | Variants for different storefront layouts |
| Detail-rich originals | Smaller working copies for review and revision |
Practical rule: Keep the original if it’s good, but don’t force the original file into every retail use case.
Single oversized images are annoying. A full seasonal catalogue of oversized images becomes operational drag. That’s why the best approach isn’t one magic trick. It’s a layered workflow: quick one-off resizing when you’re in a rush, better camera settings before you shoot, and batch processing when you’re handling a full collection.
Quick Resizing Methods for One or Two Photos
If you only need to shrink one image for a quick upload or send a proof to someone, built-in iPhone sharing tricks are usually enough. They’re fast, require no setup, and work well when speed matters more than repeatability.
Use the Mail app for fast downsizing
This is the simplest in-a-pinch method.
- Open Photos and select the image.
- Tap Share.
- Choose Mail.
- Address the draft to yourself or a teammate.
- When iPhone asks for image size, choose a smaller option.
- Send it, then save the received version.
This works because Mail creates a reduced copy during sending. It’s useful for one-off listing fixes, supplier approvals, or sending compressed proofs.
The trade-off is control. You’re choosing a broad output size, not a precise marketplace dimension.
Try Messages when you just need a lighter copy
Messages can also reduce the practical burden of a large image during sharing. If the goal is quick communication rather than exact listing prep, it’s often enough to send the image to yourself and save the result.
That said, this isn’t a professional catalogue workflow. You won’t get naming consistency, exact export dimensions, or a reliable process for a batch.
Export smaller copies instead of editing the original
If you’re sharing through apps that offer size choices on export, take the smaller copy and leave the original untouched. That matters when the same product image may later need a square crop, a marketplace-specific frame, or a cleaner background.
Keep your original capture separate from your upload copy. Sellers get into trouble when the only version left is the one they already compressed too aggressively.
If you also shoot portraits, staff bios, or founder photos for your storefront, this guide to professional headshot apps is useful because it shows where app-based edits help and where they create inconsistent outputs.
A similar issue comes up with social crops. If your resized image later needs a different framing for vertical placements, this Instagram portrait size reference is a good reality check.
What these methods do well, and what they don’t
- Best for speed: Sending a smaller file right now.
- Good for one image: Updating a single listing or getting feedback.
- Bad for consistency: The output can vary from one share to the next.
- Bad for scale: Repeating this across a full product drop becomes tedious quickly.
For one or two photos, these tricks are fine. For a catalogue, they break down fast.
Proactive Reduction by Optimizing Camera Settings
You finish a product shoot on your iPhone, open Photos, and realize every image is larger than the marketplace needs. That is wasted storage, slower uploads, and extra cleanup before anything goes live. The better fix starts at capture.

Switch from JPEG to High Efficiency
Go to Settings > Camera > Formats and select High Efficiency.
ShortPixel’s guide to reducing iPhone photo file size notes that HEIC usually cuts file size compared with JPEG while keeping image quality strong enough for common e-commerce use. In practice, that means lighter files from the start and less cleanup later.
For a store owner shooting fresh inventory every week, this is one of the few changes that saves time before the editing even starts. Smaller originals are easier to review, back up, upload, and pass into the rest of your listing workflow.
Why this matters in a selling workflow
Single-photo fixes are fine for one urgent listing. They break down once you are shooting a catalogue for Amazon, Shopify, Etsy, and social placements at the same time.
Camera settings affect the whole pipeline. If your iPhone produces lighter files at capture, you reduce friction before those photos ever hit editing apps, background removal tools, or marketplace upload forms. That matters most for sellers who shoot in batches and need a repeatable process, not a string of one-off workarounds.
Physical setup still matters too. A clean scene from the start reduces how much correction each photo needs later, especially if you are building a repeatable studio photo backdrop setup for product shots.
If you shoot near strong window light or outside, it also helps to control light with neutral density filters so you do not end up compensating with avoidable edits after the fact.
The trade-off sellers need to know
HEIC is efficient, but it is not always the final format you will deliver. Some marketplaces, editing tools, freelancers, and older office workflows still expect JPEG. That is the main trade-off. You save space and reduce friction on capture, but you need to know where conversion happens later.
AirDrop, Mail, and some apps can convert or resize during export depending on the settings you choose. If you do not check that step, you can lose the consistency you were trying to build into your workflow.
A quick visual walkthrough helps if you’re changing this on a working device:
For most sellers, High Efficiency should be the default capture setting on iPhone. Keep JPEG in mind for compatibility, but do not wait until after the shoot to solve a file-size problem your camera can reduce upfront.
Batch Resizing on Your iPhone with Shortcuts Automation
Doing this for a whole catalog?
MerchLoom runs background removal, upscaling and AI editing across every product photo you have — one prompt, whole batch. Try 2 batches free, no signup.
Try it freeOnce you’re dealing with a real product set, manual resizing stops making sense. The built-in Shortcuts app is the first point where an iPhone workflow starts to feel scalable.
Build the shortcut once
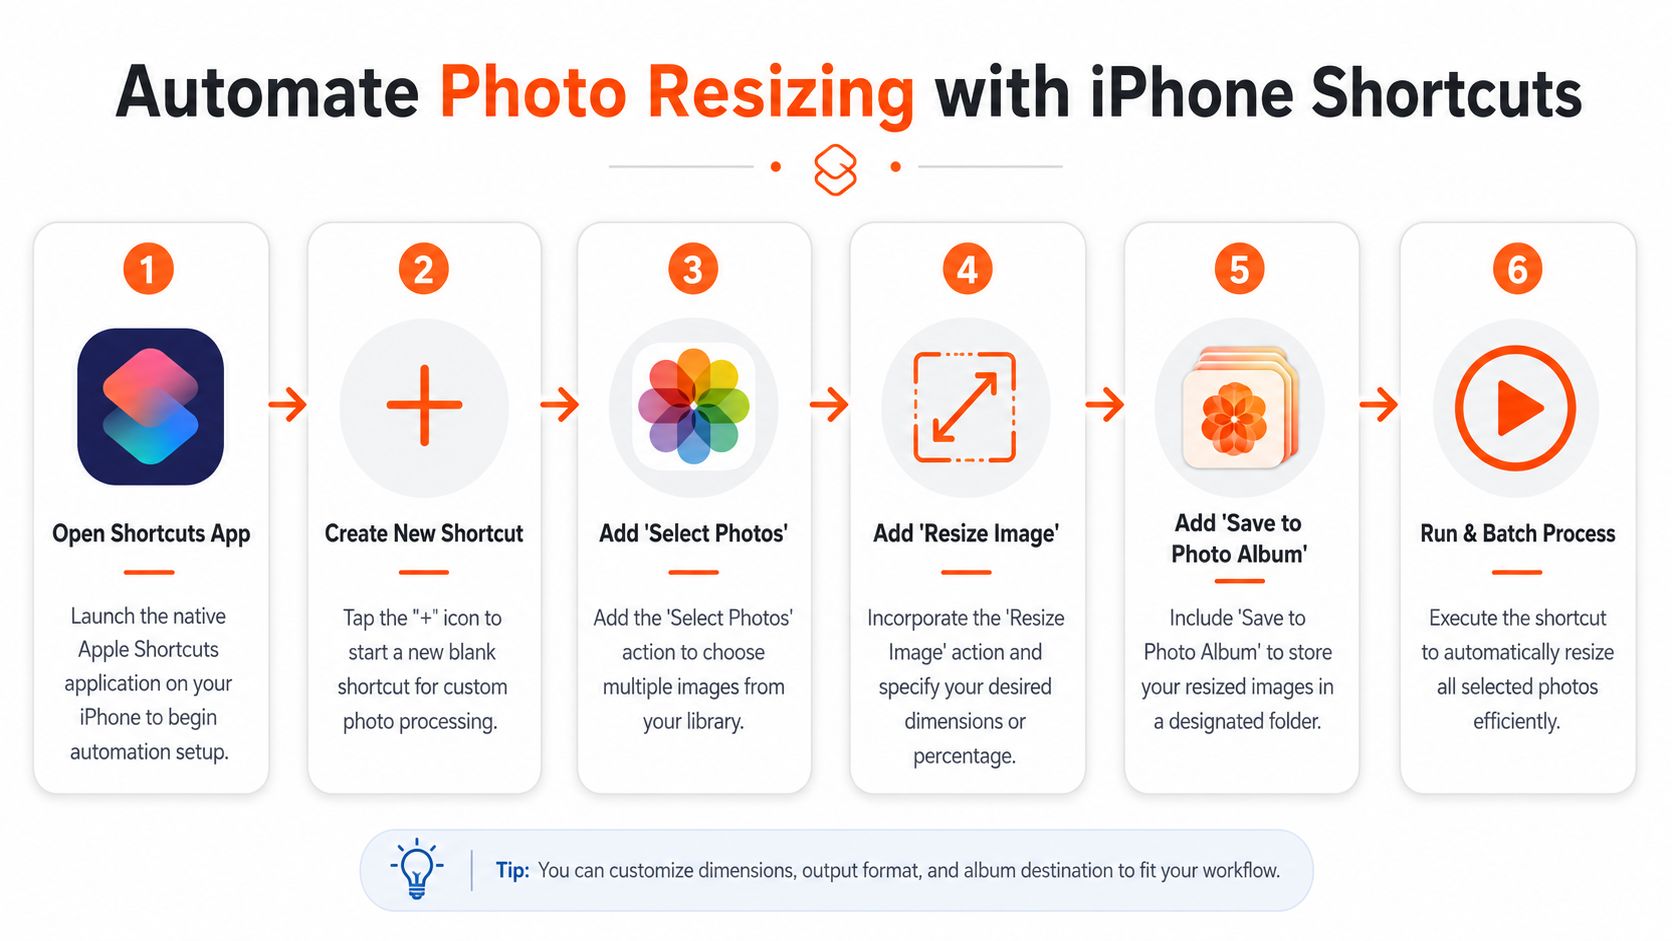
Set up the shortcut like this:
- Open Shortcuts.
- Tap + to create a new shortcut.
- Add Select Photos.
- Add Resize Image.
- Set the width field. Leave height on Auto Height.
- Add Save to Photos.
- In shortcut settings, enable Show in Share Sheet if you want faster access from Photos.
The important detail is Auto Height. If you manually force both width and height, you can distort the image. That’s one of the easiest ways to wreck product photos without noticing until they’re live on a listing.
Why this works for catalogue batches
According to ImageSuggest’s guide to resizing photos on iPhone, using a custom iOS Shortcut with Resize Image and Auto Height preserves aspect ratios while giving you dimension control. The same source says resizing an image to 640px width can reduce file size by 65-75%, and that this workflow can process 50-200 images in 3-5 minutes, compared with 20-30 minutes of manual cropping. It also notes that the shortcut creates non-destructive copies, which is important for version control.
That non-destructive behaviour matters more than people think. Sellers often need multiple versions of the same image: one for a thumbnail, one for a marketplace gallery, one for a social teaser, one for archived originals.
Don’t overwrite your camera originals. Save resized copies to a separate album so you can rebuild outputs later without re-shooting.
Practical ways to use it
Shortcuts is best when you know the target width you need for a specific use.
- For thumbnails: Use a smaller width for quick-loading internal assets.
- For marketplace prep: Create one shortcut per destination, such as Etsy-ready or gallery-preview.
- For team handoff: Save processed copies into a dedicated album so an assistant can review only the exported set.
A simple comparison helps:
| Method | Best use | Limitation |
|---|---|---|
| Mail or Messages | One urgent image | No precise repeatability |
| Photos edits | Basic quick changes | Not efficient for batches |
| Shortcuts automation | Repeated resizing across many photos | Still limited when multiple marketplace rules collide |
If your phone-based process is getting more complicated, it’s worth understanding what happens when you need sharper exports from smaller working files. This HD photo converter reference is useful for judging when upscaling helps and when it just hides an earlier workflow problem.
Prepping Images for E-commerce Marketplaces
Reducing file size is only one part of listing prep. An image can be lightweight and still be wrong for the platform.
That’s the point many sellers miss. The question isn’t only how to reduce photo size on iPhone. It’s whether the resized image still fits the rules and visual expectations of where it will be published.
Different platforms want different things
A product shot that looks fine in your camera roll can fail in commerce for three separate reasons:
- Aspect ratio mismatch: A vertical image may look awkward in a square grid.
- Background requirements: Amazon-style listing standards often call for a clean white main image.
- Framing inconsistency: Product size and spacing can vary wildly across a collection if each photo is cropped by hand.
Etsy, Shopify, Amazon, and social storefronts don’t all want the same thing. Even when an image is accepted, the wrong crop can make a product look smaller, off-centre, or less polished than the rest of the catalogue.
Why simple resizing isn’t enough
If you only reduce dimensions, you may still end up with a file that needs:
- background removal
- square padding
- tighter reframing
- alternate crops for collection pages versus product detail pages
That’s why sellers often feel like they’ve already “resized the images” but still aren’t done. They’re right. Resizing solves file weight. It doesn’t solve presentation consistency.
A lighter file doesn’t automatically become a listing-ready file.
There’s also the catalogue management problem. If you need to sync products or audit media across multiple channels, this guide on how to retrieve product details from eCommerce platforms is useful context for understanding how images connect to broader product data.
A practical decision framework
Use this quick check before exporting any batch:
Where is this image going first
Main image, gallery image, collection tile, ad creative, or social asset.Does the platform care about shape more than file size
Square and vertical placements often expose framing problems immediately.Will this same product need multiple versions
If yes, don’t rely on one manual crop to do every job.
For a few products, you can manage this by hand. Once you’re handling a large catalogue, the issue shifts from editing to system design.
Scaling Up with a Cloud Processor like MerchLoom
A phone-first workflow starts to strain when image prep becomes a daily operations task instead of a quick cleanup job. That usually shows up during a product launch, a supplier image refresh, or a catalog update where dozens of SKUs need different outputs for different channels.
At that point, resizing is only one step in the job. The primary issue is keeping every image processed in the right order, with the right rules, and saved in a way your team can use later.

When phone-based workflows start to break
Shortcuts works well for repeatable edits. It gets slower to manage when one batch needs multiple decisions per image.
A growing seller often needs to:
- remove backgrounds
- reframe for different marketplaces
- create square and non-square variants
- keep outputs organised across a large catalogue
- review results before the whole batch finishes
Cloud processing fits that stage better. You upload a collection once, set the output rules, and process the whole batch with consistent settings instead of supervising every file on your phone.
What a chained workflow does better
E-commerce images usually need a sequence of edits, not a single resize. A product photo may need background removal first, then reframing, then export sizing for the final listing slot. The order matters. If the crop happens too early, the image can look cramped on one marketplace and off-center on another.
That is why sellers outgrow one-off editing habits. They do not just need smaller files. They need repeatable outputs for Amazon main images, Shopify product pages, collection tiles, ads, and marketplace variants.
A tool built for batch image operations handles that better than a camera roll. MerchLoom’s cloud image processing workflow lets sellers run large collections through chained AI steps, adjust the result in plain language, and rerun batches without rebuilding the process each time.
The operational advantage
This becomes more useful as the catalogue keeps changing. New color variants, seasonal products, supplier updates, and channel-specific requirements all create image work that repeats. Manual phone editing can still cover quick fixes, but it does not scale well once image prep is tied to merchandising, launch timing, and listing accuracy.
The practical takeaway is simple. Use iPhone tricks for one or two photos. Use Shortcuts when you need a faster batch process on device. Use a dedicated cloud workflow when image prep becomes part of running the catalogue, not just editing a photo.
Stop editing product photos one at a time
Upload your catalog or connect your store. Describe the result once. MerchLoom does the rest.
Try it free — no signup