
How to Increase DPI of Image: The 2026 Guide
Learn how to increase DPI of image for sharp prints and high-converting listings. Simple steps to boost resolution in 2026.
You've got two hundred product photos that look fine in the browser, then print soft, lose useful zoom, or arrive at a marketplace with inconsistent dimensions. The problem usually isn't the number shown in the file properties. It's that the images don't contain enough pixels for the size you're asking them to fill.
Before opening an editor, record the current pixel dimensions of a representative batch. Then write down the largest print size and the platform export size each SKU needs. Pixel dimensions come first. DPI metadata only tells print software how densely to place existing pixels. It doesn't create detail.
Introduction Why DPI Is Really About Pixels Not a Magic Number
A product image can look sharp in a browser, then turn soft on packaging or fail a marketplace zoom test. DPI helps describe print placement, but the usable starting point is the image's pixel width and height. The working formula is:
Required pixels = print width in inches × target DPI, with the same calculation for height.
At 300 DPI, each inch of a full-size print requires 300 pixels in each direction. A 4×5 inch photo therefore needs about 1,200×1,500 pixels. An A4 page at 300 DPI needs about 2,480×3,508 pixels, using the practical relationships covered in Let's Enhance's resolution and print-quality guide.
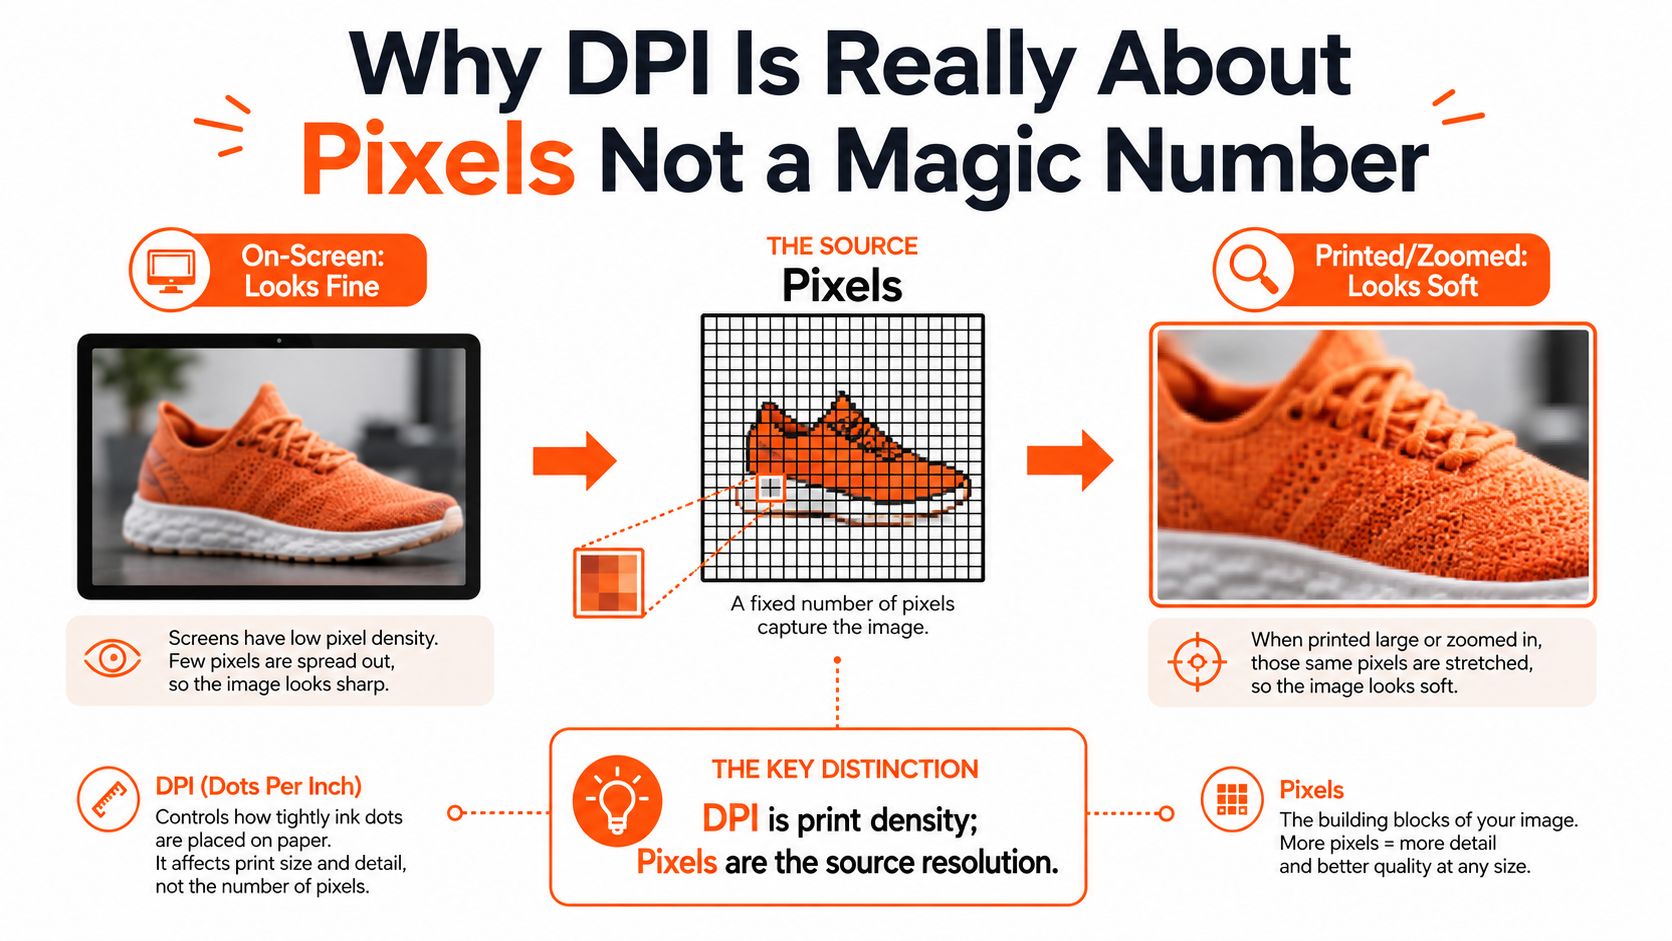
The metadata trap
Photoshop, GIMP, and other editors let you change the resolution field to 300 without increasing the pixel count. That setting changes the suggested physical print size. It cannot recreate a missing fabric weave, sharpen a label edge, or restore a clean product contour.
For marketplace images, pixel dimensions and aspect ratio matter more than print-style DPI metadata. Amazon's main image rules specify a pure white background with RGB 255,255,255. Its seller guidance requires at least 1,000 pixels on the longest side for zoom, with 1,600 pixels or larger recommended for better display. Check the current requirements in Amazon's main image rules.
Print workflows have a different constraint. Catalog sellers often reuse one source for product cards, detail pages, packaging inserts, line sheets, and trade collateral. A file that looks fine in a small digital placement may lack the pixels needed for a larger physical output. The final output determines whether the source has enough pixels.
Practical rule: Ask, “How many pixels does this output require, and how many pixels does my source actually contain?” Set 300 DPI for the print workflow only after that pixel check.
For one file, an editor can handle the correction. Across a catalog, manual edits produce inconsistent crops, dimensions, color profiles, and sharpening. MerchLoom can apply the same background, resize, upscale, color, and export operations across a collection instead of processing each image separately. Review the output manually, especially labels, edges, and fine textures.
Calculate What You Need Before You Upscale
Start with a sizing sheet for each SKU. Record the source width and height, marketplace requirements, intended print size, crop ratio, and export preset in separate columns. This prevents a catalog-wide resize to one arbitrary pixel count and exposes which files need more pixels.
Print targets come from physical size multiplied by DPI. A 4×5 inch image at 300 DPI needs about 1,200×1,500 pixels. An A4 page at 300 DPI needs about 2,480×3,508 pixels, using the practical figures outlined in this print-resolution reference.
A 16×20 inch print requires 4,800×6,000 pixels at 300 DPI. A suitable 2× enlargement can reach that target, as described in this print upscaling guide. Posters and banners may use a lower effective DPI when viewers stand farther away. Set the target from the finished size and viewing distance, then check whether the source can support it.
Build the target sheet
| Output Size / Platform Rule | Required Pixels at Target DPI | Practical Action |
|---|---|---|
| 4×5 inch print at 300 DPI | About 1,200×1,500 | Compare the source with both dimensions, then upscale only the shortfall |
| A4 print at 300 DPI | About 2,480×3,508 | Match the page ratio, then soft-proof before export |
| 16×20 inch print at 300 DPI | 4,800×6,000 | A suitable 2× enlargement may reach the target, but inspect detail at 100% |
| Amazon main image | At least 1,000 pixels on the longest side for zoom, with 1,600 pixels or larger recommended for display | Keep the background pure white, RGB 255,255,255, and create a marketplace preset |
| Etsy listing photo | At least 2,000 pixels on the shortest side | Standardize the shortest side across the catalog, then crop consistently |
| Shopify square product image | Shopify permits uploads up to 4,472×4,472 pixels, with square images around 2,048×2,048 commonly recommended for consistent presentation | Create a square master and derive smaller exports from it |
The Etsy baseline appears in this Etsy image-size guide. Shopify's upload dimensions and square workflow are covered in this Shopify product-image guide. For digital assets, browse the resolution calculator to check screen dimensions during planning.
Decide the enlargement factor
Calculate width and height ratios separately. If a source is 1,200 pixels wide and the target is 2,400, the width requires a 2× enlargement. If the source already exceeds the target, resize it down through the export preset rather than enlarging it to attach a higher DPI value.
A practical guide recommends 2× for small-format prints up to 8×10 and 4× for larger formats such as posters and banners, but source quality controls the result. Large jumps can soften edges or create invented texture. DPI metadata changes the print-size instruction, while added pixels change the image data. For a clear method to distinguish the two, see how to check the DPI of an image.
Apply these calculations across the catalog before processing. MerchLoom can run consistent resize, upscale, color, background, and export operations across a collection. Review labels, product edges, and fine textures manually after processing, since those areas reveal failed enlargement fastest.
How to Increase DPI of Image in Photoshop ImageMagick and GIMP
A marketplace rejection and a blurry print often start with the same catalog problem: the file carries a higher DPI value, but its pixel dimensions still fall short. Use a tool that separates pixel resizing from DPI metadata so you can set the physical print instruction and the actual image detail independently.
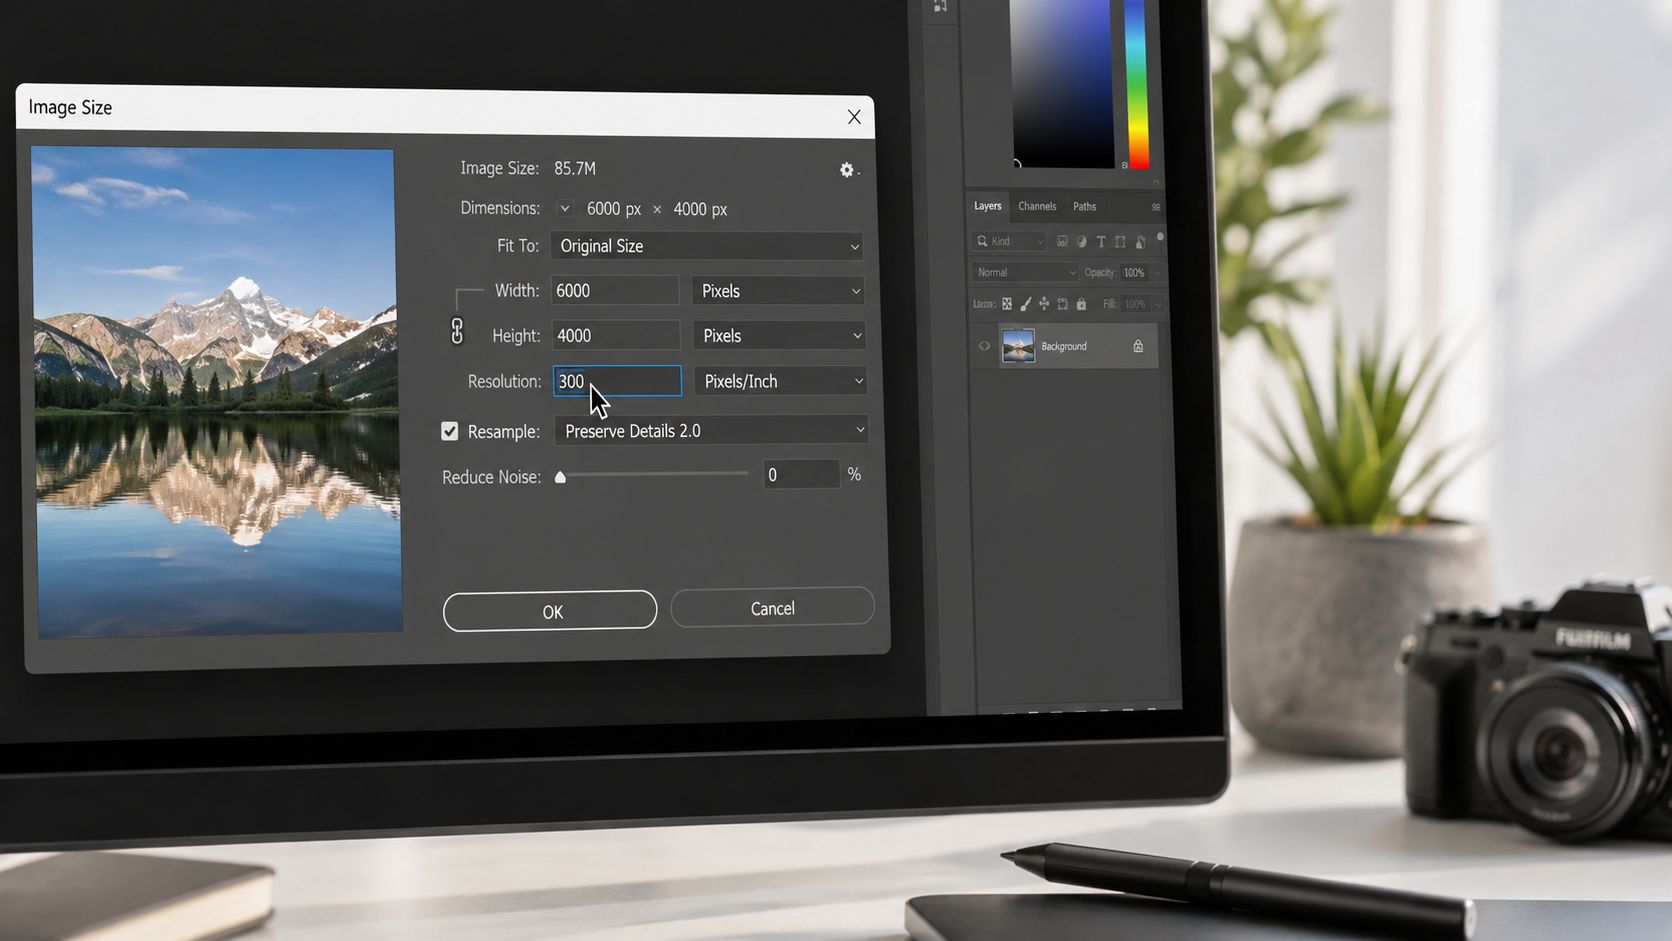
Photoshop
Open Image > Image Size. To change only the embedded resolution, turn off Resample, set the resolution to 300 Pixels/Inch, and confirm. The pixel dimensions remain unchanged, so this step does not add detail or improve marketplace sharpness.
If the physical print size must stay fixed while the file needs more pixels, turn Resample on. Enter the target pixel width and height, choose Preserve Details where available, and keep the proportions linked unless the product is intentionally cropped. Inspect the result at 100% before saving, especially around labels, thin edges, and small text.
Set the working file to Image > Mode > RGB Color, then convert to CMYK when the printer requires it. A print-prep workflow can convert sRGB to CMYK with a perceptual rendering intent and use soft-proofing before export. Keep a lossless intermediate such as PNG, and create the final JPEG once.
ImageMagick
ImageMagick fits catalogs that need repeatable commands. To set print metadata without changing pixels, use:
magick input.jpg -units PixelsPerInch -density 300 output.jpg
To add pixels as well, combine the density setting with an explicit resize target:
magick input.jpg -units PixelsPerInch -density 300 -resize 2400x3000 output.jpg
Doing this for a whole catalog?
MerchLoom runs background removal, upscaling and AI editing across every product photo you have — one prompt, whole batch. Try 2 batches free, no signup.
Try it freeTake the resize value from the sizing sheet. A generic percentage can distort a mixed catalog unless every source already uses the same crop and canvas. The same command applied to every SKU can also repeat a bad crop, color conversion, or sharpening setting, so keep originals separate and inspect samples from each product type before processing the full folder.
GIMP
Use Image > Print Size when the task is limited to X and Y resolution metadata. Keep the chain linked so both values stay consistent, then save a copy.
For actual enlargement, open Image > Scale Image. Enter the required pixel width or height, choose an interpolation method, and set print resolution separately. Lanczos or a high-quality cubic method can preserve existing edges better than a crude resize, but neither can restore detail that the camera never captured.
GIMP works well for free manual preparation. This GIMP resizing walkthrough covers the related workflow. For hundreds of SKUs, build one approved master preset covering color, dimensions, crop, sharpening, and export quality. MerchLoom can apply consistent resize, upscale, color, background, and export operations across a collection, while manual review remains necessary for product edges, labels, and fine textures.
AI Upscaling vs Standard Resampling What Holds Up Across a Catalog
A catalog can pass a print DPI requirement and still look soft online if the files lack enough pixels. Standard resampling calculates new pixels from neighboring ones. Bicubic and Lanczos keep the result predictable for a small adjustment, but they do not recreate missing texture or fine product detail.
AI upscaling analyzes visual patterns and generates plausible detail. It can rescue a clean, slightly undersized product shot, especially when edges are clear and softness is mild. It can also introduce false fabric weave, halos around contrast edges, waxy skin, or altered lettering. Generated detail may not be accurately represented, so treat AI as a controlled recovery step rather than proof of what the source contained.
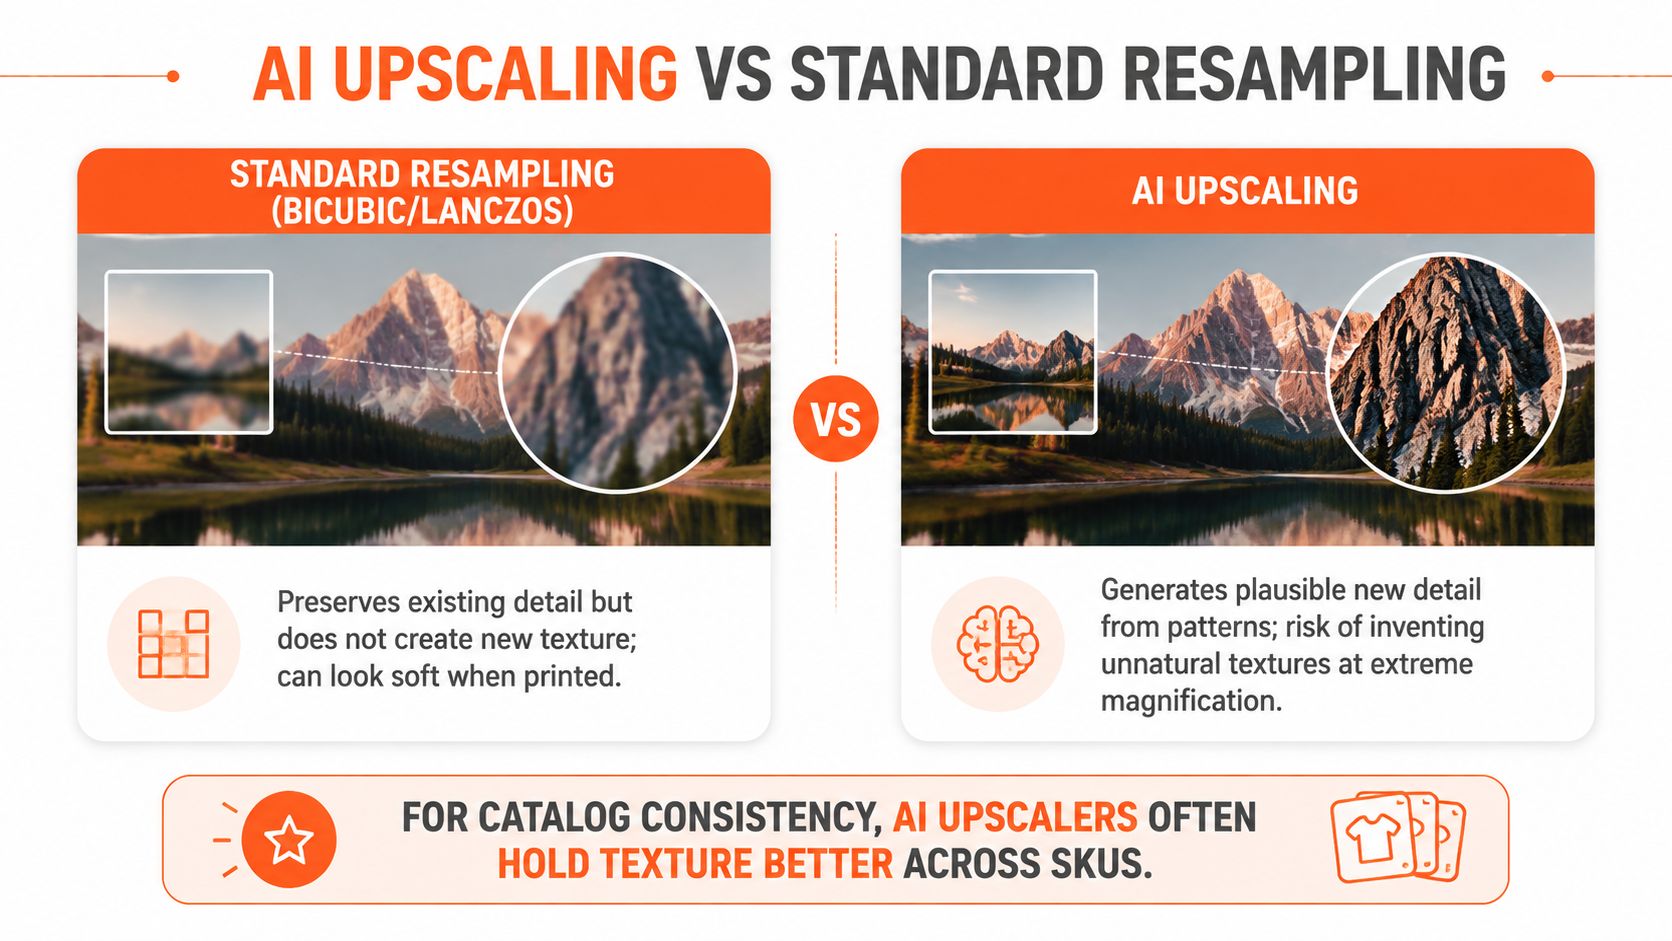
Choose from the source, not the target
Start with the highest-quality original available. Screenshots, social-media downloads, and compressed marketplace copies already contain artifacts that enlargement can exaggerate. Keep a PNG or another lossless working file during processing, and avoid repeated JPEG saves because compression damage accumulates. The same principle applies to large-format print upscaling.
Catalog consistency matters as much as peak sharpness. If one AI model makes cotton products look heavily textured while another keeps them smooth, buyers may notice differences between SKUs from the same shoot. Keep the model, scale factor, crop, and sharpening treatment consistent within each product group. Review exceptions manually instead of forcing every file through one setting.
Use standard resampling when the source already meets the pixel target or needs only a conservative adjustment. Use AI for a modest 2× or 4× recovery when the original is clean but undersized. Inspect the result at full scale before approving it. Avoid extreme enlargement for small text, repeated patterns, jewelry, or surfaces that are difficult to verify. A file can meet a marketplace pixel rule while making the product less truthful.
100% inspection test: Check faces, printed text, logos, thin straps, product edges, and repeating textures at 100% zoom. Reject outputs with hallucinated detail, halos, ringing, or oversharpening.
Review a contact sheet first, then open full-size files from the categories most likely to fail. For the distinction between generated resolution and source detail, see resolution in AI image workflows.
Batch Processing Hundreds of Images Without Losing Consistency
A catalogue batch can fail before enlargement starts. Gather the cleanest originals, remove duplicates, and separate product groups by aspect ratio and platform. A marketplace thumbnail should never become the master file.
Use the same sequence for each collection:
- Deduplicate sources: Keep one approved original per SKU, with a naming pattern that records SKU, view, and color.
- Remove backgrounds first when needed: Inspect the cutout before enlargement. A smaller isolated subject can reduce later processing work.
- Upscale to the target: Follow the sizing sheet instead of applying one universal factor. An image DPI converter tool can help resize files and set output metadata, but it cannot restore detail that the source never captured.
- Create the canvas: Pad or crop to the approved marketplace ratio, keeping product placement consistent across the group.
- Apply color and export rules: Use RGB for marketplace files, preserve pure white where Amazon requires it, and maintain separate print and web presets.
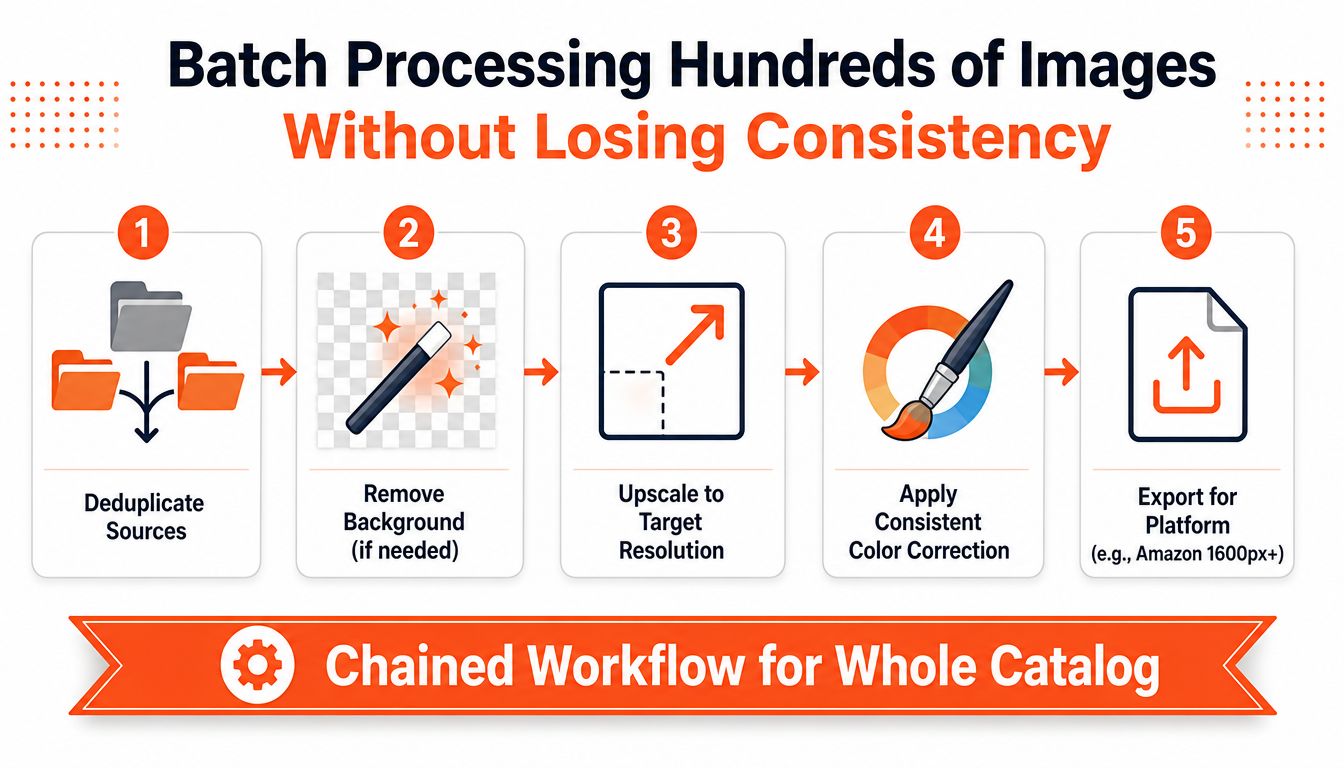
Make the presets explicit
Create named exports such as AMZ_MAIN_WHITE, ETSY_SQUARE, SHOPIFY_SQUARE, and PRINT_A4. Define pixel dimensions, aspect ratio, color profile, background treatment, sharpening, file format, and filename pattern inside each preset. For print, set the required physical dimensions and DPI together. For marketplaces, prioritize the platform's pixel rules because metadata alone does not sharpen a product image.
Amazon needs a pure white main-image background at RGB 255,255,255, with the longest side meeting its zoom requirement. Etsy needs at least 2,000 pixels on the shortest side. Shopify allows uploads up to 4,472×4,472 pixels, while a square workflow around 2,048×2,048 pixels is commonly used for consistent product-page presentation. Store these rules in presets rather than relying on memory.
Run a representative test batch before processing the full catalogue. Include white and dark products, reflective items, labels, fine patterns, and the weakest originals. Review a contact sheet first, then inspect full-size results at 100%. This catches inconsistent crops, halos, invented texture, and unreadable labels before they spread across hundreds of files.
For library hygiene, include auditing fonts in your asset library when catalogue graphics contain labels, promotional text, or branded overlays. A missing font or substituted typeface can create a production error even when the product photo is sharp.
MerchLoom can connect to Drive, Dropbox, Shopify, WooCommerce, or S3, then run chained AI pipelines across an existing collection. It uses pay-per-image credits that never expire, and the first images can be tried with no account. Review each result as a production draft before approving it for the catalogue. Stop the batch when an unusual product group produces artifacts.
Troubleshooting Blurry Prints Halos and Marketplace Rejections
A product file can pass a DPI check and still produce a soft print, a haloed edge, or a marketplace rejection. Diagnose the pixels, metadata, color settings, and export properties as one production record.
Start with the final physical print size. Divide the image width and height in pixels by the corresponding output dimensions to get effective DPI. A low effective DPI commonly produces visibly blurry or pixelated paper output, as explained in this print-resolution reference. Changing the DPI field alone only updates metadata. Resampling increases pixel dimensions, though it cannot recover detail absent from the original.
Halos and ringing usually point to excessive sharpening or repeated enlargement. Lower the sharpening amount, inspect the source, and avoid processing an already sharpened export. For Photoshop settings and edge control, follow this guide to sharpening an image in Photoshop. If AI alters a logo, label, face, or fabric pattern, reduce the scale factor, enforce the required aspect ratio, or replace the source with a higher-resolution file.
Verify pixel dimensions and file properties together
- Blur after a DPI change: Confirm that width and height in pixels increased. Metadata alone adds no image detail.
- Soft print at the intended size: Recalculate effective DPI from the physical output dimensions. Reduce the print size or use a stronger source.
- Halos and ringing: Reduce sharpening and keep one clean enlargement path.
- JPEG damage: Return to the cleanest original, retain a lossless intermediate, and export JPEG once.
- Marketplace rejection: Check the canvas, aspect ratio, RGB color, background, and pixel dimensions. Shopify's 72 dpi reference does not replace its pixel-based upload requirements, as outlined in this Shopify image-size guidance.
For print, convert sRGB to CMYK when the printer requires it, then soft-proof before export. Marketplace presets should enforce pixel dimensions, canvas, color, and background rules.
Reliable catalogue output depends on correct pixel math, controlled enlargement, consistent presets, and human 100% review. MerchLoom can import images, run repeatable AI workflows, and process chained operations across hundreds of files without editing each image manually. Review outputs as production drafts before approval.
MerchLoom supports background removal, reframing, upscaling, color correction, and marketplace exports across an existing product collection. Its pay-per-image credits do not expire, and the first images can be tested without an account. Visit MerchLoom to prepare a repeatable DPI and pixel-resolution workflow for a catalogue.
Stop editing product photos one at a time
Upload your catalog or connect your store. Describe the result once. MerchLoom does the rest.
Try it free — no signup