
Etsy Product Photo Size Guide for Catalogue Sellers
Etsy product photo size explained for busy sellers: exact 2,000 pixel rules, aspect ratios, formats, batch workflow, and how MerchLoom scales the work.
You've got a folder full of product photos, perhaps 200 files, and an Etsy deadline closing in. Some are square, some are tall, some are soft around the edges, and every product seems to have been shot under slightly different light. The problem isn't finding one acceptable image. It's producing a catalogue where every listing survives Etsy's display rules and still looks like it belongs in the same shop.
Start with the source files, not the editor. For Etsy, work toward at least 2,000 pixels on both width and height, with the shortest side at 2,000 pixels as the practical floor. Keep a full-resolution master before you crop, compress, or remove a background. That single decision prevents a large batch from becoming a collection of progressively damaged exports.
What Etsy Requires Before You Touch a Single Photo
A catalogue of hundreds of Etsy listings needs more than one file that passes upload. Etsy's current image guidance recommends listing photos with both width and height of at least 2,000 pixels. Its official help documentation also states that the first listing photo should be at least 635 pixels on each side to avoid ranking lower in search results. Check the current requirements in Etsy's official image guidance.
These are two separate checks. The 2,000-pixel recommendation is the production standard. The smaller threshold is a safeguard for the primary image, not a sensible target for a catalogue. A file that barely clears it may look weak in search, while a larger source gives Etsy more detail for thumbnails and listing views.
Separate hard checks from quality checks
Before editing, run a triage pass:
- Resolution: Reject or isolate anything below the target shortest-side resolution. Keep those files out of the normal batch.
- Primary image: Confirm that the first image is large enough on both sides to avoid Etsy's search penalty guidance.
- Format: Etsy accepts JPG, GIF, and PNG, as stated in Etsy's community announcement about listing-image updates.
- Visual integrity: Check focus, product edges, reflections, and colour before styling.
- Composition: Leave enough space around the product for Etsy's different display crops.
Resolution is easy to verify mechanically. Composition requires review. Etsy can accept an upload without warning that a bag corner, candle label, or jewellery clasp sits too close to the edge.
Production rule: Never use the Etsy upload screen as your quality-control system. It can confirm that a file uploads. It cannot confirm that 200 thumbnails look consistent.
The published recommendation remains current in 2026, and Etsy's documentation connects visual quality with search discoverability. Image sizing therefore affects merchandising, not just final export. Across a catalogue, inconsistent dimensions create repeated exceptions: separate crops, exports, and checks for every product that falls outside the chosen standard.
Keep the master untouched. Create working copies for background removal, reframing, colour correction, and compression. If a batch tool clips a product or shifts the colour of a white ceramic item, the original lets you rerun that step instead of repairing an already processed JPEG. That separation matters even more when chained AI tools handle the same sequence across hundreds of listings.
Formats, Ratios, and the Numbers Behind the Spec
A dependable Etsy baseline is a 2,000 × 2,000 pixel square. Square files give you equal breathing room on every side and make the same master easier to adapt for search cards, listing galleries, and other storefronts. Etsy also handles 4:3 images well, and practical guidance commonly points to this framing because the platform resizes images across several contexts.
The ratio matters less than the safe area. A 4:3 image can work when the subject sits comfortably inside the frame. It fails when a tall vase, long necklace, or product label touches the border and Etsy's crop removes the information a buyer needs.
For further reference on the underlying geometry, see this explanation of aspect ratio for ecommerce images. The useful operational choice is simple: keep one large master, then create derivative crops instead of forcing every channel to use the same framing.
Choose the format by the job
JPEG is the practical default for photographic products. It keeps files lighter than an equivalent PNG and works well for fabrics, wood grain, ceramics, and lifestyle scenes. PNG makes more sense when you need crisp graphic edges or transparency during an intermediate editing stage, although a PNG can create a heavier upload. GIF belongs only in workflows that require that format. It isn't a better choice for ordinary product photography.
Etsy's community announcement recommends 72 PPI and advises keeping files under 1 MB for faster uploading. PPI won't rescue a low-pixel file, so check pixel dimensions first. For compression, a JPEG export around 80 to 85 quality is a useful starting point for batch work, then inspect fine texture, small lettering, and sharp edges before approving the preset.
| Format | Best Aspect Ratio | Recommended Pixel Size | Typical File Size | Use Case |
|---|---|---|---|---|
| JPEG | Square or 4:3 | 2,000 pixels on the shortest side | Lighter than PNG for photos | Default product and lifestyle photography |
| PNG | Square or 4:3 | 2,000 pixels on the shortest side | Often heavier | Crisp graphics, working files, transparency workflows |
| GIF | Square or 4:3 where applicable | 2,000 pixels on the shortest side | Varies by image content | Special cases where GIF is required |
Compression works until it doesn't. It usually holds up on broad, smooth surfaces, but it can damage woven texture, engraved marks, hair, fine jewellery chains, and small printed type. Review a representative group from each product category, not just the first export. A setting that works for cotton may look poor on a detailed metal product.
For practical help reducing file weight without losing the useful detail, RankEngine's guide to image SEO and smaller files is a relevant reference. Use it as a file-management resource, not as a reason to shrink every image below Etsy's resolution target.
Choosing the Primary Photo and Supporting Images
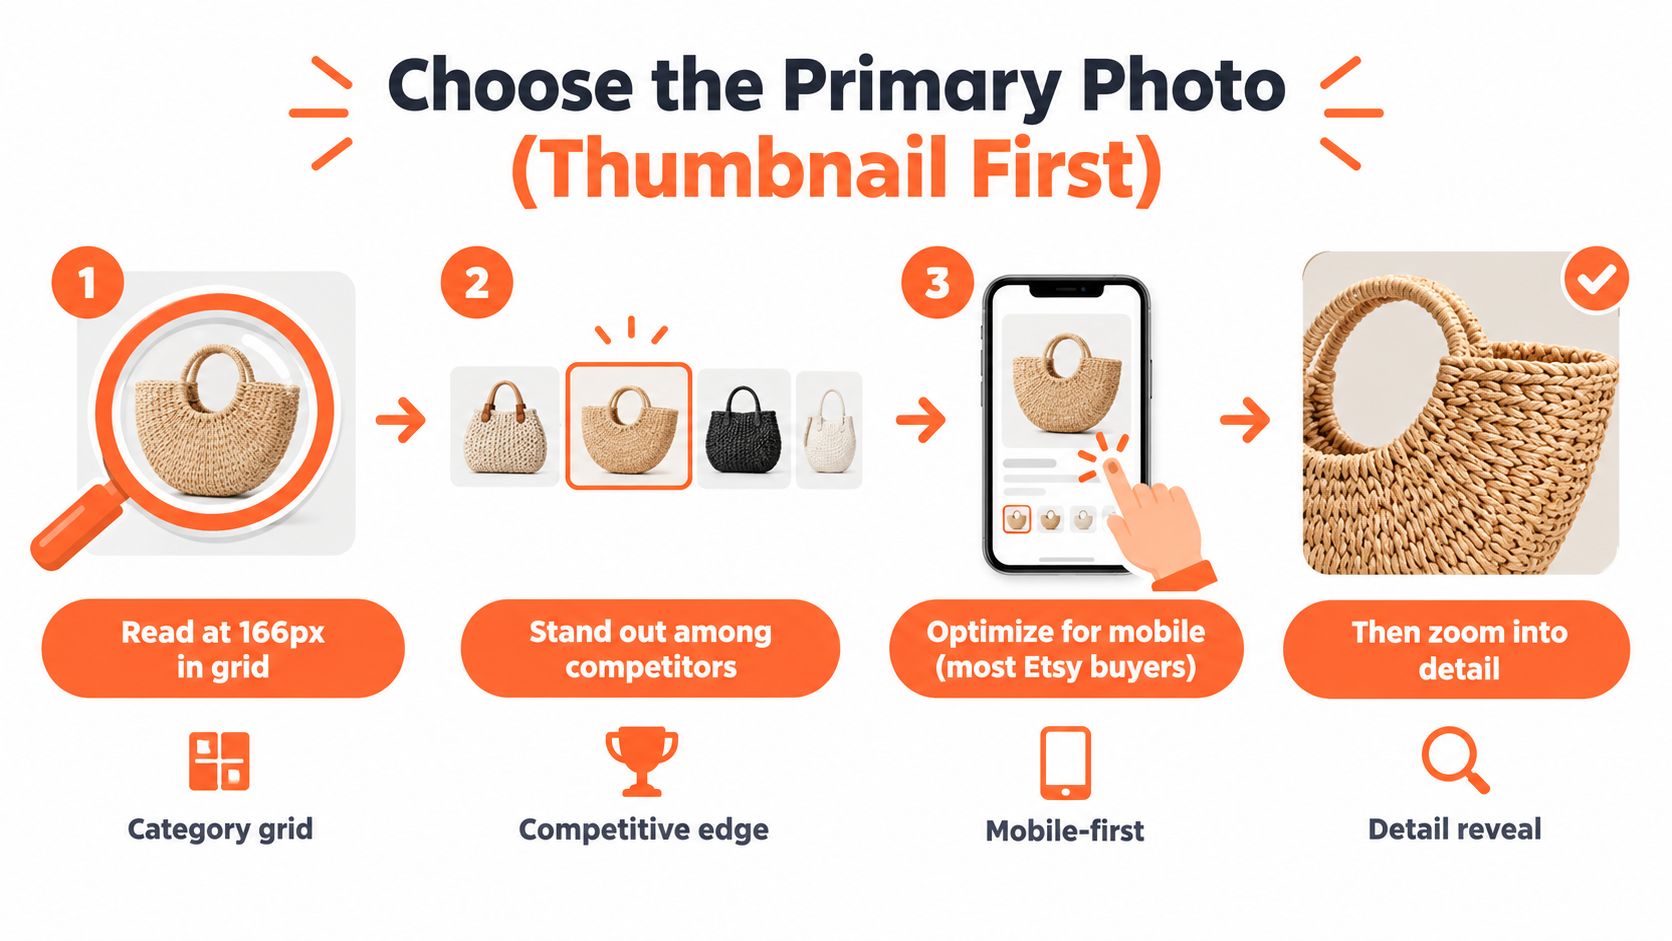
The primary photo has two jobs, and the first happens before zoom. It must identify the product when the image is small, surrounded by competing listing cards, and viewed on a phone. Use a front-facing or clearest product view, keep the whole item in frame, and choose either a neutral background or a context that doesn't hide the product.
A useful thumbnail test is to view the first image at 166 pixels wide. If the product becomes an indistinct shape, changing the file from 4:3 to square won't solve the problem. Increase contrast between the item and its background, simplify the scene, or choose a clearer angle.
Give every supporting slot a job
Etsy's official image guidance allows a listing gallery to contain 10 images. At catalogue scale, don't fill those slots with near-duplicates. Assign each position a purpose:
- Primary view: The clearest thumbnail and full product.
- Alternate angle: Show the back, side, underside, or interior.
- Detail close-up: Reveal texture, stitching, finish, or hardware.
- Scale reference: Use a hand, familiar object, or clear measurement context.
- In-use view: Show how the item sits, hangs, fits, or functions.
- Variant comparison: Display colours, sizes, or available options.
- Packaging: Show arrival condition when presentation affects purchase confidence.
- Dimensions: Add a clean measurement graphic when size questions are likely.
- Customisation: Demonstrate names, finishes, or selectable details.
- Final reassurance: Use another useful view, not a repeat of the hero image.
A staged image that hides the product is not supporting content. Nor is a second image with the same angle, crop, and background. Buyers need a sequence that answers practical questions in order, from “What is it?” to “How large is it?” and “What will arrive?”
For a more complete shooting setup and framing reference, use these photography tips for product shoots. Keep the decisions repeatable. If one listing uses a close-up as slot three, use the same logic across the rest of the product family, even when the exact subject changes.
The broader guide to ecommerce photoshoot styles can also help you define which scenes belong in a primary image and which belong later in the gallery. The point isn't to create ten attractive photos. It's to make ten useful decisions.
How Etsy's Spec Lines Up with Amazon, Shopify, and Other Marketplaces
A single source image can support several channels, but a single exported version usually shouldn't serve all of them. Etsy gives you room for styled and contextual photography. Amazon's main image requires a pure white RGB background of 255,255,255 and a longest side of 1,600 pixels or more, while Shopify commonly works from a square 2,048 × 2,048 pixel upload and allows images up to 4,472 × 4,472 pixels, according to the cited Shopify guidance.
That means your workflow should create derivatives from one master. Don't reshoot just because the channel changes. Reframe, change the background when required, and export a channel-specific file.
Doing this for a whole catalog?
MerchLoom runs background removal, upscaling and AI editing across every product photo you have — one prompt, whole batch. Try 2 batches free, no signup.
Try it freeBuild a master and channel derivatives
| Marketplace | Min. pixels | Aspect ratio | Formats | File size cap |
|---|---|---|---|---|
| Etsy | 2,000 pixels on the shortest side | Square or landscape commonly used | JPG, PNG, GIF | Keep under 1 MB for faster uploading |
| Amazon | Longest side 1,600 pixels or more | Main image commonly square | Channel-specific marketplace formats | Verify current seller requirements before upload |
| Shopify | Square upload commonly 2,048 × 2,048 pixels | Square | Common web image formats | Maximum image dimensions of 4,472 × 4,472 pixels |
| eBay | Use a channel-specific derivative from the master | Match the listing template | Common web image formats | Check the active listing workflow |
| WooCommerce | Theme and template driven | Match the store template | Common web image formats | Check hosting and theme settings |
| Poshmark | Marketplace display driven | Use a safe central crop | Common web image formats | Check current upload behaviour |
| Depop | Marketplace display driven | Keep the subject central | Common web image formats | Check current upload behaviour |
| Faire | Square baseline commonly used | Square | Common web image formats | Check current wholesale workflow |
The Etsy file should preserve the shop's visual character. The Amazon main image should be isolated against exact white when that channel requires it. Shopify may need a clean square that fits the theme's product-card and zoom behaviour. eBay, WooCommerce, Poshmark, and Depop should receive derivatives tested against their current templates rather than an assumed universal crop.
Use separate filenames and folders for each channel. A useful structure is SKU_primary_etsy.jpg, SKU_main_amazon.jpg, and SKU_square_shopify.jpg. Metadata can also diverge. Etsy titles, tags, and listing descriptions serve one marketplace, while Amazon identifiers and Shopify product records follow different systems.
For teams coordinating listings, inventory, and support across channels, this overview of how to streamline ecommerce support provides useful operational context. Image preparation is one part of the catalogue, so keep the asset naming system aligned with the rest of your product data.
The Amazon listing image size guide is useful when you're creating that separate Amazon derivative. Don't flatten your whole catalogue into one compromise file. One master, several controlled exports, and one review checklist per channel is faster than correcting every listing after upload.
Preparing Hundreds of Photos in One Repeatable Sequence
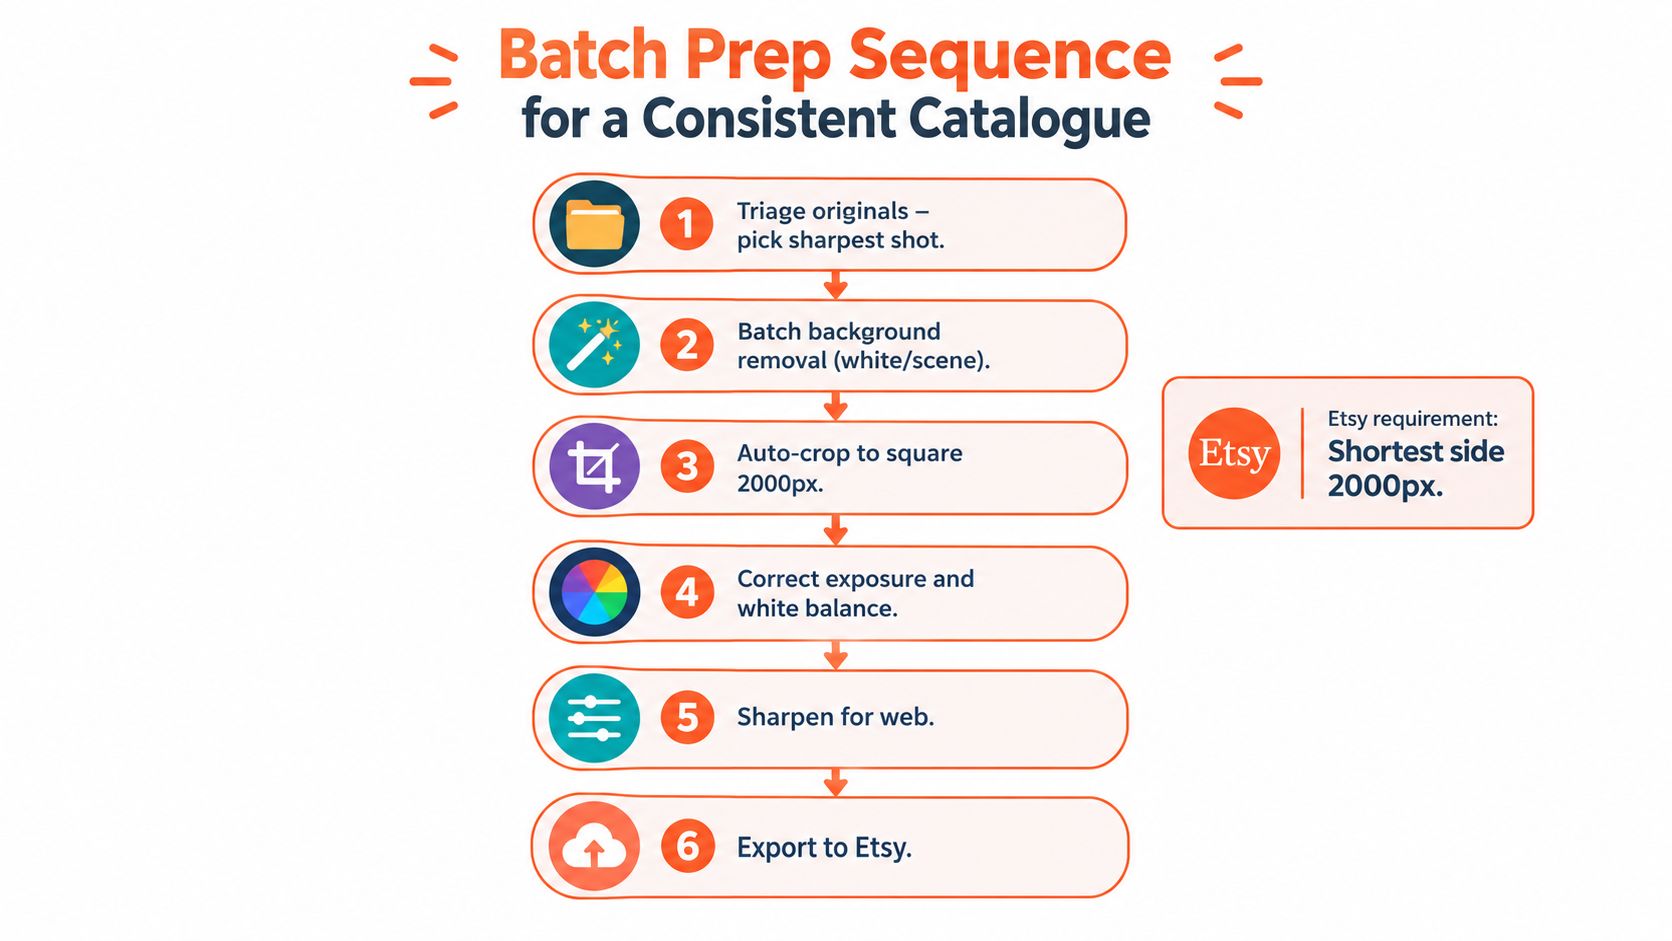
Batch processing only works when the order is deterministic. Start by choosing the sharpest original for each product, then preserve it before any destructive edit. A background removal pass should happen before final reframing, because the subject boundary affects how much room you need around the product.
Use a consistent white background or one approved scene reference for the relevant image group. Etsy doesn't force a pure white hero image, so choose the visual system that fits the product and shop. Amazon is different, and its main image needs the exact RGB value specified above.
The production sequence
- Triage the originals. Pick the sharpest single frame, remove obvious focus failures, and label the source by SKU and intended slot.
- Remove backgrounds in a batch. Use one edge and shadow policy across the group. Review hair, transparent objects, loops, and reflective surfaces manually.
- Reframe to the target safe zone. A square export is a practical Etsy baseline, while a 4:3 or 5:4 working crop can preserve more flexibility. Leave corner breathing room.
- Correct colour from a reference image. Set exposure, white balance, and neutral tones on one approved product, then apply the adjustment consistently.
- Upscale only where necessary. A low-resolution source may need more help than a clean original. Don't enlarge every file automatically.
- Export the Etsy version. Use 2,000 pixels on the shortest side, sRGB, and a JPEG setting around 80 to 85 quality as the initial production preset.
- Archive other derivatives. Keep the master, Etsy export, Amazon crop, Shopify square, and social versions in clearly named folders.
Three failures appear repeatedly in large catalogues. The first is skipping the master copy, which leaves you unable to recover from a bad crop. The second is re-encoding already compressed JPEGs several times, which gradually damages texture and edges. The third is trusting an automatic crop without checking tight products at the corners.
Quality-control rule: Review the first, middle, and last items from every batch, plus every product with a transparent, reflective, unusually tall, or unusually wide shape.
You can formalise this sequence with a batch-processing workflow for ecommerce images. Keep the preset stable, but don't confuse a stable preset with automatic approval. A pipeline can repeat the same mistake perfectly across hundreds of files.
SEO and Performance Trade-Offs You Only Notice at Scale
Image SEO starts with organisation. Name files so a human can identify the product and slot without opening them, such as linen-tote-natural-primary.jpg or ceramic-mug-blue-detail.jpg. Use accurate alt text in the listing system, and vary it according to what the image shows. Copying the same description into every slot makes the gallery less useful and creates maintenance problems across a large shop.
The pixel target protects detail during zoom, but larger files also take more effort to upload, review, store, and deliver. Etsy's own guidance recommends keeping files under 1 MB for faster uploading, while the source still needs to meet the platform's pixel recommendation. That's why controlled JPEG compression is preferable to reducing dimensions.
Review the catalogue, not just the listing
At small volume, one oversized image feels harmless. Across hundreds of listings, repeated overhead becomes a workflow issue. The same applies to inconsistent dimensions. If every product arrives in a different crop, the shop grid looks uneven and your team spends time correcting exceptions instead of publishing new products.
Check these catalogue-level signals:
- Duplicate alt text: Make each slot describe its actual view.
- Mixed colour: Compare a reference white, grey, or neutral product across batches.
- Uneven framing: Look for products that appear much smaller or larger than their neighbours.
- Compression damage: Inspect fine texture, small type, thin chains, and sharp corners.
- Supporting-image weight: Don't assume later gallery images are irrelevant to mobile performance. Buyers still load and inspect them.
sRGB is the practical colour space for storefront delivery. It reduces the chance that product colours shift between your editing environment and the live listing. An absolute white background can also help when you need a clean card preview, but Etsy doesn't impose Amazon's white-background rule, so don't remove useful context merely to imitate another marketplace.
The right test is visual and operational. Open a sample of listings on desktop and mobile, then inspect the grid, primary thumbnail, gallery order, and zoom detail. If the same issue appears repeatedly, fix the preset. If it appears only on one product shape, route that item through an exception path rather than weakening the standard for the whole catalogue.
Running the Whole Workflow Across Your Catalogue with MerchLoom
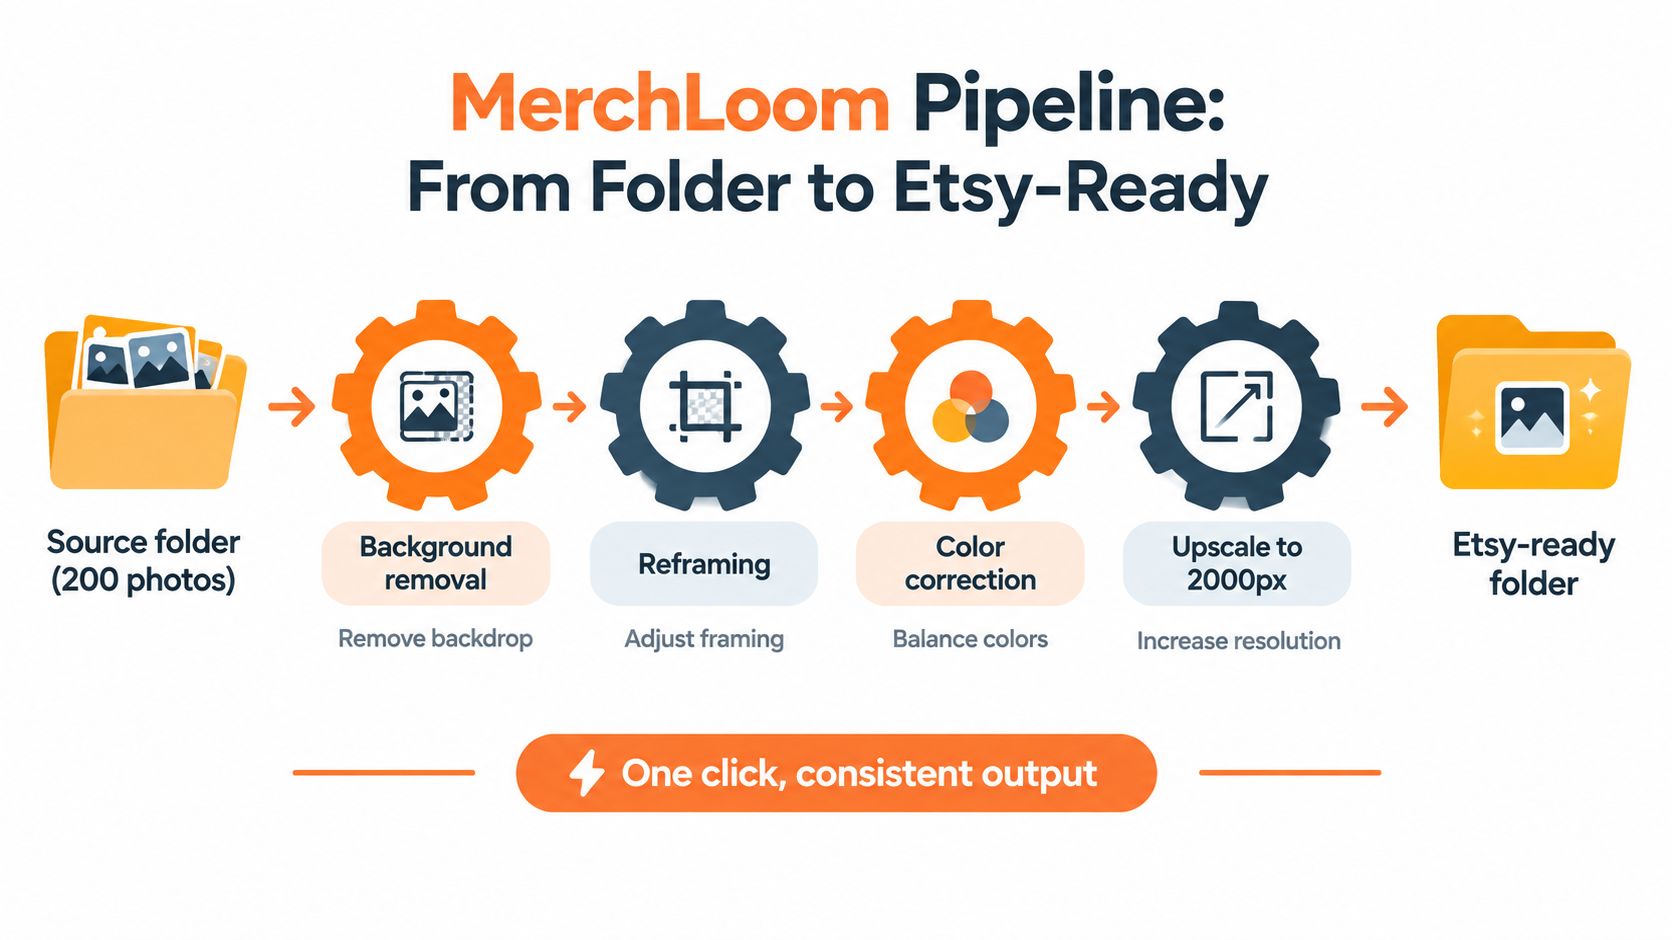
MerchLoom fits this job when you need chained AI pipelines instead of editing one image at a time. You can import a source folder, connect existing storage or commerce sources, and run background removal, reframing, colour correction, and resolution work as a repeatable sequence. The first images can be tried with no account. It's pay-per-image with credits that never expire.
Set the source folder first. Then create an Etsy listing preset with a 4:5 primary and 1:1 secondary output if that matches your catalogue design, enable smart crop with subject lock, and turn on colour consistency. The preset should encode your decisions, not replace your judgement.
Run a controlled pilot
Process a sample before sending the remaining catalogue through the workflow. Review 20 images for white-balance drift, clipped corners, inconsistent subject scale, and background edges. Include difficult products in the sample, not only the cleanest items.
Once the sample passes, lock the preset and process the remaining batches. Add a 2x upscale pass only for images below 1,500 pixels on the long edge, as the workflow specification requires. Route outputs into listing folders named with the SKU and slot number, for example SKU123/01_primary.jpg and SKU123/03_detail.jpg.
Track the credit cost for each image against the time saved, but keep human review in the loop. AI background removal can miss transparent edges. Reframing can make a long product feel too small. Upscaling can create plausible detail that still needs checking against the actual item. MerchLoom isn't a full Photoshop replacement, and it shouldn't be treated as an approval system.
For technical users connecting image sources and repeatable actions, the MerchLoom MCP documentation explains the available workflow context. Save the approved preset for the next product drop. The value comes from reusing a tested sequence while keeping an exception path for products that don't fit the standard frame.
MerchLoom lets you run background removal, reframing, colour correction, and Etsy-ready resolution work across a catalogue rather than repeating each edit manually. Try the first images without an account, review the output yourself, and visit MerchLoom to build a pay-per-image workflow with credits that never expire.
Stop editing product photos one at a time
Upload your catalog or connect your store. Describe the result once. MerchLoom does the rest.
Try it free — no signup