
Watch Product Photography for E-Commerce Sellers
Watch product photography made practical for e-commerce sellers. Gear, lighting, settings, retouching, and batch workflows that scale across your catalog.
A shipment of 40 watches lands on Thursday. By Friday night, each one needs marketplace-ready photos, and the weekend launch is still ahead. If you shoot every watch as a separate creative project, the deadline disappears under retakes, dust removal, reflections, crops, and file exports.
Start by treating watch product photography as a batch operation. Build one capture position, one lighting diagram, one naming convention, and one export path before you place the first watch on the set. That decision matters because a watch has small reflective surfaces, strict marketplace expectations, and polished parts that expose even minor changes in camera height or light position.
Online shoppers depend heavily on product imagery. A 2026 roundup reports that 93% of consumers consider visual appearance the primary factor in online purchase decisions, while 75% rely on product photos when deciding whether to buy. The same roundup reports that high-quality images convert 94% better than amateur imagery, and listings with 7 or more images convert at 2.4 times the rate of single-image listings. These figures come from LumePixa's product-image statistics roundup.

The practical target isn't a perfect hero frame. It's a repeatable system that can move a large catalogue through capture, retouching, review, and export while preserving color, framing, shadow behavior, and product truth. A standardized workflow also gives you a clear stopping point. You know which shots are essential, which defects require a reshoot, and which imperfections can be corrected in post.
For a useful foundation, compare your current process with this guide to what product photography involves. Every technique below is chosen for what survives repetition across Shopify, Etsy, Amazon, eBay, WooCommerce, Poshmark, and Depop.
Why Watch Product Photography Is a Catalog Problem
A single watch can look correct while the next twenty fail. Lock the system before shooting the products. Photograph one representative steel watch, one gold-tone watch, one dark-dial watch, and one watch with another strap material. Use those test frames to set camera position, light marks, white balance, crop, and retouching standards.
Watches punish small inconsistencies. A polished case reflects the room, softbox, camera, and nearby cards. Sapphire or mineral crystals can turn a readable dial into a white patch. A slight angle change also alters the bezel reflection, so a setup that works for one SKU can produce glare or distortion on the next.
The catalog problem continues after capture. Your workflow must carry the same color, framing, shadow behavior, and product truth through capture, retouching, review, and export. Define which frames every SKU needs, which defects require a reshoot, and which imperfections can be corrected in post. That decision prevents operators from judging each image by a different standard.
Marketplace rules add fixed constraints. Amazon's main image requires a pure white RGB 255,255,255 background, and the longest side should be at least 1600 pixels for zoom and detail-page performance, according to Amazon's seller image requirements. Etsy guidance recommends at least 2000 pixels on the shortest side. Shopify community guidance supports square assets up to 4472 x 4472 pixels and commonly recommends 2048 x 2048 pixels. Refer to the Etsy listing image guidance and Shopify image-size guidance when setting export presets.
Build the batch before the camera comes out
Create a SKU sheet with the model, strap type, dial color, required shots, retouch status, and export status. Give every product the same shot sequence. If the hero is always first and the wrist image fifth, missing frames appear before upload.
According to Rewarx's 2026 ROI data, the global commercial photography market was valued at about US$5.1 billion in 2025. The source estimates e-commerce product photography at roughly 45% of that market and says Europe accounts for nearly 40% of the global e-commerce product photography market. For watch sellers, the practical point is that imagery functions as structured merchandising, not an occasional creative task.
Use a clear foundation for what product photography involves for e-commerce. At catalog scale, the post-shoot batch pipeline often saves more time than another round of individual image polishing. Capture a controlled set, apply the same correction logic, and review only frames that fail the defined standard.
Gear and Macro Setup That Stays Consistent
A catalogue setup doesn't need every lens in your bag. It needs a small group of tools that hold their position and produce the same perspective from one SKU to the next.
Use a tripod-mounted mirrorless or DSLR with a 90mm or 105mm macro lens for dial and case detail. A macro lens in the 90 to 100mm range is also recommended in this watch photography setup guide, because it gives working distance without forcing the camera close to the crystal. Add a 50mm prime for wrist and lifestyle frames, where the wider perspective helps show scale and context.
A sturdy copy stand with a locking center column is more useful for batch work than a lightweight tripod that shifts between products. Mount the camera directly above the watch for straight dial frames, then mark the alternate angle on the stand or floor. Use a tethered connection to a calibrated monitor. You need to inspect dust, hands, indices, and crystal glare at capture time, not after the entire shipment is photographed.
Accessories that prevent repeat failures
A macro rail lets you move the focus plane in measured increments. A cable release prevents hand movement at the moment of exposure. Place a color-checker card in the first frame of every lighting session, and shoot it again whenever you change the light, background, or watch finish.
Keep one lens assigned to each shot type. Tape over zoom rings so nobody changes framing halfway through the batch. Record the camera-to-subject distance and rail position in a setup sheet. If you need to switch from a steel diver to a slim dress watch, change the product position, not the entire camera system.
| Shot Type | Lens | Distance | Key Accessory |
|---|---|---|---|
| Hero and front catalog | 90mm or 105mm macro | Fixed copy-stand position | Tripod, tether, color checker |
| Dial detail | 90mm or 105mm macro | Fixed macro-rail position | Macro rail and cable release |
| Wrist lifestyle | 50mm prime | Marked subject distance | Tethered monitor |
| Caseback and clasp | 90mm macro | Preset rail position | Polarizer and dust blower |
The purpose of this gear stack is boring in the best way. You should be able to replace a watch without changing the visual language of the catalogue.
Camera Settings and Focus Stacking for Sharp Dials
Sharpness across the dial, bezel, lugs, and case doesn't come from stopping the lens down. Close macro distances create a shallow depth of field even when the lens is set to a moderate aperture. Use f/8 to f/11, then focus-stack the frame so the final image combines several sharp focus planes.
A practical starting point is a 90mm or 105mm macro lens at f/8, ISO 100, and a shutter speed of at least 1/125s. Use mirror lock-up or an electronic shutter if your camera supports it. Set manual white balance from the color checker, then lock exposure and white balance for the whole group of watches shot under the same lights.
The repeatable stack sequence
Set manual focus near the front edge of the crystal. Move the macro rail in 1mm steps and capture 8 to 12 frames for a standard dial stack. The first frame should cover the front crystal or bezel edge, and the final frame should cover the dial floor or rear case area that needs to remain sharp.
The exact number of frames will vary with case depth and framing. The production rule should not. Use the same aperture and rail step for a watch line, then adjust only when a test frame proves that the product geometry requires it.
- Lock shutter speed, aperture, ISO, and white balance.
- Set manual focus at the nearest required plane.
- Trigger the first frame with the cable release.
- Move the rail in equal increments.
- Repeat until the farthest required plane is captured.
- Combine the frames in your retouching workflow.
This macro product photography guide is useful when you need to translate that process into a repeatable close-up workflow.
| Watch Style | Aperture | ISO | Shutter | Stack Frames |
|---|---|---|---|---|
| Slim dress watch | f/8 | 100 | 1/125s or faster | 8 |
| Standard three-hand watch | f/8 | 100 | 1/125s or faster | 8 to 10 |
| Diver with raised bezel | f/11 | 100 | 1/125s or faster | 10 to 12 |
| Chronograph with deep dial | f/11 | 100 | 1/125s or faster | 10 to 12 |
Don't change the workflow because one watch looks more expensive or more complicated. Change the stack depth when the physical depth changes, while keeping the capture logic stable.
Lighting and Staging for Reflective Watches
Reflective cases need something to reflect. A bare light pointed at the watch creates a hard, recognizable source shape across the crystal and steel. Large diffusion creates broader gradients, which makes the case look round without covering the dial in hot spots.
Use a 60 x 90cm softbox as the key, positioned 45 degrees camera-left and approximately 1.2m from the watch. Run the source through a strip diffuser and set the exposure around f/8. Add a bare speedlight behind the watch with a 30-degree grid if the case needs separation from the background.
Place a white fill card camera-right and a black flag near the opposite edge of the set. The white card lifts shadow under the lugs. The black flag removes unwanted double-bounce and gives polished steel a darker edge to reflect. Mark the softbox, speedlight, card, flag, and watch riser positions with tape.
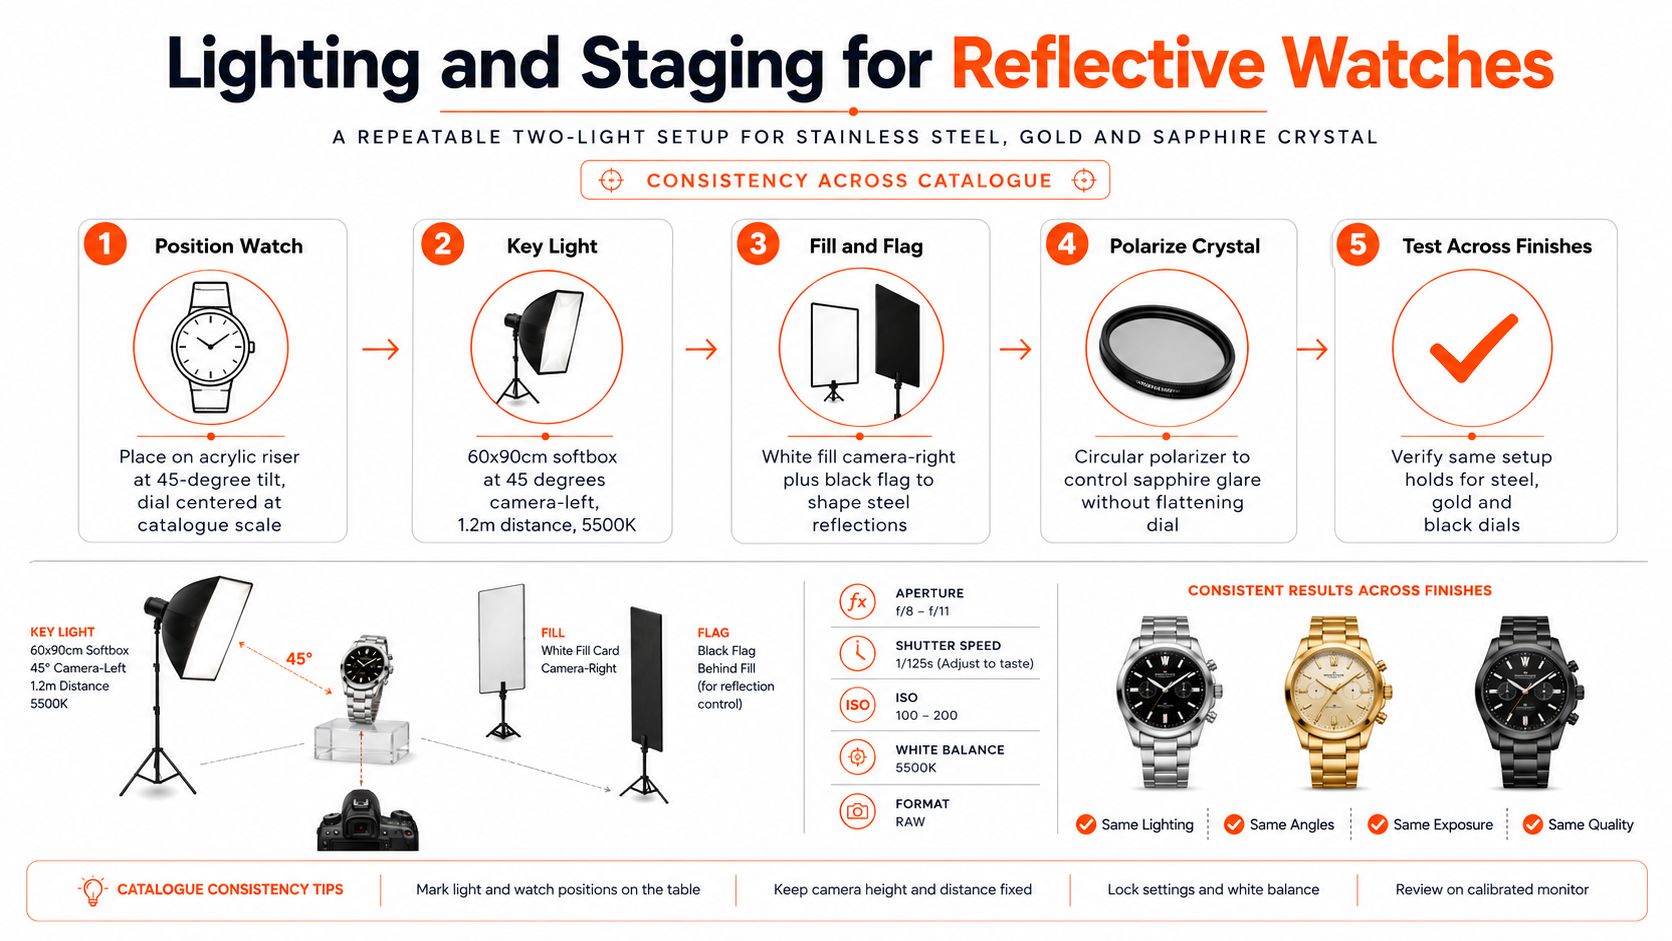
Use two staging positions
For the hero frame, place the watch on a 30-degree tilted acrylic wedge. This gives the dial a readable angle and lets the case profile appear in the thumbnail. For a straightforward catalogue frame, place it flat on a 20% gray PVC sweep. The gray surface gives you a controlled reference during capture, while the final marketplace version can use the required white background where applicable.
A circular polarizer can suppress crystal glare, but don't rotate it blindly. Turn it while watching the tethered monitor. The best position may reduce the reflection without removing the controlled highlight that gives the watch dimension.
Doing this for a whole catalog?
MerchLoom runs background removal, upscaling and AI editing across every product photo you have — one prompt, whole batch.
Try MerchLoomReflection rule: Move the card or flag by small amounts first. A tiny change can fix a flare without forcing a complete lighting rebuild.
Keep the key-light distance fixed across the batch. A source moved closer for one dark dial changes contrast and exposure behavior for every later image. If a black dial needs more readability, adjust the fill or flag deliberately and record the change as a separate setup.
Use the watch product photography lighting workflow as a reference for organizing these marks and adjustments.
Marketplace Specs and Export Presets Compared
A catalog becomes difficult to manage when each marketplace receives a separate working file. Build one large, clean master, then generate destination versions from it. Keep the master in a working color space that preserves capture detail, and export every marketplace file in sRGB. Never resize a compressed marketplace JPEG into another JPEG.
The Amazon column should be checked against the Amazon product image requirements. Etsy and Shopify allow different gallery treatments, so use the guidance cited earlier rather than duplicating those source links here. The useful comparison is how one master canvas supports each platform's display and zoom behavior.
| Spec | Amazon | Etsy | Shopify | Master Preset |
|---|---|---|---|---|
| Main canvas | Product-first main image | High-resolution listing image | Square catalogue asset | Square working file |
| Minimum or supported size | Set by current marketplace requirements | Shortest side at least 2000px | Up to 4472 x 4472px | 2400 x 2400px |
| Background | Required treatment for main image | Styled backgrounds allowed in secondary slots | Theme-dependent | Neutral reference background |
| Color space | sRGB export | sRGB export | sRGB export | Preserve master, export sRGB |
| Best use | Main listing image | Gallery and lifestyle images | Product page gallery | Single source for variants |
Use a 2400 x 2400 pixel master in a square layout. That canvas gives the crop room needed for platform-specific framing and preserves enough working area for a watch that must remain readable in thumbnails and zoom views. The Amazon export can be reduced to the marketplace threshold while retaining the same product placement. Etsy and Shopify versions can keep more breathing room or use a different crop without returning to the raw capture.
Record the crop, background treatment, sharpening, and output size in each preset. Amazon needs a product-first main frame. Etsy can carry styled secondary images, while Shopify can hold a fuller gallery. Keep the hero, dial detail, wrist, and packaging files available from the same master rather than rebuilding them per listing.
Name presets by destination, canvas, background, color space, and sharpening target. That naming system makes a batch easy to audit, especially when one watch moves across several channels. It also prevents a rushed export from becoming the catalog's accidental source file.
Shot List by Purpose and Conversion
A catalog-ready watch listing must answer the buyer's practical questions without another message: shape, size, materials, closure, and context. Build the shot list around those decisions, then keep the same sequence for every SKU.
- Hero tilt. Use the pure-white main image at a 45-degree tilt. Center the dial and make the case large enough to remain readable in a marketplace thumbnail.
- Straight front. Shoot the dial dead-on for markers, hands, date windows, legibility, and surface texture.
- Side profile. Use a 30-degree three-quarter view to show case thickness, lugs, and crown position.
- Clasp and bracelet. Capture the clasp, links, stitching, buckle, and strap texture at macro distance.
- Lifestyle on wrist. Use natural light to show scale and how the strap sits.
- Movement or caseback. Show the movement on automatic pieces. Otherwise, photograph the caseback markings and finish.
- Scale reference. Place the watch beside a coin or ruler so buyers can judge its absolute size.
Shoot in this order because it catches problems early. A damaged crystal or incorrect strap should surface before time goes into lifestyle staging. The same sequence also gives the post-shoot batch pipeline predictable file groups, which matters more across a large catalog than perfecting one isolated frame.
A product-image roundup reports that 360-degree images can boost conversion by 22% and add-to-cart rates by 35%, supporting a gallery with multiple angles rather than a single packshot. No universal seven-image combination fits every price tier, so let your own catalogue data decide which frames earn their place.
Start each SKU with the hero, straight front, side profile, and wrist image. Add movement or caseback, clasp, and scale frames when buyers need more proof about condition, size, construction, or packaging. Keep filenames and frame order consistent so marketplace exports and later retouching can run in batches.
For additional selling context, how to sell luxury watches explains why high-value listings need clear presentation alongside accurate product information.
Retouching and Batch Pipeline From Raw to Listing
A watch catalogue becomes difficult after the shutter stops. One inconsistent crop, white background, or filename can create manual work across every marketplace. Keep the post-shoot order fixed, because each stage affects the next. Correct source exposure before removing the background, and sharpen only after the final resize. Otherwise, edge masks and halos become harder to judge.
Cull before you edit
Import the RAW files into Lightroom and review them in grid view. Flag usable focus-stack frames, reject images with vibration or a person reflected in the crystal, and rate the selected product set. Keep the SKU in the metadata or folder name so a frame cannot drift away from its product record.
Apply one develop preset to the batch. Sync white balance, exposure, lens correction, contrast, and crop ratio from a reference frame. Leave one-off fixes unsynced. A scratch, unusual bezel reflection, or damaged strap belongs to that watch, not to every file in the group.
Export the selected files as 16-bit TIFFs for detailed Photoshop work. Retaining editing latitude at this point helps with background cleanup, colour consistency, and crystal corrections before the listing files are compressed.
Use a fixed Photoshop action stack
Run the actions in the same order for every SKU:
- Frequency separation on the dial only. Use it for small surface variations and dust. Preserve printed indices, brushing, and genuine texture.
- Dodge and burn on the hands. Restore readable contrast while keeping the hands anchored to the dial.
- Color overlay at 8% opacity. Apply it only when the reference frame shows a consistent metal cast across the batch.
- Crystal and case cleanup. Remove dust, fingerprints, and unwanted reflection artifacts, while retaining real finishing and edge definition.
- Final crop and sharpen. Clean the product first, crop to the destination framing, then sharpen for the actual export resolution.
A Photoshop droplet or a background-removal service such as remove.bg can handle repetitive masking. Inspect every edge around lugs, crown guards, bracelet gaps, and transparent crystal reflections. Narrow links, black cases, and polished surfaces frequently produce masks that look acceptable at thumbnail size but fail at listing size.
Apply sharpening only after the destination resolution is set. Save files with a naming preset such as SKU_dial_01, SKU_side_02, and SKU_wrist_05. A useful filename identifies the product, purpose, and sequence without opening the file, which keeps review and upload work tied to the correct SKU.
Keep the export layer separate
Use platform-specific presets rather than resizing files manually. Use the marketplace presets defined in the earlier marketplace specs section, and keep those settings separate from the master-edit workflow. The master should remain available for later crops, alternate galleries, or a new channel.
The action stack should output sRGB JPEGs for the destination, while the high-quality master remains archived. Before export, check the white point across a representative group, not only the first image. Sample the background near the case, between bracelet links, and around the crown. A background that appears white beside one watch can show a grey or warm cast beside another, especially after batch processing.
Review the dial texture, fine indices, polished edges, and bracelet gaps after compression. A purpose-built best product image compressor tool can reduce file weight after those details have passed inspection. Open the compressed result at listing size before replacing the master.
Automate the repeatable parts
MerchLoom can run chained AI pipelines across a collection instead of processing one image at a time. It supports background removal, reframing, colour correction, upscaling, and export presets, followed by human review before publishing. The first images can be tried with no account, and it uses pay-per-image credits that never expire. It does not replace Photoshop for reflective watches, so check glare, edges, colour, and product accuracy yourself.
The same workflow logic appears in this guide to ecommerce product photo editing. Whether the batch uses Lightroom and Photoshop, a background service, or a chained workflow, retain a review gate between automation and publication.
Batch control: Never approve a whole folder because the first image looks correct. Review one representative file from each finish, strap type, background treatment, and shot category.
Use this checklist before publishing:
- Gear standardization: Lock the camera, lens, copy stand, rail, and light positions.
- Preset build: Create one capture preset and one develop preset from a color-checker reference.
- Action stack: Keep dial cleanup, hand correction, color overlay, crop, and sharpen in a fixed order.
- Export presets: Save destination presets for Amazon, Etsy, Shopify, and the social channels you use.
- Naming convention: Use SKU, shot purpose, and sequence in every filename.
- SKU tracking sheet: Mark capture, retouch, review, export, and upload status separately.
- Weekly batch slot: Reserve one repeatable block for catalogue photography and post-production.
- Color target card: Include the card in the first frame of every lighting session.
- Retouch sample library: Keep approved steel, gold, black-dial, crystal, and strap examples.
- Monthly catalog audit: Check crops, white points, missing shots, colour drift, and broken product links.
The repeatable decisions carry the scale. A controlled capture setup reduces reshoots, a fixed retouch order reduces judgement calls, and a representative-file review catches batch errors before they reach a full catalogue.
MerchLoom supports chained AI pipelines for watch backgrounds, reframing, upscaling, colour correction, and marketplace exports across a collection. Try the first images with no account, then use pay-per-image credits that never expire while keeping human review in the workflow. Visit MerchLoom and test the process on a small group before moving the rest of the catalogue through it.
Stop editing product photos one at a time
Upload your catalog or connect your store. Describe the result once. MerchLoom does the rest.
Try MerchLoom