
Shoe Product Photography Workflow for E-commerce Sellers
Build a shoe product photography workflow that scales across hundreds of listings. Covers prep, lighting, angles, marketplace standards, and batch editing.
You're looking at a stack of two hundred pairs, a Monday deadline, and a camera setup that still changes every time you move the shoe. Don't start shooting yet. Pick the master format and marketplace rules first, then lock the physical setup, exposure, angle sequence, and file naming so every pair follows the same path.
That decision saves more time than retouching skill. Good shoe product photography has to survive batch editing, channel exports, seasonal re-listing, and quality checks months after capture. The aim isn't one beautiful hero image. It's a dependable image set for every SKU.
Why Catalog Scale Changes How You Shoot Shoes
At catalogue scale, a small inconsistency becomes a production problem. A camera that shifts slightly between pairs creates different toe positions. Auto white balance makes one white sneaker look cool and the next look warm. A loose lace on one SKU forces manual corrections that multiply across the collection.
Start by choosing a master square canvas. A square file works across common storefront layouts and reduces repeated crop work. Shopify merchant guidance commonly uses 2,048 × 2,048 pixels as an ideal product-image size, with 4,472 × 4,472 pixels as the maximum dimension described in that guidance. Etsy guidance calls for at least 2,000 pixels on the shortest side. Amazon's current image help requires at least 1,000 pixels on either height or width for zoom, with a 500-pixel floor and a 10,000-pixel ceiling on the longest side. Check the live rules for each account before export because marketplace requirements can change. Shopify and Etsy image-size guidance
Practical rule: Shoot once for a controlled master file, then derive channel versions. Don't capture separate Amazon, Etsy, and Shopify sets unless the channel genuinely needs a different composition.
A repeatable setup also protects image quality. High-resolution product photos have been reported to convert about 94% better than low-resolution images, and listings with 7 or more images have been reported to convert at about 2.4 times the rate of single-image listings. These figures come from an industry compilation, so treat them as directional evidence rather than a guarantee for every store. E-commerce product-image statistics
Create a batch sheet before the first pair arrives. Include SKU, material, color name, left or right orientation, required angles, background, and export destination. Photograph a gray-card frame and a color-checker frame at the start of each material group. That reference becomes the control point when black leather, suede, mesh, and metallic finishes move through the same catalogue.
For broader workflow ideas, use these product photography tips for e-commerce as a checklist, then reduce the process to the few steps you can repeat without hesitation.
Prepping the Shoes Before They Hit the Set
The set shouldn't be the first place you inspect a shoe. Use a packing table as the preparation station and process each pair in the same order.
Prepare shape before appearance
Begin by opening the box and checking the pair against the SKU. If shipping compression has flattened the upper, let the shoes rest for 24 hours before photography. This gives the materials time to recover their shape and prevents you from correcting a temporary crease in editing.
Use standard acid-free tissue to fill the toe box. Add shoe shapers where they fit without stretching the upper. Boots need internal support that holds the shaft upright without creating a visible bulge. A concealed block or pool-noodle insert can work, but check the silhouette from the camera angle before capturing the batch.
Lace every pair to the same tension. Use a reference card that shows the lace pattern, crossover position, and final knot placement. This matters more than it sounds. A catalogue buyer should see a styling choice, not evidence that each shoe was prepared by a different person.
Clean by material
Remove dust with a clean microfiber cloth. Use a mild cleaner appropriate to the material, and test it on an inconspicuous area before applying it across a batch. Don't use the same treatment on suede, glossy leather, mesh, and coated synthetics.
Work under the same light you'll use for capture. Surface marks that disappear beside a packing table window can become obvious under a softbox. Brush suede in one consistent direction, remove lint from mesh, and inspect glossy uppers for fingerprints after handling.
Finish with a short quality-control pass:
- Scuffs: Separate pairs with marks that can't be removed safely.
- Lint: Check seams, tongues, collars, and outsole grooves.
- Labels: Straighten size tags, branding, and tongue labels.
- Pairing: Confirm left and right shoes belong to the same SKU and colorway.
- Shape: Look at the shoe from the intended profile and three-quarter angles.
Never rely on retouching to hide a product defect. Editing can remove dust or a stray thread, but it shouldn't change the product a customer receives.
This short footwear preparation video is useful as a visual reminder before you build your own packing-table checklist.
Studio and On-Location Lighting Setups
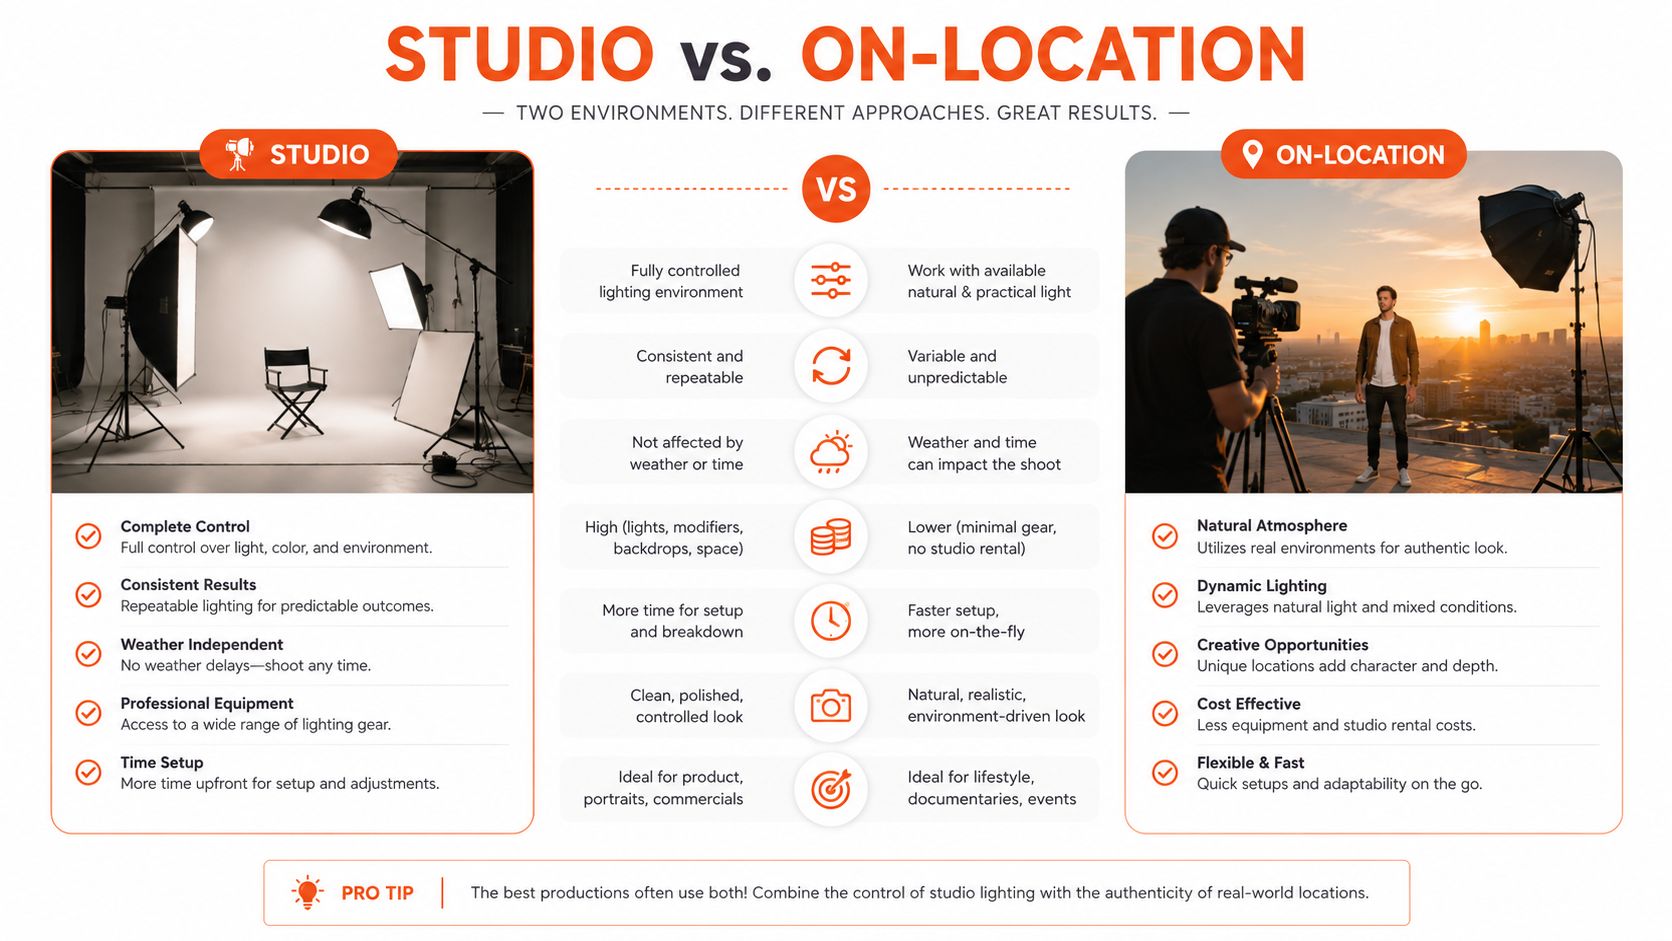
Use one lighting design for the largest part of the catalogue. A controlled studio setup makes color, shadow direction, and background easier to repeat. Location lighting is useful when you need to work away from the studio, but it requires stricter exposure discipline.
Studio setup
Place the shoe on a neutral surface with the background at least 18 inches behind it. Use a foam flag or similar separator between the shoe and background to control shadow spill. Keep the camera on a tripod and place the main softbox or scrim at roughly 45 degrees to the camera.
Put a white fill card on the camera-left side. The fill should open the darker side without flattening the sole or destroying material texture. Add a narrow strip light behind the shoe as a kicker. Aim it at the heel and rear edge so the shoe separates from the background without producing a bright outline around the entire product.
Start with f/8, ISO 100, and 1/125 second. Set these manually and adjust light output before changing the exposure. The setup described in footwear photography guidance also uses a small kicker behind the shoe and a fill card opposite the main light, which gives a practical baseline for repeated catalogue work. Footwear studio setup guidance
On-location setup
Choose open shade, not direct sun. Direct light changes quickly and creates hard edges that are difficult to match across a batch. Place a collapsible 5-in-1 reflector near the darker side of the shoe and use the silver surface as fill when the material can tolerate a brighter reflection.
Clip a diffuser overhead to soften changing daylight. Keep the shoe position, camera height, and distance marked with tape. Dial in the same manual exposure values used for the studio batch, then inspect the histogram and a gray-card frame before continuing.
The trade-off is simple. Studio light gives you control and repeatability. Open shade can be faster to assemble, but clouds, reflected surfaces, and time of day can shift color between groups. If you're photographing a collection with premium finishes, review a sample from each material before continuing. A visual reference such as custom footwear collections can help you define how much detail and separation your own collection needs.
For more positioning examples, keep this product photography lighting guide beside the set while you build the first batch.
Camera and Phone Settings That Hold Up Across Batches
Lock the camera before the first shoe lands on the set. The goal is not maximum technical control. The goal is to stop the device from making a different decision for every SKU.
Camera settings
For a DSLR or mirrorless body, shoot RAW when your storage and workflow can handle it. Use the lowest native ISO available, commonly ISO 100 to ISO 200, and set the aperture between f/8 and f/11 for full-shoe sharpness. Keep the shutter at 1/125 second or faster when ambient flicker is a concern.
Set white balance manually. Use a custom Kelvin preset around 5500K for strobes and around 6500K for daylight, then verify the result with a gray card. Don't use Auto white balance for a catalogue that contains white, cream, gray, and black shoes. Auto settings can create variation that takes longer to correct than setting the light properly.
Doing this for a whole catalog?
MerchLoom runs background removal, upscaling and AI editing across every product photo you have — one prompt, whole batch.
Try MerchLoomThe practical framing benchmark is to fill about 80% of the frame from heel to toe. Place the camera slightly above shoe level, around 15 to 20 degrees, and keep the tripod locked. A tripod-based capture sequence and manual white-balance reference are also recommended in footwear photography workflows. Shoe framing and exposure guidance
Phone settings
Use Pro mode or a manual camera app. Lock exposure and focus with a tap-and-hold, force the main lens, and disable AI enhancement options that alter texture or color. Capture RAW DNG where the phone supports it.
Mount the phone on a small tripod and use a Bluetooth remote. A tiny tilt can change the amount of sole, toe, or background visible in every frame. At catalogue scale, alignment matters more than the convenience of tapping the screen.
Your standard sequence should include lateral, medial, top-down or vamp, heel, outsole, three-quarter, pair, and detail views. The three essential marketplace angles are the three-quarter hero, strict profile, and top-down view. Add toe and sole images when tread, construction, or branding helps a buyer assess the product.
Use this white-balance workflow to keep material groups consistent before you begin the main capture.
Angles and Styling for Common Shoe Types
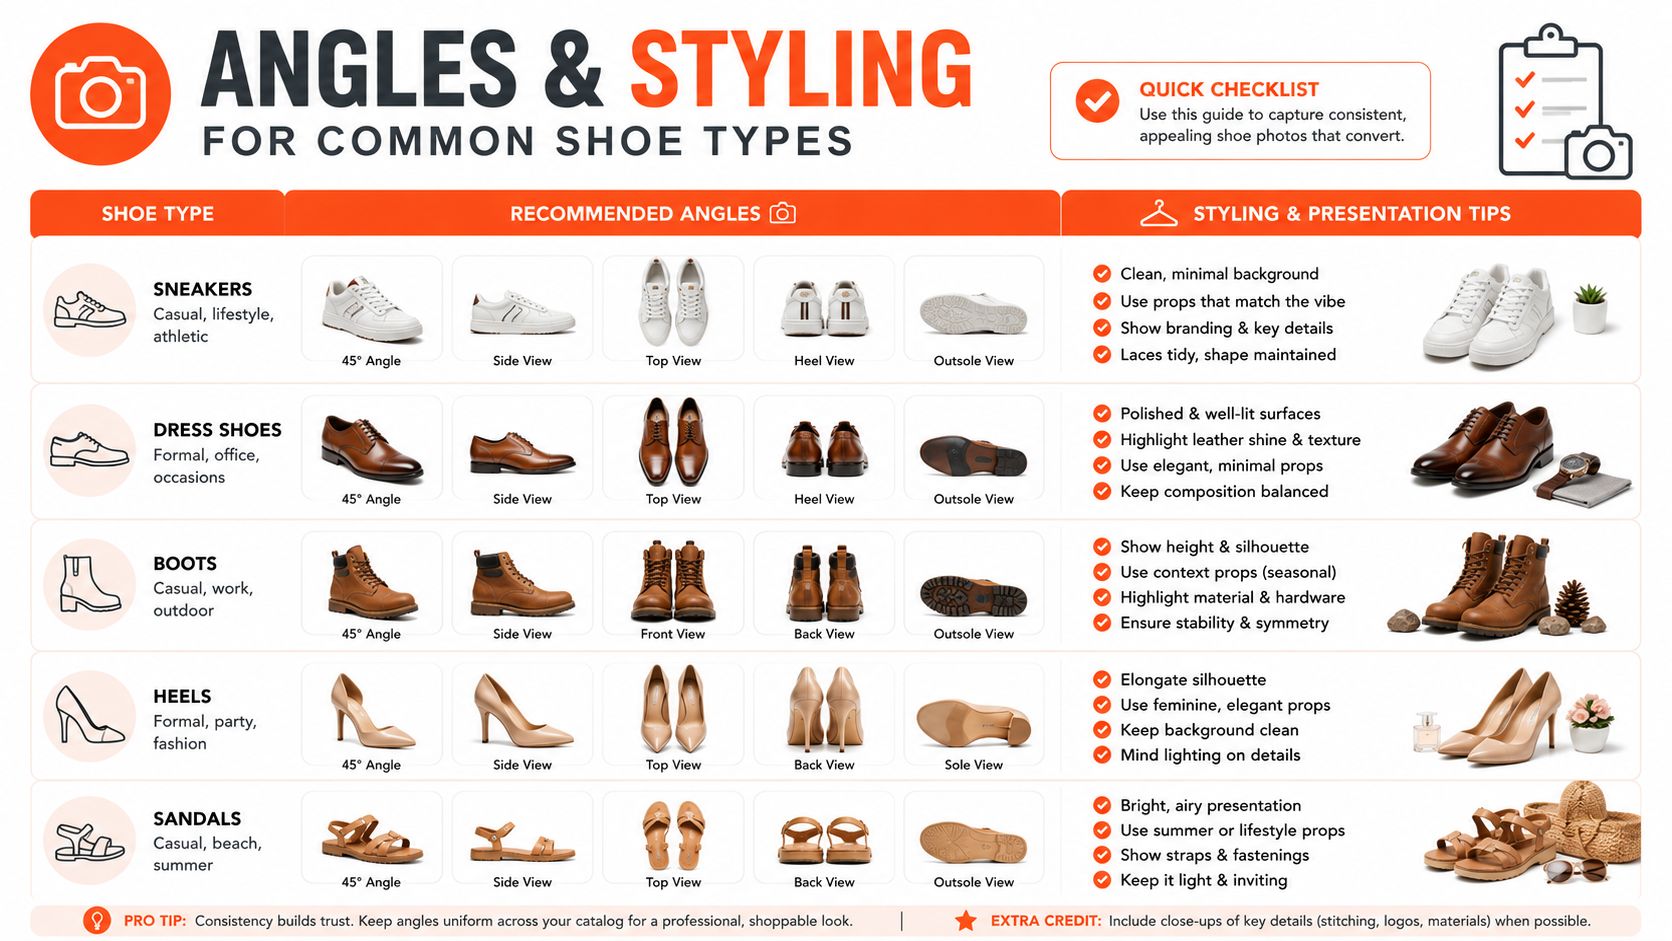
A buyer should recognize the shoe in a few seconds. That requires a fixed angle sequence, not a new creative decision for every SKU.
The core set is straightforward:
- Three-quarter hero: Use the 45-degree view to show height, toe shape, upper, and heel together.
- Strict profile: Choose lateral or medial based on the side that shows branding and construction.
- Top-down view: Confirm the silhouette, opening, color, and lace or strap layout.
- Toe detail: Add this when material grain, stitching, or protective construction matters.
- Outsole view: Include it when the tread or signature sole pattern supports the buying decision.
The top three should look almost identical from one pair to the next. Keep the toe pointing in the same direction, match the distance from the camera, and place left and right shoes consistently. Mirror-image treatment should be used only when a marketplace prevents reverse uploads, because flipping can reverse branding or construction details.
Style by construction
Sneakers need light white tissue in the toe and a tidy criss-cross lace pattern. Don't overstuff the collar, or the opening will look unnaturally wide. Heels and boots need concealed internal support, especially when the shaft collapses without it. Sandals and slides should lie flat with straps relaxed, unless the product is specifically sold in a worn or styled pose.
Flat shoes benefit from a low camera position that preserves their profile. High-top sneakers need enough height in the frame to show the collar without leaving excessive empty space. Shiny leather needs controlled reflections, while suede needs soft directional light that reveals nap without creating blotchy patches.
For a real-world reference, compare how a simple seasonal product such as Dunlop spotty flip-flops in the UK can be presented with clear silhouette and strap detail rather than unnecessary styling.
Use this product photoshoot style guide to decide where a clean packshot ends and a useful contextual image begins.
Marketplace Image Standards Side by Side
Choose one canonical export before editing. For a large shoe catalogue, a 2,400 × 2,400 pixel square master with a pure white background is a practical internal standard, but it must still be checked against each channel's current rules. The master should preserve enough room for platform-specific crops without forcing a new retouching pass.
Amazon's main image requires a pure white background, RGB 255,255,255, and an actual product photo. It can't contain text, watermarks, distracting props, mockups, or inset images. Amazon's help documentation also says images should be at least 1,000 pixels on height or width for zoom, with the longest side between 500 and 10,000 pixels. Amazon product-image requirements
Etsy's guidance calls for at least 2,000 pixels on the shortest side. Square images display cleanly across many marketplace placements, and Etsy gives sellers more room for lifestyle scenes than Amazon's main-image rule.
Shopify commonly uses square product images, with 2,048 × 2,048 pixels described as ideal and 4,472 × 4,472 pixels as a maximum dimension in merchant guidance. For eBay, verify the current listing rules in your account before building exports. Don't assume one undocumented minimum applies to every listing type.
| Marketplace | Min size | Recommended size | Background | Notes |
|---|---|---|---|---|
| Amazon | 500 px longest-side floor, 1,000 px on height or width for zoom | Use a high-resolution square master within Amazon's limits | Pure white, RGB 255,255,255 for the main image | Actual product photo, no text, watermarks, props, or inset images |
| Etsy | 2,000 px shortest side | Square master for repeated listing use | No strict background rule in the cited guidance | JPG or PNG guidance should be checked before upload |
| Shopify | No single enforced size in the cited guidance | 2,048 × 2,048 square, with 4,472 × 4,472 described as maximum | Storefront-dependent | Square crops suit common themes and apps |
| eBay | Verify current account and listing rules | Use the same square master where accepted | Listing-dependent | Check the live upload guidance before export |
Capture a gray card and color checker at the start of every lighting or material group. Keep the camera height, shoe mark, and background distance fixed. Photograph all colorways of one construction together when possible, then move to the next construction. That reduces lighting changes and makes material correction easier.
Batch Capture Workflow and Post-Processing Pipeline
Treat every pair as a record moving through a fixed pipeline. Don't edit one image until it looks perfect, then improvise on the next. Save the operation order, naming pattern, and export folders so the same process works for the next collection.
The seven-step production sequence
- Ingest the source files. Import RAW or JPEG files into a folder named for the collection, then validate SKU names before editing. Keep original files untouched.
- Correct the lens. Apply the camera profile and lens correction before cropping. This prevents edge distortion from changing the apparent toe and heel proportions.
- Crop to the master canvas. Place the shoe on a 2,000 × 2,000 pixel square working canvas, keeping the framing position consistent across the batch.
- Remove the background. Set the background to pure white, #FFFFFF, and keep edge feathering under two pixels. Inspect laces, outsole teeth, and thin straps at full size.
- Correct color. Use the neutral gray card captured at the session start. Compare white midsoles, black leather, suede nap, and metallic highlights against the physical shoe.
- Upscale when required. Bring low-resolution frames to the master output only after cleanup and background work. Review fine stitching and outsole edges because enlargement can create halos.
- Export by channel. Write finished files into marketplace-specific folders, with filenames that retain the SKU, angle, color, and version.
The requested output targets can be organized like this:
- Amazon main: 2,000 × 2,000 pixels at 300 DPI, then confirm the pure-white main-image rules before upload.
- Etsy secondary: 2,700 × 2,025 pixels, if that crop suits the listing layout and your current Etsy workflow.
- eBay thumbnail: 800 × 800 pixels.
- Shopify: Keep the square master and create the required square crop for the theme or app.
These targets should be treated as workflow outputs, not universal platform guarantees. Your account, theme, listing type, and current marketplace rules still control the final upload.
Review the points that automation misses
Background removal is usually fastest when the edge cases are isolated. Check translucent mesh, white rubber against white backgrounds, black-on-black soles, loose laces, and reflective patent leather. AI can produce a usable first pass, but it can also trim a thin strap or soften a tread pattern. Human review remains necessary.
Color correction needs the same discipline. A white background can be technically correct while the shoe itself carries a blue or green cast. Compare the exported file with the physical product under neutral light, especially when customers are choosing between close shades.
A workload of 20 pairs per batch can be organized around a 30-second-per-pair capture checkpoint when the set is already locked. That benchmark describes a capture rhythm, not a guaranteed end-to-end production time. Cleaning, restocking, file review, corrections, and exports still consume time.
At catalogue scale, an automation layer such as MerchLoom can run chained AI pipelines across a collection instead of processing one image at a time. You can import existing product photos, remove backgrounds, reframe for channels, correct color, upscale, and place results into channel-ready folders. It's pay-per-image with credits that never expire, and you can try the first images with no account. Review every batch before publishing, because the system supports the workflow but doesn't replace human product judgment. See this guide to batch product photo editing for a practical way to structure the sequence.
MerchLoom lets you run chained AI image pipelines across hundreds of shoe SKUs, including background removal, square reframing, color correction, upscaling, and channel-ready exports. Try the first images with no account, then use its pay-per-image credit system, with credits that never expire, to process the collection in controlled batches. Visit MerchLoom and test the workflow on a small group before sending the full catalogue through it.
Stop editing product photos one at a time
Upload your catalog or connect your store. Describe the result once. MerchLoom does the rest.
Try MerchLoom