
Turn Your Logo Into a Sticker: A Guide for Shop Owners
Learn to turn your logo into sticker without costly errors. Our guide covers file prep, materials, and automating the process for perfect, professional results.
Turning your logo into a sticker sounds easy. You've got a great design ready to go. You want it on your packaging, as a freebie in every order, or for a giveaway. But then you send it to the printer. The results come back blurry, with weird colors, or flat-out rejected. What went wrong?
You waste hours fighting with design software, trying to figure out what a “bleed” or a “cut line” even is. Then the proofs arrive. The colors are dull, or there are ugly white borders around your design. It looks nothing like the brand you’ve worked so hard to build.
So you think about hiring a freelancer. That’s not much better. Paying someone $50 or more just to prep a single logo file feels like a ripoff. If your store has dozens of products or you run seasonal designs, that cost explodes. Manually preparing 20 logos could easily turn into $1,000 in freelance fees and days of painful back-and-forth emails.
This manual grind is a massive time-drain that pulls you away from actually growing your business.
Why Turning a Logo Into a Sticker Is So Frustrating
This is a story every Shopify store owner and Etsy seller knows. You have the perfect logo, but getting it onto a physical sticker is a journey of a thousand tiny frustrations.
The Hidden Costs of Manual Work
This isn’t just about money; it’s a massive time-drain. Just think about all the hours you lose:
- Searching for tutorials to learn how to format your logo file correctly.
- Waiting for proofs from the printer, only to be told you need to make corrections.
- Editing every single logo variant, one by one, for each new product you launch.
For a growing e-commerce brand, this manual grind is a serious bottleneck. What starts as a small task quickly becomes a major operational headache that delays your product launches and eats away at your profits.
Before: Your logo looks crisp as a PNG on your website. You upload it to a sticker printing service, and it transforms into a pixelated mess. The printer then quotes you an extra fee to “vectorize and prep” the file, tacking on unexpected costs and delays.
After: You process the same logo file through MerchLoom. In under a minute, you have a perfectly upscaled, background-removed file ready for the printer. It costs less than a quarter, and you didn't need to open a design app.
The problem isn't your logo; it's the broken, expensive process. Before we get into a smarter, automated way to do this, we need to cover the fundamentals that make or break a sticker. Getting the basics right—like choosing between a vector and raster file—is the first step to getting your time and money back.
The Foundation for a Perfect Sticker: Vector vs. Raster
Before you even think about printing, the very first thing you need to get right is your digital file. This is where most sticker projects go wrong. The problem isn’t your logo design; it’s the file format you’re sending to the printer.
At the heart of it all is a fundamental difference between two types of image files: raster and vector. Understanding this is key to creating a perfect sticker every single time.
Why Your JPEG or PNG Becomes a Blurry Mess
Most of the logos you encounter online are raster files, like JPEG, PNG, or GIF. A raster image is built from a fixed grid of tiny colored squares called pixels. At its intended size, it looks perfectly sharp.
The trouble starts the moment you try to scale it up. Let's say your logo is 200 pixels wide on screen, but you need to print a four-inch sticker. When you enlarge that raster file, the software has to guess how to fill in the new, bigger space. All it can do is make the original pixels larger, which creates that blurry, unprofessional mess.
Think of a raster logo like an old digital camera photo. It captures a moment perfectly at one specific size. But try to blow up that small, low-resolution picture to the size of a wall poster, and it turns into a fuzzy disaster.
That’s exactly what happens when a small logo file is sent to a sticker printer. The clean, sharp edges of your design become jagged, and smooth curves turn into blocky, stair-stepped lines.
The Power of a Scalable Vector File
This is where vector files save the day. Formats like SVG, AI, and EPS work in a completely different way. Instead of a grid of pixels, a vector file is a mathematical blueprint. It uses lines, points, and curves defined by equations to draw the shapes in your logo.
Because it's all based on math, a vector logo can be scaled to any size without losing a shred of quality. You could shrink it to fit on a pen or blow it up to cover a building, and it will stay perfectly crisp and clean. If you want to dig even deeper into image quality, our guide on how to sharpen an image with different tools has more detail.
This infinite scalability is what makes vector the gold standard for any print project, especially turning a logo into a sticker.
Raster vs. Vector at a Glance
Use this quick comparison to choose the right file type for your sticker project.
| Attribute | Raster (JPEG, PNG) | Vector (SVG, AI, EPS) |
|---|---|---|
| Composition | Fixed grid of pixels | Mathematical paths & curves |
| Scalability | Becomes blurry when enlarged | Infinitely scalable, never loses quality |
| Best For | Complex photos, digital display | Logos, illustrations, print |
| File Size | Larger, depends on resolution | Smaller, depends on complexity |
| Typical Use | Website images, social media posts | Sticker printing, billboards, apparel |
For any seller on Shopify or Etsy, having a vector version of your logo isn’t a nice-to-have; it's a core business asset. It’s your insurance policy that no matter where you print it—on packaging, product labels, or promotional stickers—your brand will always look its absolute best.
So, you've got your vector logo. That's a big win. But the journey from a sharp digital file to a perfect physical sticker has a few more technical traps.
The most painful part? You approve a digital proof that looks flawless. Weeks later, a package arrives. You open it, and your heart sinks. The colors are dull and muddy. There are ugly white slivers along the edges. Now you're stuck: either you hand out a product that makes your brand look cheap, or you pay for a full reprint.
Let’s walk through the essential pre-print checks. These are the difference between disappointment and a sticker you're proud of.
Choosing the Right Colour Mode: CMYK vs. RGB
This is the number one reason your vibrant on-screen colors look flat in print.
- RGB (Red, Green, Blue) is for glowing screens. It’s an additive model that starts with a black screen and adds colored light to create bright hues.
- CMYK (Cyan, Magenta, Yellow, Key/Black) is for physical ink. It’s a subtractive model that starts with a white surface and subtracts brightness by adding ink.
When you send an RGB file to a commercial printer, its software has to guess how to translate those light-based colors into ink. The result is almost always a batch of stickers with muted, washed-out colors.
The fix is simple: always set your design document's colour mode to CMYK before you start working.
Setting the Correct Resolution for a Crisp Sticker
Resolution is what makes your sticker look sharp, not a blurry mess. It’s measured in DPI, or Dots Per Inch, which tells the printer how many ink dots to squeeze into a one-inch line.
For websites and screens, 72 DPI is standard. For print, it's a disaster. The industry gold standard is 300 DPI. Submitting a file under 300 DPI is one of the most common reasons printers reject artwork.
This flowchart lays it out clearly. Your initial file choice dictates your final quality.
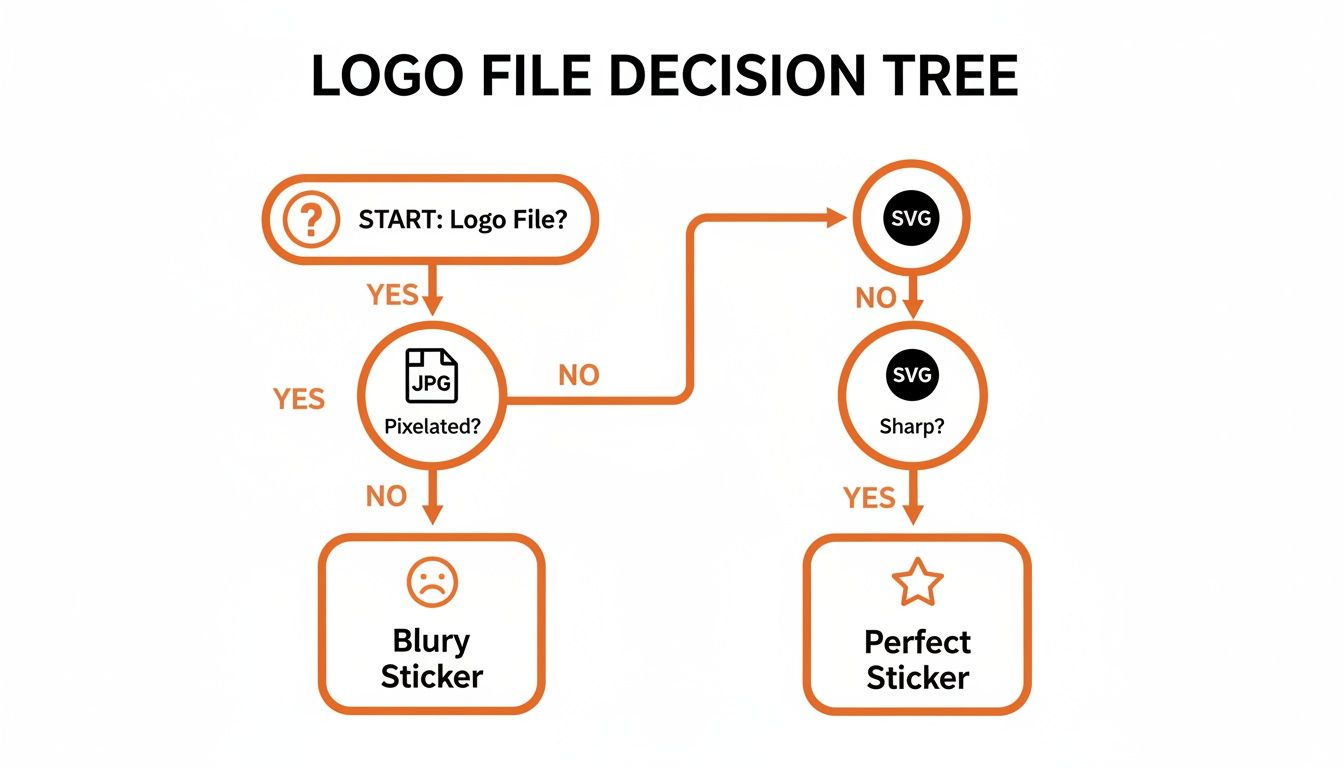
As you can see, a pixel-based file like a JPG puts you on a path to a blurry result. A scalable vector file like an SVG is your starting point for a perfect sticker.
Understanding Bleed and Cut Lines
Finally, let's nail down two terms that sound confusing but are crucial for a clean finish: bleed and cut lines.
Bleed is a safety margin. It's a small area of your design's background colour that extends beyond the final cut edge of your sticker.
The machines that cut stickers can shift by a fraction of a millimeter. If your color stops exactly at the cut line, that tiny shift will leave a hideous sliver of white, unprinted sticker paper.
By adding a bleed—the standard is 1/8th of an inch (about 3mm)—you give the blade a margin of error. Of course, this only works if your logo has a clean, transparent background. If you need help with that, our guide on how to remove a background for free using GIMP is a good place to start.
The cut line is the path the blade follows to create the final shape. You'll typically choose between two types:
- Die-Cut: The blade cuts through both the sticker vinyl and its paper backing to create a custom-shaped sticker.
- Kiss-Cut: The blade cuts only through the top vinyl layer, leaving the square or rectangular backing paper intact. This makes the sticker much easier to peel.
Nailing these details ensures the logo on your screen becomes a physical product you can’t wait to share.
Choosing the Right Sticker Material and Finish
A pixel-perfect file is only half the story. The physical sticker material is what your customer will actually touch. It’s what communicates quality, durability, and your brand’s vibe.
Get this wrong, and your sticker peels, fades, or just feels cheap. That isn't just a waste of money—it's a blown chance to make a lasting impression.
Durable Vinyl for Maximum Impact
For most situations, vinyl is the default choice for a reason. It’s tough, flexible, and made to last.
- Weatherproof and Waterproof: This is your go-to for anything that lives outdoors or gets handled a lot. Laptops, water bottles, car bumpers—vinyl won’t fade in the sun or disintegrate in the rain.
- Scratch-Resistant: A good vinyl sticker can take a beating without getting scuffed into oblivion.
When your brand’s reputation rides on a feeling of quality, vinyl is almost always the right call.
Doing this for a whole catalog?
MerchLoom runs background removal, upscaling and AI editing across every product photo you have — one prompt, whole batch. Try 2 batches free, no signup.
Try it freeSustainable Paper for Eco-Conscious Brands
If your brand story is built around sustainability, paper stickers are a smart choice for indoor applications—sealing tissue paper on an order, labelling a coffee bag, or adding a branded touch to a shipping box.
This isn’t just about being green; it’s about aligning your physical products with your brand's values. Customers notice. With the global sticker market at $4.61 billion, there’s a massive push toward compostable and recyclable options. You can explore more about the evolving sticker market and its key statistics to see just how fast this segment is growing.
Selecting the Perfect Finish
The finish, or laminate, is that final layer that completely defines a sticker's look and feel.
- Gloss: This is the most common finish. It's shiny, reflects light, and makes colours feel rich and vibrant.
- Matte: For a more modern, understated effect, matte is the way to go. It has a smooth, non-glare surface that feels soft to the touch.
- Clear: A clear or transparent sticker background creates a sleek, "no-label" look, perfect for glass or windows.
Before/After Scenario: Imagine you run a small coffee roastery. Before, you used a generic paper label that faded and peeled easily. After, for your retail coffee bags, you choose a matte paper sticker. The elegant, non-glare finish perfectly complements your craft aesthetic. For giveaways, you order glossy vinyl die-cut stickers of your logo. Customers slap them on their laptops and travel mugs, where the durable, vibrant finish acts as a tiny, travelling billboard for your brand that lasts for years. Same logo, two different materials, two smart, strategic applications.
How to Automate Your Logo to Sticker Workflow
Prepping one logo for a sticker sounds simple enough. Check the file, add a bleed, maybe clean it up. It’s tedious, but manageable.
Now, imagine you have 50 logo variations for a new product launch. Or you’re an Etsy seller with 200 personalized designs that all need to be sent to your print-on-demand partner. The manual work stops being an annoyance and becomes a real business bottleneck, grinding your momentum to a halt as you edit each file, one by one.
The True Cost of Doing It by Hand
Let’s run the numbers for that Etsy store with 200 unique logo designs. Say it takes you 10-15 minutes per file to get it ready—remove the background, resize it for your sticker template, and bump the resolution to 300 DPI.
That’s over 40 hours of mind-numbing clicking. A full work week. If you hire a freelancer at $25 per hour, you’re staring at a bill for over $1,000. If you do it yourself, that’s an entire week you could have spent on marketing or product development.
From a Week-Long Headache to a 5-Minute Task
This is where a repeatable system becomes essential.
- Before: The Etsy seller faced 40+ hours of monotonous labor and a potential $1,000+ cost. Every new sticker was a manual project, slowing down every product launch.
- After (with MerchLoom): They build a simple, three-step pipeline once and apply it to all 200 images at once. The entire batch is processed in minutes.
Here’s what that pipeline looks like:
- Remove Background: Instantly carves out the logo for a clean die-cut sticker. Cost: $0.05 per image.
- Reframe for Sticker Template: Automatically centers and resizes the logo to fit a standard sticker canvas. Cost: $0.14 per image.
- Upscale to 300 DPI: Intelligently sharpens the image to a print-ready resolution. Cost: starts from $0.05 per megapixel.
The total cost to get one logo sticker-ready is just $0.24. The entire batch of 200 images is done in the time it takes to make coffee, for a total of $48. That's a 95% cost saving and 40 hours of your life back.
The Power of Smart Optimization
MerchLoom optimizes the order of operations for you. For instance, the pipeline removes the background before it upscales the image.
This might seem like a tiny detail, but the financial impact is huge. When you strip away the background first, the file size plummets. Since the upscaling cost is priced per megapixel, you end up paying significantly less—we've seen savings of up to 87% on this step alone. The system automatically finds the cheapest path to get you the same high-quality result.
The demand for custom stickers is exploding, especially for die-cut stickers. In North America, digital printing holds a massive 38.8% market share in this booming segment. If you want to dive deeper into the numbers, you can see the complete analysis of the die-cut sticker market.
The screenshot below shows you how intuitive it is to build one of these workflows.
You just stack the operations you need—like "Remove Background" and "Upscale"—to create your pipeline, and you see the total cost updating in real-time. To see just how easy it is to get started, check out our guide on the "Drop, Describe, Done" workflow.
The best part? There are no subscriptions and your credits never expire. You can run your first few logos through the system to see the results for yourself, with no account needed to try. This puts you in control, letting you scale production from one sticker to thousands, without the manual grind or unpredictable costs.
Your Next Step From Digital File to Physical Sticker
You've made it through the technical weeds. You know the difference between a vector and a raster file, you understand bleed lines, and you’ve seen how automation can rescue you from hours of tedious prep work.
Now for the best part: turning that clean digital file into a real sticker. But this last step can feel like a leap of faith. What if you order 500 stickers and they show up looking wrong? The fear of wasting money is real. The key is to take the risk out of the equation by starting small.
Your Three-Step Action Plan
Here’s a straightforward plan to get your first batch of logo stickers ordered without the guesswork.
- Test Your Own Logo (For Free): First things first, see the quality for yourself. Head over to merchloom.ai and upload one of your logos. You don't need an account. Just drop the file in and run it through the background removal tool to see how cleanly it can isolate your design.
- Download Your Print-Ready File: Once MerchLoom has worked its magic, you can download the print-ready PNG. The system automatically preps a file with a transparent background—precisely what a printer needs for a custom die-cut or kiss-cut sticker.
- Order a Small Sample Run: Now, find a print-on-demand service or a local print shop and order a small batch. Think 25 or 50 stickers. This is a minimal investment that lets you physically inspect the material, colors, and cut quality before you commit to a bigger order.
How to Review a Printer's Proof
Before that test batch hits the press, the printer will send you a digital "proof." This is your final checkpoint. Don't just give it a quick glance.
A proof isn't just a picture of your logo; it's a technical blueprint. Look for the cut line (it's usually a bright magenta line) and make sure it perfectly outlines your logo. Check that the bleed area is there and that all your colours and text look right. If you approve a proof with a mistake, that mistake is what you'll get.
For anyone selling online, turning a logo into a sticker is a powerful branding move. In fact, branded packaging has been shown to boost repeat customer purchases by as much as 25% in competitive markets.
With a tool like MerchLoom, you can process hundreds of logo variations for your packaging for just $0.05 for background removal and $0.14 for smart reframing. You can find more data on the impact of custom labelling in the latest reports on the United States print label market.
Your next step is simple: go to merchloom.ai, upload your logo, and see your print-ready file appear in seconds. Stop reading about it and experience for yourself how easy it is to get that perfect logo sticker into production. Explore the interactive examples on the site to see real before/after results.
To see what other brands are creating, check out our latest product showcase for January 2026.
Your Questions Answered
Going from a digital logo to a pile of physical stickers can feel like a minefield. You spend hours getting the design right, send it off to print, and what comes back looks… wrong. The colors are off, the edges are blurry, or it’s just not what you pictured.
Let’s walk through the most common questions we see from shop owners so you can get it right the first time.
What’s the Best File Format for a Sticker?
Short answer: a vector file. Think SVG, AI, or EPS.
Here’s why. Vector files are built with math, not pixels. This means you can scale your logo to any size, and the lines will stay perfectly crisp. It’s the professional standard for a reason.
If all you have is a PNG or JPEG, don’t panic. You can still get a great-looking sticker, but you have to make sure your file is saved at 300 DPI (dots per inch) at the final size you want to print. Anything less and you risk a blurry, pixelated mess.
What’s the Deal With Die-Cut vs. Kiss-Cut?
This is all about how the sticker is cut from its backing paper.
- Die-Cut: The cutting blade slices through both the sticker vinyl and the paper backing. This creates a custom-shaped sticker that follows your logo’s outline. It has a premium, standalone feel.
- Kiss-Cut: The blade just "kisses" the top vinyl layer, cutting out your design but leaving the square backing paper intact. This makes the sticker way easier for your customers to peel and is great for sticker sheets.
Do I Really Need to Remove the Background?
Yes. One hundred percent, yes.
For any die-cut or kiss-cut sticker that isn't a simple square, you need a transparent background. A logo with a clunky white box around it instantly cheapens your brand. It’s the difference between a professional product and something that looks like it came from a home printer in 2005.
You can do this by hand in a design app, but that time adds up fast. MerchLoom can remove the background from an image in seconds, for just $0.05 per image. See the MerchLoom pricing details here—no hidden fees, no subscriptions, and credits never expire.
Why Do My Printed Colours Look So Different From My Screen?
This is the classic printing problem, and it almost always comes down to one thing: colour mode.
Your screen creates colour by adding light together using RGB (Red, Green, Blue). A printer creates colour by subtracting light with ink on paper using CMYK (Cyan, Magenta, Yellow, Black).
When you send an RGB file to a professional printer, you’re forcing its software to guess how to convert the colors. The result? The vibrant electric blue on your screen turns into a dull navy on the sticker.
The fix is simple: Always convert your design to CMYK before you export the final file for your printer. This gives you control and ensures the colors that get printed are the colors you actually chose.
Stop editing product photos one at a time
Upload your catalog or connect your store. Describe the result once. MerchLoom does the rest.
Try it free — no signup