
Beauty Product Photography: A Practical Catalog Workflow
Beauty product photography made practical: gear, lighting, and AI batch workflows for Amazon, Shopify, and Etsy sellers managing large catalogs.
At 8:14 on a Tuesday, you're looking at a folding table covered with 240 skincare bottles, two lights, and a phone. Amazon has flagged six listings because the background is reading RGB 245 instead of pure white. Etsy has rejected the angle of a lipstick bullet. Shopify needs square crops, but your raw files weren't shot that way.
That isn't a photography talent problem. It's a repeatability problem. Every decision, from white balance and camera height to file names and retouch order, has to survive hundreds of products. The workflow below is built for that reality, with fixed settings, marketplace exports, and a cost-ordered AI pipeline that keeps a large beauty catalog moving.
Two Hundred Bottles on the Table
The first six bottles are easy. You clean them, place them under the light, adjust the exposure, remove a fingerprint, and export the files. By bottle 60, small inconsistencies start appearing. One serum sits closer to the camera. One label tilts slightly. Another image has a gray background, even though the sweep looked white on the table.
At 8:14 AM, the seller with 240 skincare SKUs has two choices. Rework every image individually, or stop treating each product as a separate photography project. The second option is the only one that scales.
Beauty product photography has to communicate shade, texture, packaging, finish, and trust in one frame. That matters commercially because static display advertising and social placements rely heavily on controlled still imagery. In the U.S., cosmetics and personal care companies spent over $1.2 billion on static display advertising in 2021, more than twice the 2019 level, and roughly three in 10 U.S. shoppers discovered new brands and products through social media ads in 2022, according to Statista's beauty and cosmetics advertising overview. Your product photo isn't a support file. It's an acquisition asset used across listings, retargeting banners, paid social, and brand pages.
Practical rule: Build one image system that can produce a good result repeatedly. A single beautiful bottle shot won't fix a catalog with mixed crops, color casts, and inconsistent backgrounds.
Start with a shot list for every SKU:
- Primary packshot: Front-facing product on a clean background.
- Tight detail: Cap, applicator, texture, typography, or finish.
- Secondary angle: A view that confirms shape and packaging depth.
- Context image: A controlled lifestyle frame for your store or social channels.
Keep the product identity unchanged between versions. A lifestyle image can add atmosphere, but it shouldn't replace the precise listing image that shows what the buyer receives. For small products, the workflow in this guide to photographing small items is useful because it treats scale, camera position, and repeatable placement as production decisions.
Before you photograph the next bottle, mark the product position on the sweep with removable tape. Mark the tripod or phone stand position too. That one-minute setup prevents the camera from drifting across the day. When the same mark is used for every SKU, one correction preset can handle most of the catalog instead of forcing you into image-by-image rescue work.
Gear and Lighting for a Whole Catalog
You don't need a large studio. You need a small setup that stays fixed while the products change.
Use a 24x36 inch white acrylic sweep as the base. Acrylic is easier to wipe than paper when a serum leaks or a cream leaves residue. It also gives you a smooth transition from the horizontal surface into the background, which reduces the visible horizon line in the main image.
Use two continuous LED panels, each 60W at 5600K, with a CRI of 95 or higher. Set both lights to the same color temperature and disable auto-brightness. Mixed color temperature is a catalog problem. You might correct one image by eye, but the correction won't transfer cleanly to every serum, compact, and tinted product in the batch.
The fixed layout
Place the 20x30 inch softbox as the key light, 45 degrees camera-left and roughly 24 inches from the product. Put the 12x16 inch strip softbox or a white foamcard opposite it, about 36 inches away, at one-third power. The key gives you the main shape. The fill controls how much information remains in the darker side of a bottle.
A small gooseneck LED behind translucent bottles helps separate clear or colored liquid from a white background. Keep it low and hidden. You're looking for a controlled glow through the liquid, not a bright hotspot that makes the bottle look blown out.
Compacts need a different adjustment. Don't add a second fill just because the compact looks dark. A black flag placed outside the frame can deepen the edge and create a clean dark reflection along glossy packaging. White fill often removes the shape you need.
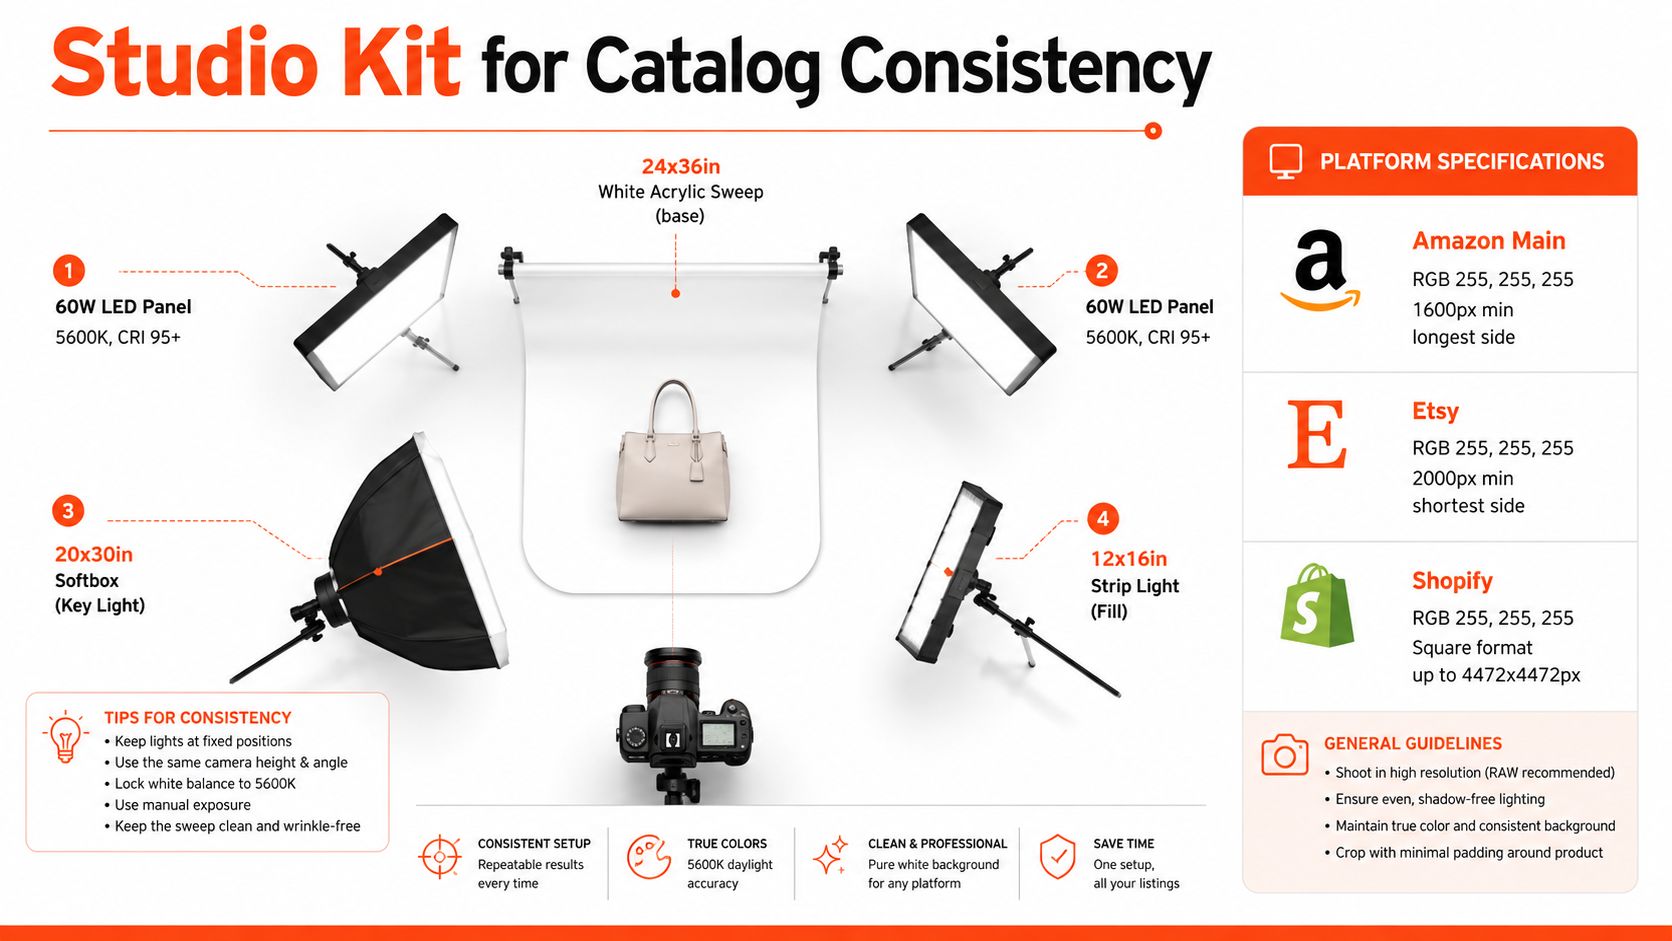
The product should stay in the same place while you adjust only the product itself. For palettes, mount the camera on an L-bracket and use a turntable for top-down shots. Rotate the tabletop, not the camera. If the camera moves between palette colors, your framing and perspective will drift, and the batch will need manual cropping.
Tether before you shoot at scale
Connect the camera to a laptop running Capture One, or use a phone tethering app. The point isn't remote control for its own sake. You need to see sharpness, label alignment, reflections, and background uniformity on a larger screen before you photograph the next group.
Shoot a test bottle from each packaging type:
- Opaque plastic: Check label contrast and edge definition.
- Glossy glass: Check reflections and fingerprints.
- Translucent liquid: Check the rear accent light.
- Metallic compact: Check whether the black flag gives the edge enough shape.
- Dark packaging: Check that the product doesn't merge into the background.
Lock those positions before processing the full collection. The lighting principles in this product photography lighting guide are most useful when converted into fixed measurements rather than improvised from one SKU to the next.
Camera and Phone Settings That Survive Batch
Manual exposure is the dividing line between a controlled catalog and a collection of unrelated images. Set the camera to 1/125 second, f/8, and ISO 100. Put a gray card exactly where the product will sit, not at the edge of the table, and create a custom white balance from that position.
Use a 50mm or 60mm macro prime when available. Focus manually on the nearest product edge, then switch to manual focus lock. Autofocus can jump from a label to a highlight on a glossy cap, which means the next frame may be sharp in the wrong place.
Shoot RAW plus a small JPEG proofing file. RAW preserves the adjustment range needed for white balance and exposure. The JPEG gives you a quick reference for contact sheets and rough selection without opening every large source file.
The settings table
| Setting | DSLR/Mirrorless | Phone, Pro mode |
|---|---|---|
| Exposure | Manual, 1/125 second, f/8, ISO 100 | Lock exposure with a long press |
| Lens | 50mm or 60mm macro prime | Rear 2x or 3x lens if available |
| Focus | Manual focus, locked after focus pull | Tap product edge, then lock focus |
| File format | RAW plus small JPEG proof | ProRAW or highest-resolution DNG available |
| White balance | Custom setting from gray card | One fixed white balance preset |
| Processing controls | Filters and auto corrections off | AI scene modes and filters off |
Keep the same camera height, distance, exposure, and white balance through the entire session. If one product needs a change because it's reflective or unusually dark, record the change in the SKU notes and return to the catalog preset immediately afterward.
Phone users should avoid switching between lenses during a batch. A phone's 1x, 2x, and 3x cameras can produce different perspective, sharpness, and color. Pick one rear lens and keep the product at a consistent distance. Lock exposure with a long press, disable scene modes, and don't rely on automatic portrait blur for packshots.
Color is especially sensitive in foundation, lipstick, blush, and tinted skincare. A useful white balance workflow for product photography starts with a reference card and a fixed light source, not an attempt to repair every image by eye after the shoot.
Marketplace Specs Translated to Export Presets
A 200-SKU backlog becomes expensive when each image is checked against marketplace rules by hand. Build one export preset per destination, test each on a representative product, then apply the approved presets to the full collection.
Amazon's main product image needs a pure white RGB 255,255,255 background, and seller guidance uses 1,600 pixels or more on the longest side to support listing-page zoom. Compare the Amazon product image guide with this Amazon product image size resource before locking the preset. Etsy guidance calls for 2,000 pixels or more on the shortest side, while Shopify supports images up to 4,472 x 4,472 pixels. Square presentation keeps a large storefront consistent. The Etsy and Shopify requirements are summarized in Etsy's product image size guide and this Shopify product image guide.
Export comparison
| Marketplace | Min Dimensions | Aspect Ratio | Color Space | Background | Preset Name |
|---|---|---|---|---|---|
| Amazon | 1,600px or more on longest side | Square master recommended for catalog consistency | sRGB | Main image pure white, RGB 255,255,255 | Amazon Main |
| Etsy | 2,000px or more on shortest side | Keep one catalog crop standard | sRGB | Clean, consistent listing background | Etsy Listing |
| Shopify | Up to 4,472 x 4,472px | Square core product export | sRGB | Storefront standard selected by seller | Shopify Square |
Set the Amazon preset to a square canvas, verify RGB 255,255,255, and export above the longest-side requirement. Keep a separate lifestyle preset. Styled backgrounds do not belong in the Amazon main image.
For Etsy, preserve at least 2,000 pixels on the shortest side. Apply that rule to the batch rather than resizing files individually. A fixed dimension rule keeps thumbnails and close views consistent across the collection.
Use a square crop for Shopify's core product images. The larger pixel ceiling can retain detail, but oversized files add processing and upload time without automatically improving the listing. Keep one square master for grids, galleries, and zoom.
Use sRGB for all three destinations. Set JPEG quality to 85 when the export tool supports it, and leave enough margin around caps, dropper tips, and bottle edges. For social placements, create separate square, 4:5 portrait, and 16:9 hero files instead of forcing a marketplace crop into every channel.
For motion-led launches, the startup launch video guidelines offer a companion reference for destination-specific assets. Apply the same discipline to stills: define the output before batch processing, then let the preset handle the 200-SKU queue consistently.
Tethering, File Names, and In-Camera Habits
Doing this for a whole catalog?
MerchLoom runs background removal, upscaling and AI editing across every product photo you have — one prompt, whole batch. Try 2 batches free, no signup.
Try it freeA catalog folder should be understandable before anyone opens an editing application. Tether Capture One or Lightroom to a laptop, set auto-save to a dated session folder, and send every capture directly into that folder.
Use this exact naming pattern:
SKU_CATEGORY_VARIANT_FRAME_v01
A serum might become:
SK104_SERUM_HYALURONIC_FRONT_v01
The name should describe the product before the thumbnail loads. That helps when a marketplace export fails, an assistant reviews a contact sheet, or a customer support request points to a specific variant.
Use two frames per product
Shoot a full frame and a tight frame for each SKU. The full frame gives you room for marketplace crops and future reframing. The tight frame shows the cap, label, applicator, shade, or texture at a useful scale.
Don't crop the tight frame so aggressively that the product touches the edges. The crop should be intentional, not a rescue for a poorly positioned original.
Set the camera clock to UTC before the session. Chronological sorting then follows the shoot order even if files move between computers, cloud folders, or export systems. It's a small setting that prevents confusion when several batches are combined.
After every 20 products, photograph a color checker card and gray card in the same product position. These reference frames let you recalibrate white balance when the session runs long or a light has been adjusted. They also give you a visual checkpoint if a later group looks warmer or cooler than the first group.
Catalog habit: Write the export preset number on a sticky note beside the monitor. An assistant shouldn't have to guess whether a file belongs in Amazon Main, Etsy Listing, or Shopify Square.
Keep the tethered folder clean. Don't mix raw captures, retouched files, lifestyle scenes, and final exports in one directory. The workflow advice in this guide to improve tethered workflow is relevant here because organization begins at capture, not after the editing queue is already full.
The Cost-Ordered Post-Production Pipeline
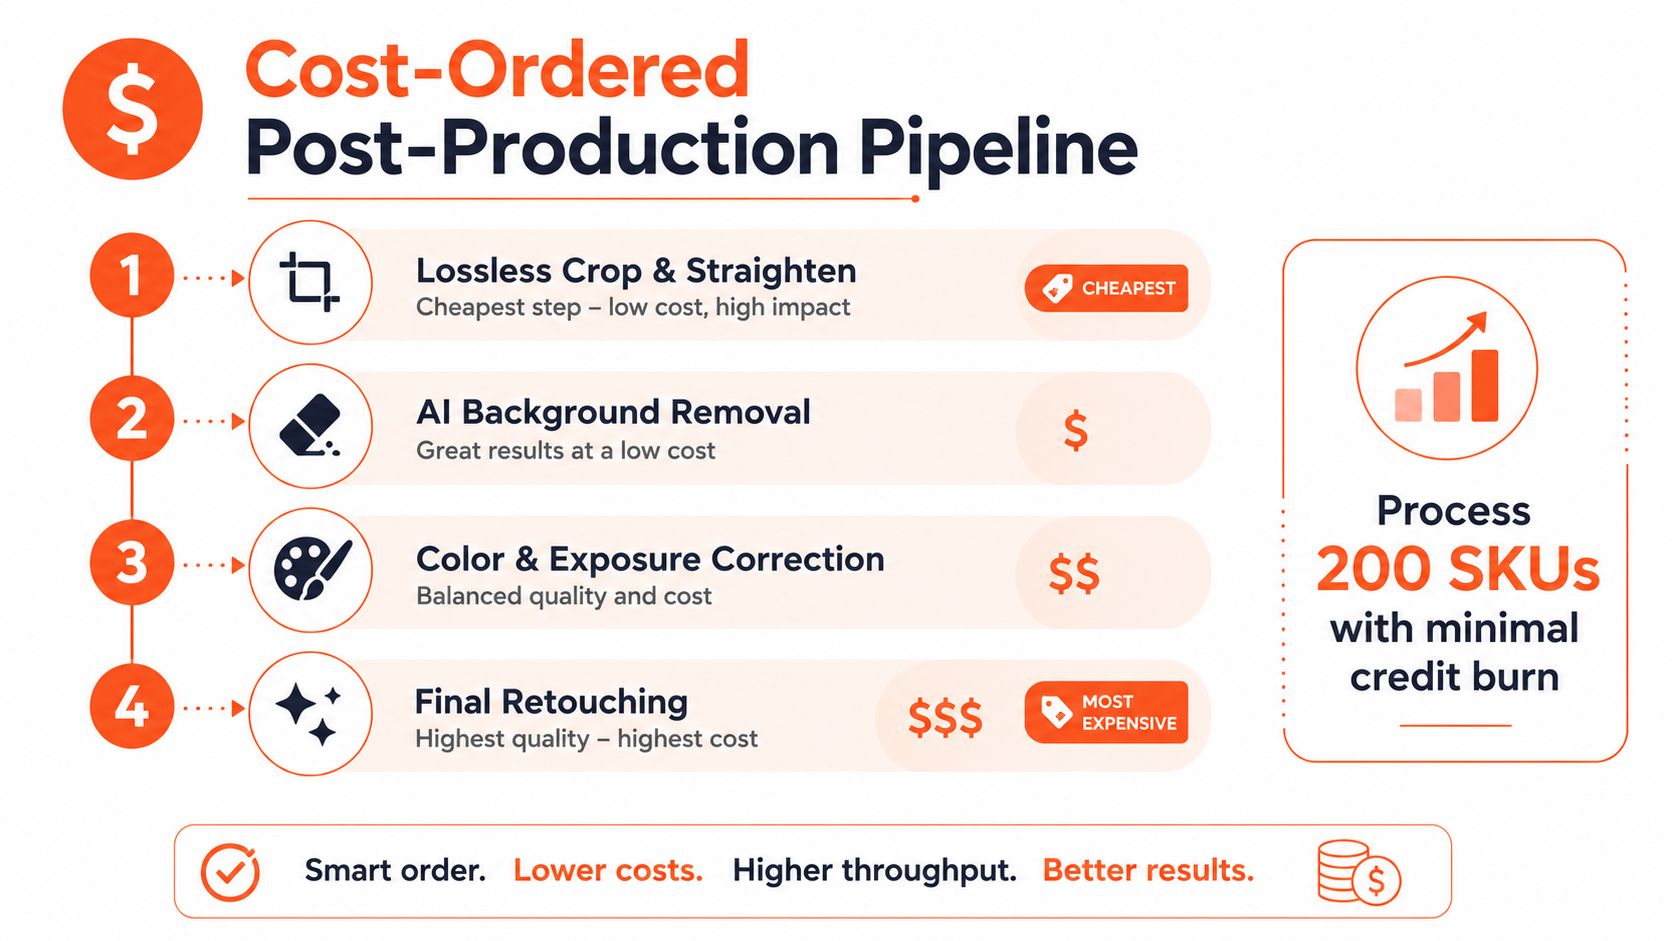
Process the least expensive operations first and reserve the heavier work for approved images. This order matters when you're working through a 200-SKU backlog and paying for AI operations or image credits.
The sequence is:
- Lossless crop and straighten. Correct rotation and framing on the original file without enlarging it.
- Bulk background removal. Run the same removal process across uniform white backdrops.
- Exposure and white balance correction. Use the gray-card reference frames to establish the batch correction.
- Color correction. Match the hero product against the approved reference image.
- Retouching. Remove dust, fingerprints, label scuffs, and small surface marks.
- Shadow generation. Add controlled contact shadows under bottles and compacts.
- Upscale. Increase resolution only to the marketplace minimum required for the export.
- Scene placement. Create lifestyle variants after the clean product file is approved.
Background removal belongs before upscale because upscaling increases the pixel workload. If you upscale a flawed image before removing its background, you spend processing capacity on pixels that may be discarded. The same logic applies to lifestyle scenes. Don't place an unretouched bottle into a styled scene, because dust and label defects become more visible once the product is enlarged or surrounded by contrast.
No universal credit price applies across every AI service, so track your own cost per operation in a simple sheet. Record the number of credits used for background removal, retouching, shadow creation, upscale, and scene placement. That gives you a real cost model without pretending that one provider's pricing applies to another.
Approve before expensive steps
Create a contact sheet after background removal and basic color correction. Reject crooked labels, soft focus, damaged packaging, and incorrect variants before retouching or scene placement.
The visual checks that matter most are:
- Edge quality: No halos around glass, chrome, or clear caps.
- Product color: Shade and finish match the physical reference.
- Background: The main image reaches pure white where the marketplace requires it.
- Texture: Matte, satin, dewy, shimmer, and gloss remain distinguishable.
- Shadow: The bottle sits on the surface instead of appearing to float.
Professional lighting and high-resolution imagery have a measurable relationship with commerce performance. One industry summary reports a 94% higher conversion rate for professionally lit, high-resolution photos compared with low-quality images, and the cited source also notes that 25% of e-commerce sites fail to support effective mobile zoom, as discussed in this product photography mistakes guide. For a large catalog, that supports a practical sequence: protect detail at capture, verify zoom, and don't spend upscale credits until the image has passed the cheaper checks.
For broader performance context, a blog for performance marketers can help connect asset quality with paid media decisions. The image workflow still needs to begin with the product file, not the ad dashboard. More editing doesn't fix inaccurate shade or a missing label.
The deeper e-commerce product photo editing workflow is easier to manage when each operation has a clear approval point. Keep the clean packshot as the source for every secondary format.
Running It Across the Whole Catalog With AI
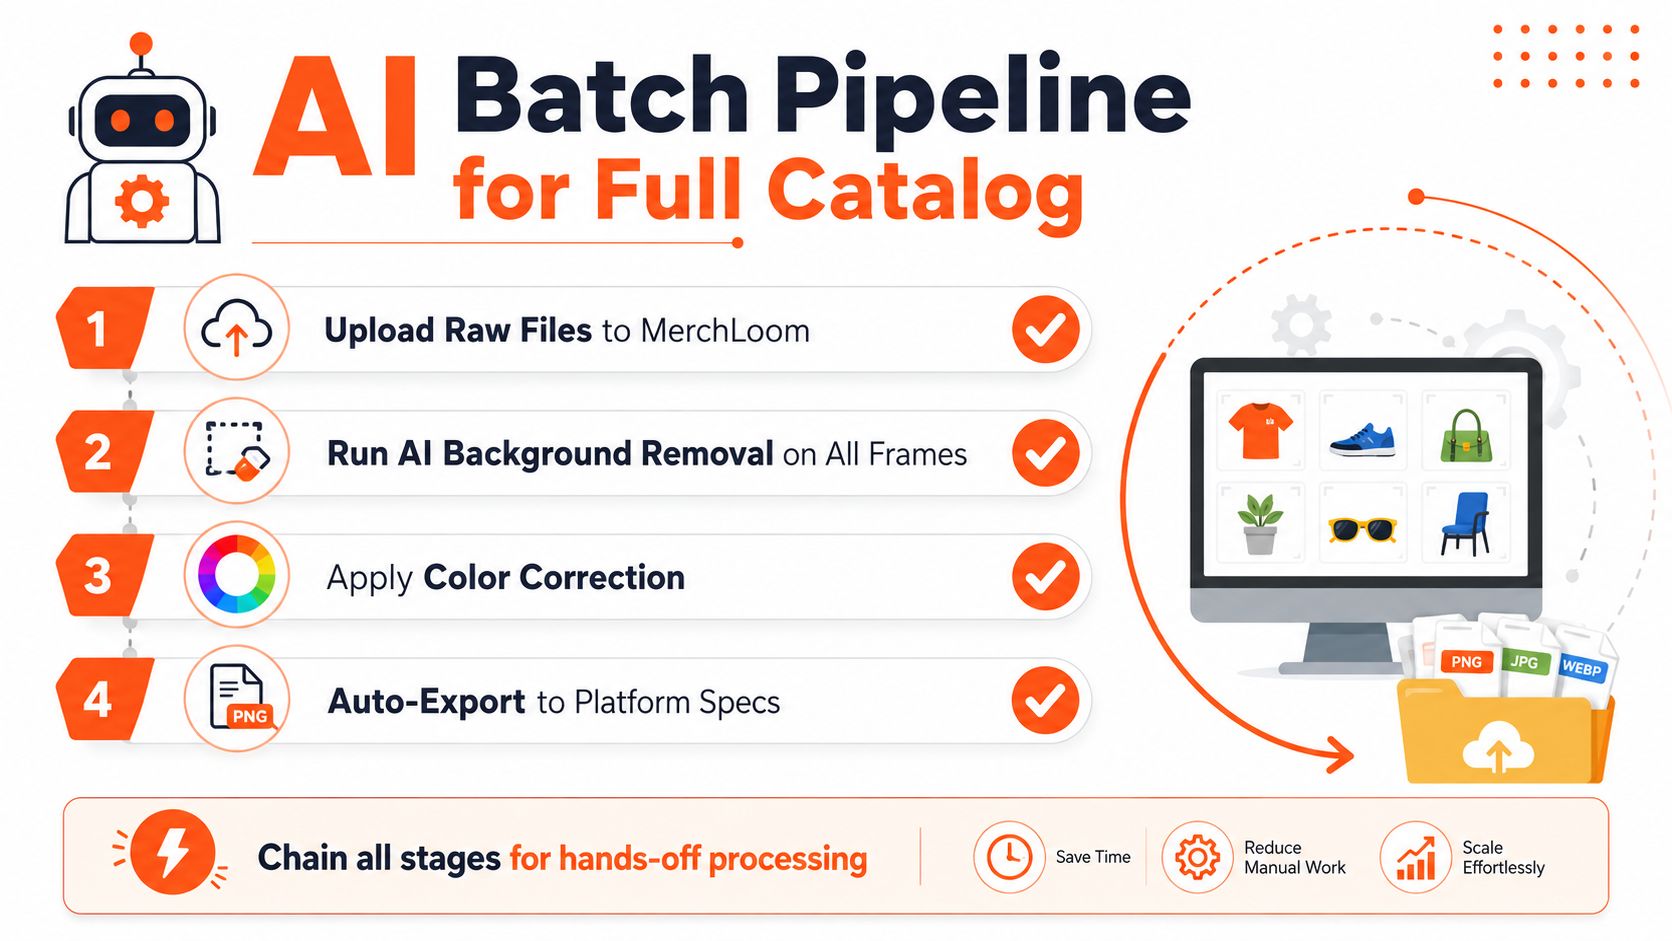
The pipeline becomes useful when it runs across the collection instead of stopping after one image. Import the raw product files, preserve the SKU names, and chain the operations so each approved output becomes the input for the next stage.
MerchLoom can run chained AI pipelines across a full collection rather than processing one image at a time. You can try the first images with no account, then pay per image with credits that never expire. That makes it possible to test a few representative products before sending a larger beauty catalog through the same workflow. It isn't a full Photoshop replacement, and you still need human review for shade accuracy, reflective edges, label text, and unusual packaging.
The batch sequence
Start with raw uploads or imported folders. Run background removal across the uniform packshots, then apply exposure and white balance correction from the reference frames. After that, run retouching, upscale only where the destination requires it, and create lifestyle scenes from the approved clean product file.
Save each stage as a named preset:
- Beauty Main White: Background removal, straighten, pure white output.
- Beauty Color Match: Gray-card correction and hero-product color reference.
- Beauty Detail Clean: Dust, fingerprints, and label cleanup.
- Beauty Marketplace Export: Destination-specific crop and resolution.
- Beauty Lifestyle Scene: Product placement with the original packaging preserved.
A named preset prevents the 500-SKU backlog from becoming 500 separate decisions. It also lets you reuse the same structure for a new shade range or seasonal collection without rebuilding the workflow.
The final quality gate
Don't approve the entire batch because the first 10 images look correct. Sample every packaging type, finish, and shade group. Reflective bottles and transparent liquids need closer inspection than matte cartons.
Use this checklist before upload:
- Background: Confirm pure white RGB 255,255,255 for Amazon main images.
- Resolution: Confirm the Amazon longest side is at least 1,600 pixels and the Etsy shortest side is at least 2,000 pixels.
- Shopify crop: Confirm the core product export is square and consistent across the grid.
- Color: Compare shade-sensitive products against the physical item and reference card.
- Edges: Inspect at 100% zoom for halos, jagged cutouts, or missing transparent parts.
- Labels: Check typography, ingredients, shade names, and barcode areas for distortion.
- File names: Confirm the SKU naming pattern survived every export.
- Output type: Match each file to the correct marketplace preset.
- Lifestyle scenes: Verify that the product remains the right shape, color, and orientation.
Beauty buyers can't physically test a lipstick, foundation, or serum through a screen. One cited analysis reports that 75% of online shoppers rely on product photos, 67% consider image quality very important, and that 22% of online returns are attributed to products looking different in person than in listing photos, according to SellHound's product photo conversion analysis. That makes visual honesty more valuable than aggressive retouching. A polished image that changes the shade creates a catalog problem, not a conversion solution.
Research on cosmetics illumination found that 4,800 lux at 5,500 K produced high color-rendering conditions close to natural light, while another facial-illumination analysis reported perceptible color differences greater than 10 in five of six tested models under poor illumination. The same source discusses e-commerce appearance differences and return risk in its cosmetics illumination research. In practice, lock the color temperature, use the gray-card reference, and review the final exports under the same viewing conditions used for the listing.
More editing isn't automatically better. Controlled capture, repeatable presets, and a human check at the end will protect a 200-product collection far better than trying to make every image look artificially perfect.
MerchLoom lets you import a beauty catalog, chain background removal, color correction, retouching, upscaling, and scene placement, then reuse the same workflow across every SKU. Try the first images with no account, pay per image with credits that never expire, and review the output before approving the batch. Visit MerchLoom and turn your next product-photo backlog into a repeatable catalog pipeline.
Stop editing product photos one at a time
Upload your catalog or connect your store. Describe the result once. MerchLoom does the rest.
Try it free — no signup